Frogs And Freedom - Code Walkthrough
Shaders
Ghost Buster Style Laser
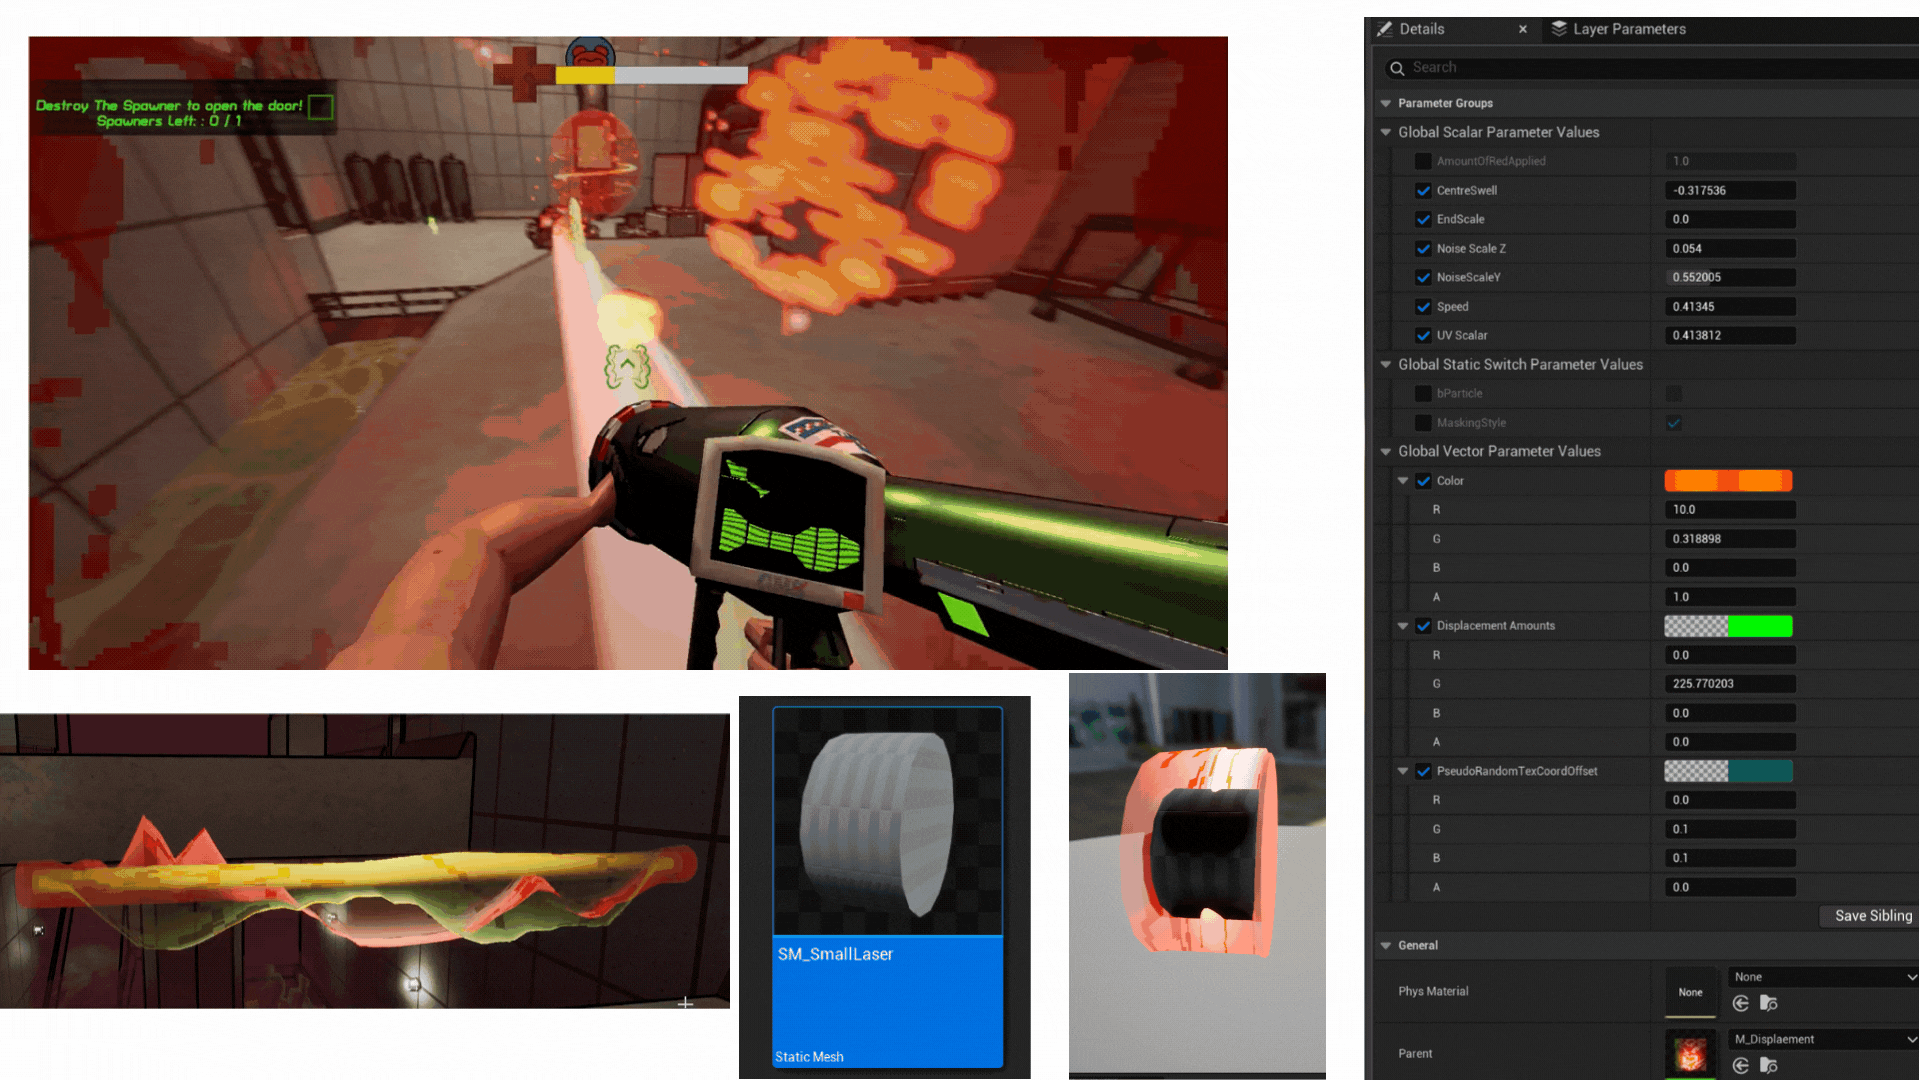
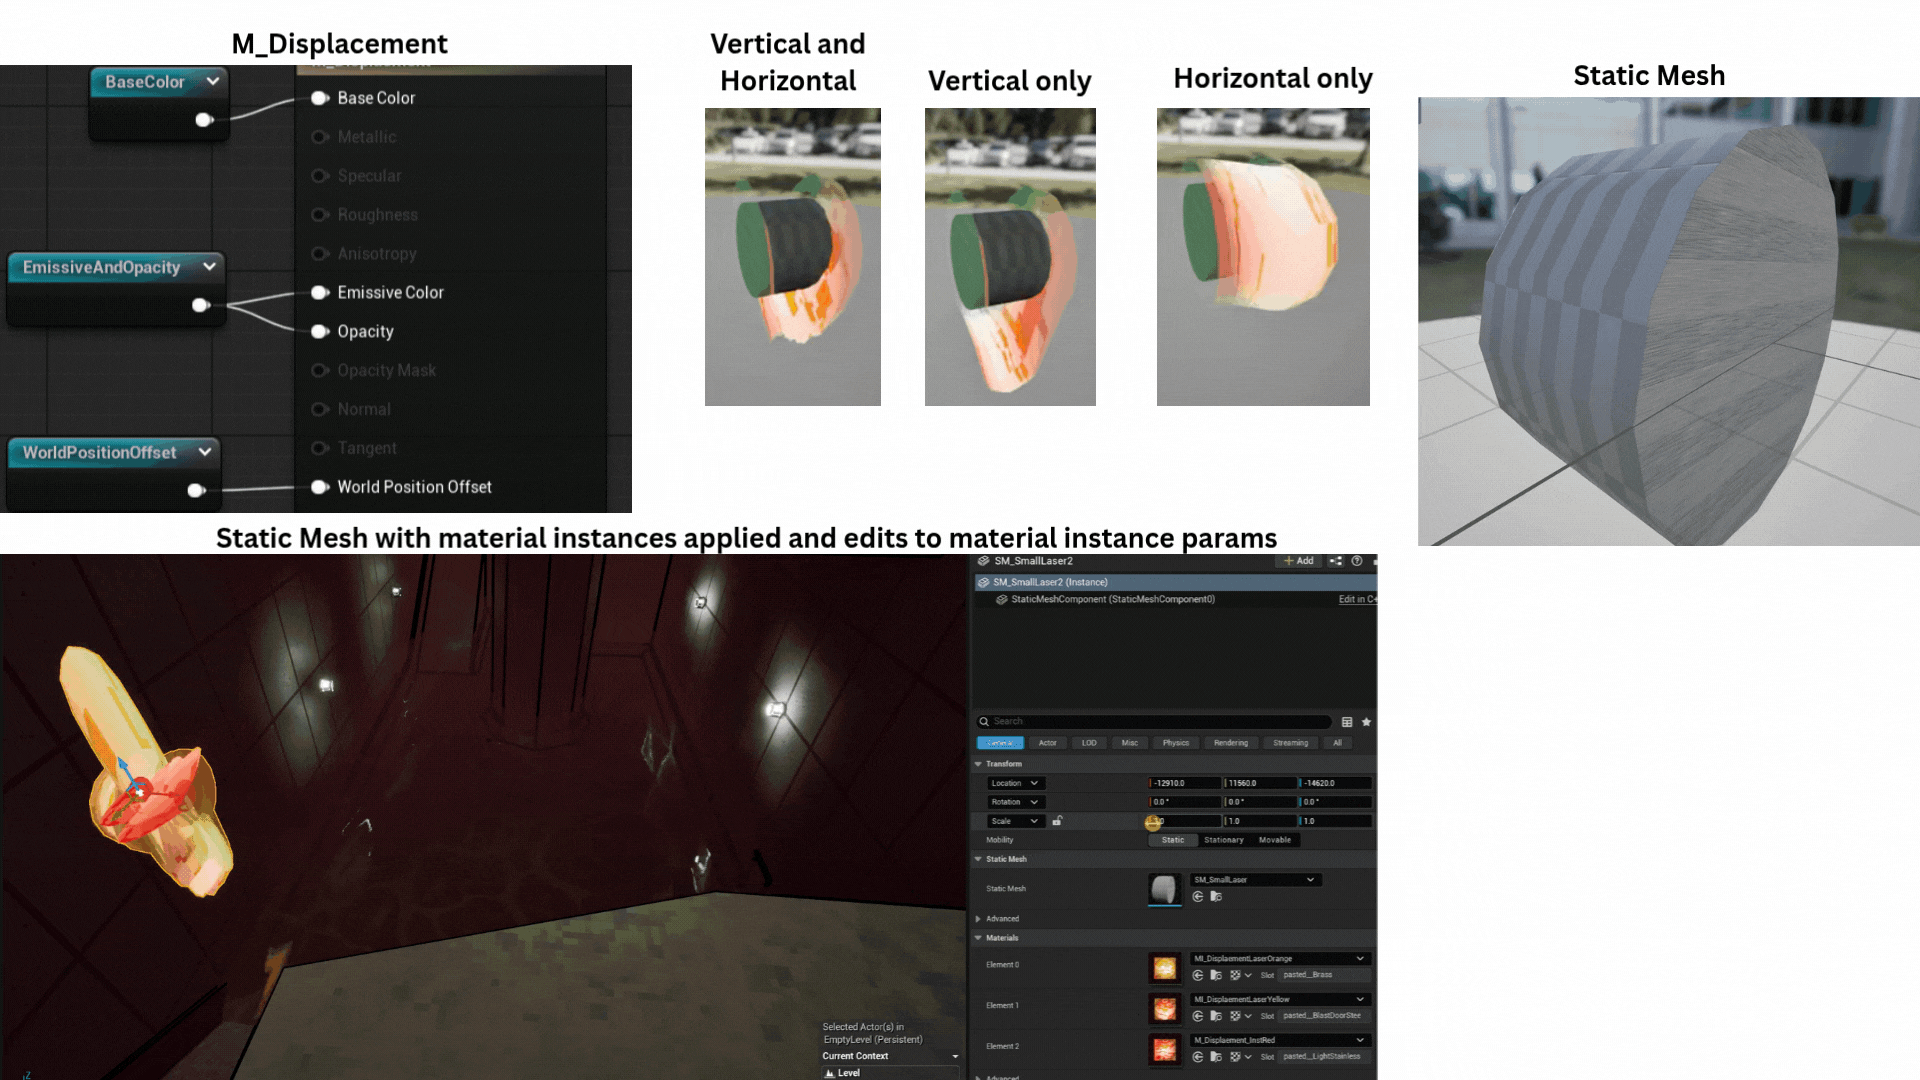
1.The Tank Frog’s laser uses a custom vertex and pixel shader applied to a high-poly static mesh composed of three cylinders.
Each cylinder uses a unique material instance for visual variation. The beam’s length is dynamically scaled along the X-axis through a parameter controlled by the particle system.
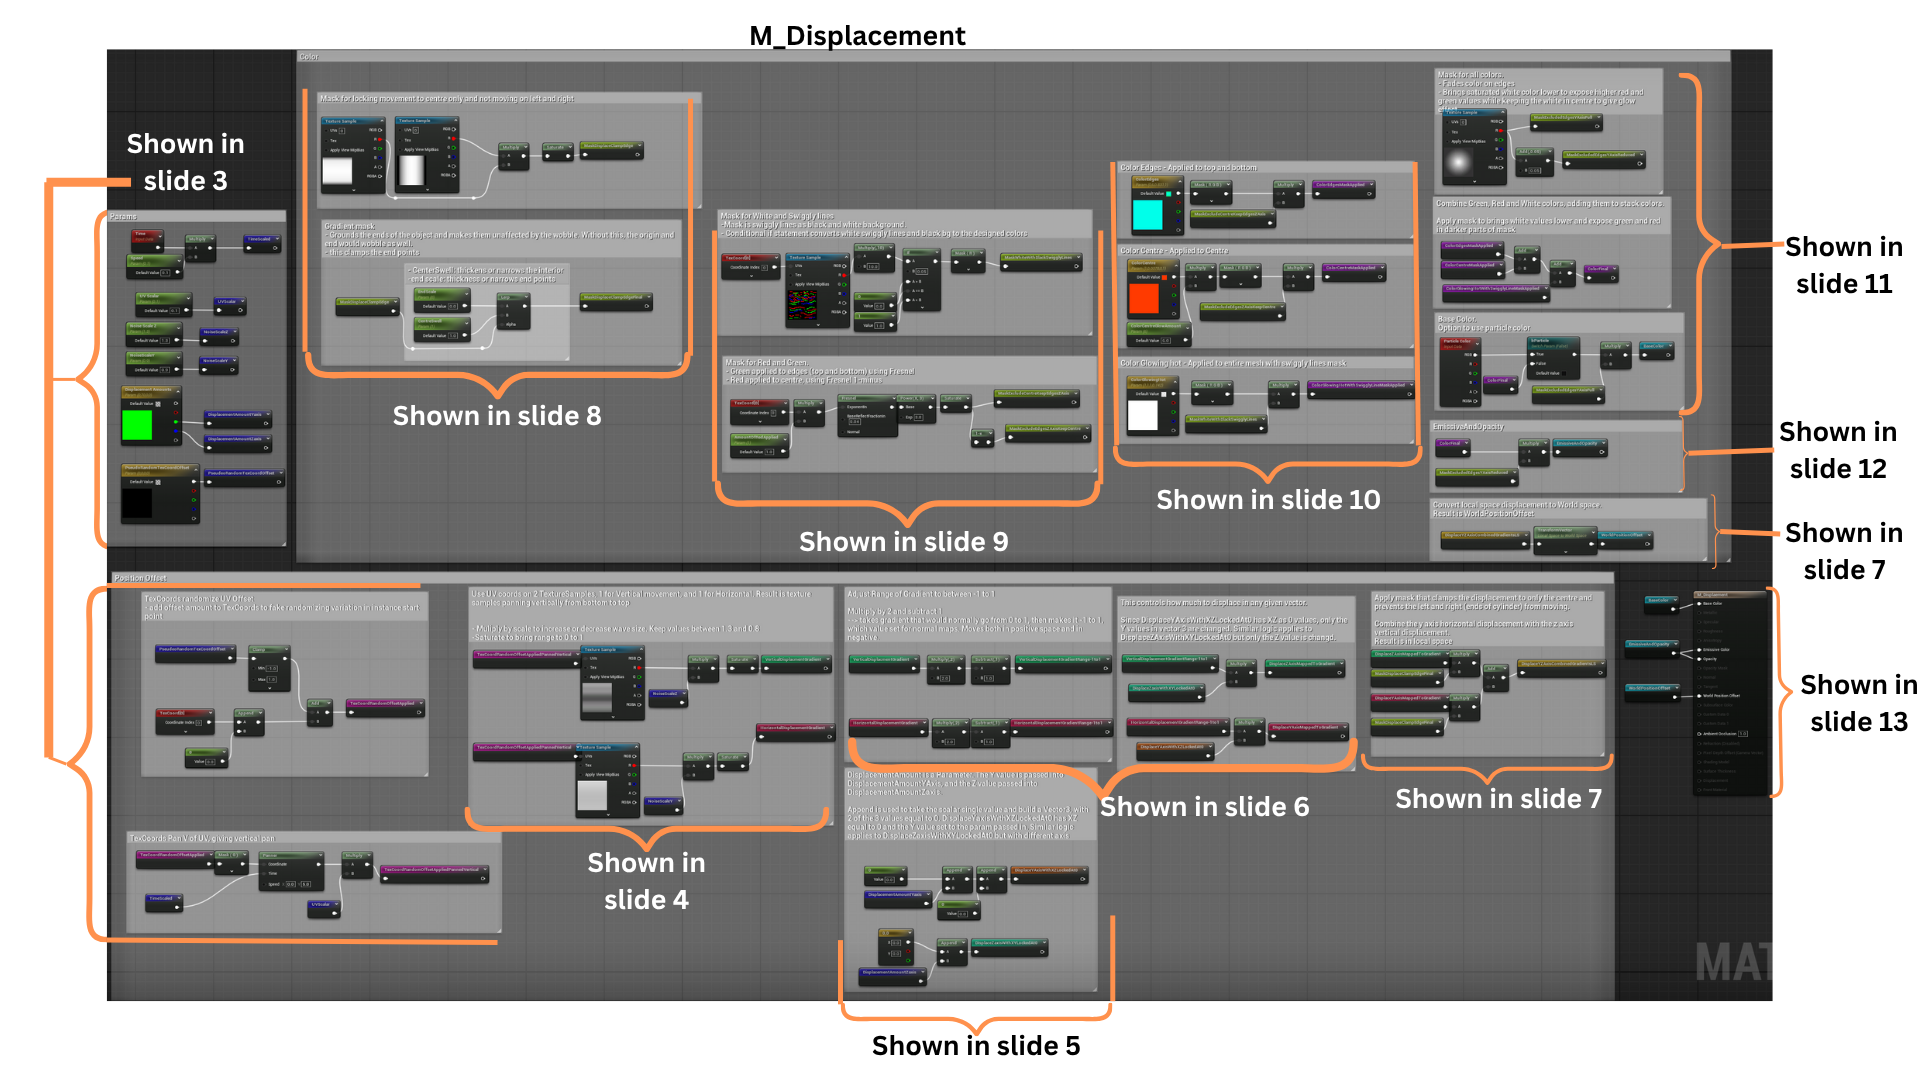
2. The vertex shader uses two panning gradient masks to control displacement—one along the Y-axis for horizontal movement and one along the Z-axis for vertical motion.
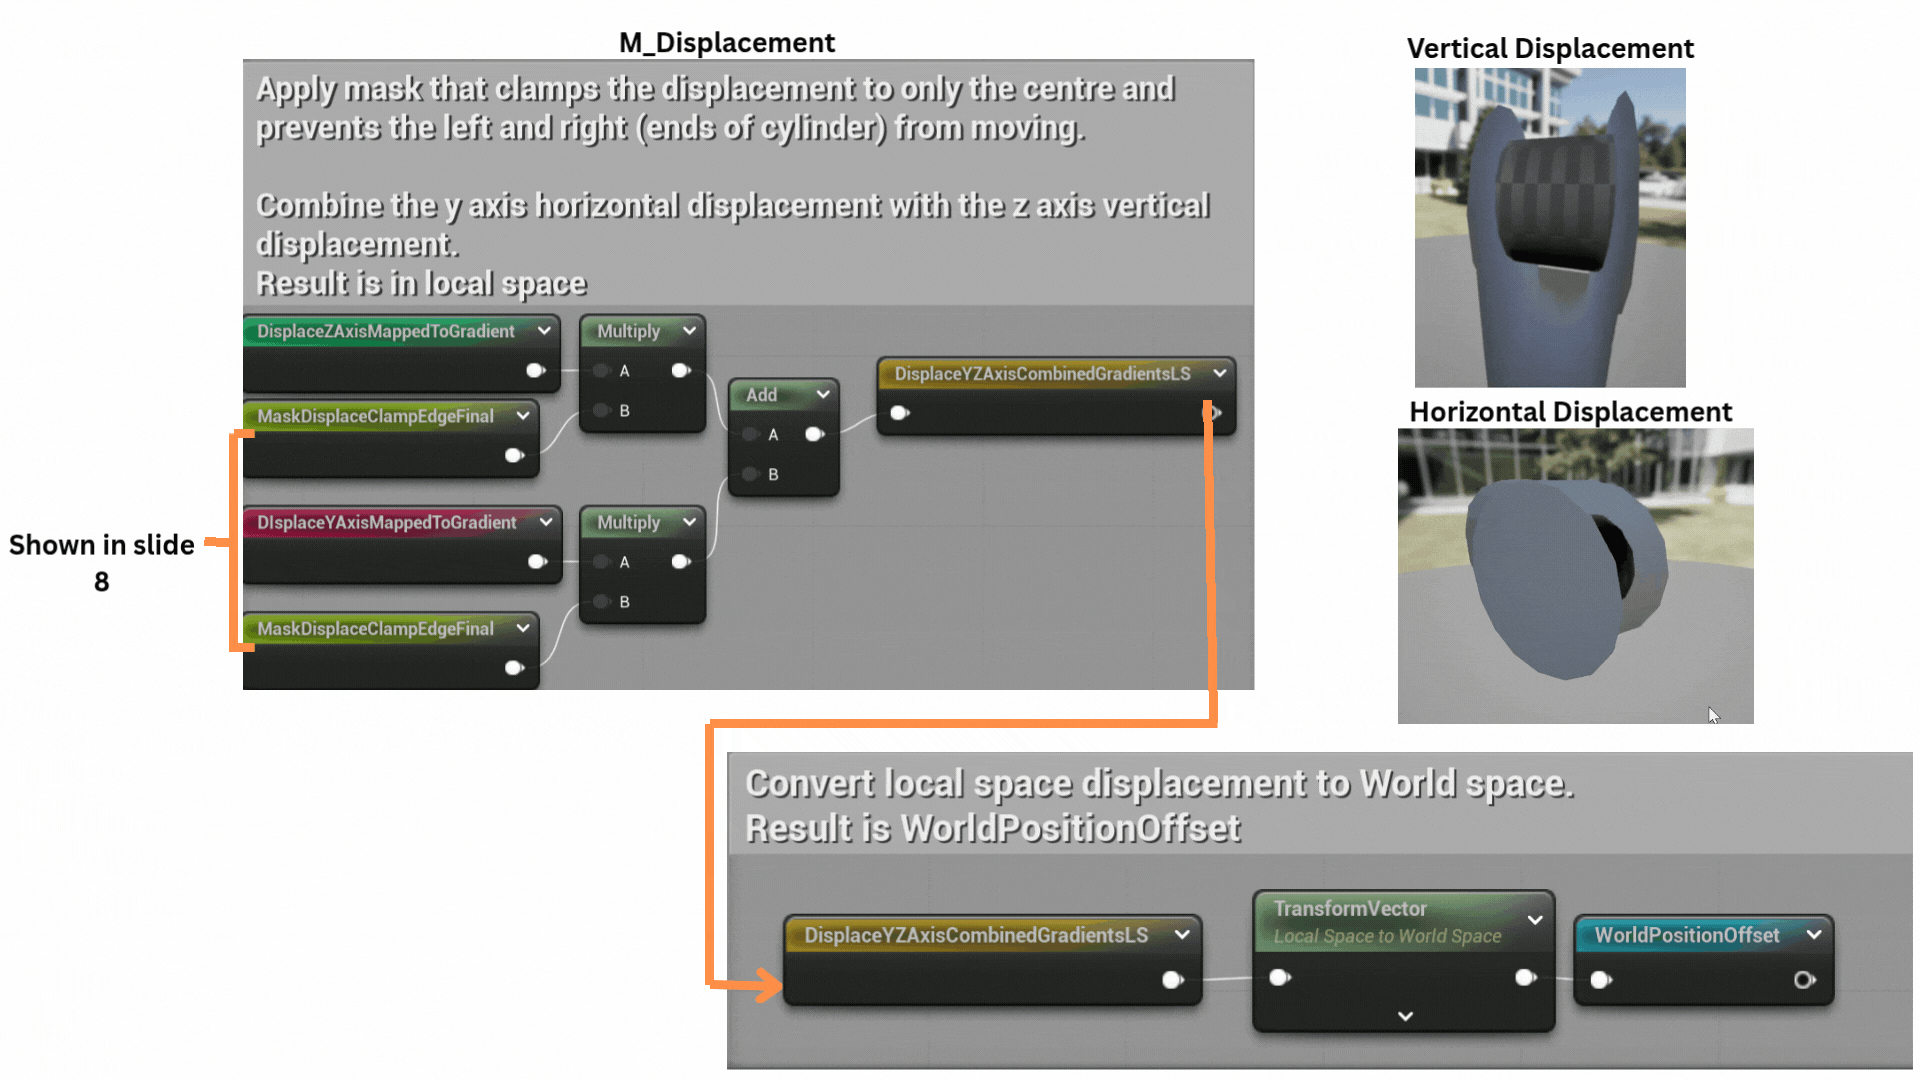
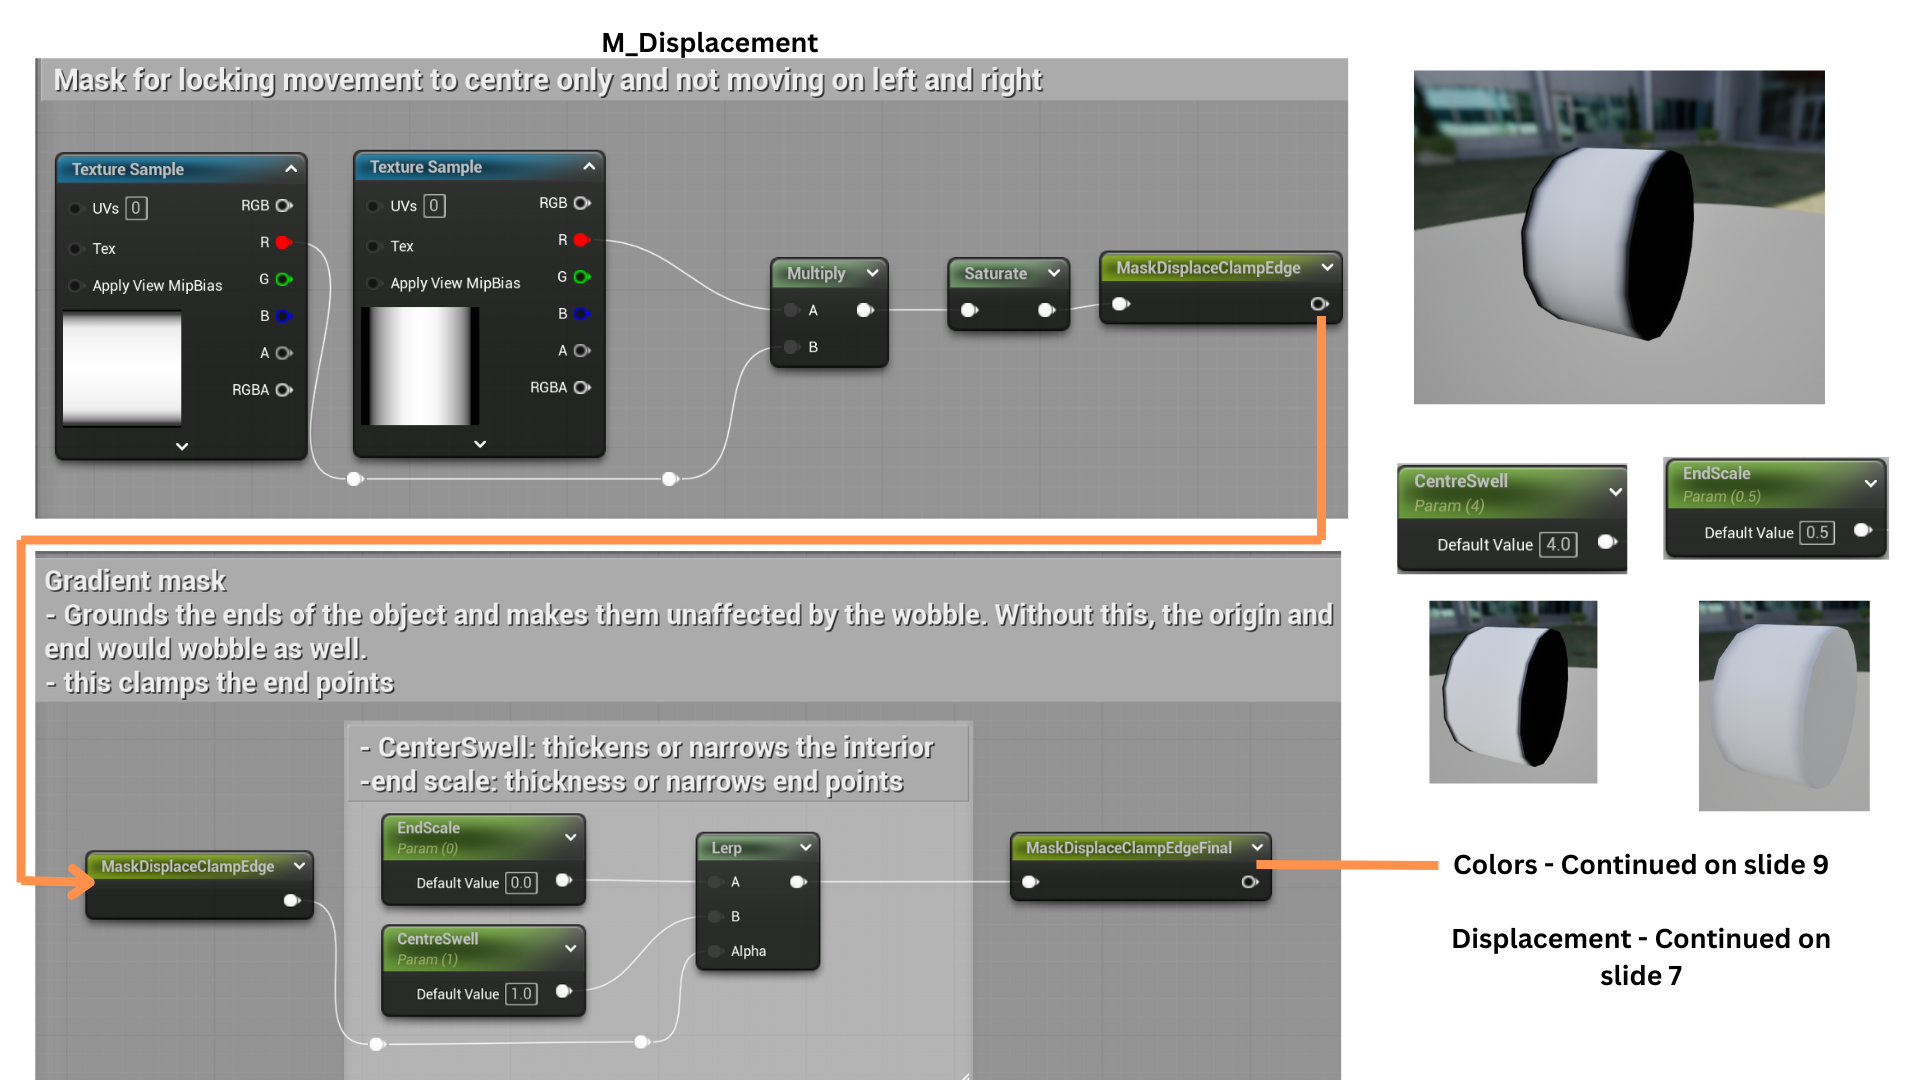
Additional masking restricts motion to the beam’s center, keeping the ends stable.
The pixel shader applies three blended colors to create the appearance of a glowing, high-energy beam with translucent edges that prevent visual obstruction.
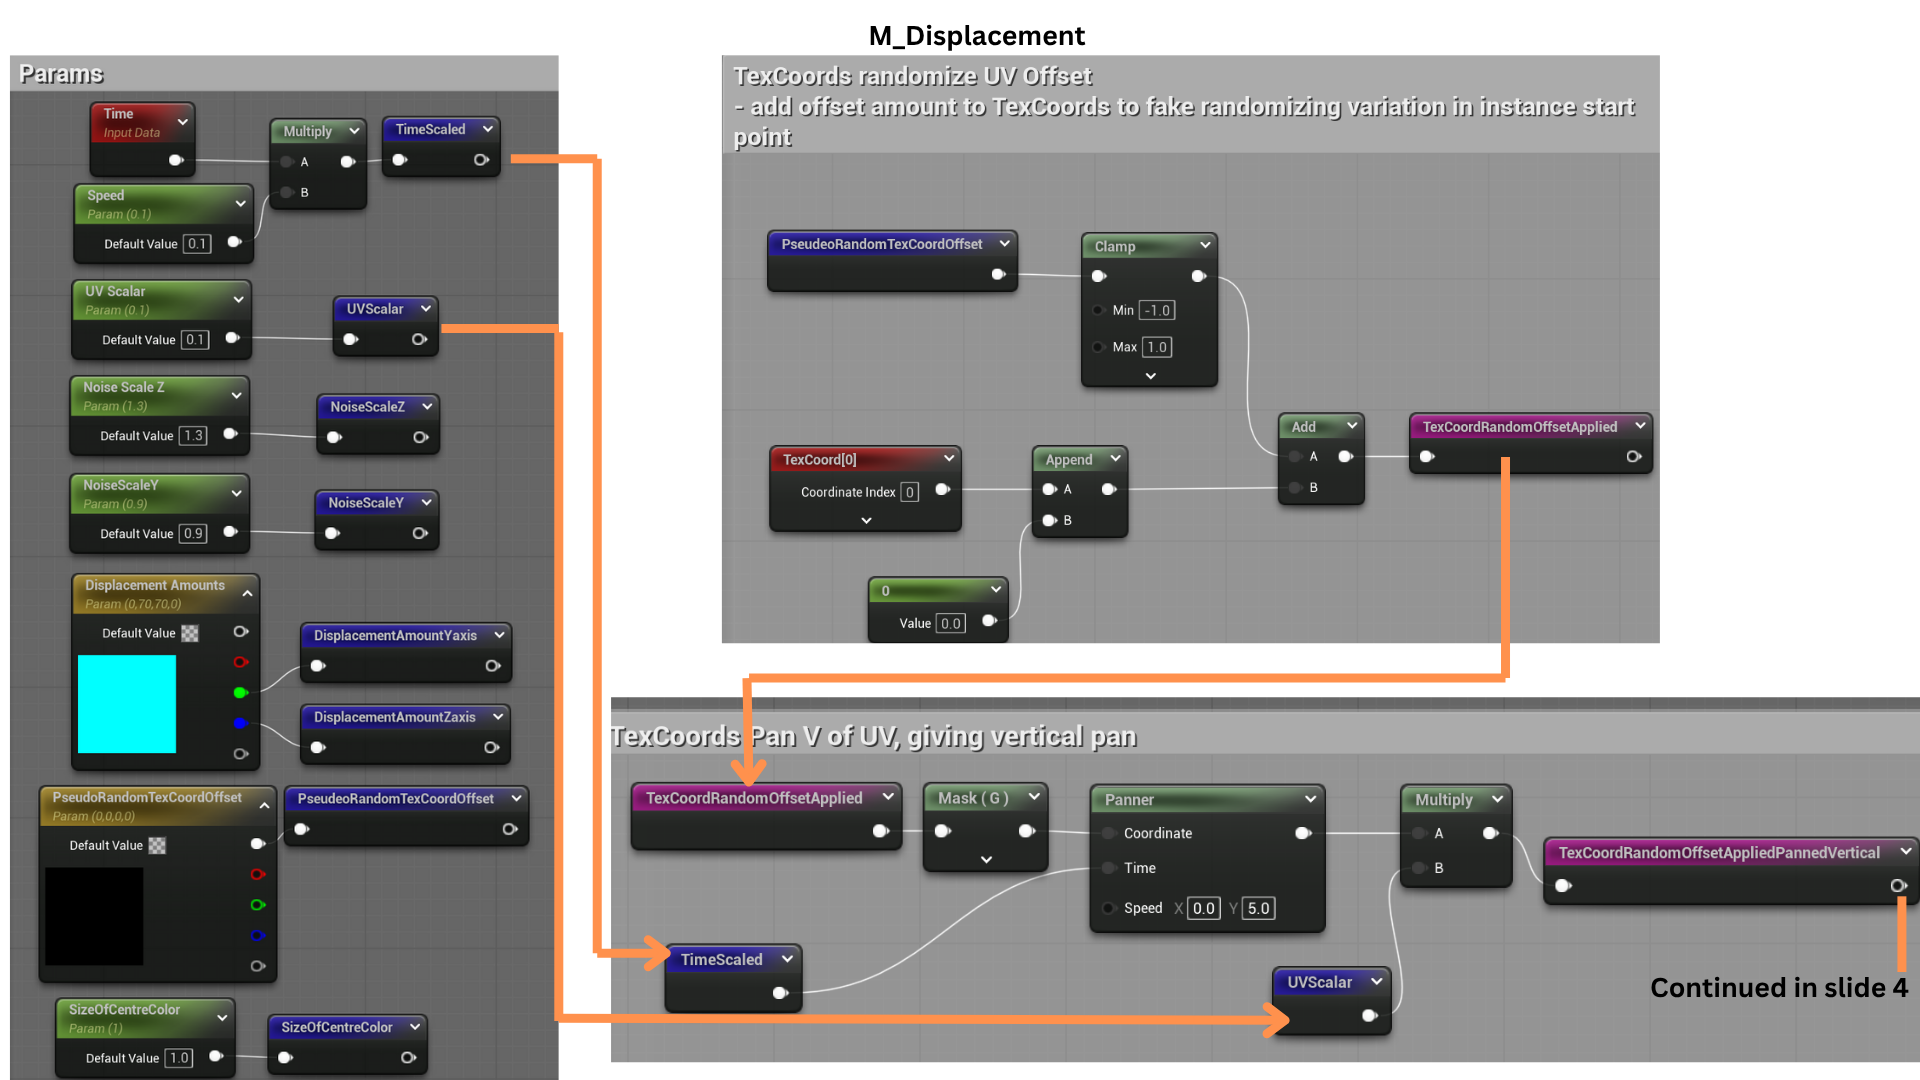
3.The Params section organizes shader inputs for clarity and modularity. TexCoord offsets adjust which parts of the gradient masks are used.
Time scaling controls the beam’s wave frequency, while UVScalar fine-tunes the sharpness of the waveform—lower values produce smoother “U”-shaped motion, and higher values yield sharper “V”-shaped displacement.
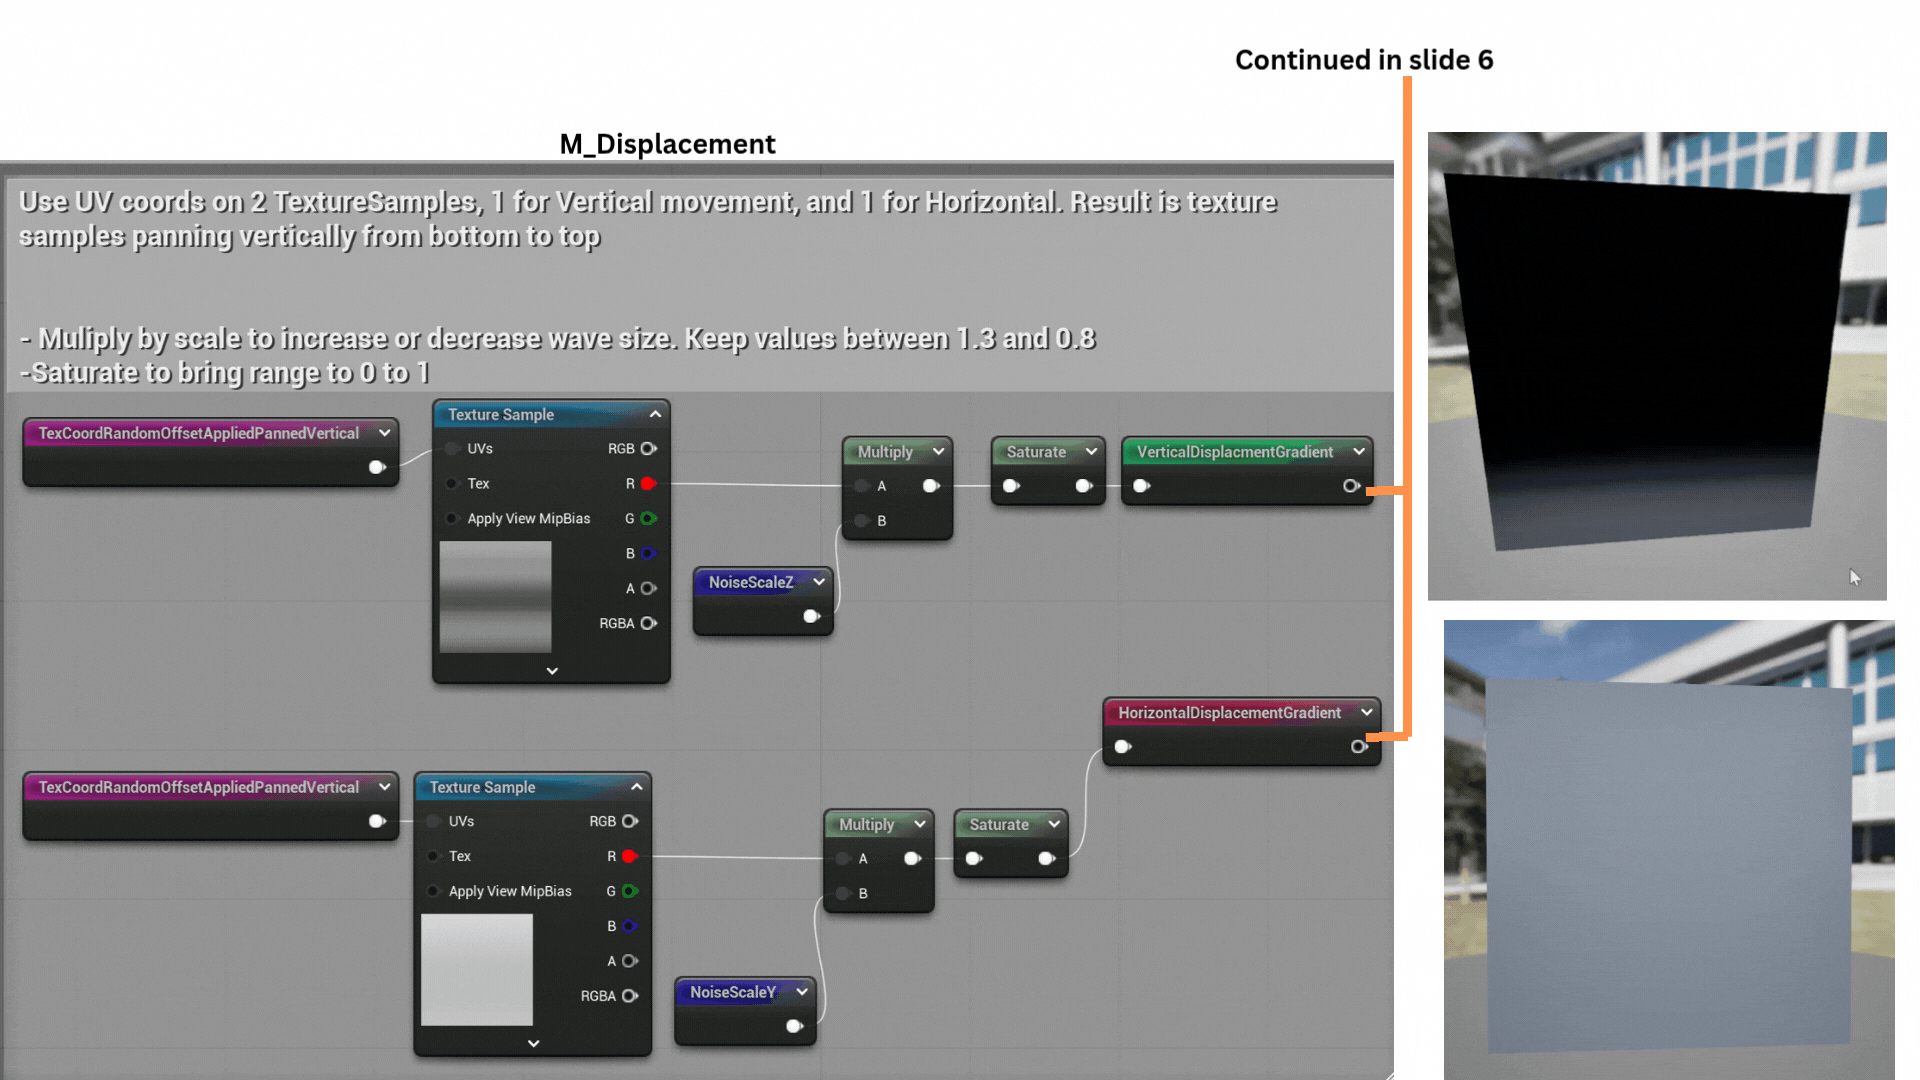
4.Offset TexCoords are fed into two gradient textures—one for vertical and one for horizontal displacement.
NoiseScale parameters determine where the distortion occurs: values near 1 isolate movement to one side of the beam, while higher values spread the effect symmetrically.
This allows flexible artistic control over the laser’s directional distortion.
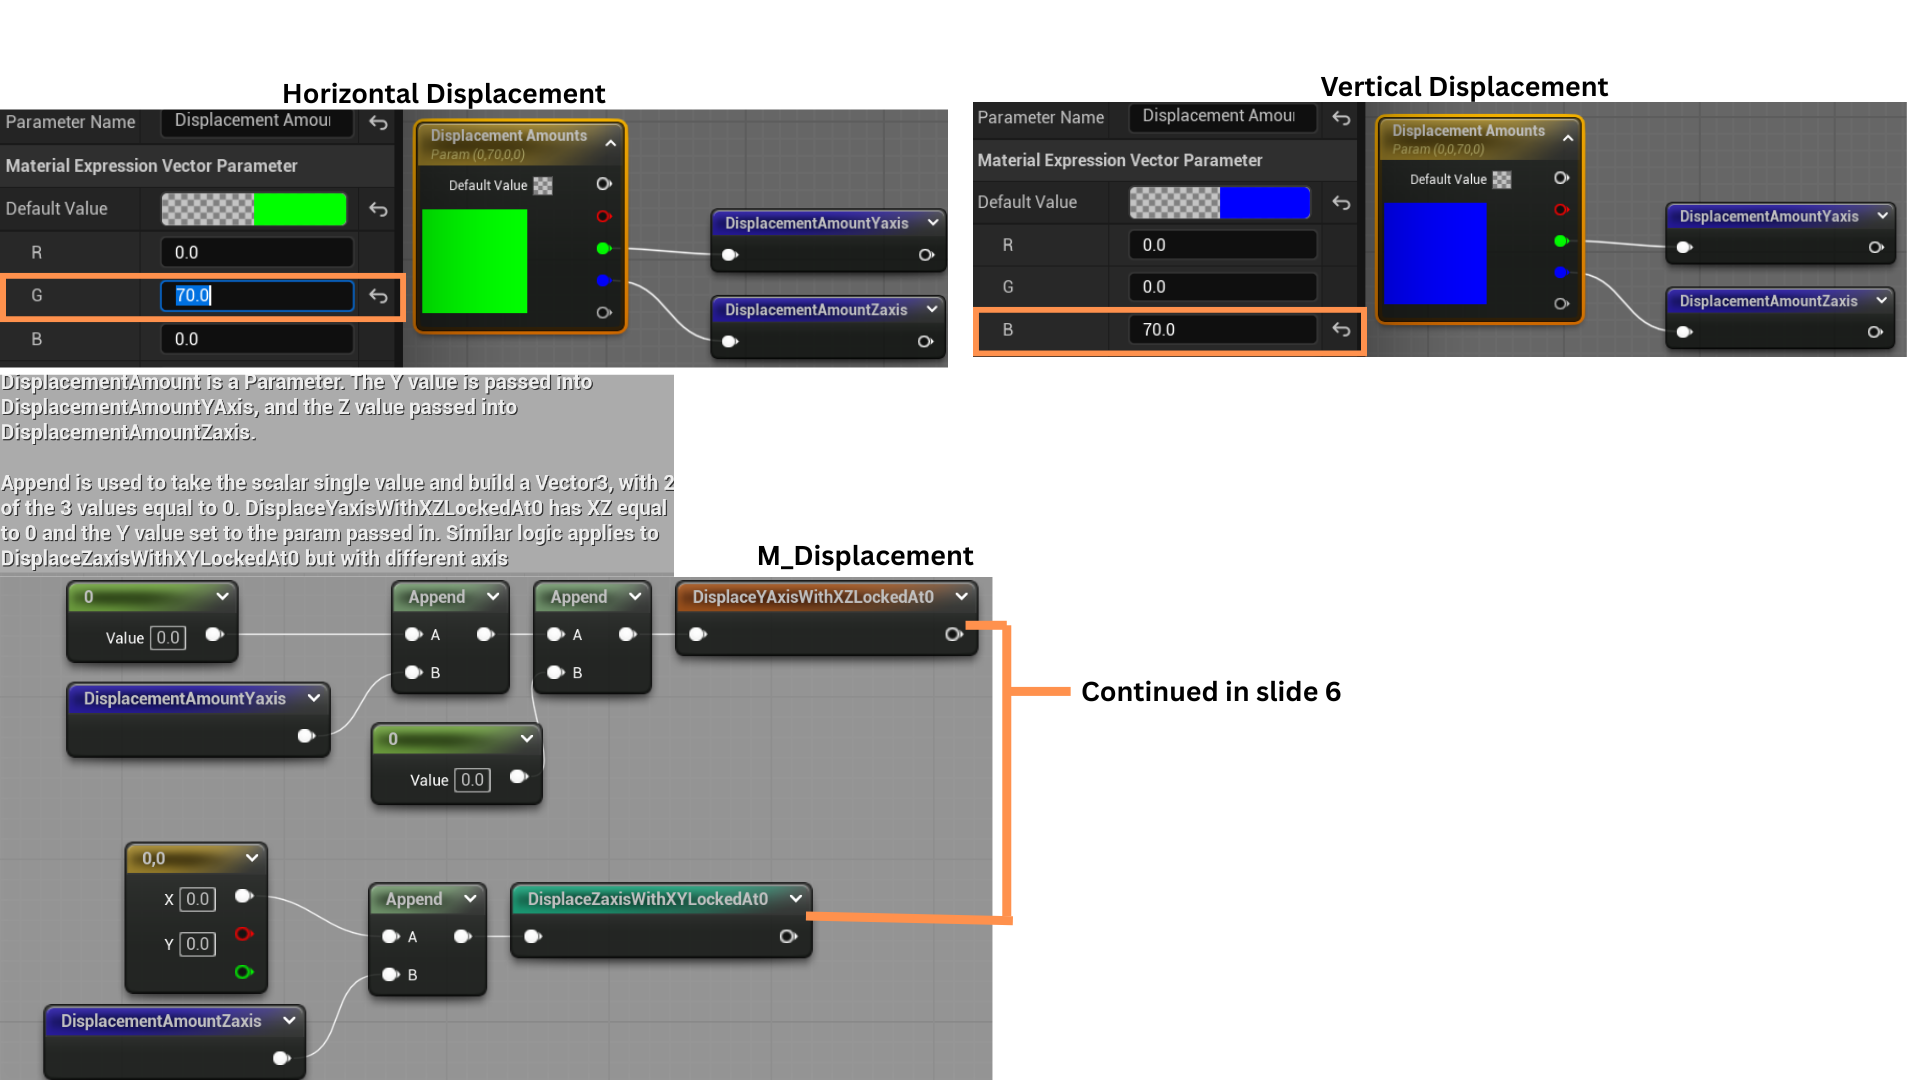
5.DisplacementAmounts generate axis-specific Vector3 values, isolating movement to a single axis for precise directional control.
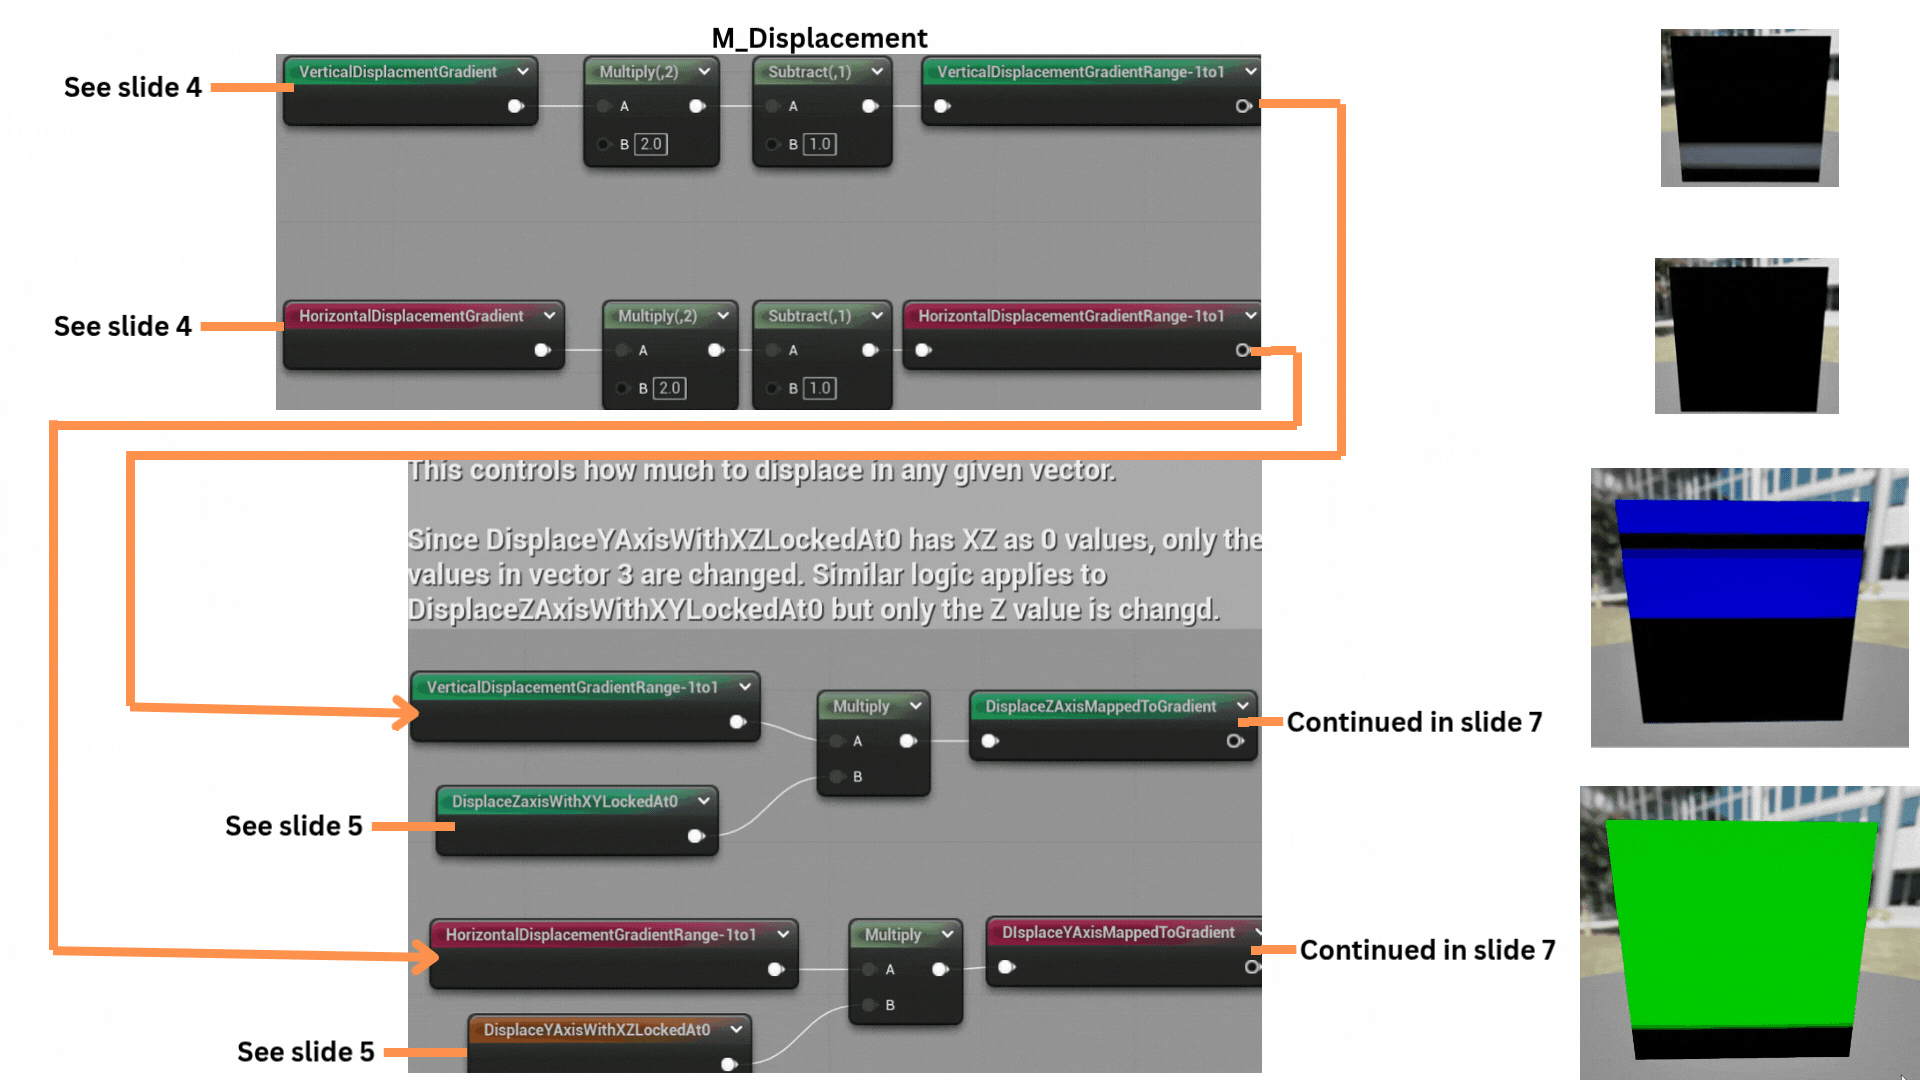
6.The vertical and horizontal displacement gradients are normalized to a -1 to 1 range to match standard normal map values.
These gradients are multiplied by their respective Vector3 masks, isolating movement along the Z-axis (blue channel) and Y-axis (green channel).
The teal nodes represent the completed vertex shader stage.
7. The axis masks are combined with a center-weighted mask that restricts displacement to the beam’s middle. The resulting local-space displacement data is converted to world-space and output as the final vertex offset.
8.Two gradients are multiplied to produce a mask that transitions from black edges to a bright center. This mask drives a lerp between EndScale (edge darkness) and CentreSwell (center brightness), allowing independent control of how much the center and edges animate.
9.CentreSwell and DisplacementAmounts define the scale and direction of displacement. CentreSwell determines how much of the mask is affected (0 disables movement). DisplacementAmounts generate axis-specific Vector3 values, isolating movement to a single axis for precise directional control.
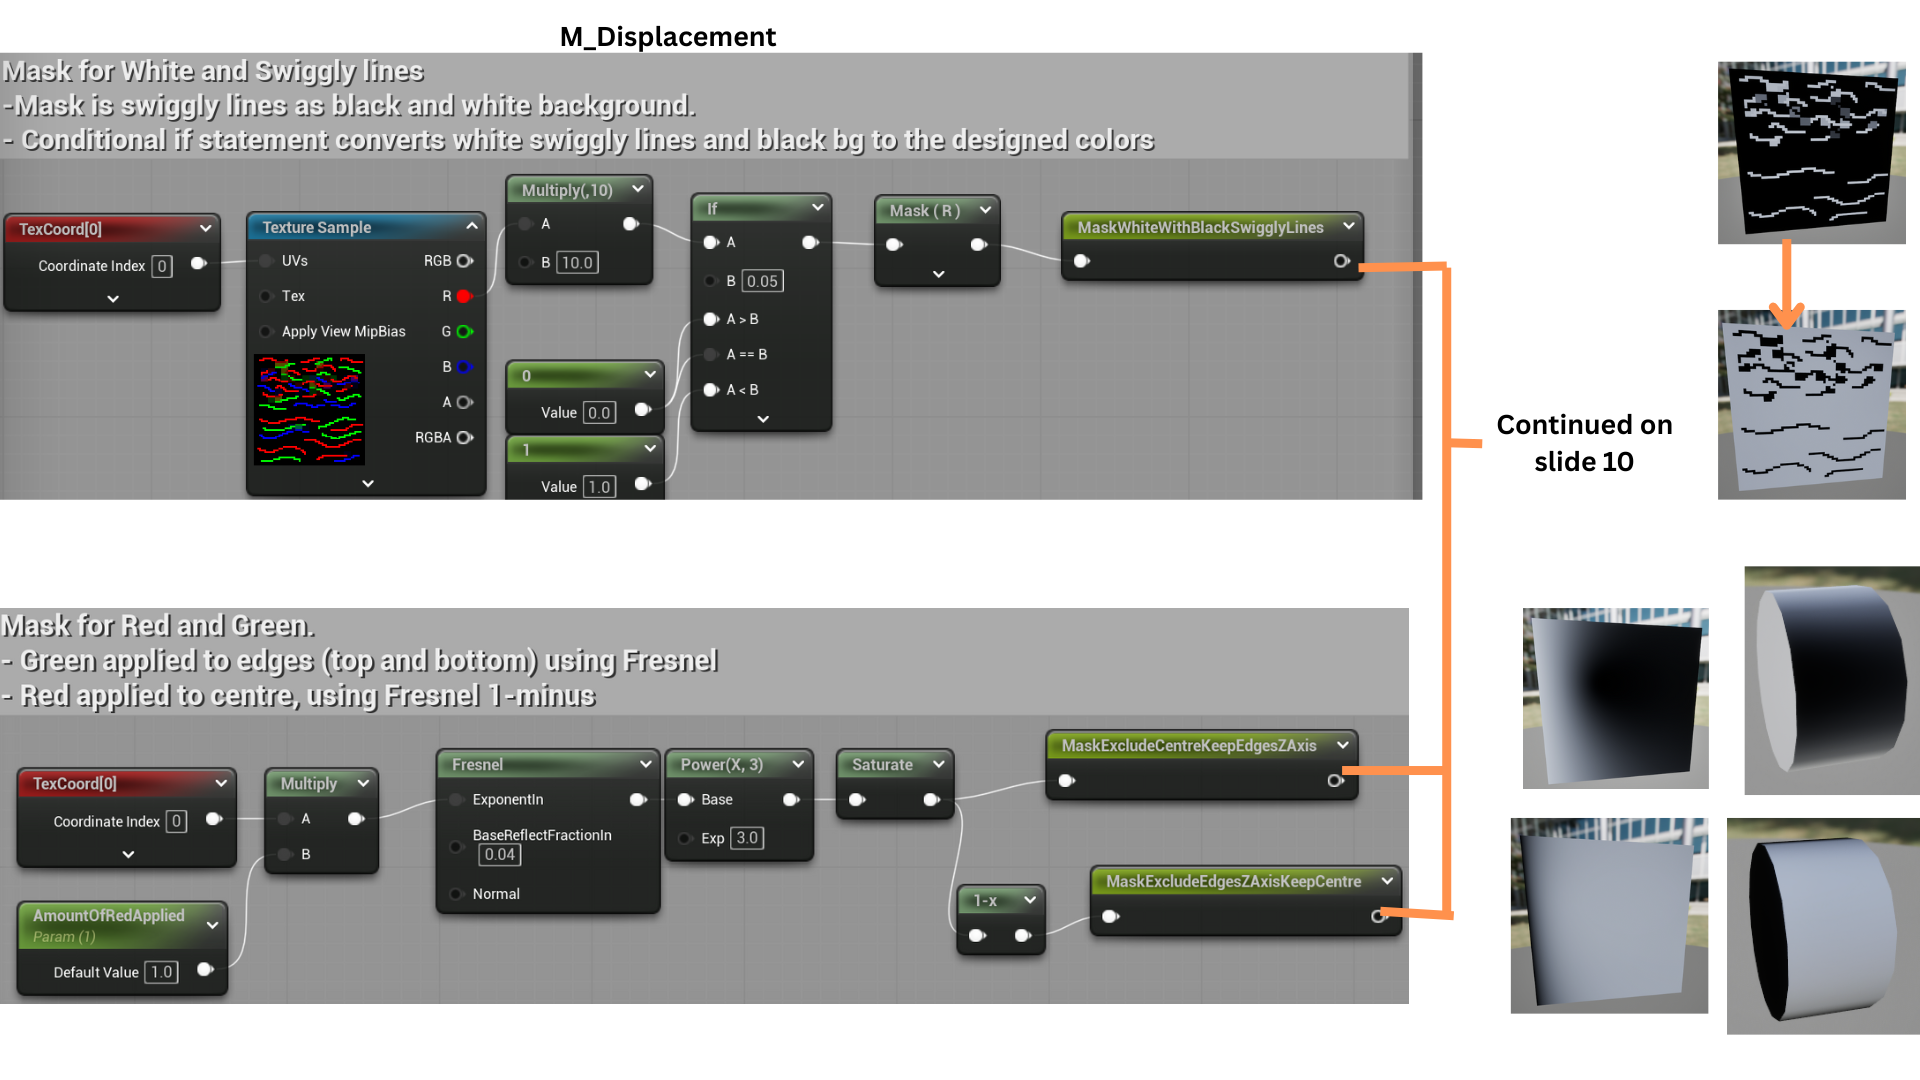
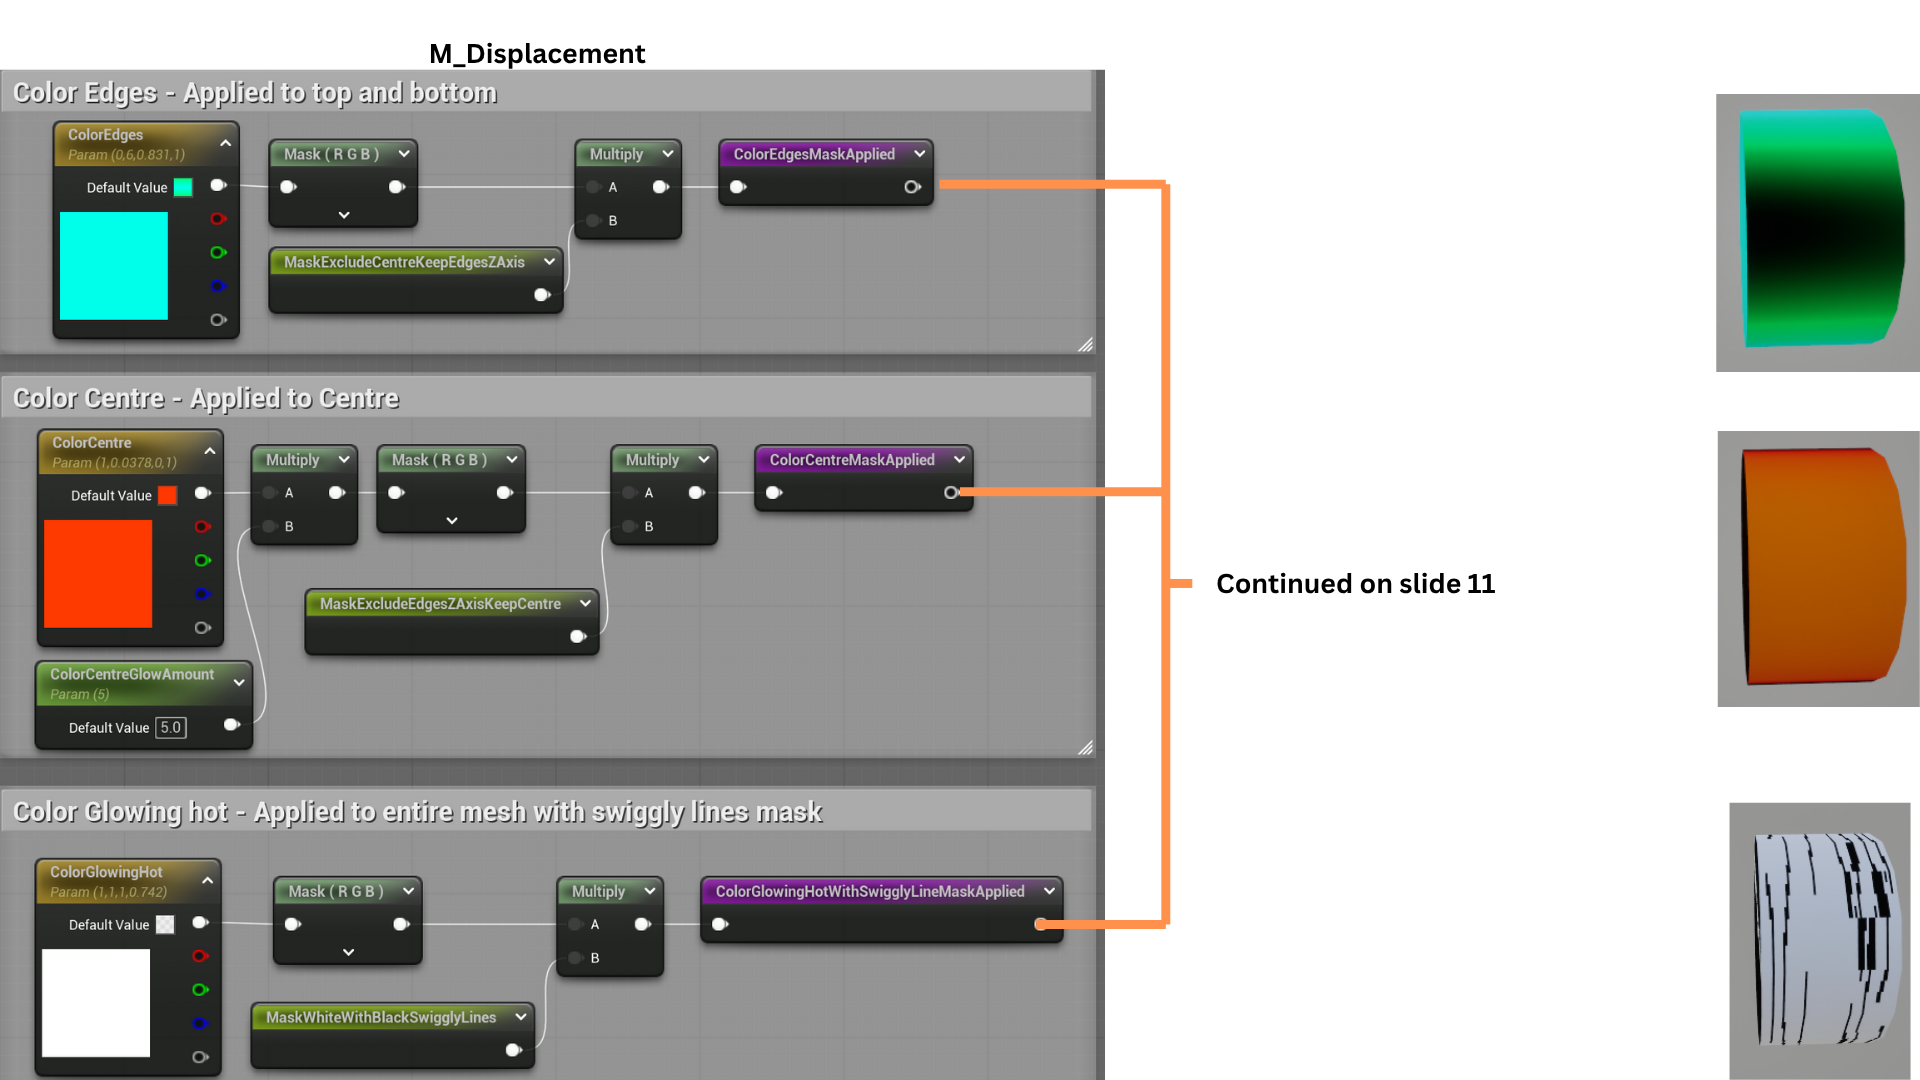
10. Three separate masks control the beam’s color layers. An inverted mask corrects the texture format, while Fresnel and inverse Fresnel effects assign distinct colors to the beam’s edges and center. The SizeOfCentreColor parameter adjusts color dominance, blending between center-heavy or edge-heavy illumination.
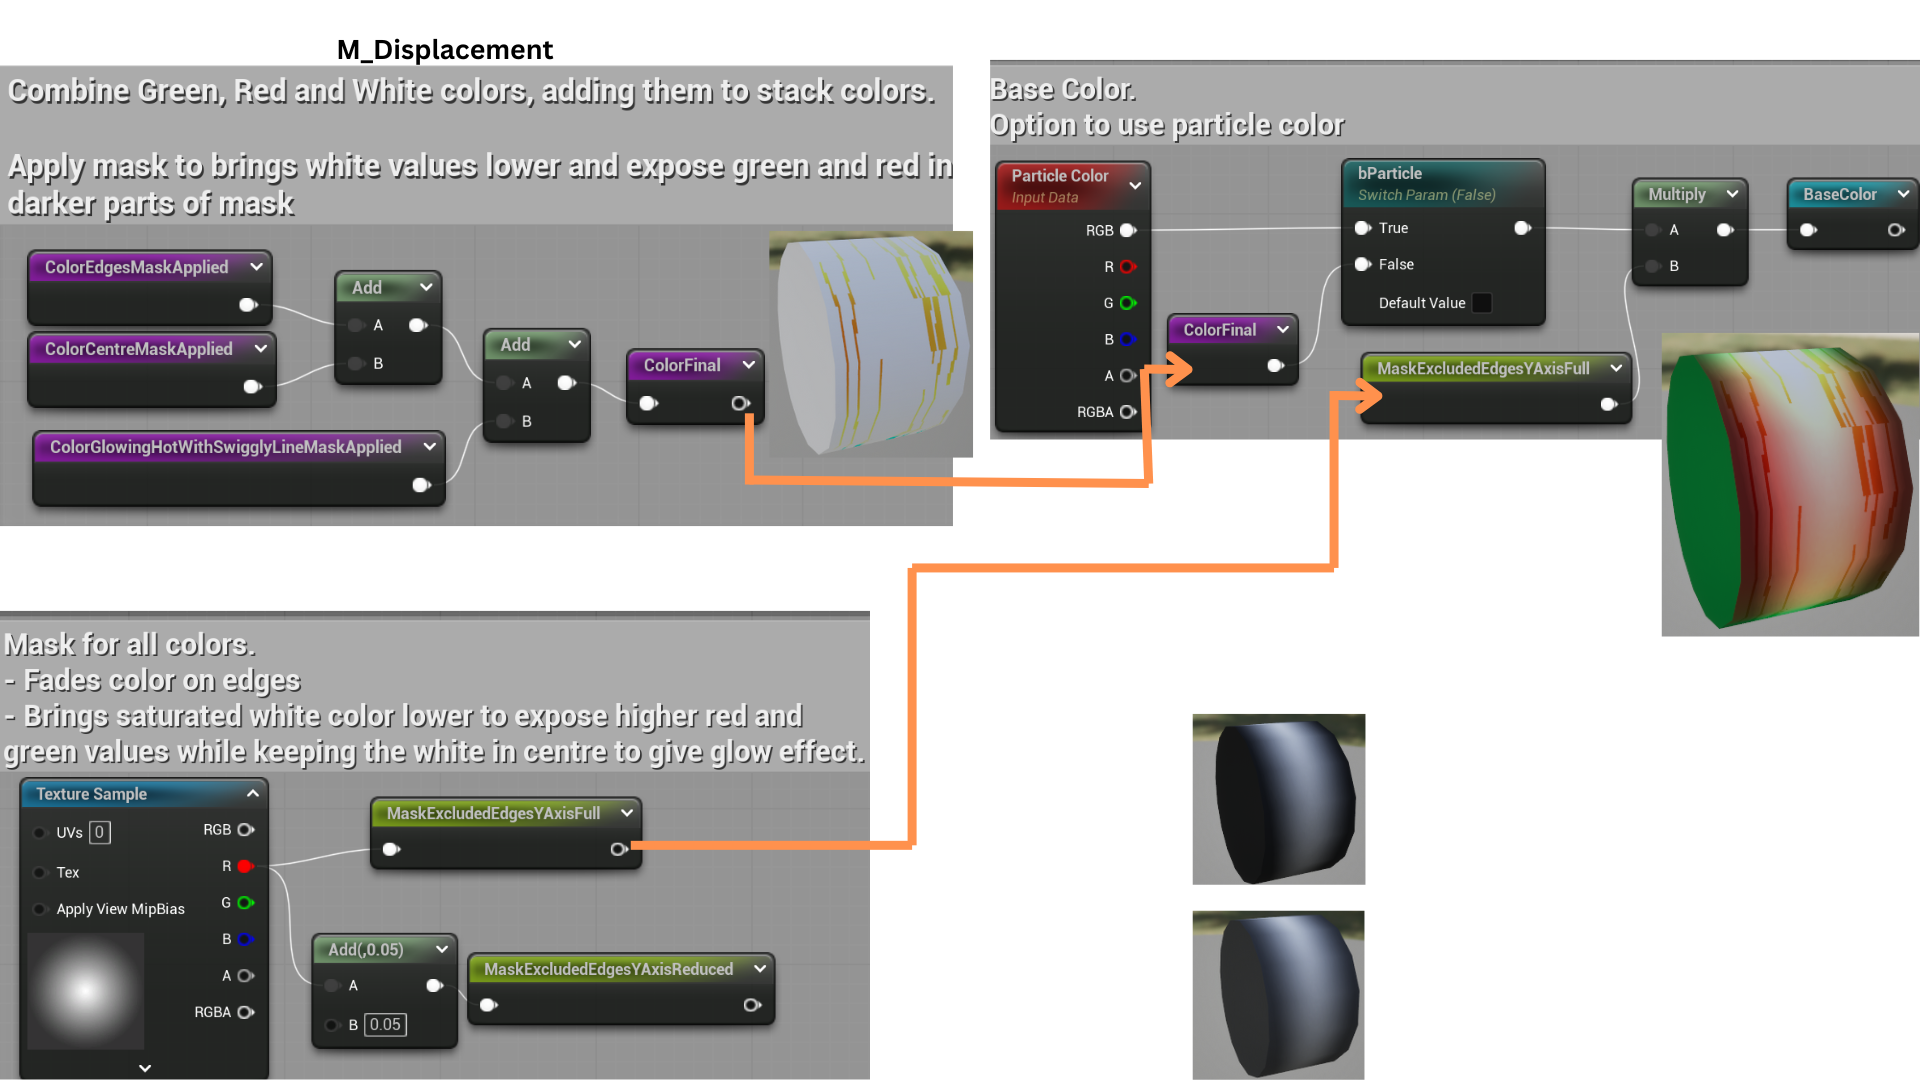
11. Each mask feeds into color parameters defining the beam’s primary hues. The colors are blended and normalized for the base color output.
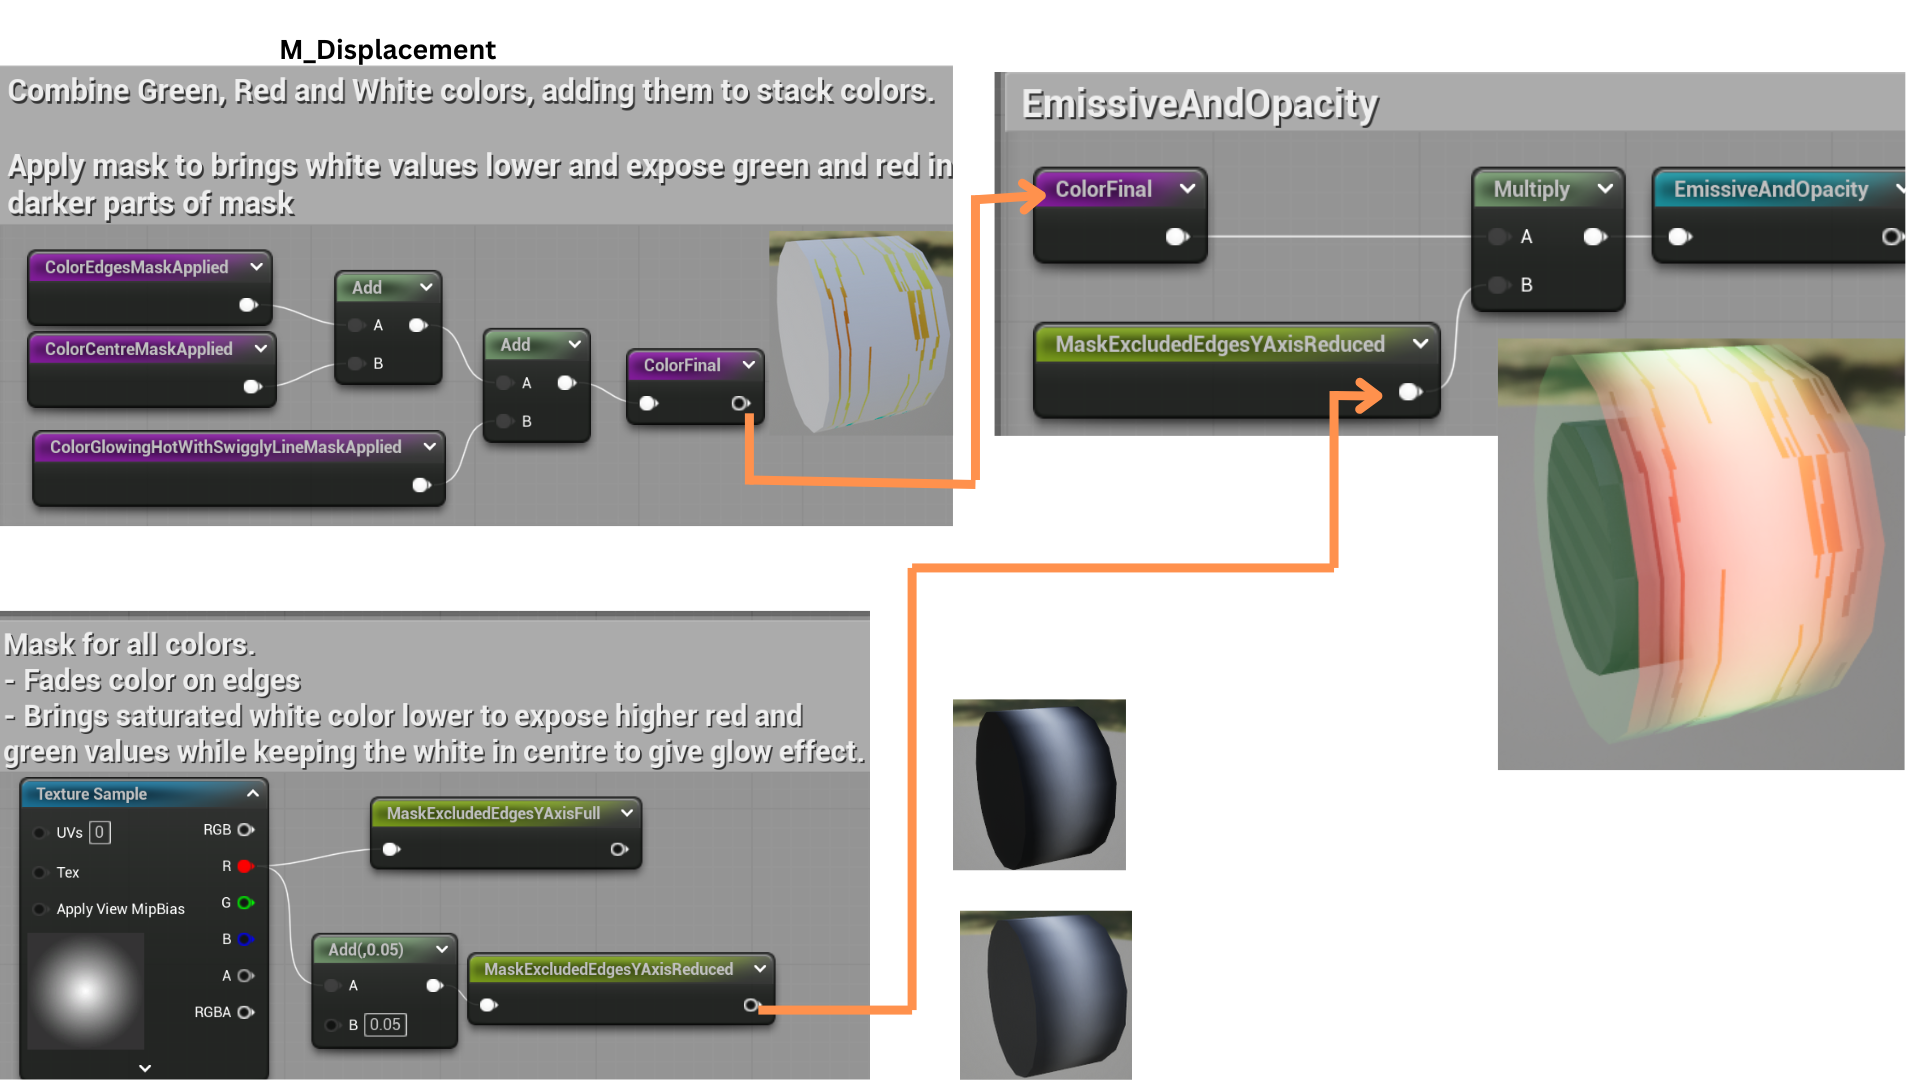
12. An enhanced mask refines emissive intensity and opacity for a luminous effect with a hot white centre.
13. Each cylinder in the static mesh uses a unique material instance to create the final stylized, Ghostbusters-inspired laser beam.
Tune Shader
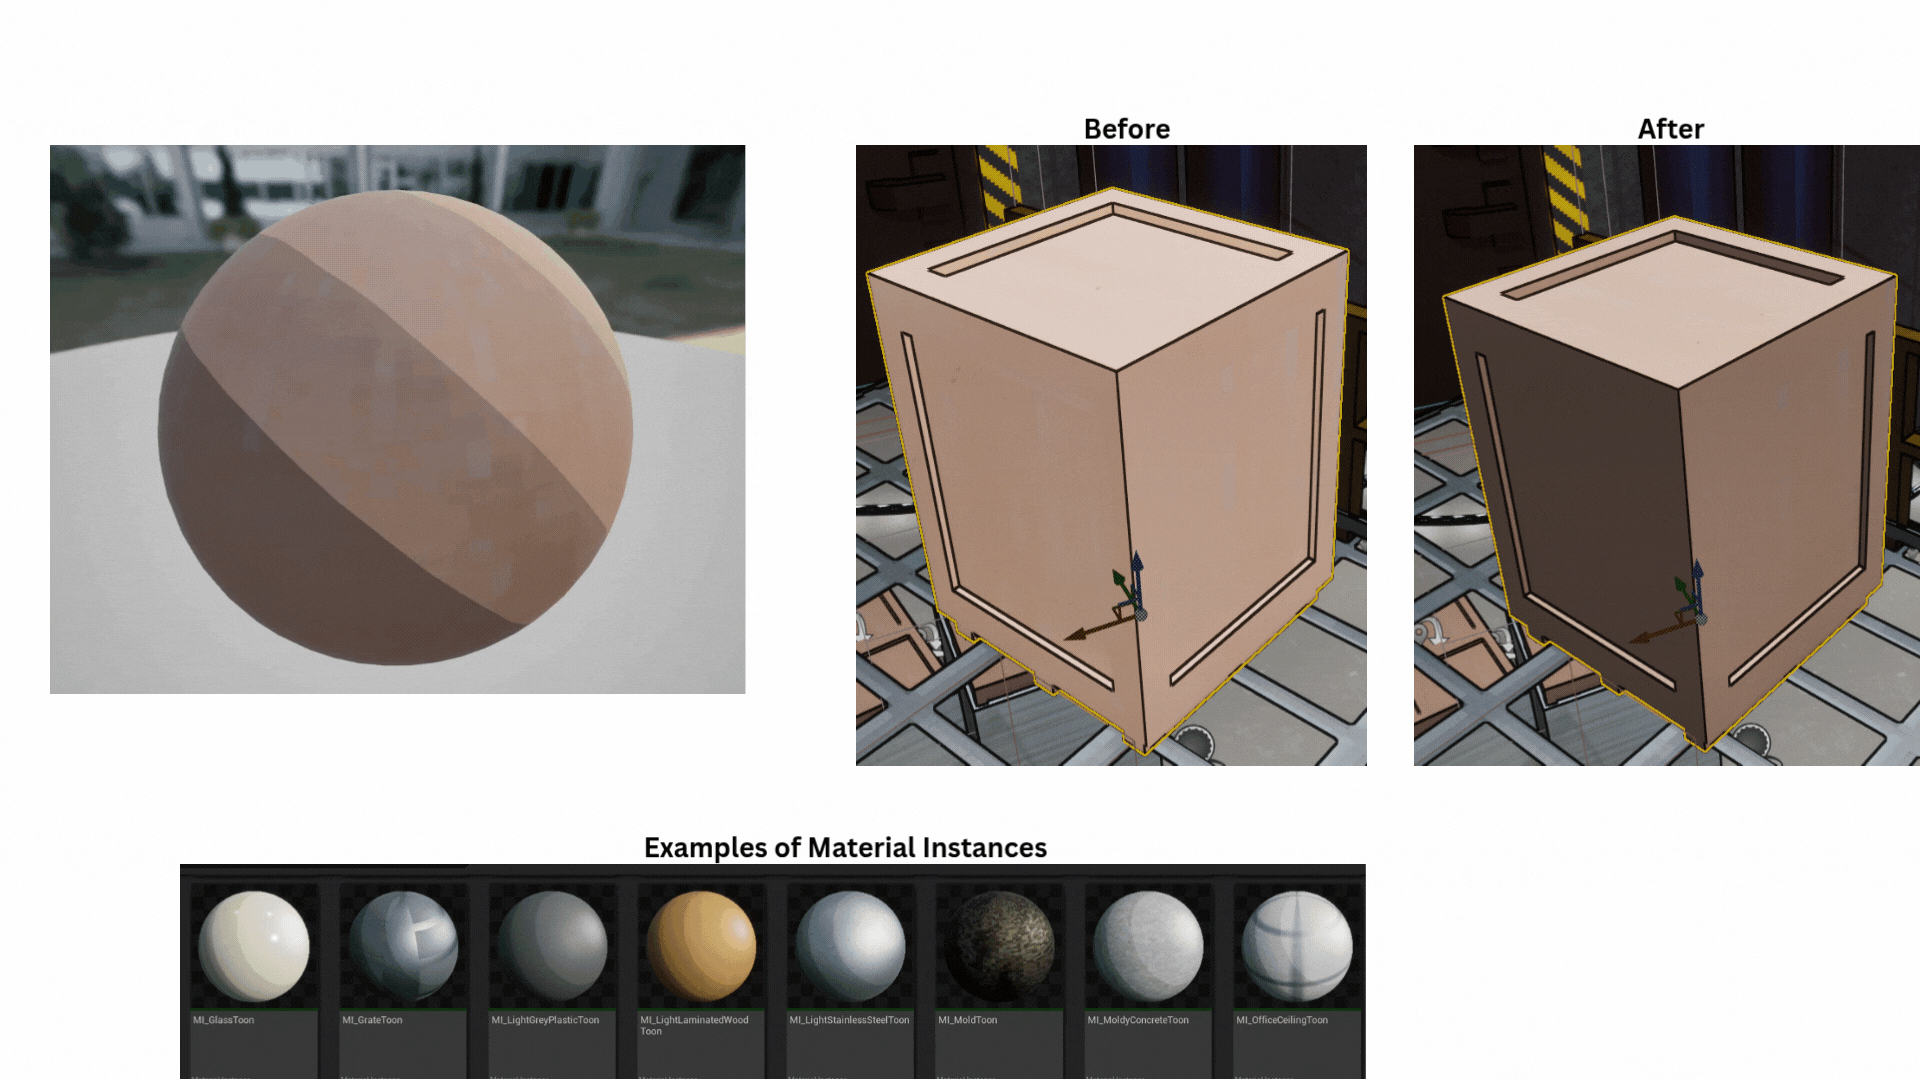

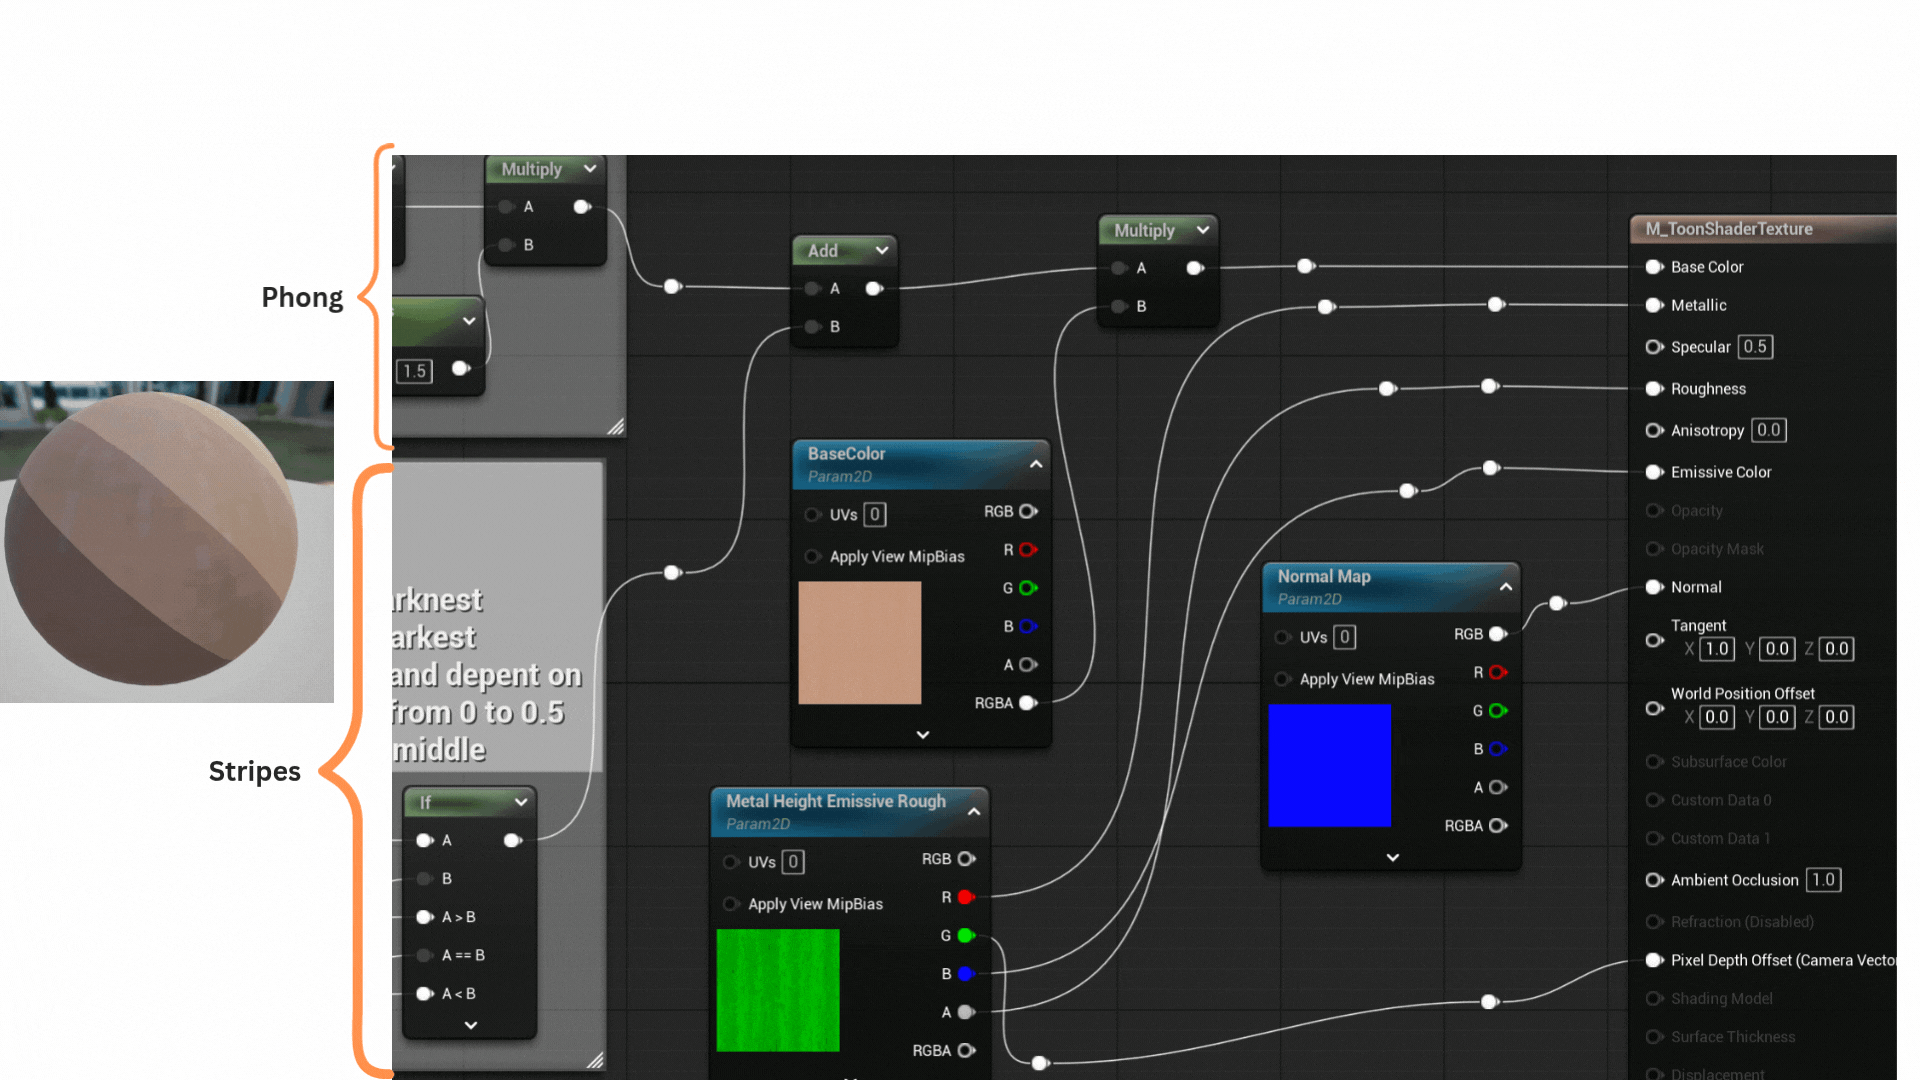
1. A toon-style pixel shader was developed to create consistent material instances across multiple environment actors. This unified visual style maintained artistic cohesion and supported flexible parameter adjustments for different materials.
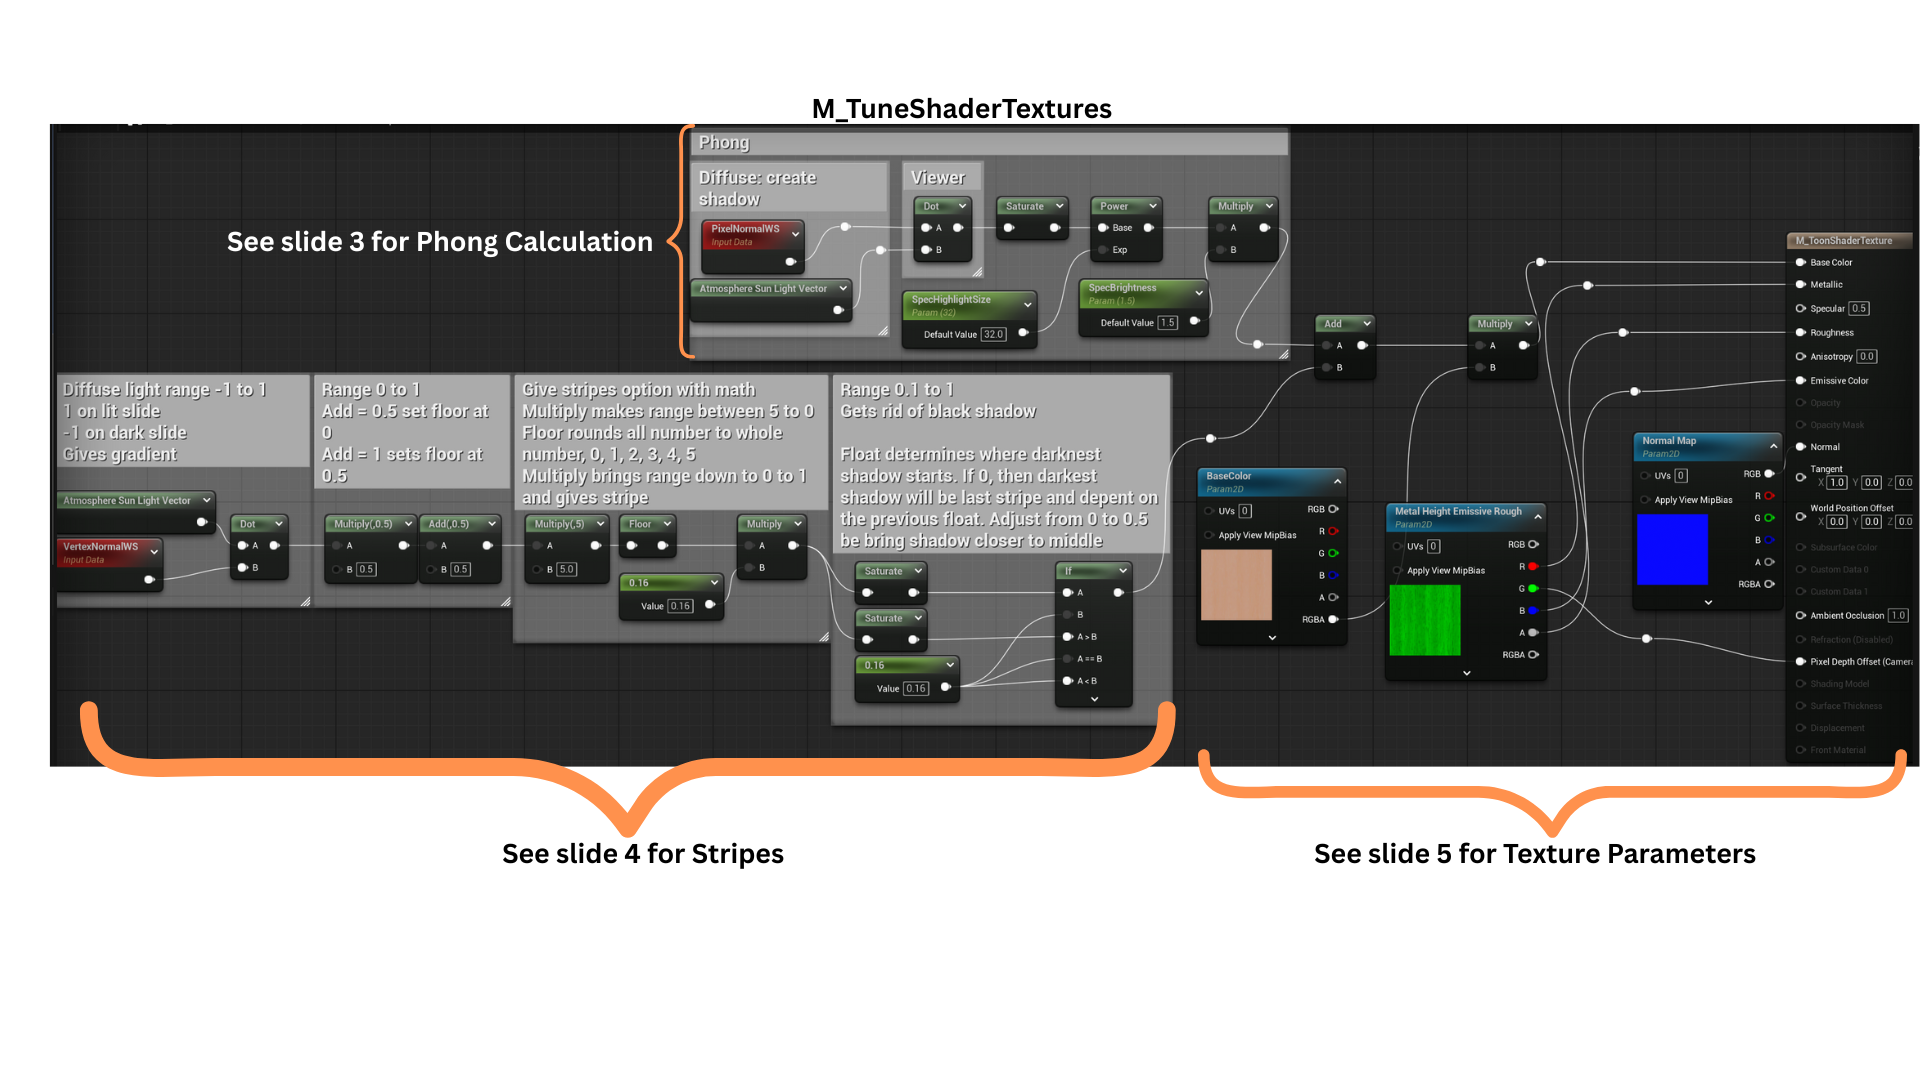
2. The shader combines a Phong lighting calculation with a greyscale striping function.
These two layers are summed and then multiplied by a base texture, allowing lighting and shading variations to dynamically influence the final texture output.
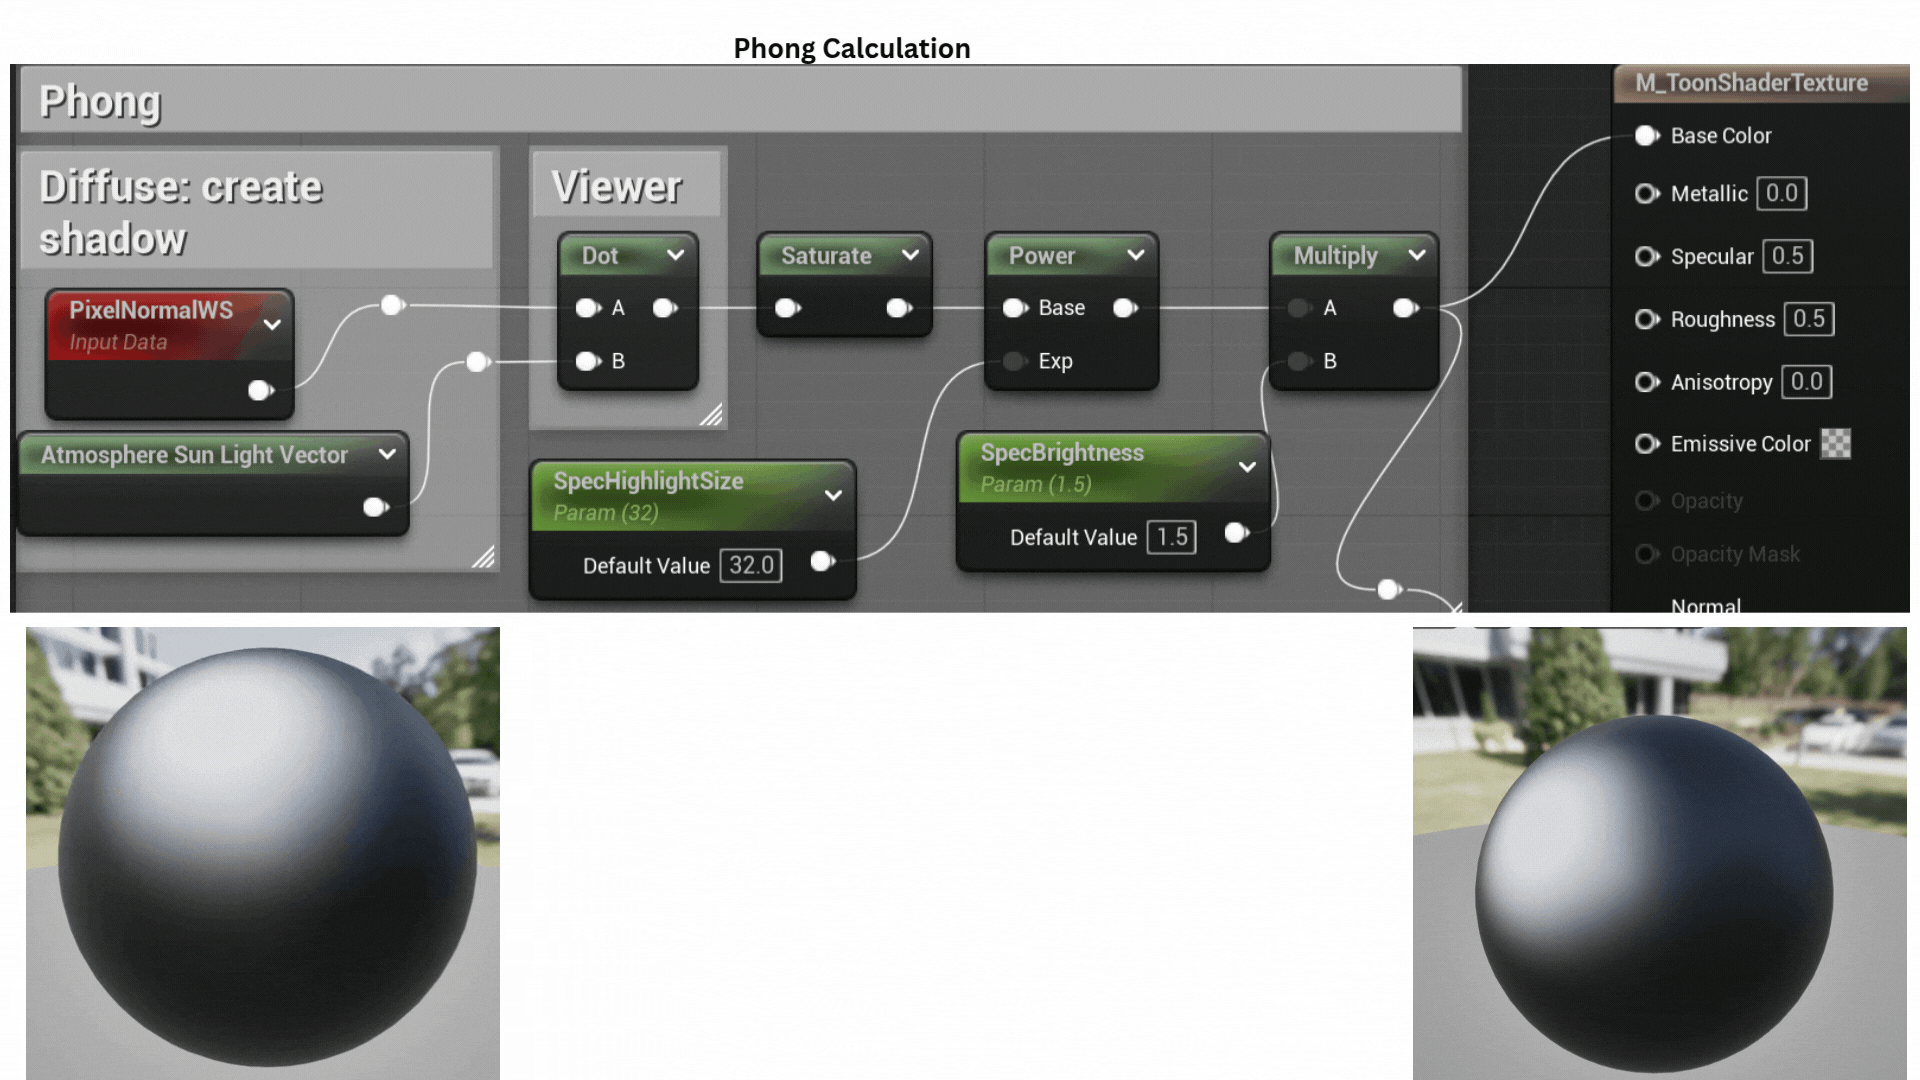
3. A standard Phong model computes diffuse, ambient, and specular components, giving the surface its stylized lighting response while maintaining a simplified, toon-inspired look.
4.A dot product is used to calculate light direction and shadow falloff.
The range is adjusted so the darkest shadows fall near the object’s base. By flooring the range and scaling by a fractional constant (e.g., 0.16), the shader creates discrete grey bands, producing the stylized cel-shaded striping effect.
5. The resulting striped mask is applied to the material’s texture parameter, allowing each material instance to define its own variation while maintaining the same toon-shaded lighting structure.
Postprocessing Tune Outline
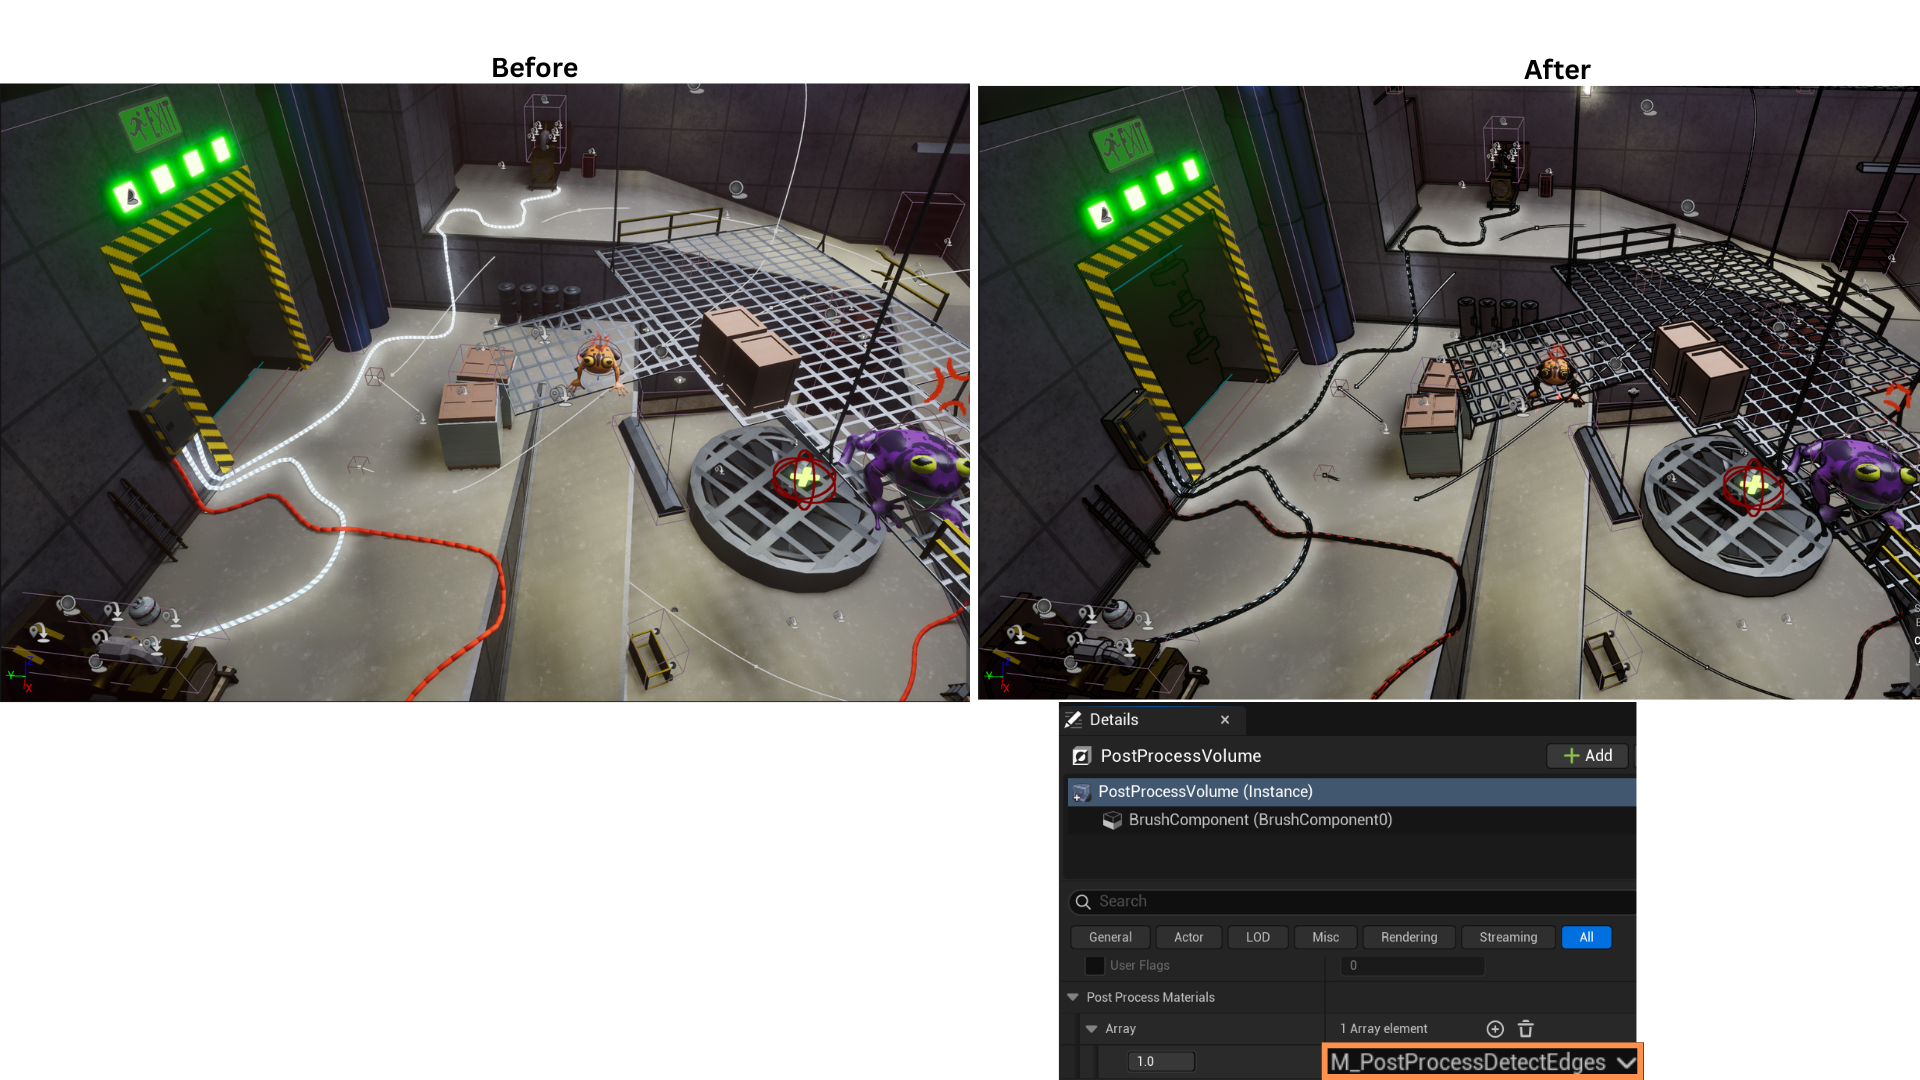
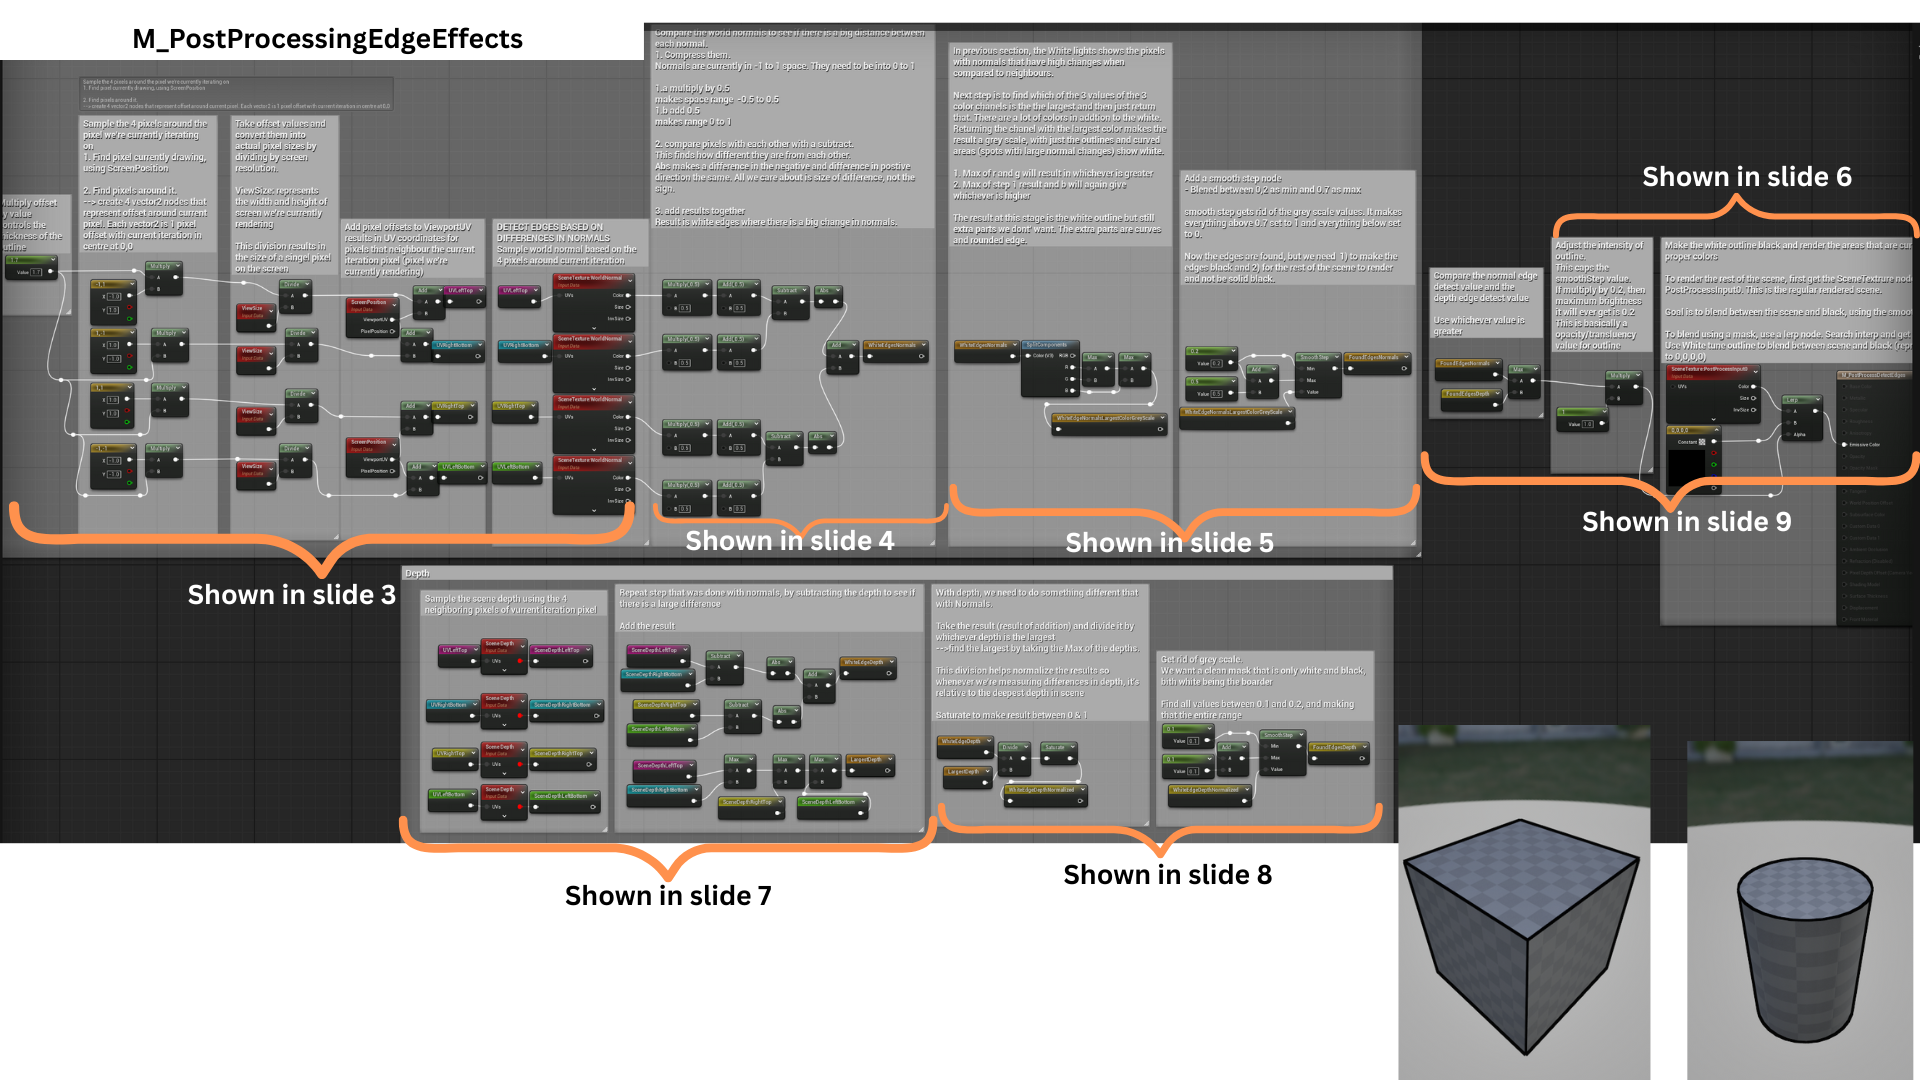
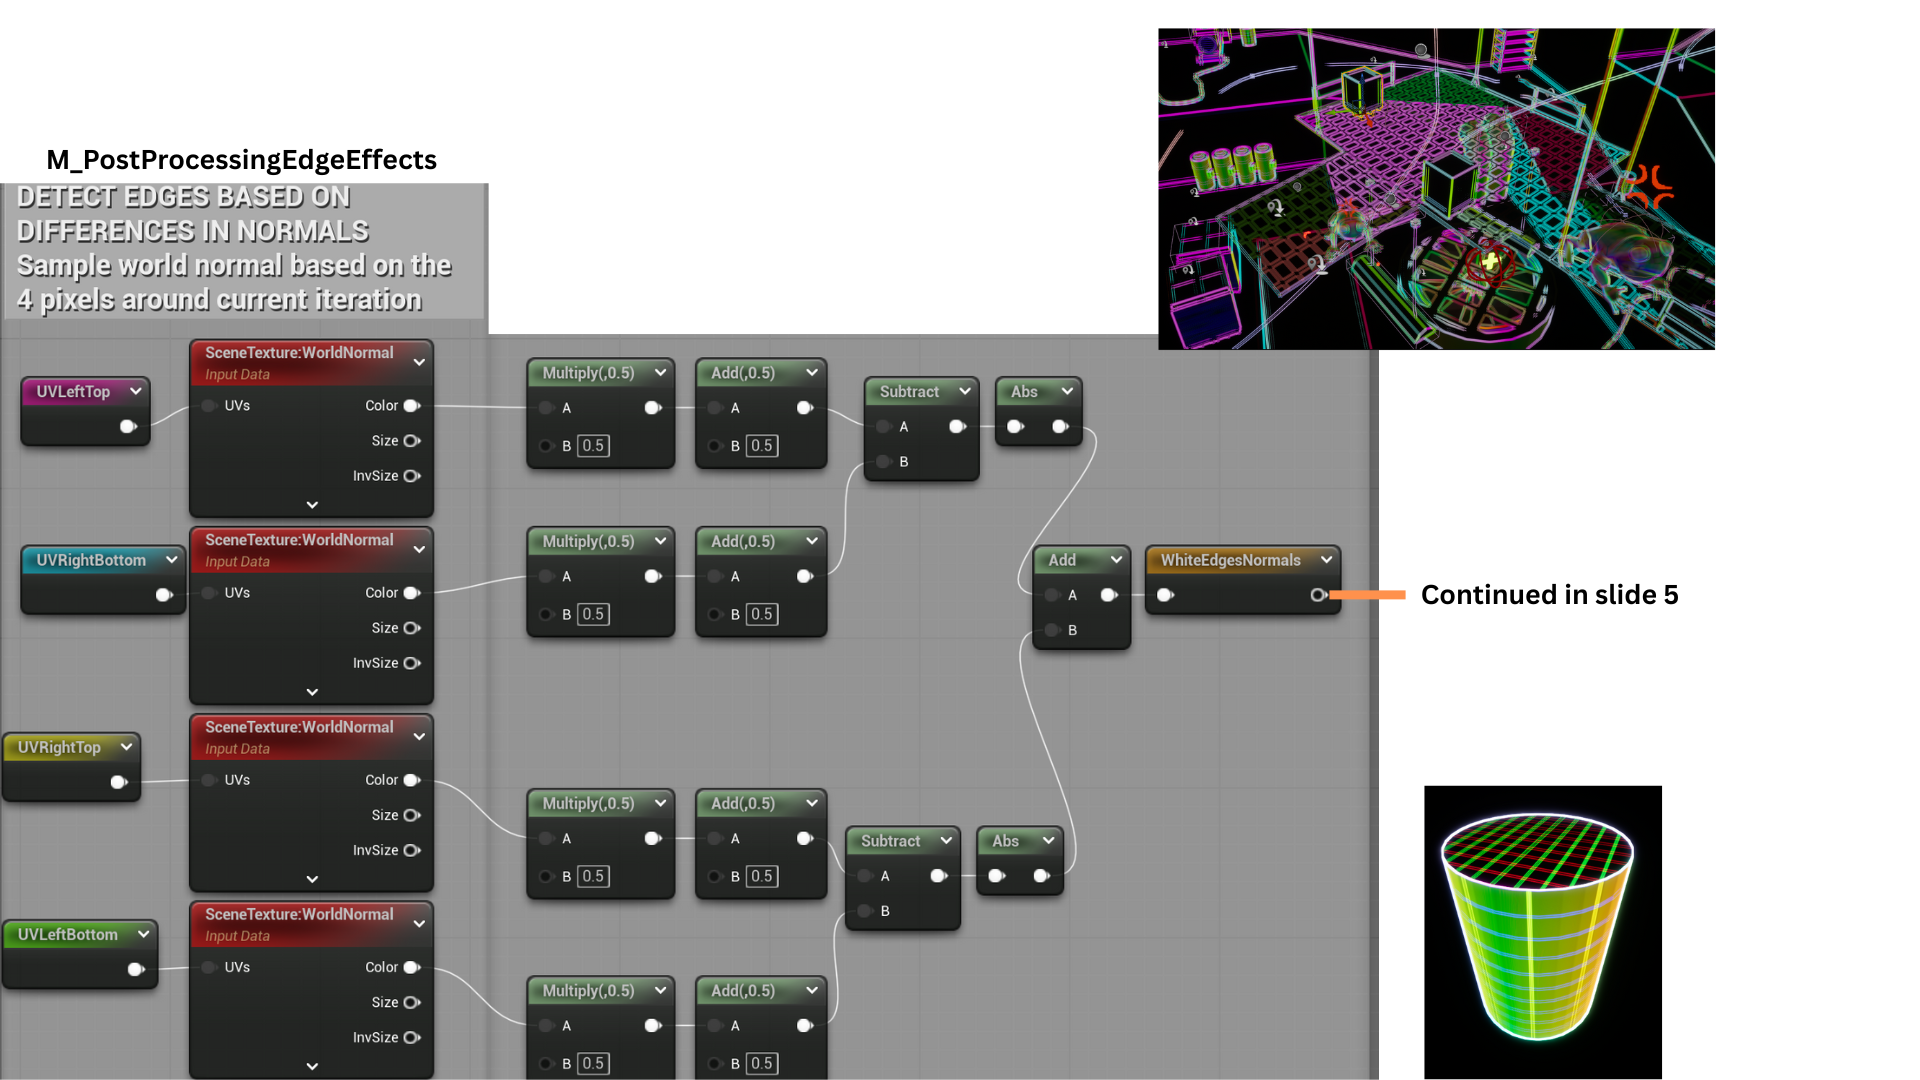
1. A black outline effect is achieved through a post-processing pixel shader using two edge detection techniques.
The first compares normal differences between neighboring pixels, and the second measures variations in scene depth.
The maximum value between both methods determines the final outline intensity, producing clean and dynamic edges.
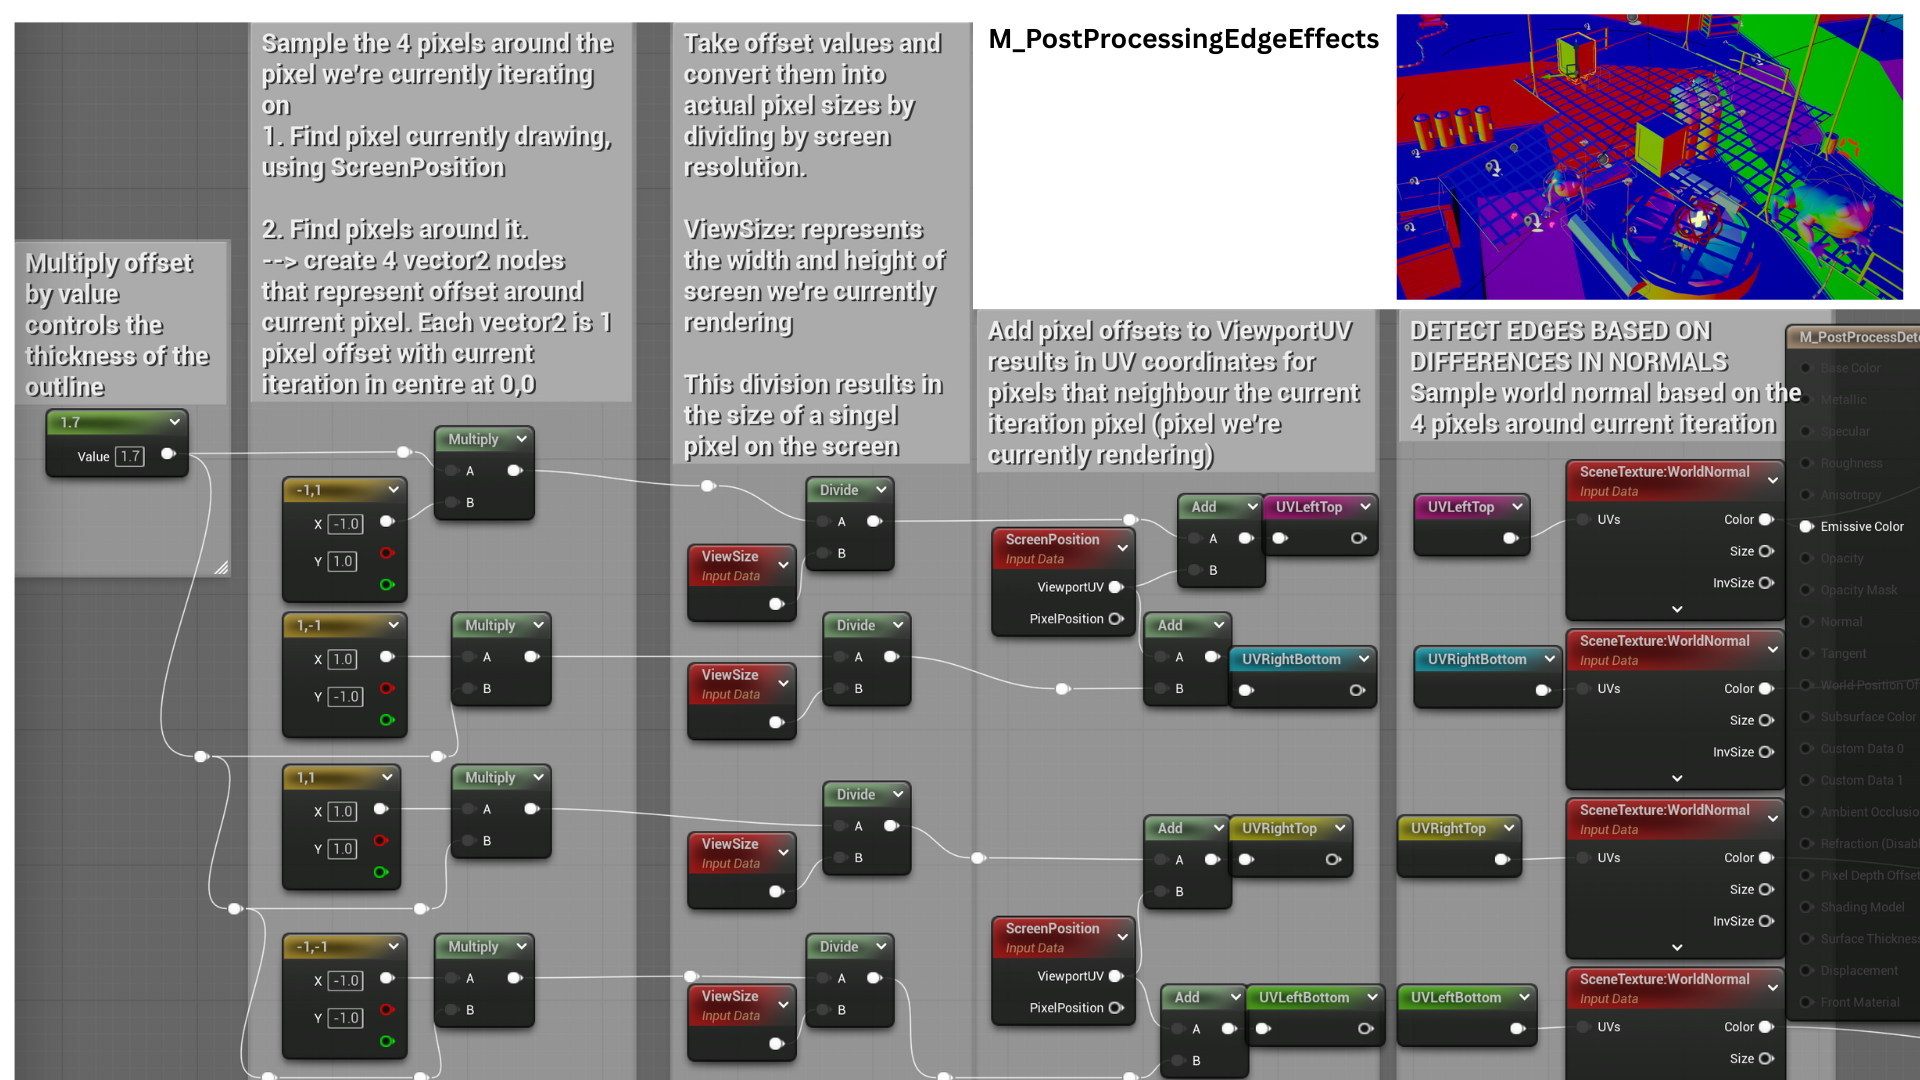
2. The shader first samples the surrounding pixels, then calculates normal and depth differences for each neighboring pixel. These calculations feed into the two edge detection passes—one based on normals and one based on scene depth.
3. Four Vector2 offsets define pixel sampling positions (up, down, left, and right). These are scaled by a line thickness parameter and normalized by the screen resolution to represent one pixel in UV space.
Sampling SceneTexture:WorldNormal at these UVs retrieves normal data for the neighboring pixels, used in edge comparison.
4. Normal vectors are remapped from a -1–1 range to 0–1 for accurate comparison.
The differences between opposing samples (top-bottom and left-right) are calculated, their absolute values summed, and the result highlights strong normal variations as white edges.
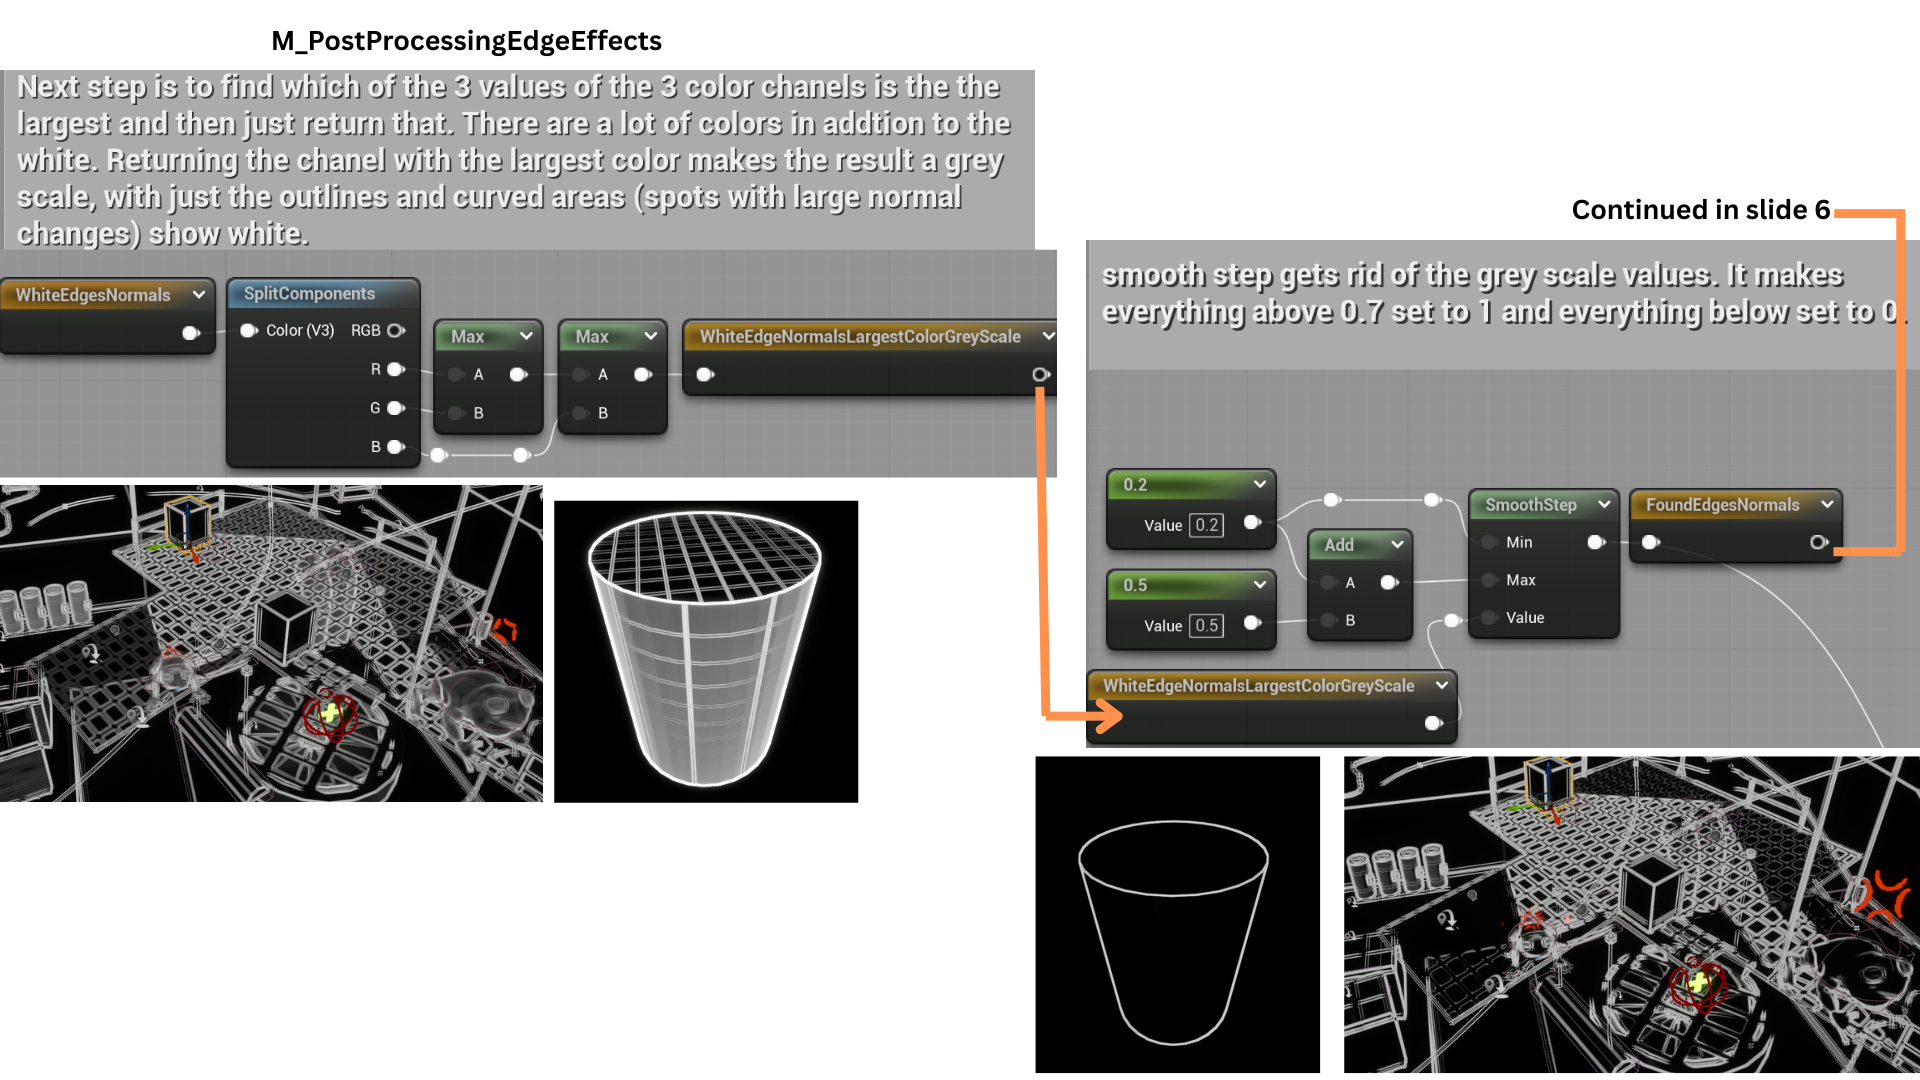
5. The shader isolates edges by selecting the maximum channel value among the RGB components, converting the result to greyscale.
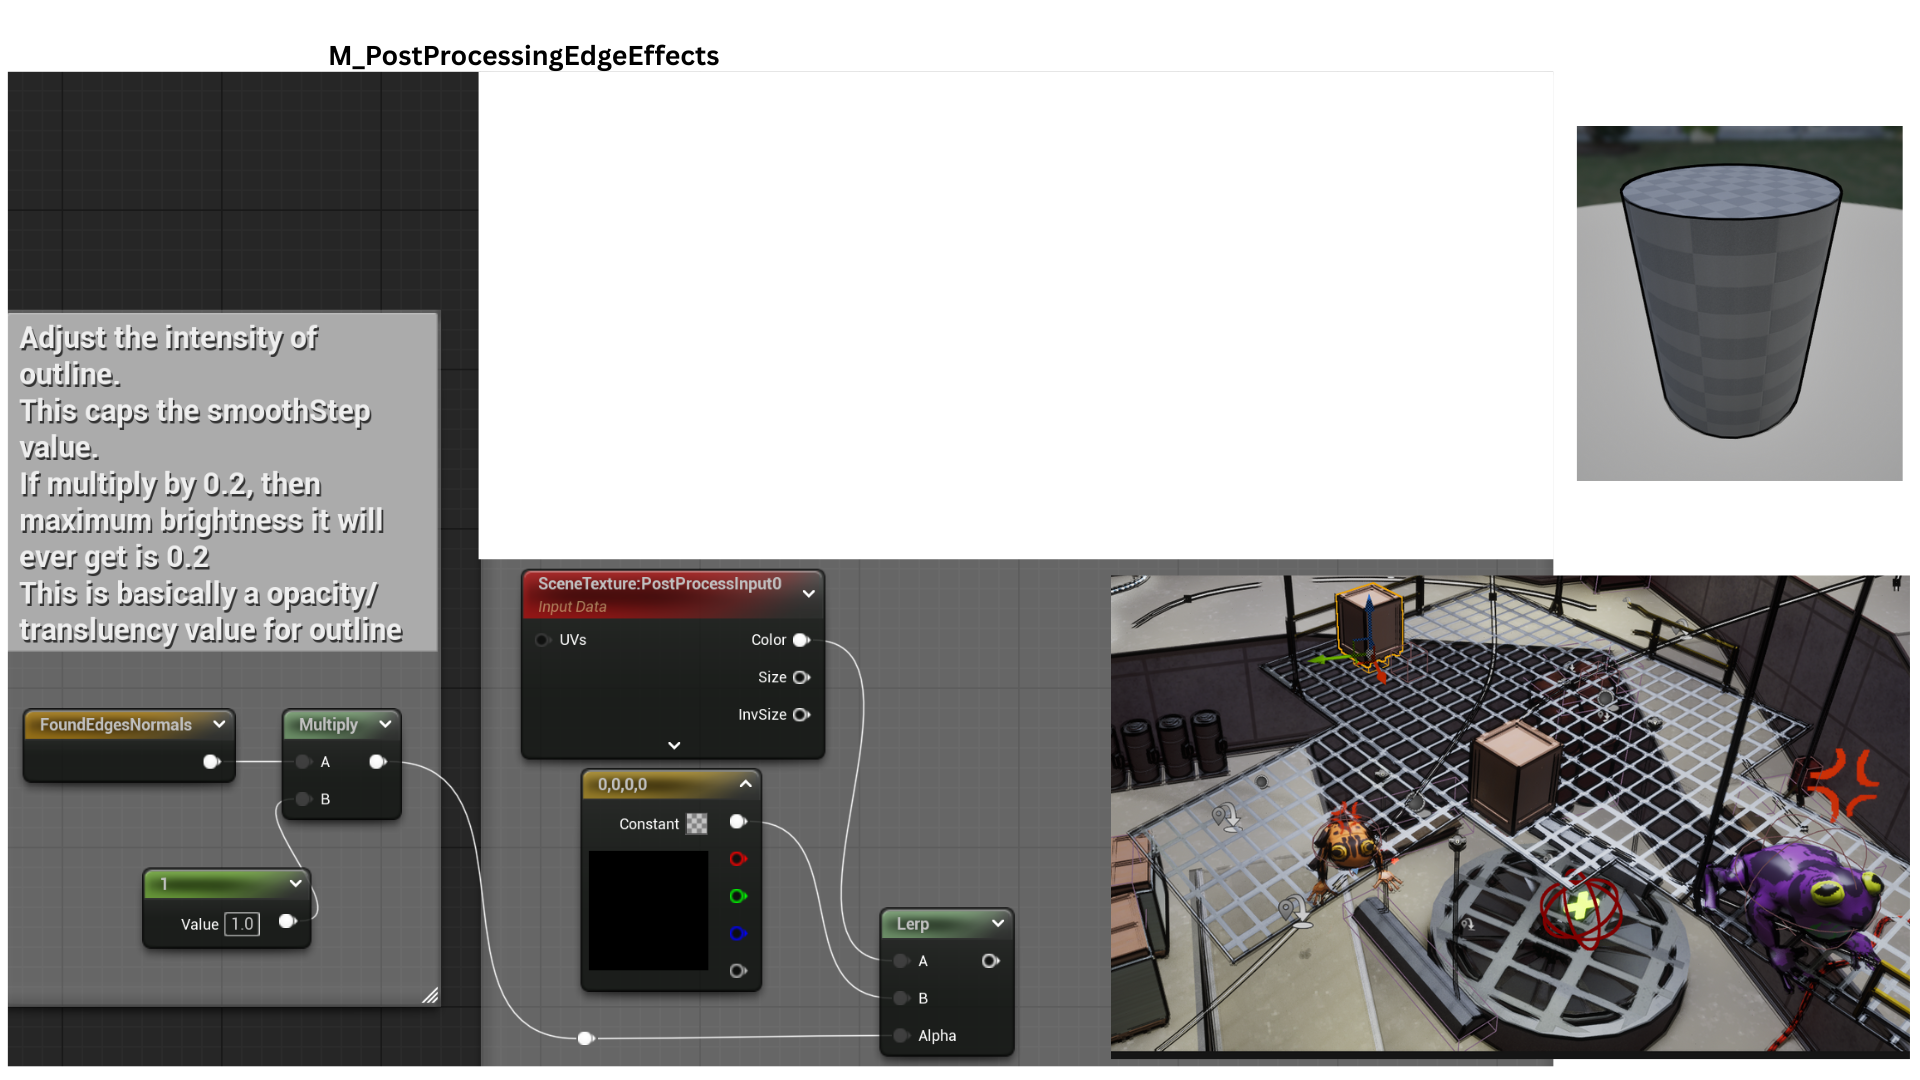
A SmoothStep function thresholds the output between 0.2 and 0.7, eliminating mid-range values to produce a clean black-and-white edge mask, removing noise from curved surfaces.
6. The resulting FoundEdgeNormals mask now contains clean white outlines derived from normal differences.
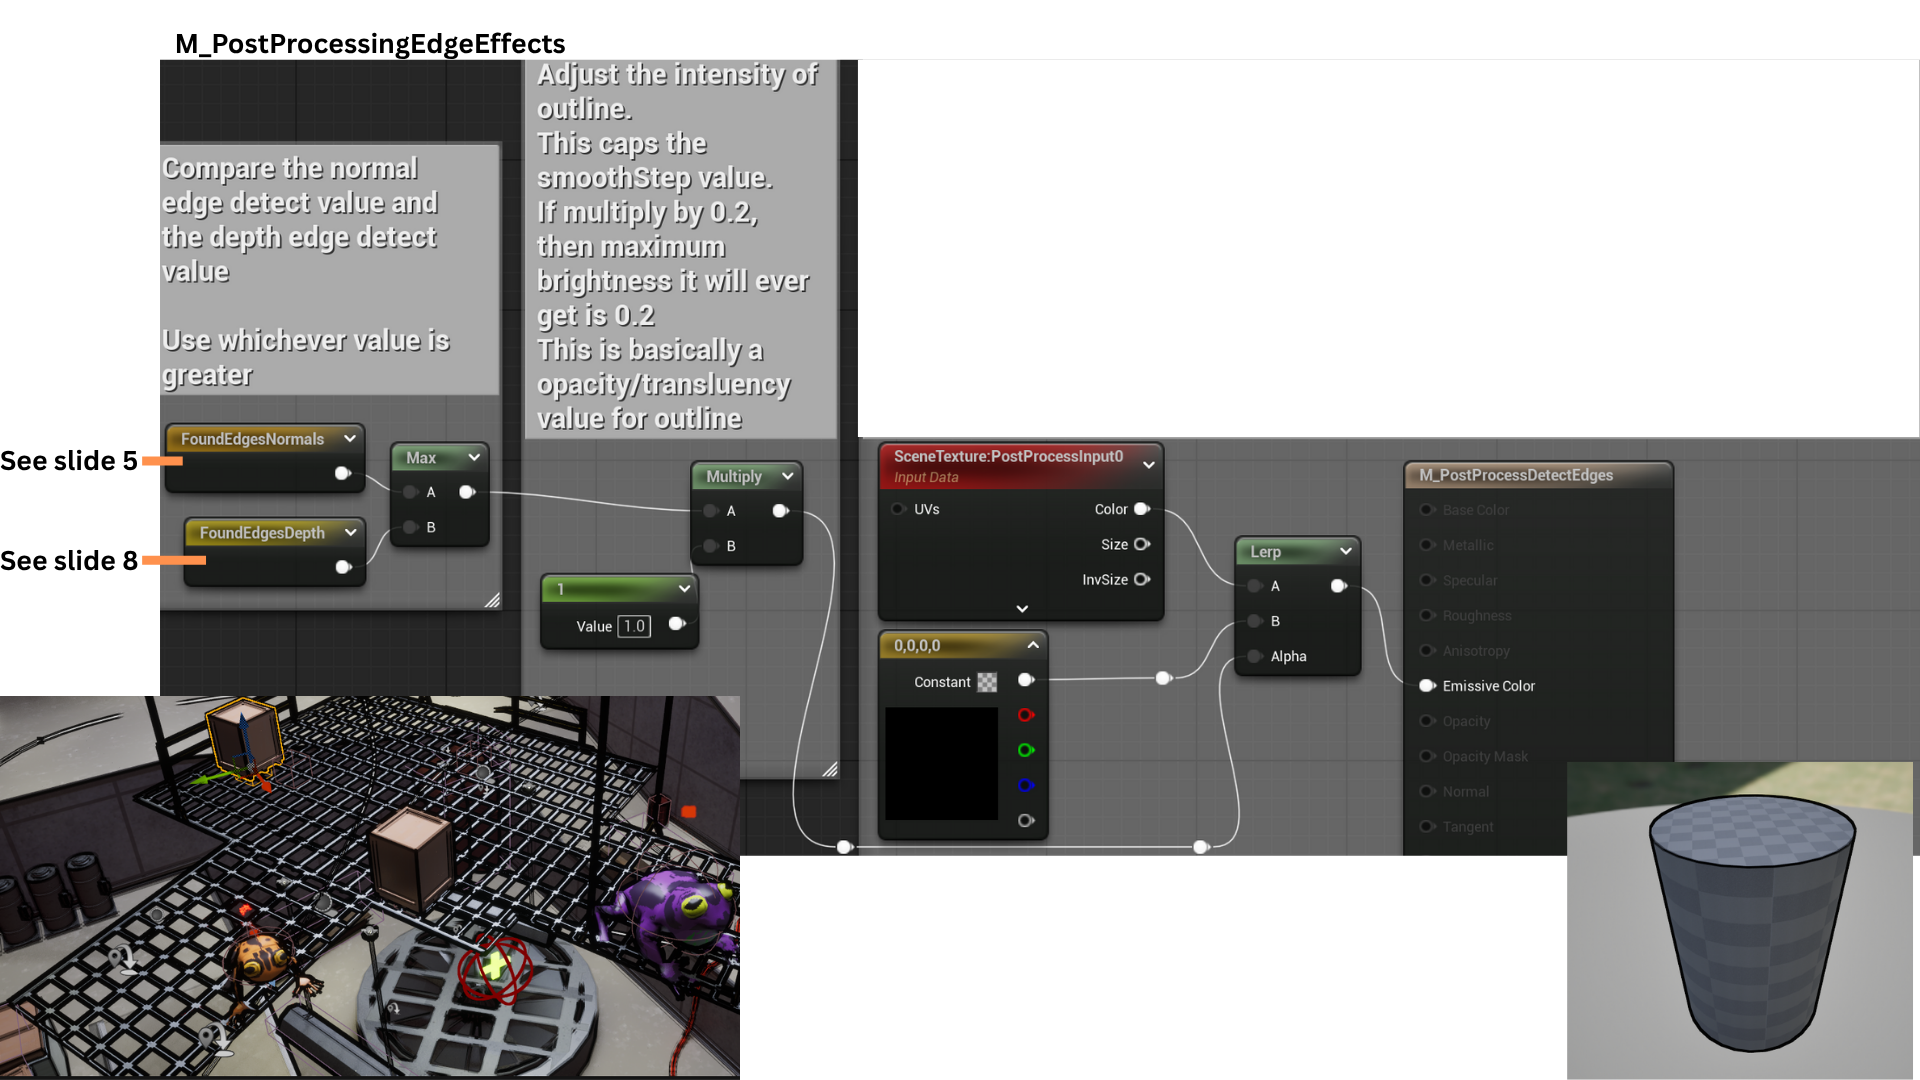
This mask is used as the alpha in a lerp between black and the unaltered scene texture, overlaying black outlines onto the render.
This concludes the first edge detection technique.
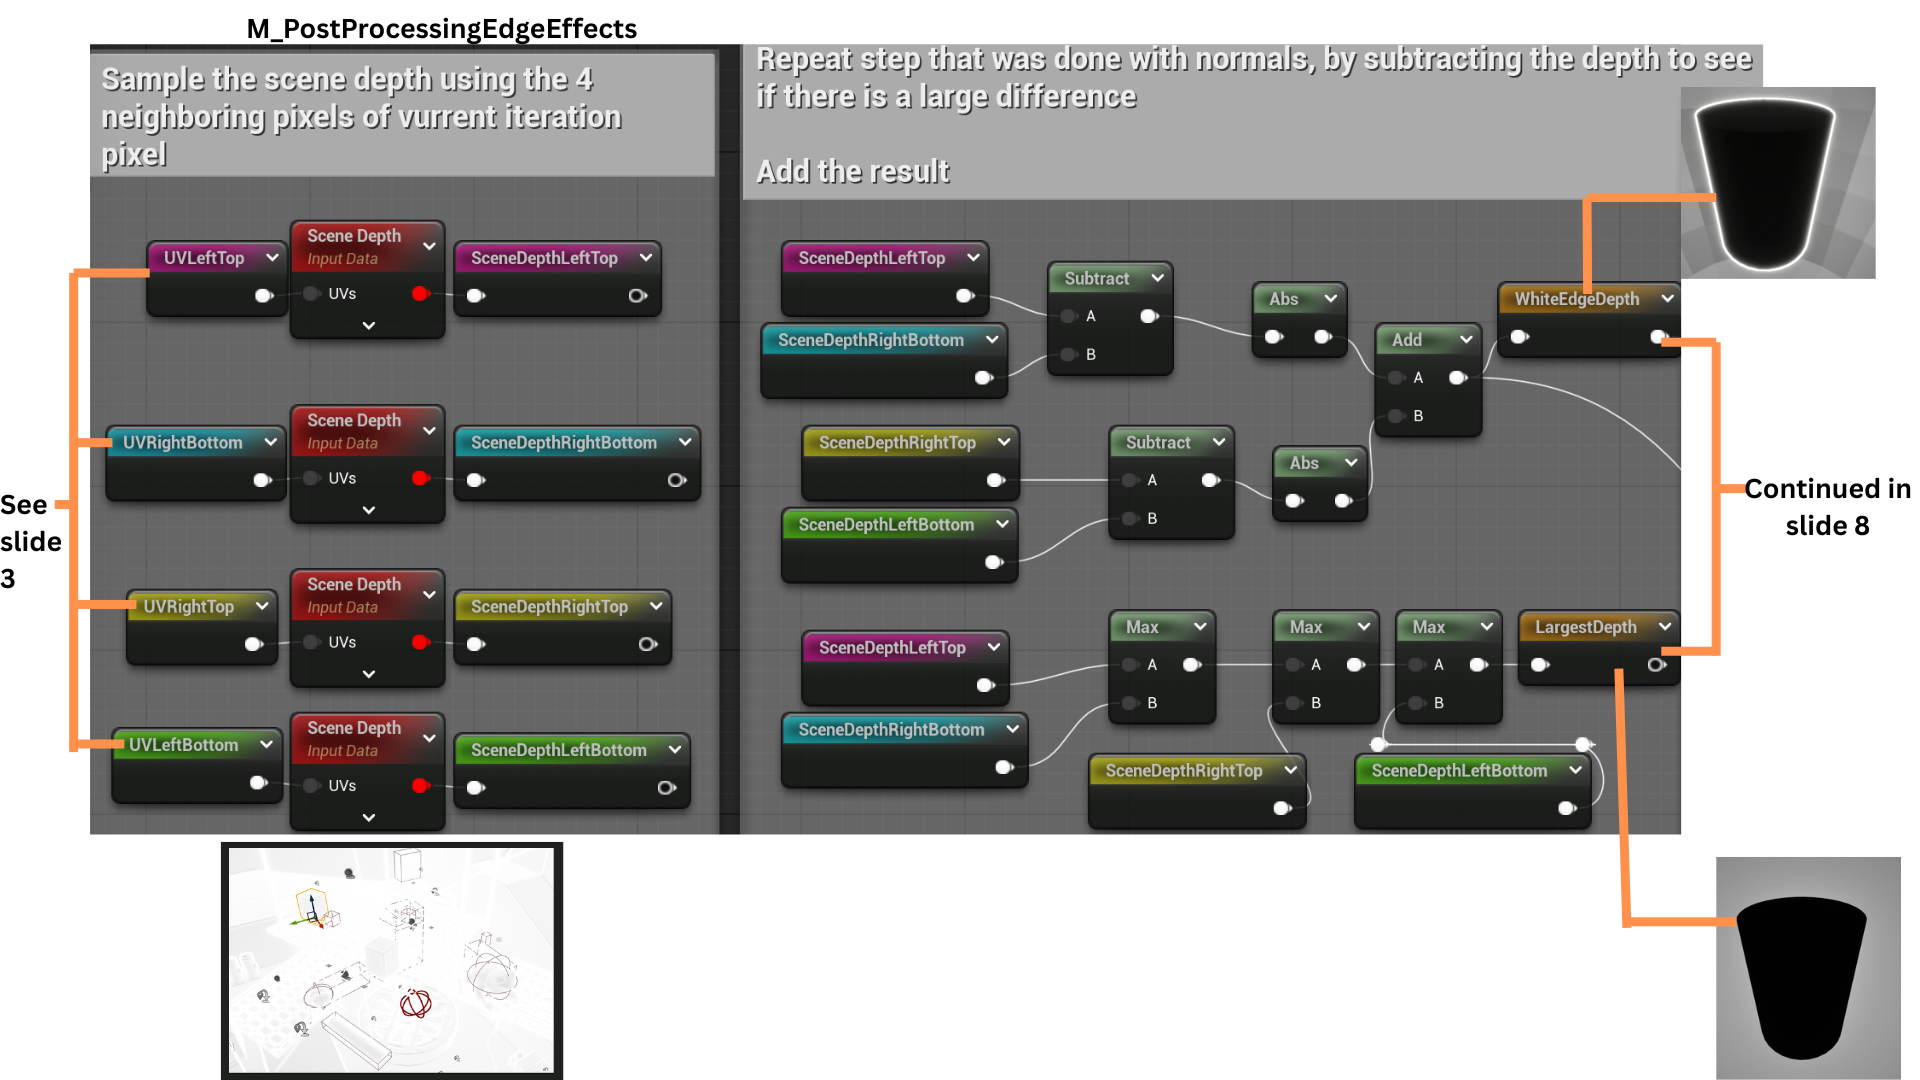
7. The same offset UVs are used to sample SceneDepth, comparing neighboring pixels to detect significant depth changes.
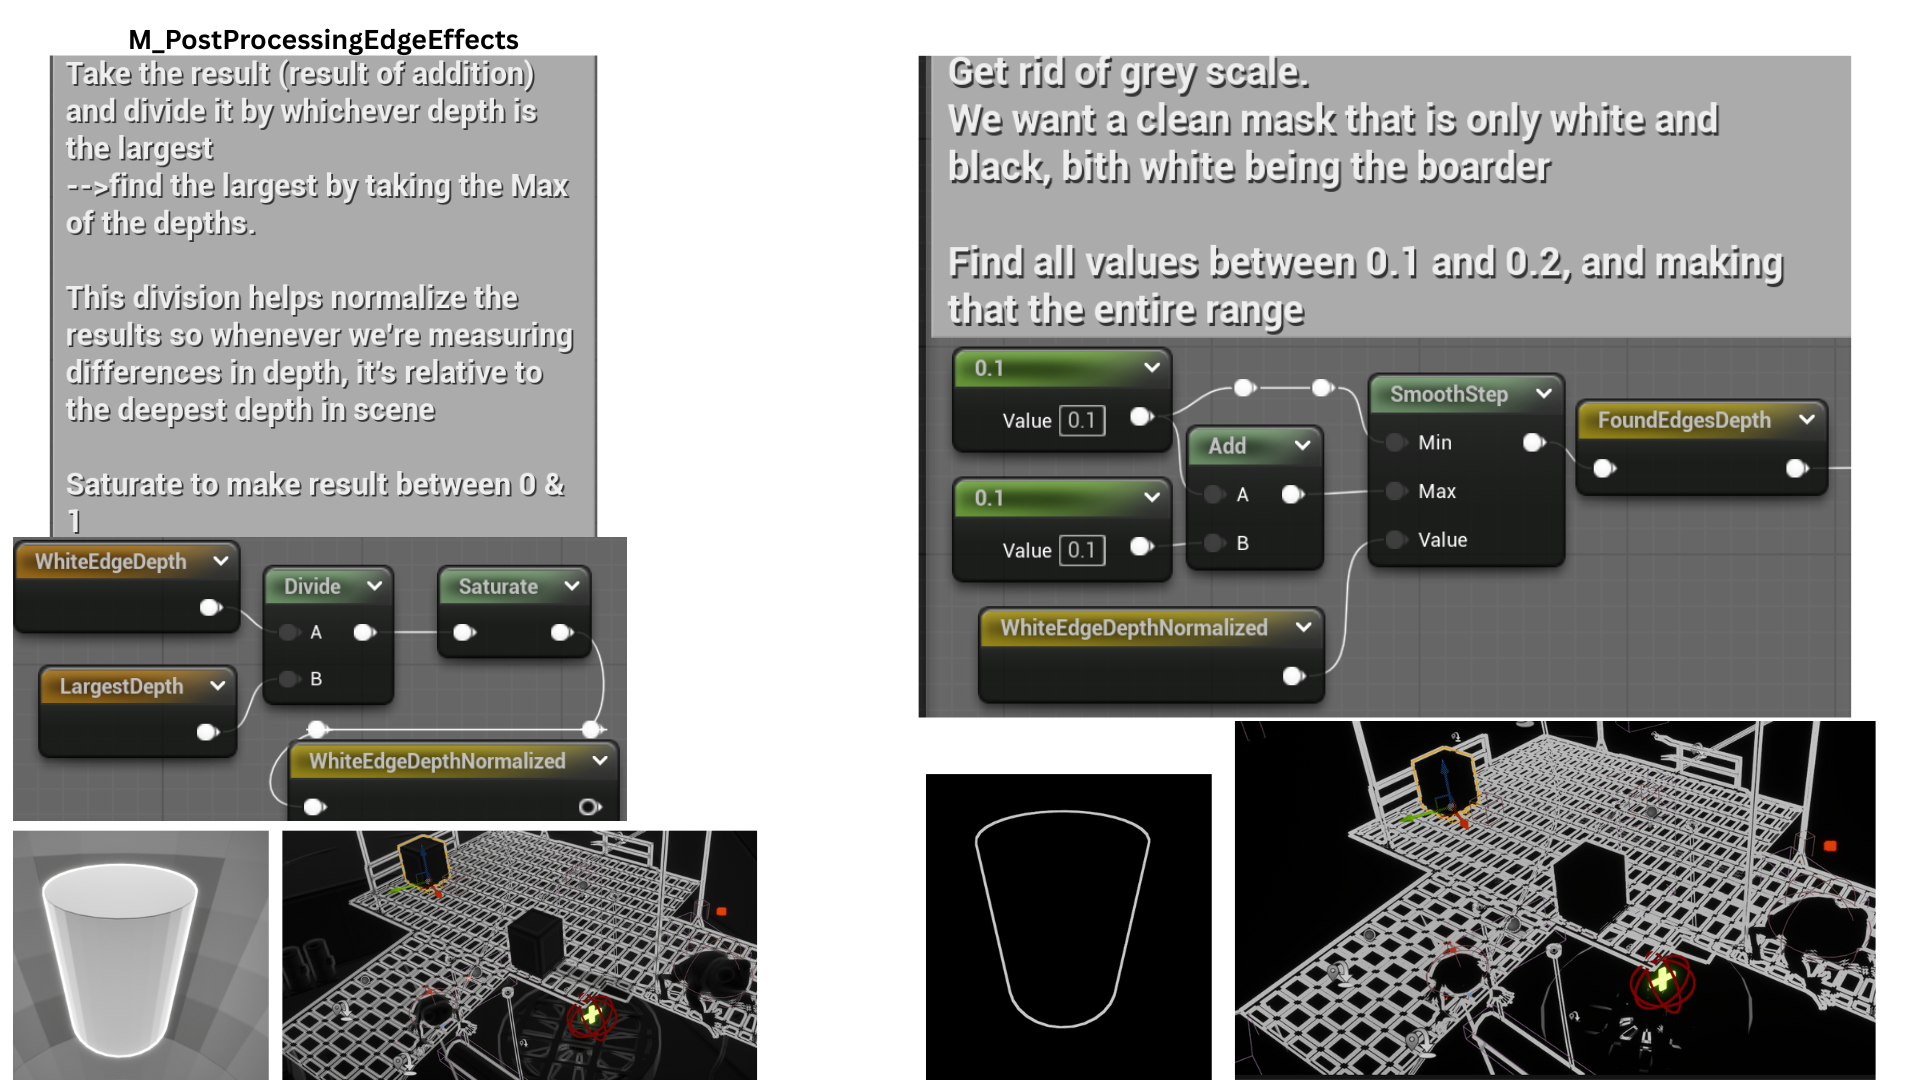
The max of all four depths is calculated and passed as LargestDepth.
8. Divide WhiteEdgeDepth is divided by LargestDepth to normalize the result making the differences in depth relative to the deepest depth in scene.
A smooth step gives clean separation of the lines.
9. The normal-based and depth-based edge masks are combined using a max function, ensuring all detected edges are included in the final outline.
Acid Bubble Attack
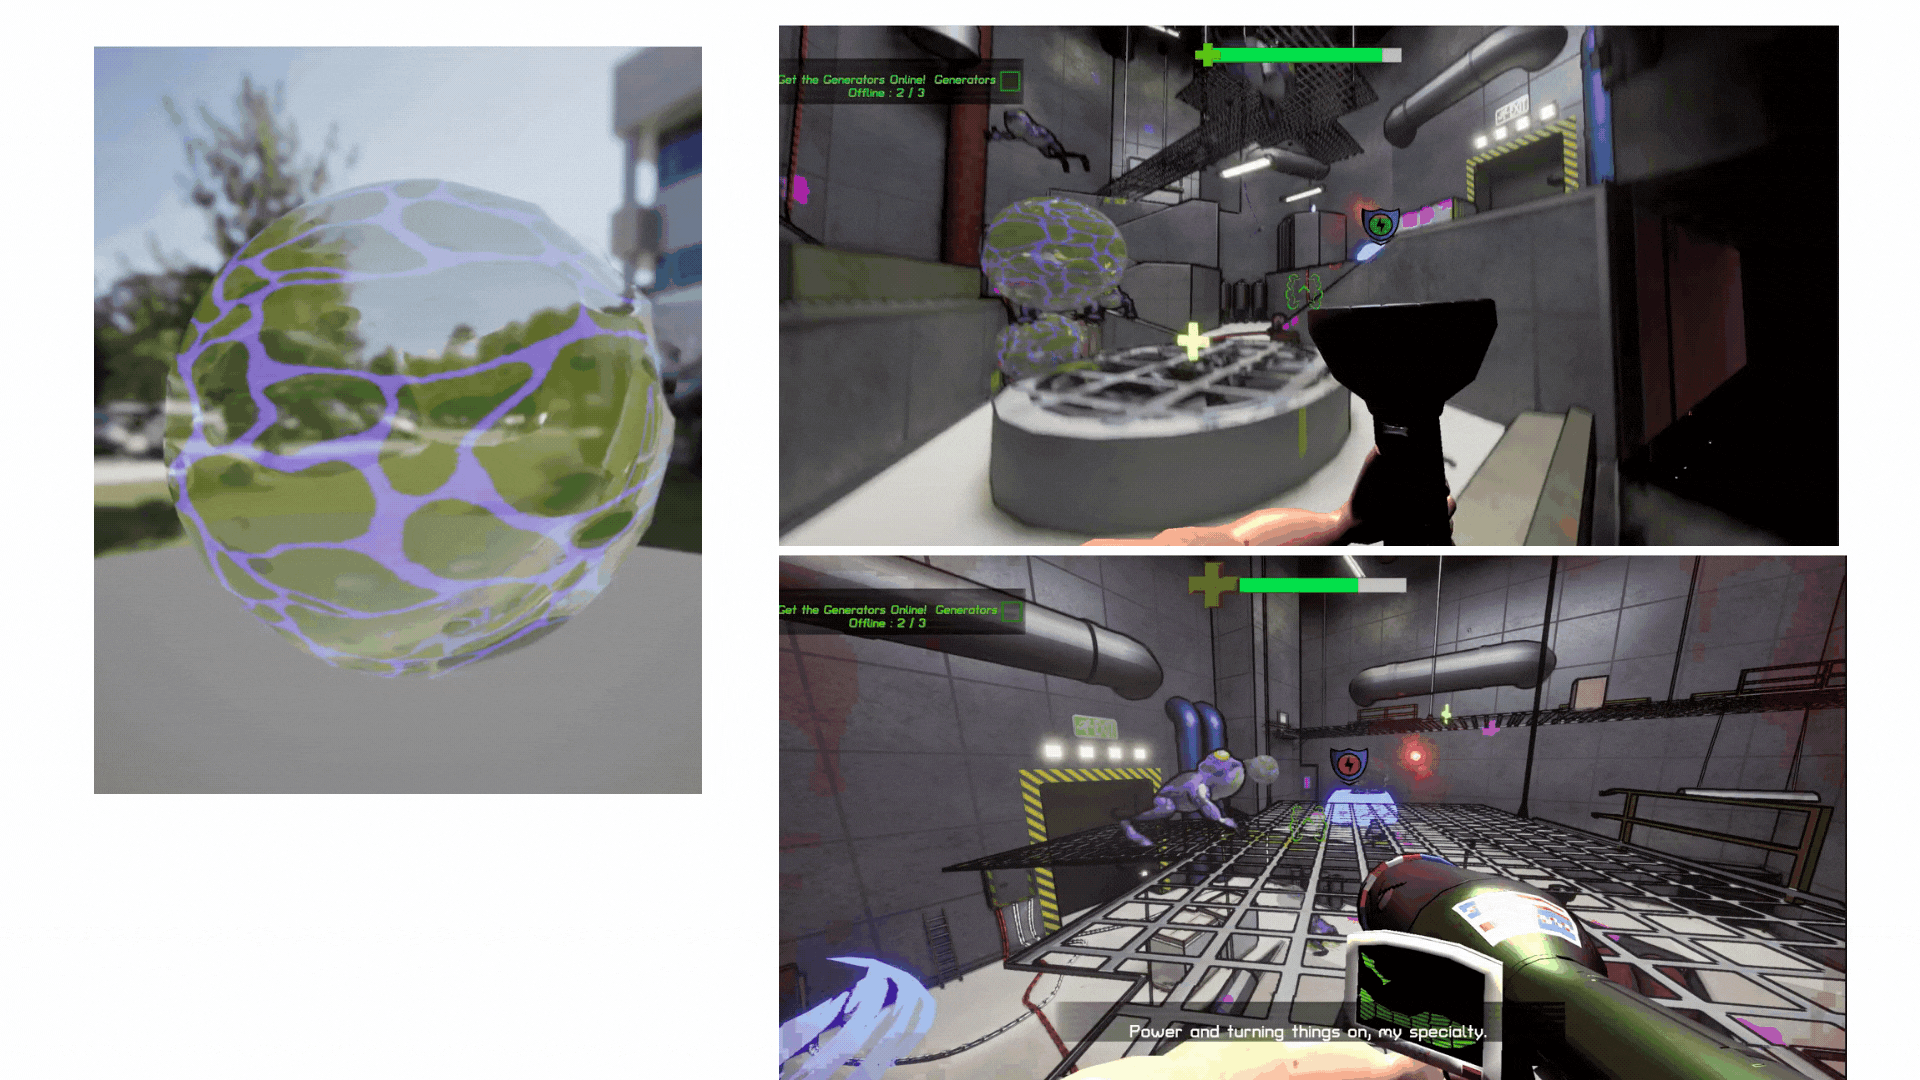
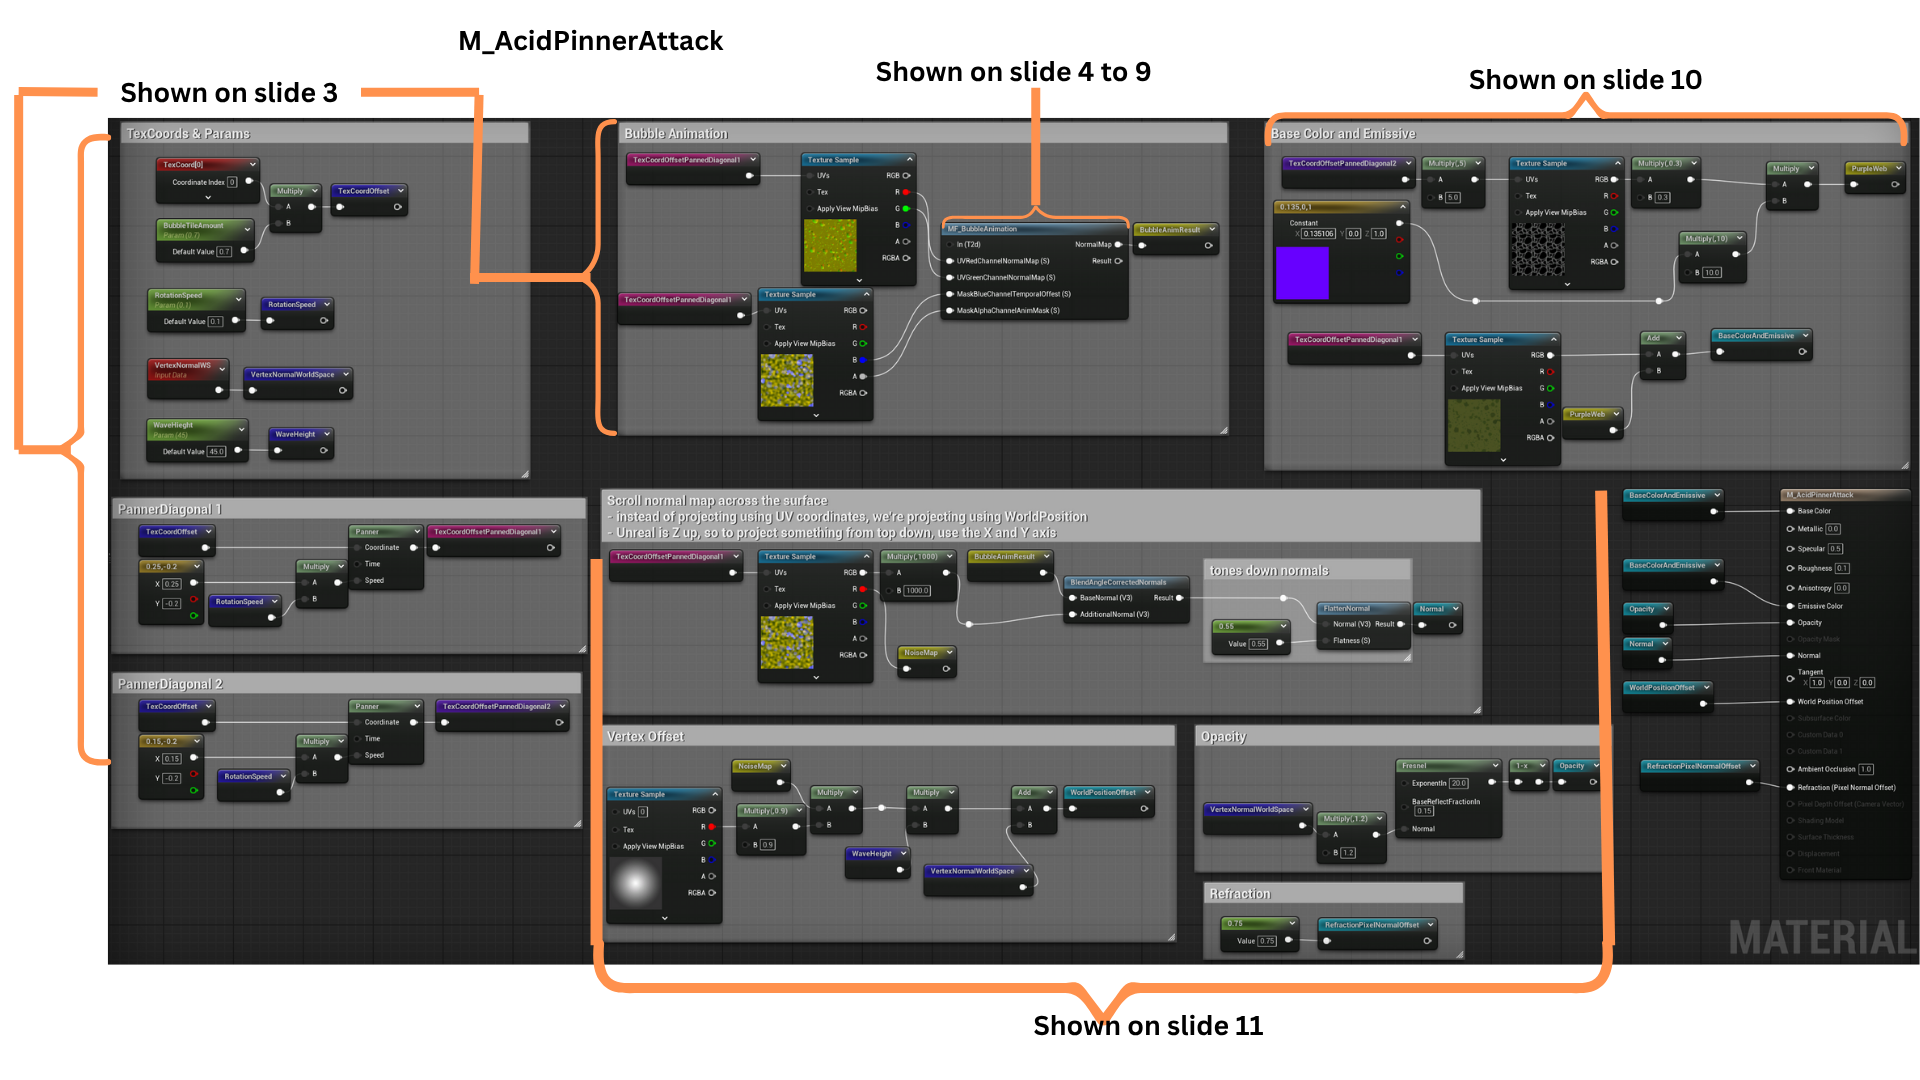
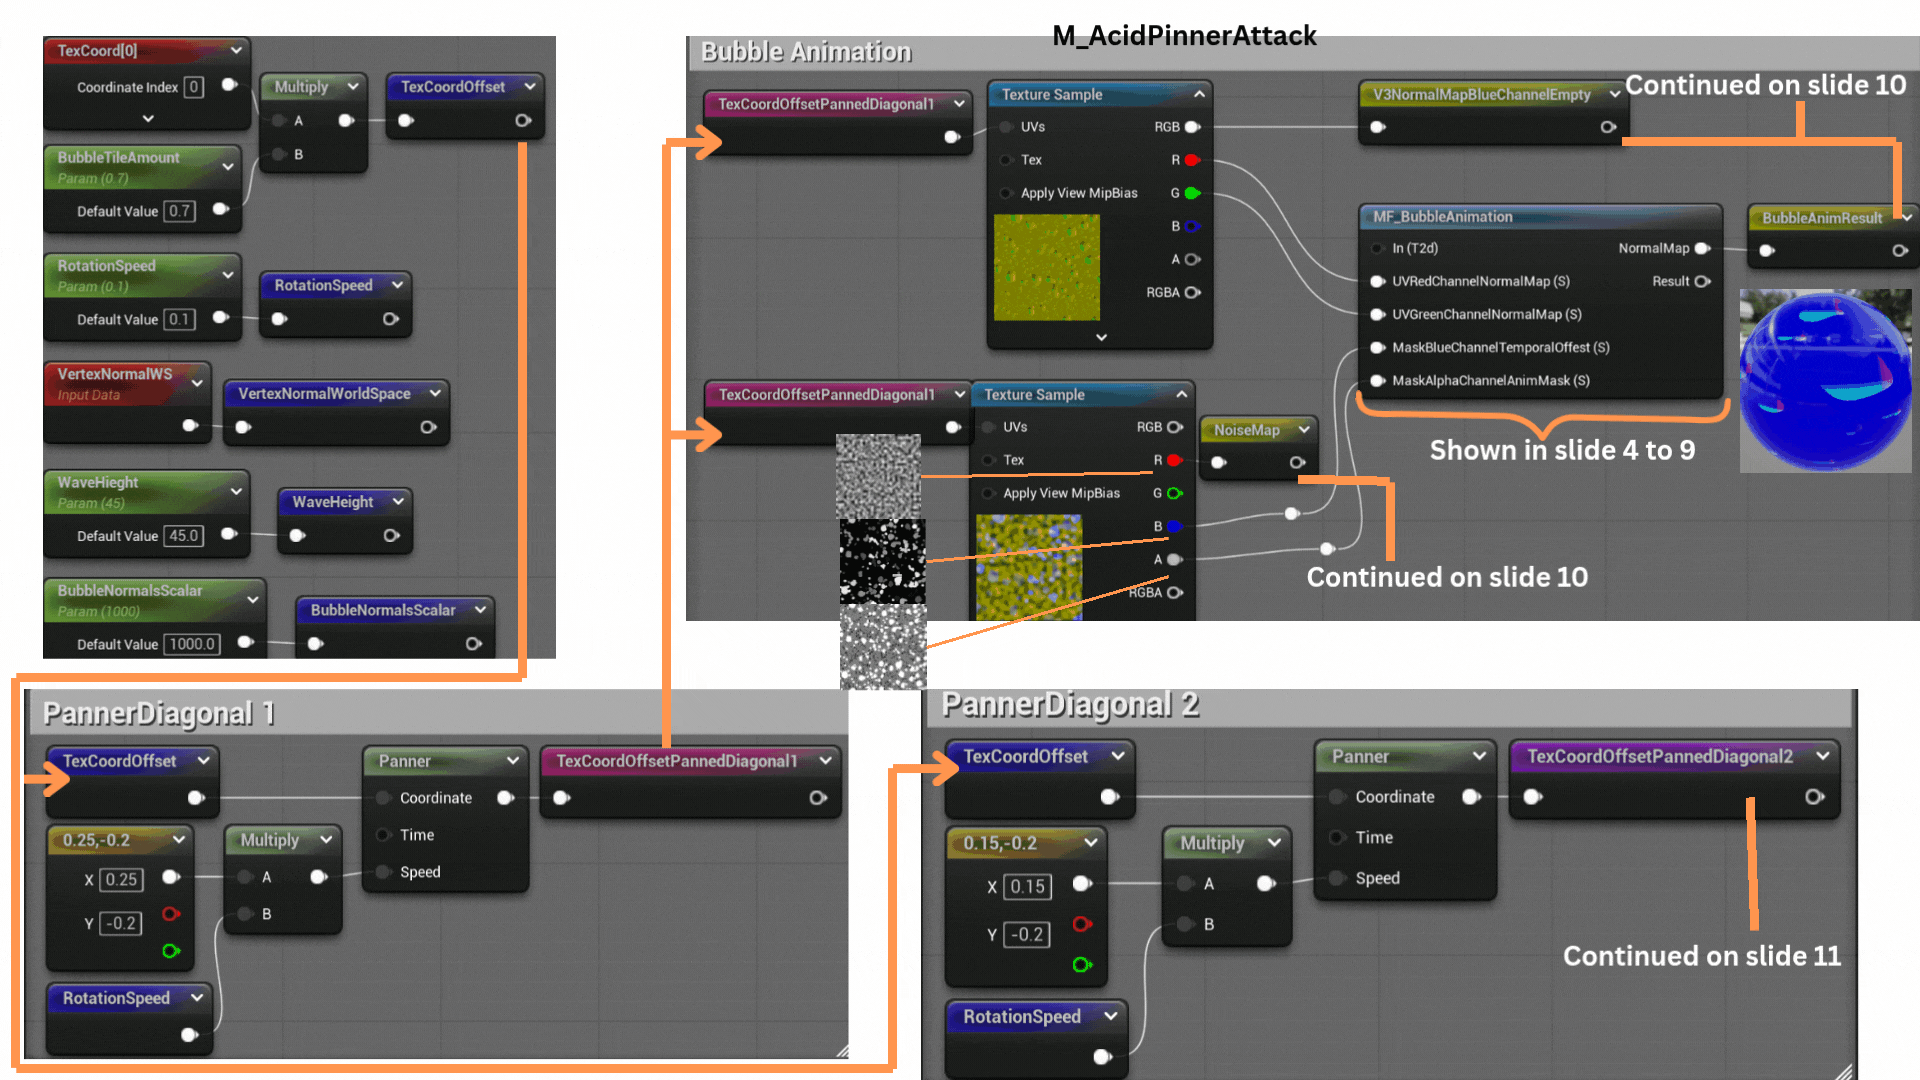

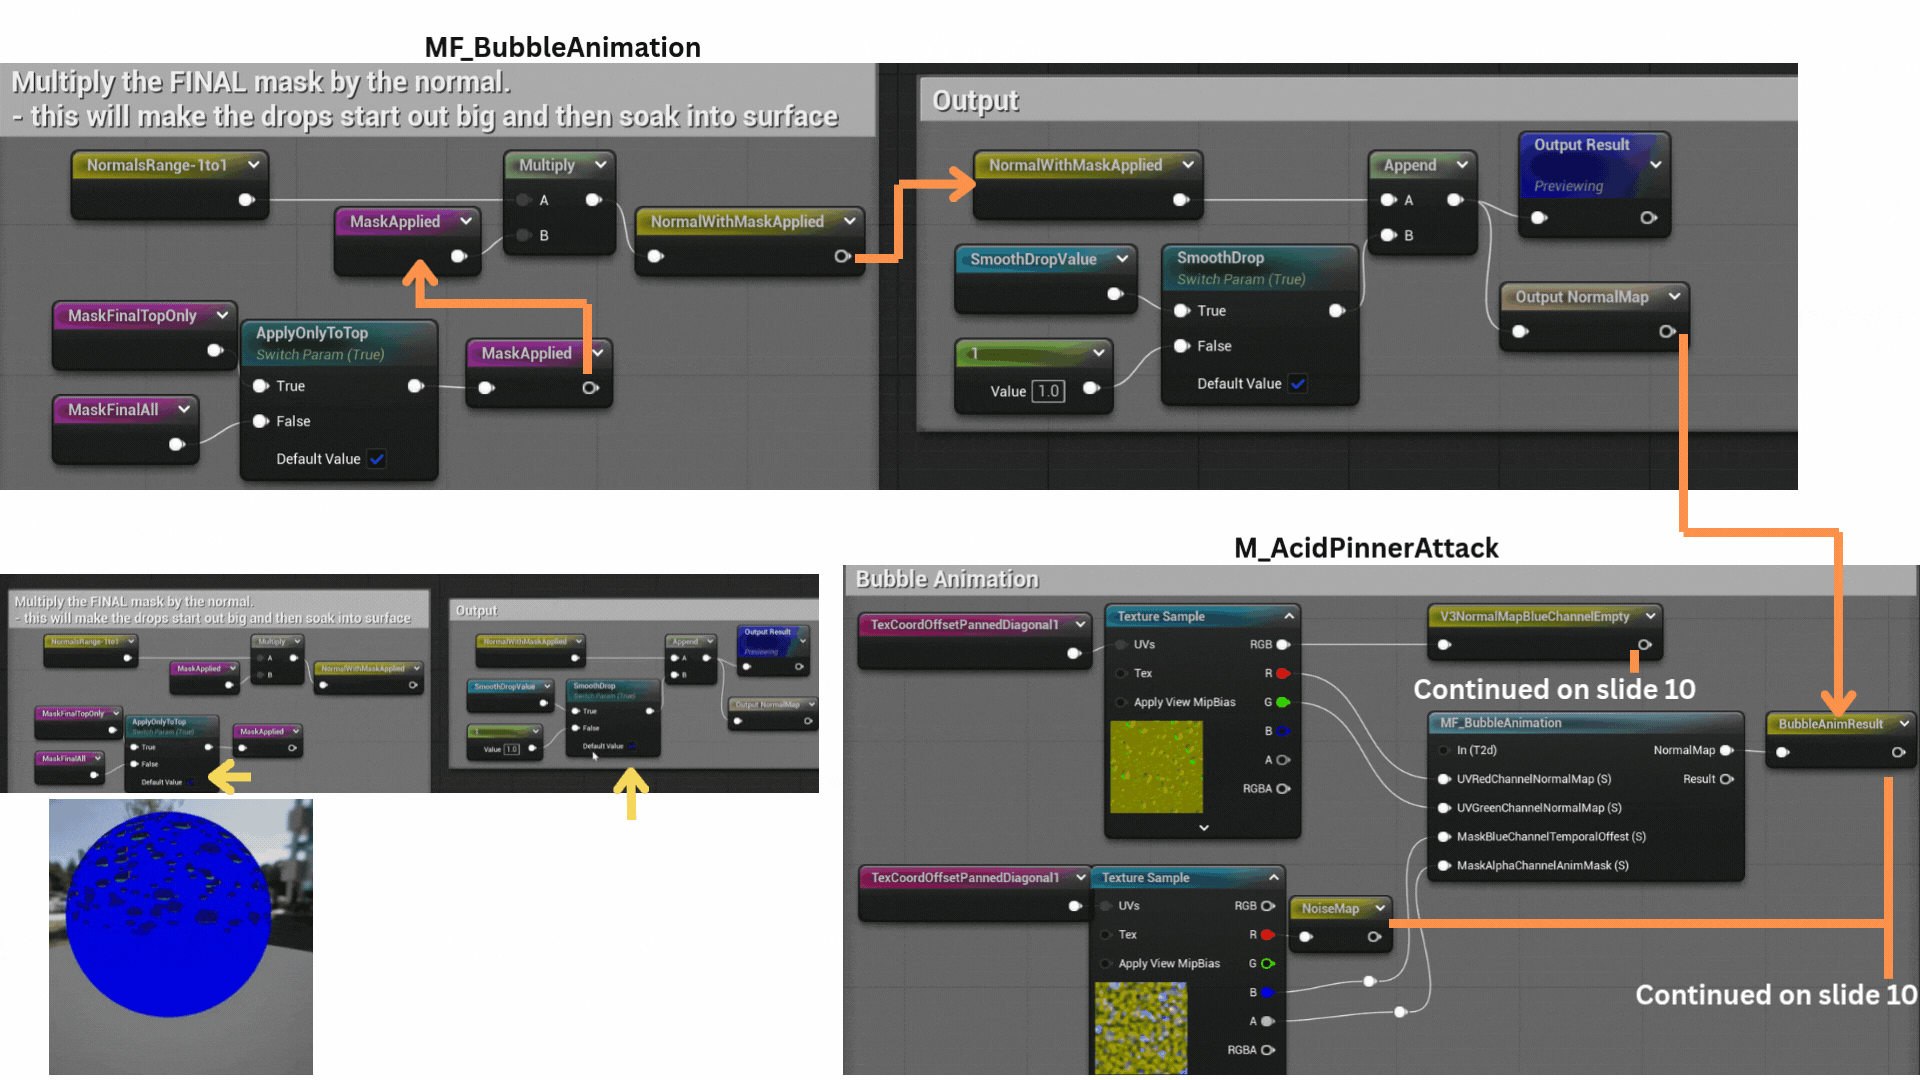
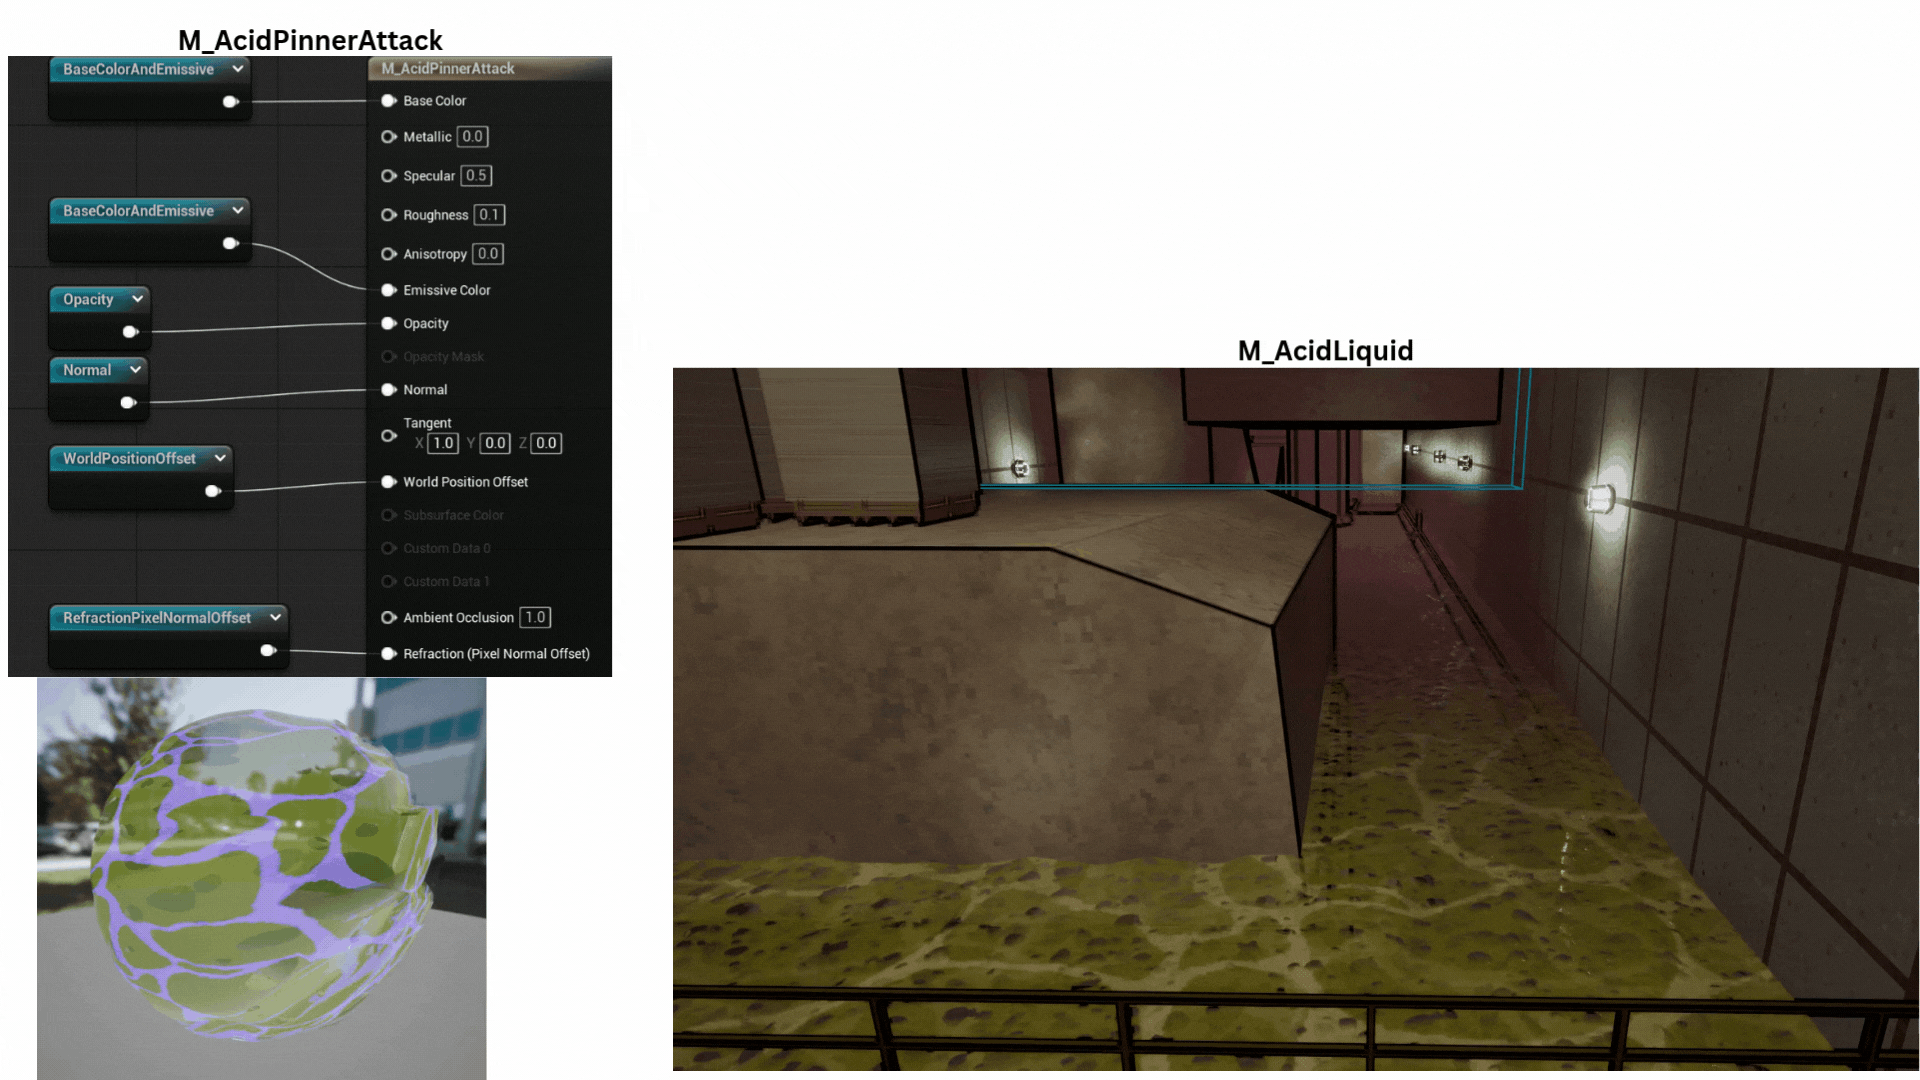
1. The “Pinner” frog’s acid bubble uses a custom vertex and pixel shader.
A shared material function drives the bubbling animation, creating the illusion of surface tension and popping bubbles. This function is also reused in the Acid Liquid shader for consistent visual behavior.
2. The left section defines shader parameters and two independently panned TexCoords.
The central code handles bubble animation through the shared material function, while the right section generates the purple subsurface web and emissive color.
The lower nodes enhance normal intensity for popping bubbles and drive vertex displacement for side wave motion.
3. TexCoords are tiled using BubbleTileAmount and animated diagonally at a rate set by RotationSpeed. These coordinates drive normal and noise textures that determine bubble pop timing.
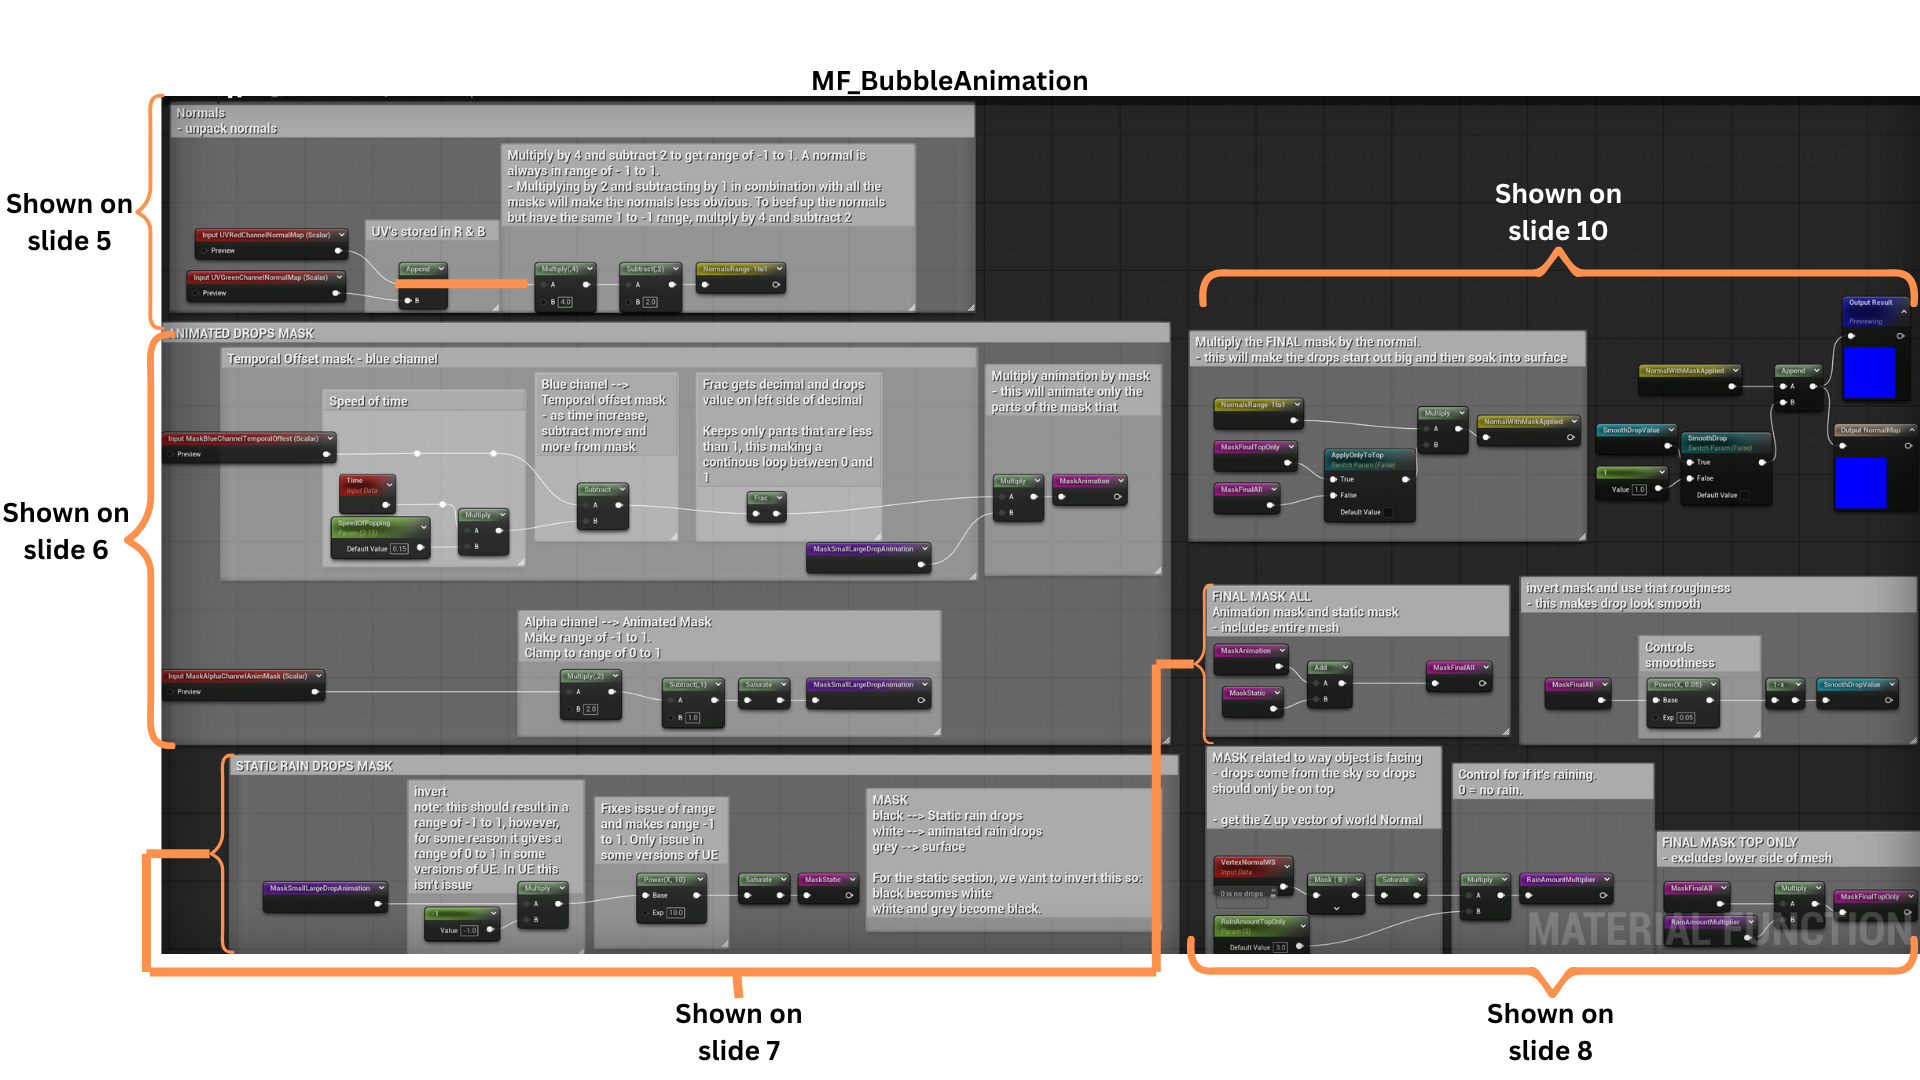
4. The upper-left section generates the animated normal map.
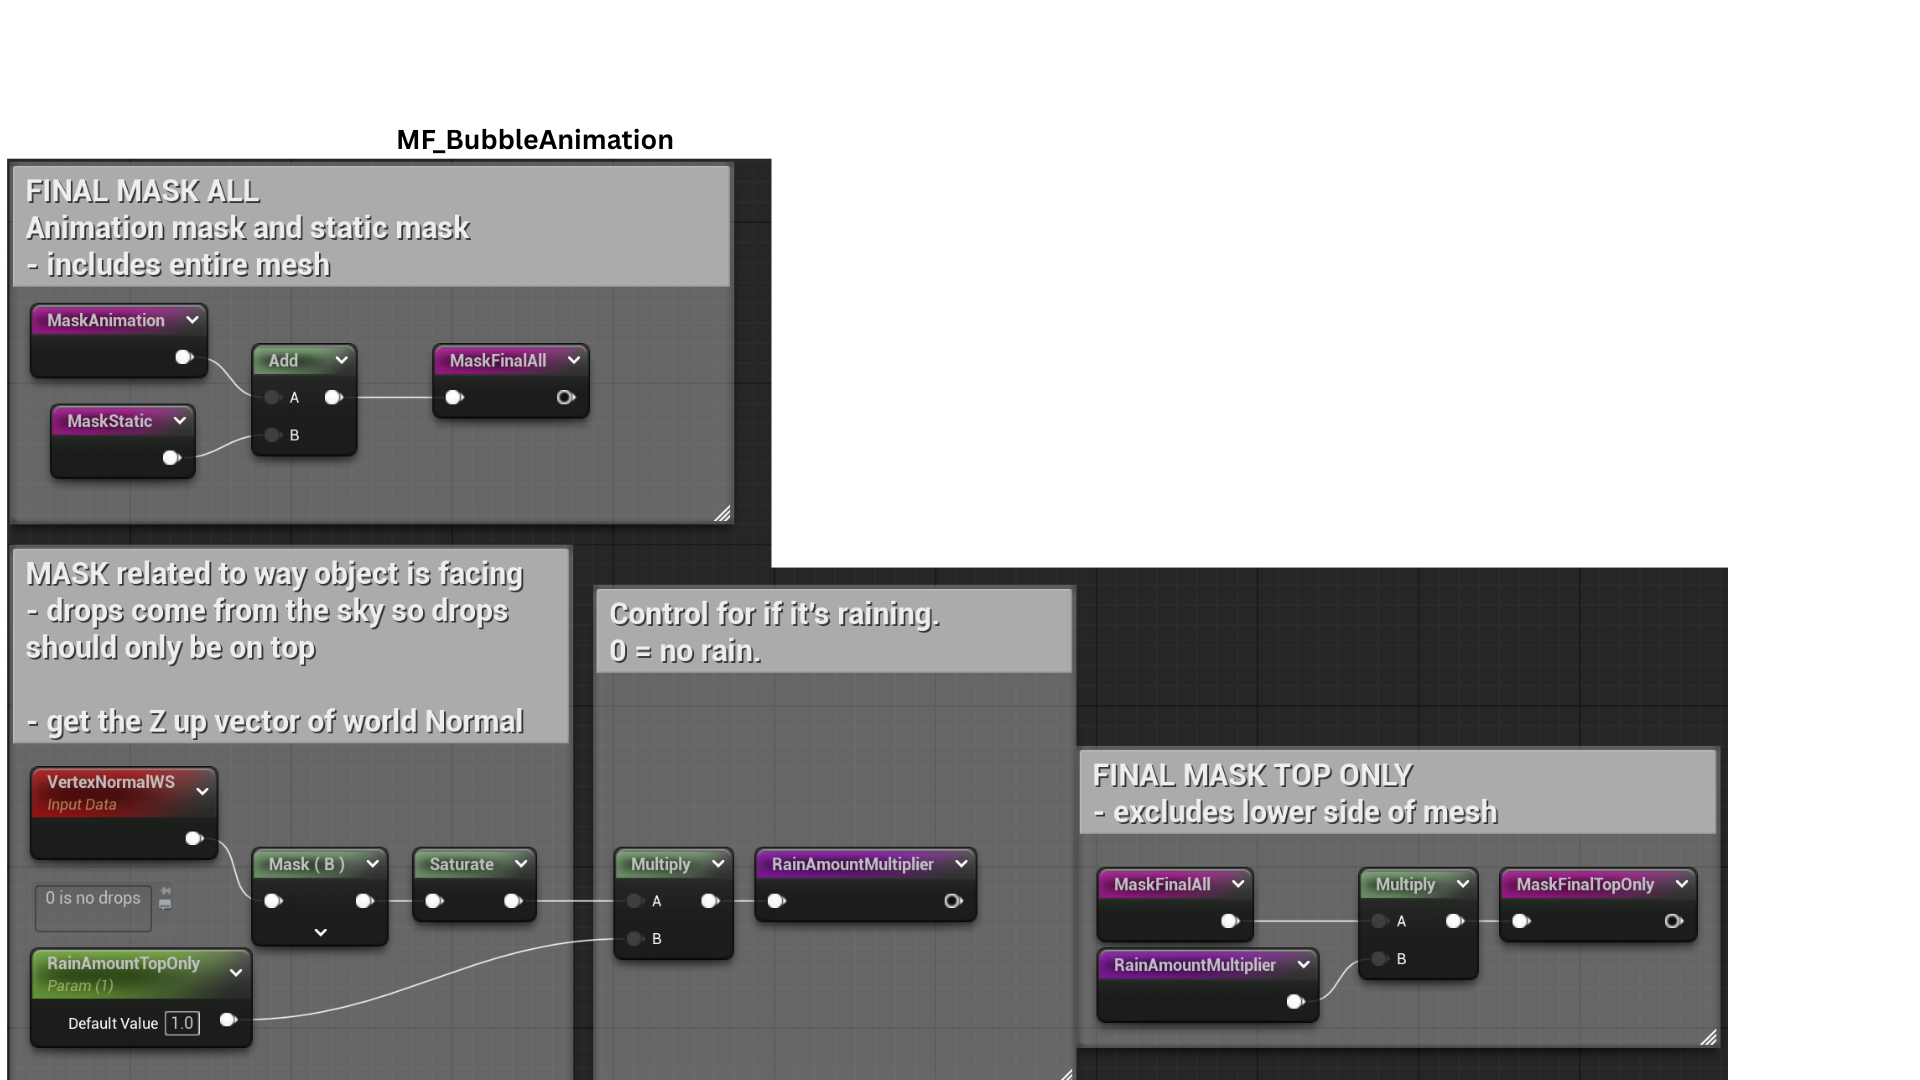
The middle-left portion builds the dynamic bubble pop mask, while the lower-left code defines which bubbles remain static versus animated.
On the right, a separate mask restricts the effect to the top of the object, with a selector controlling whether bubbles appear only on the surface top or across the entire mesh.
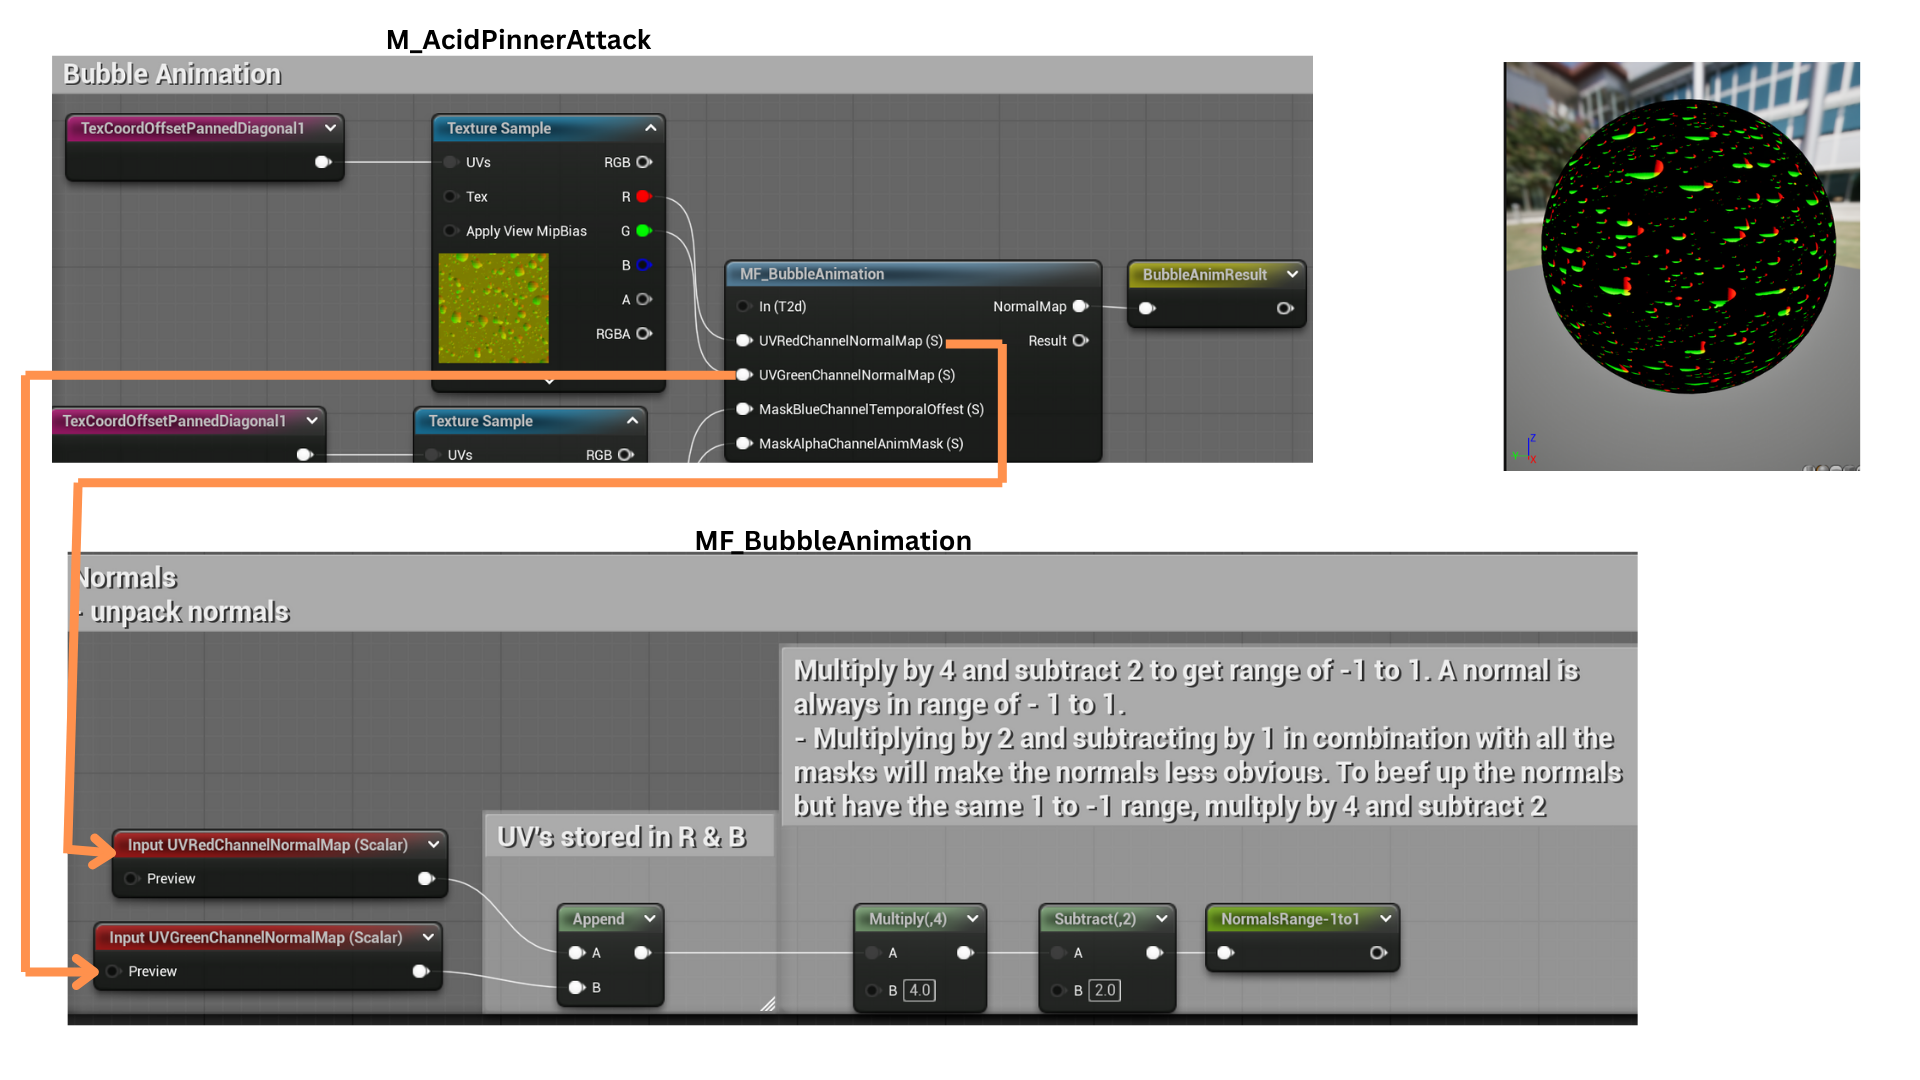
5. The red and green texture channels store normal map data, which are combined into a Vector2 and remapped from a 0–1 to a -1–1 range for accurate normal calculation.
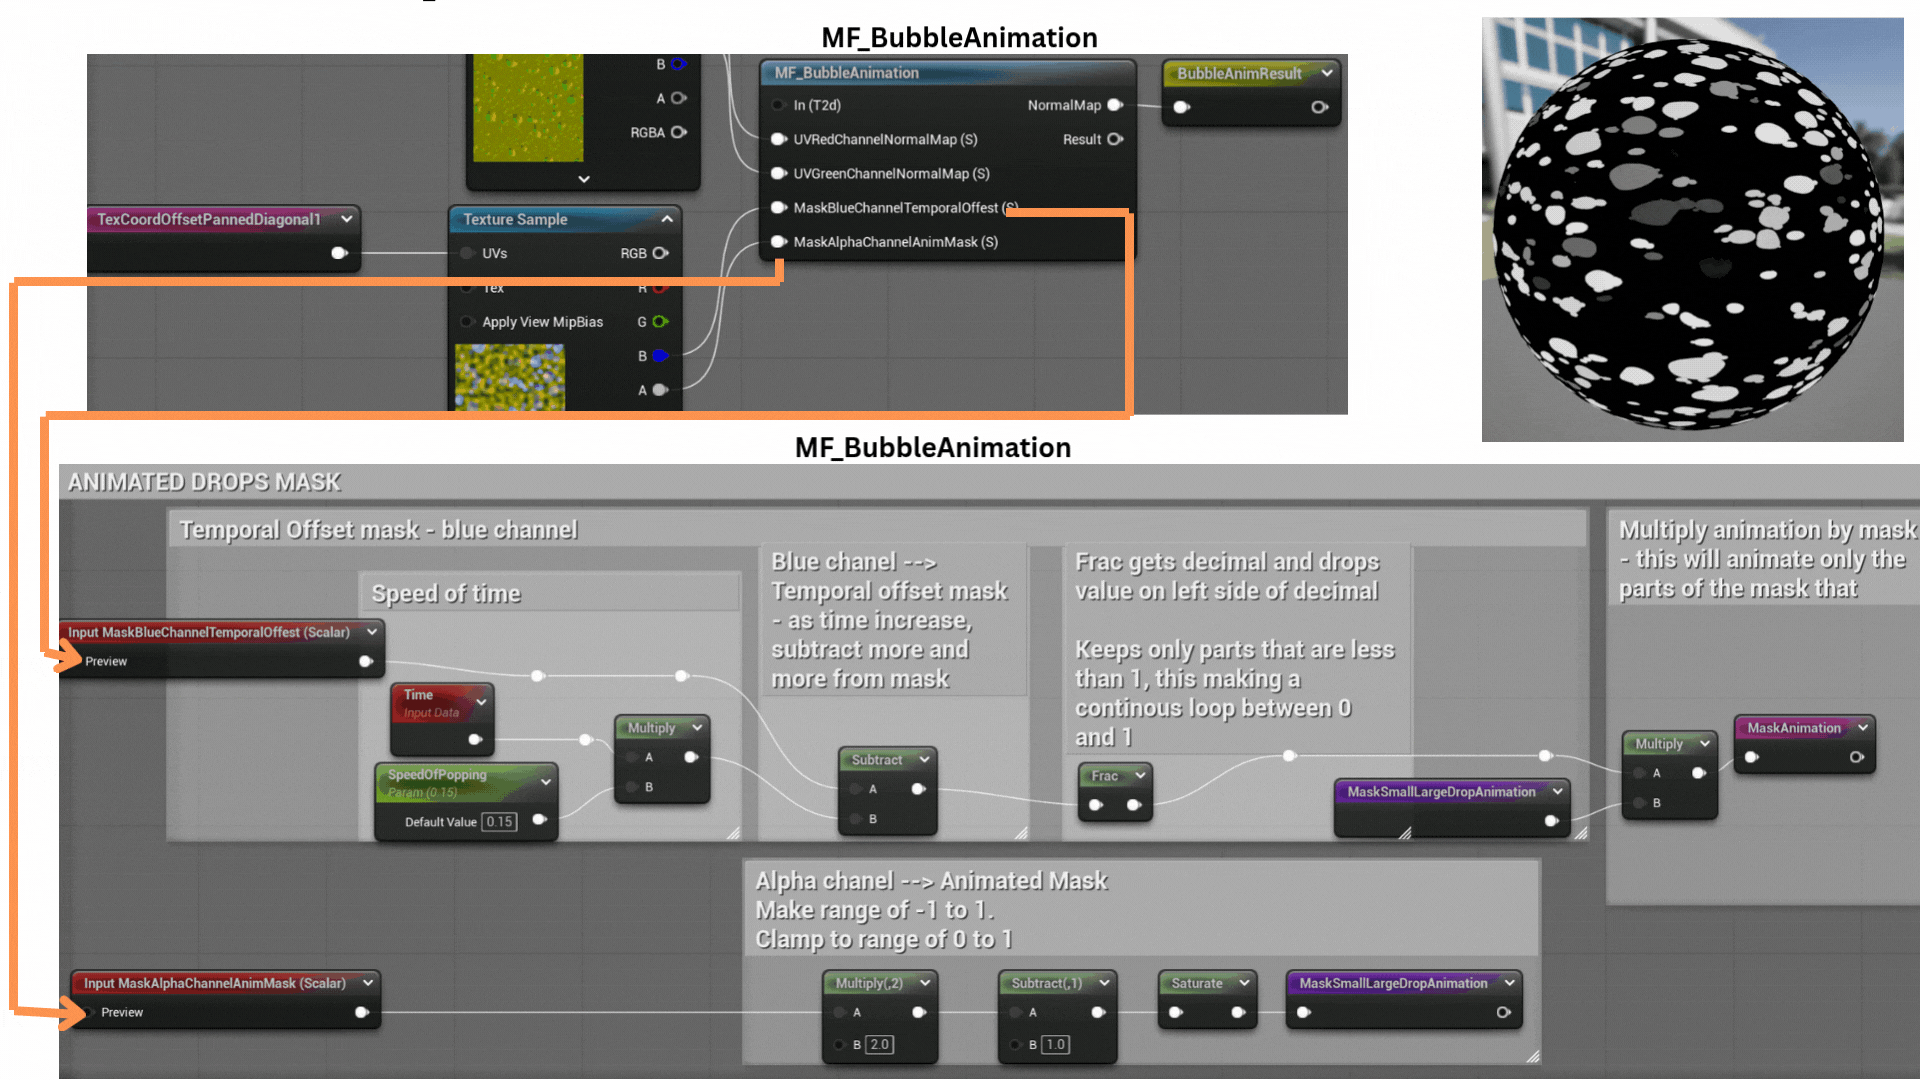
6. The blue and alpha channels store two animation masks.
The blue mask is animated using time subtraction and a Frac function to maintain a 0–1 range, then multiplied by the alpha mask to create the final composite animation mask controlling bubble visibility.
7. A static filter mask excludes specific bubbles from the animation cycle.
This static mask is then added with the animated mask to determine which bubbles remain static and which animate dynamically.
8. A top-only bubble mask is generated by isolating vertex normals pointing upward, using the blue channel of the normal map to confine the effect to surfaces facing the world’s Z-axis.
9. The ApplyTopOnly parameter switches between full-surface and top-only masks.
The SmoothDrop control blends between a default bubble intensity of 1 and a smoother, more diffused transition to soften the bubble edges.
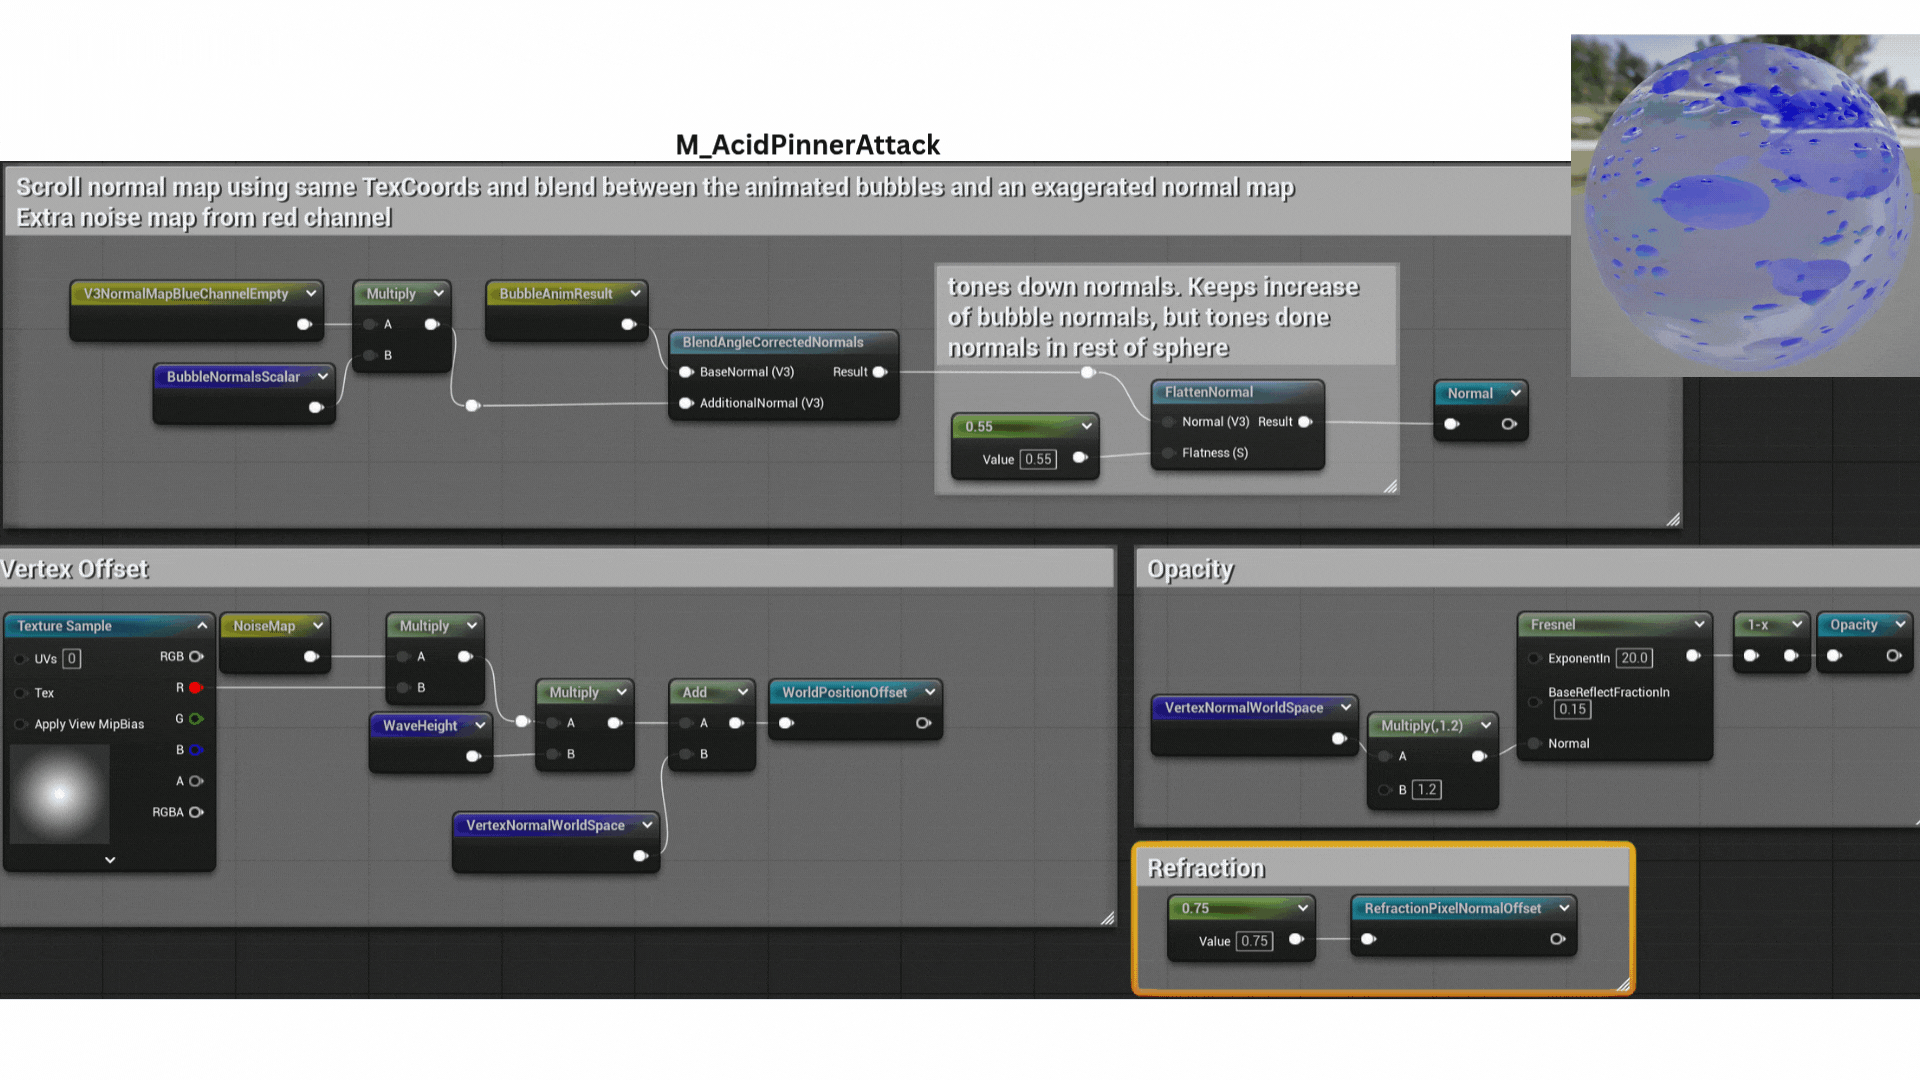
10. The bubble normal map (V3NormalsMapBlueChannelEmpty) is scaled by BubbleNormalScalar to amplify bubble extrusion.
This result is blended with animated normals and flattened to produce the final composite normal map.
A gradient mask restricts vertex displacement to the sphere’s center.
A panning NoiseMap, multiplied by this mask and scaled by WaveHeight, offsets each vertex along its normal, creating subtle surface waves forming the WorldPositionOffset output.
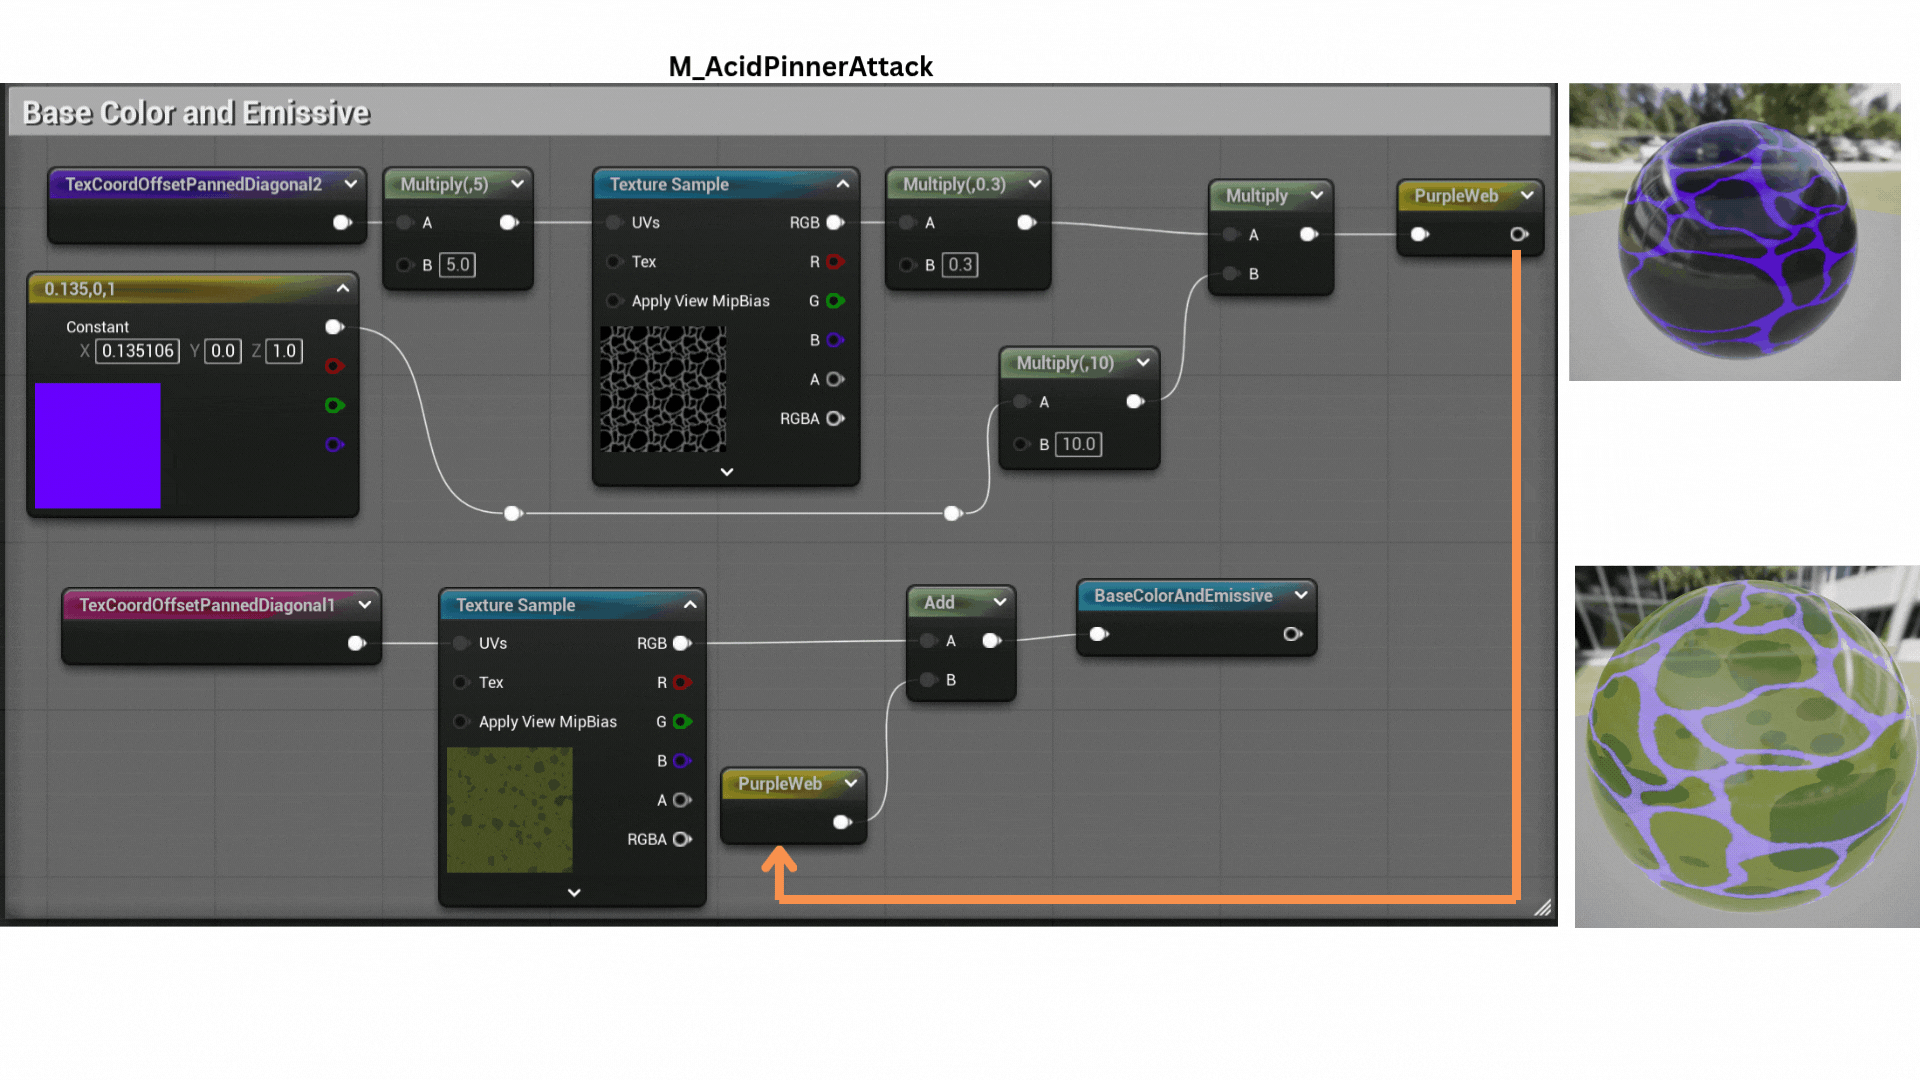
11. A secondary texture generates a purple web pattern beneath the surface using independently offset and rotated TexCoords to layer the effect.
This PurpleWeb texture is tiled and color-tinted, then blended with the bubble base color and emissive texture generated by MF_BubbleAnimation, forming the BaseColorAndEmissive output.
12. The final material produces a rotating, bubbling acid sphere with subtle surface waves.
The same MF_BubbleAnimation and layering principles were reused for M_AcidLiquid, enhanced with a custom-built Gerstner wave function to simulate fluid surface motion.
Tech
Encounter System

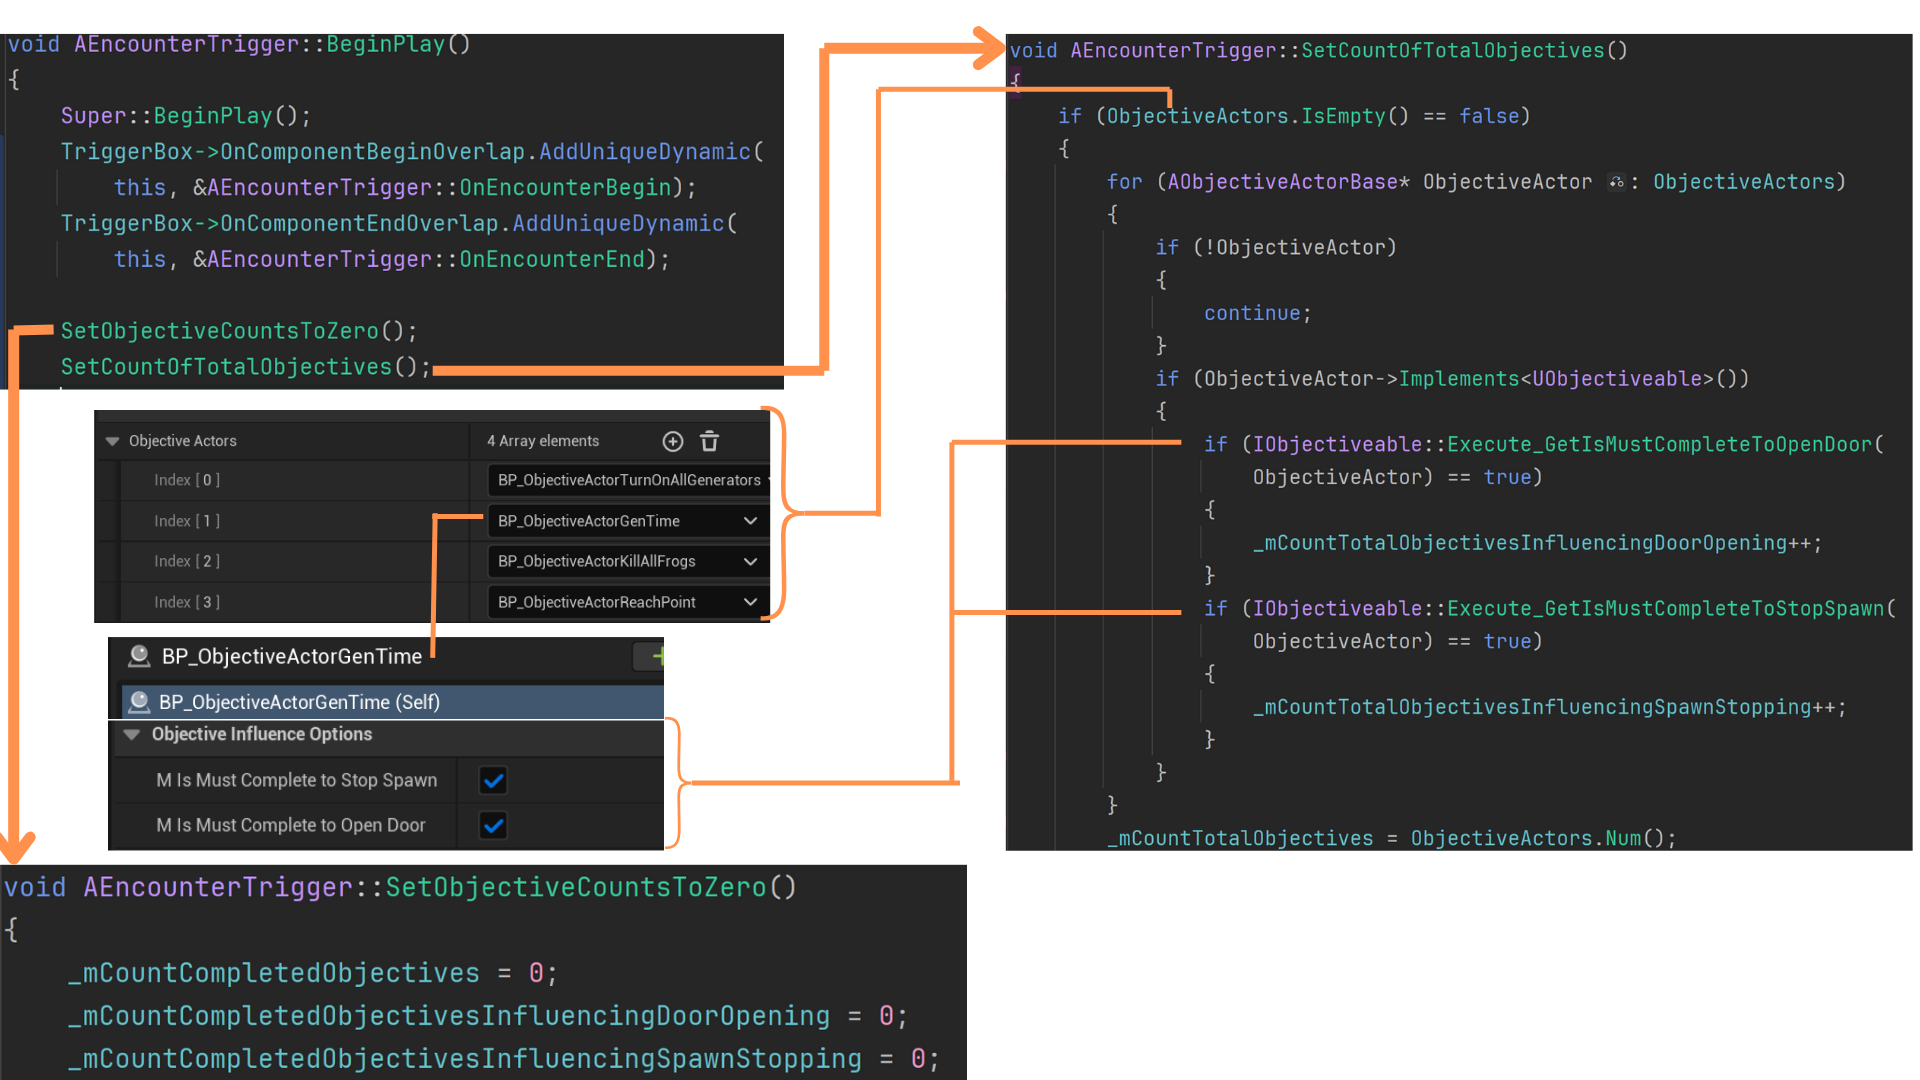
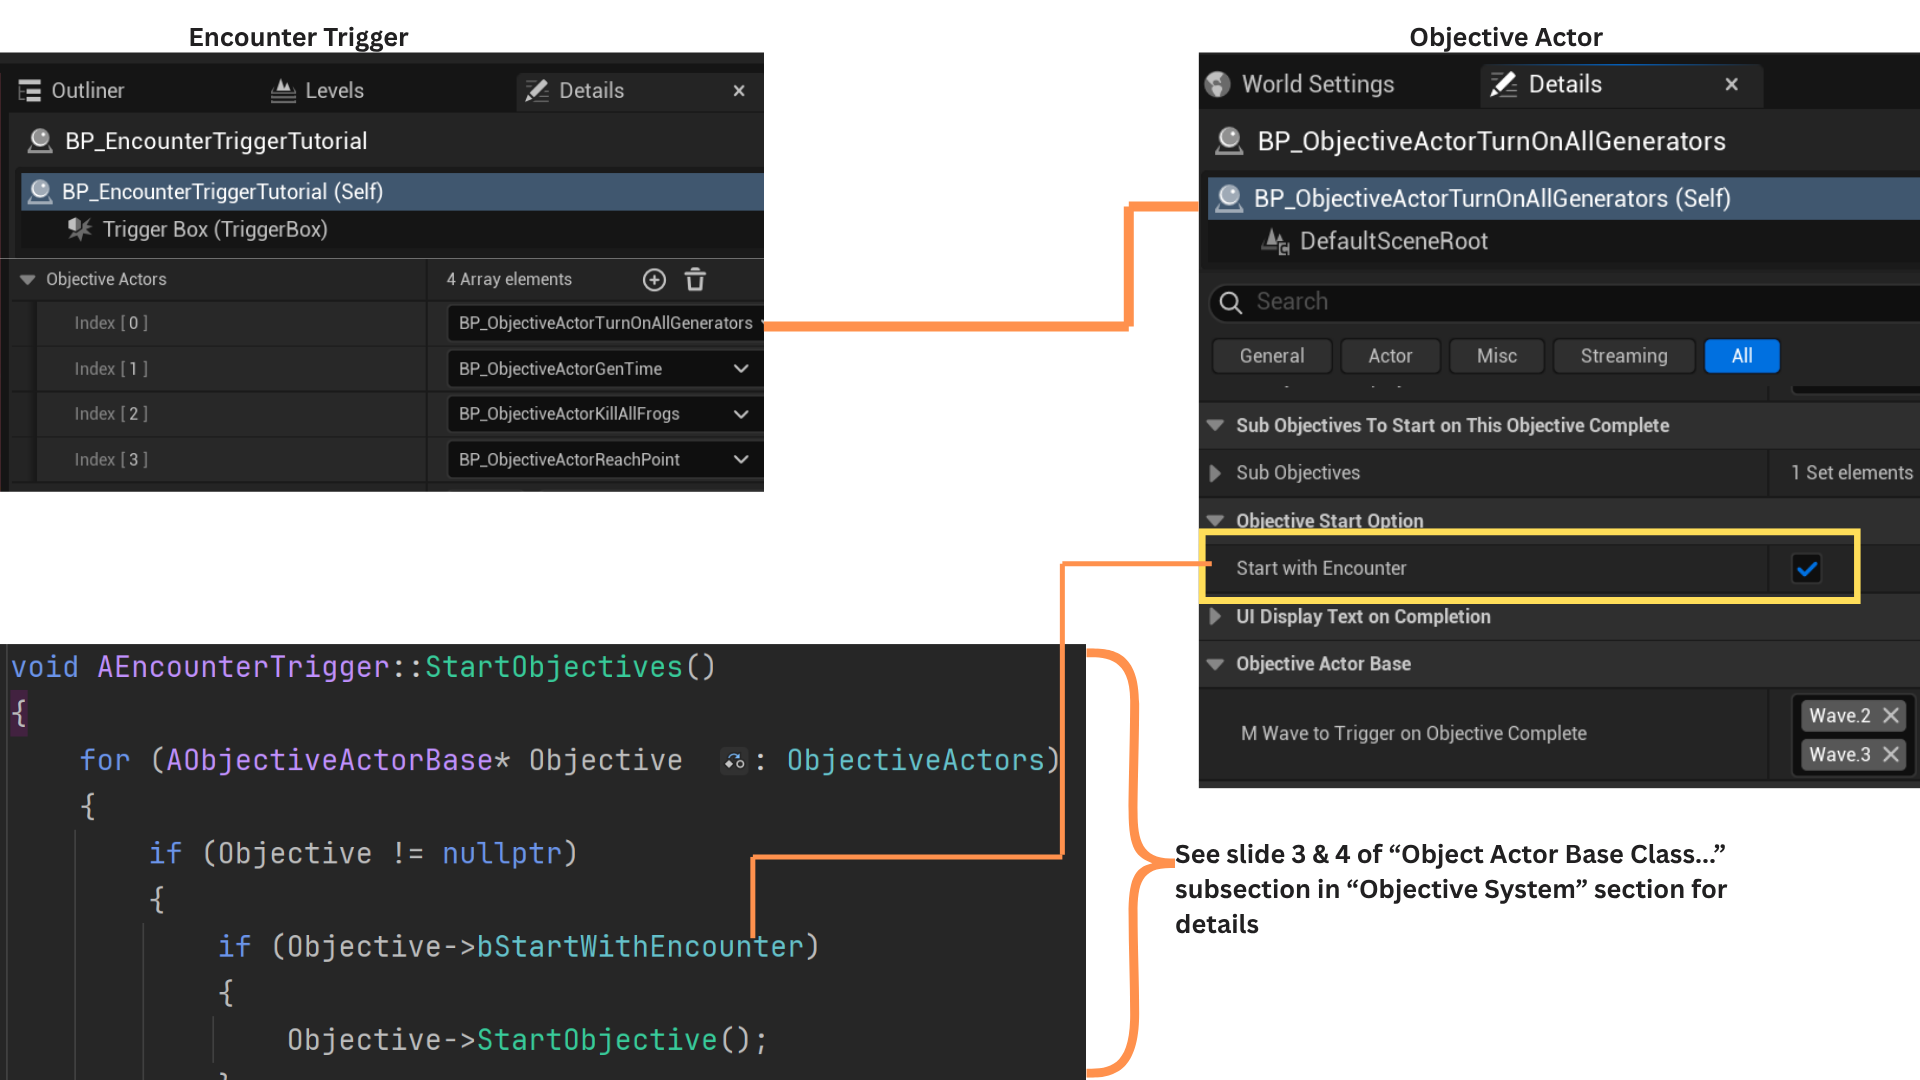

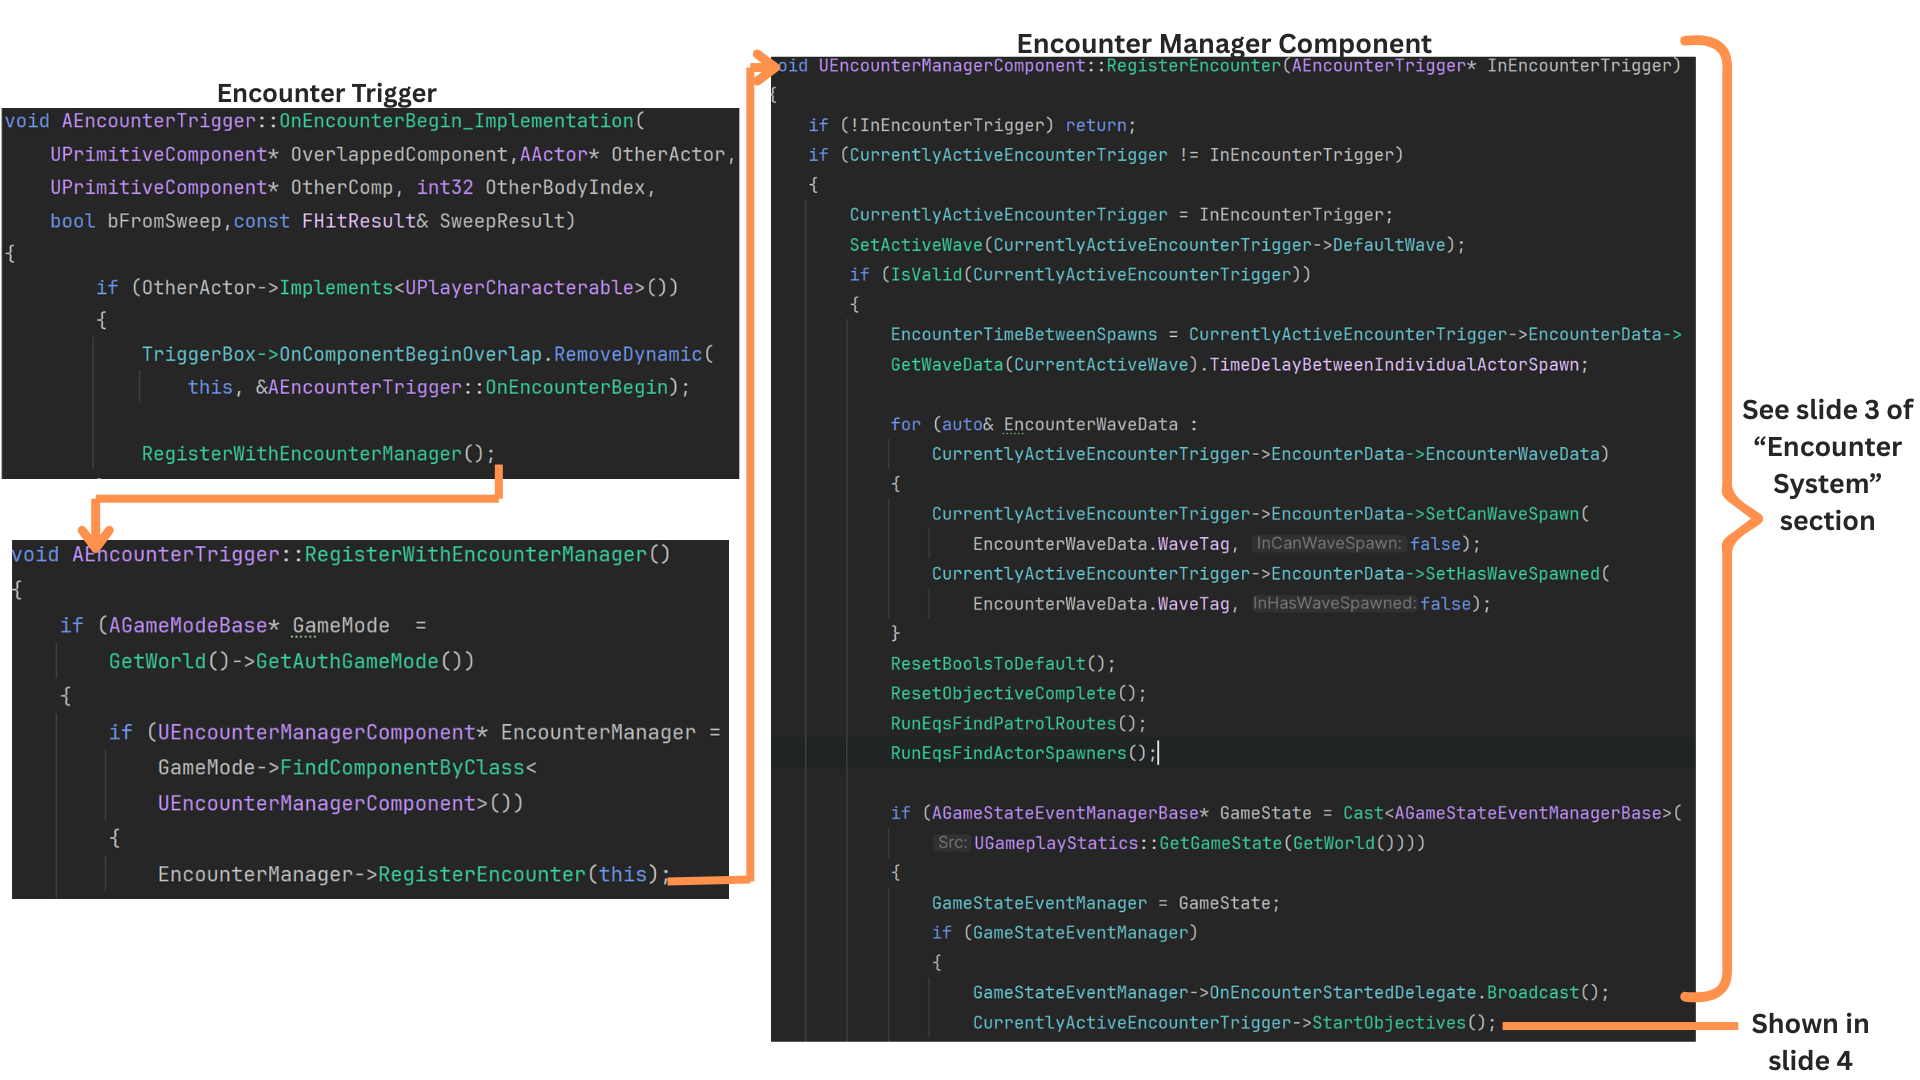
1. Encounters are coordinated by the BP_EncounterTrigger and EncounterManagerComponent classes.
BP_EncounterTrigger, derived from EncounterTrigger, stores an array of objectives and references a DataAsset defining enemy types, spawn triggers, total spawn counts, and per-location spawn quantities for each wave.
It also listens for objective completion and broadcasts delegates for related gameplay events.
The EncounterManagerComponent, attached to the GameInstance, runs EQS queries to locate valid spawn points using gameplay tags, processes encounter data, tracks enemy deaths, and triggers subsequent waves when conditions are met.
2. The trigger box binds functions that control when an encounter begins and ends.
Objective tracking properties are reset and recalculated as the encounter starts.
Each ObjectiveActor can influence gameplay elements such as halting enemy spawns or unlocking doors.
The ObjectiveActor class uses an interface to efficiently communicate its properties to other systems.
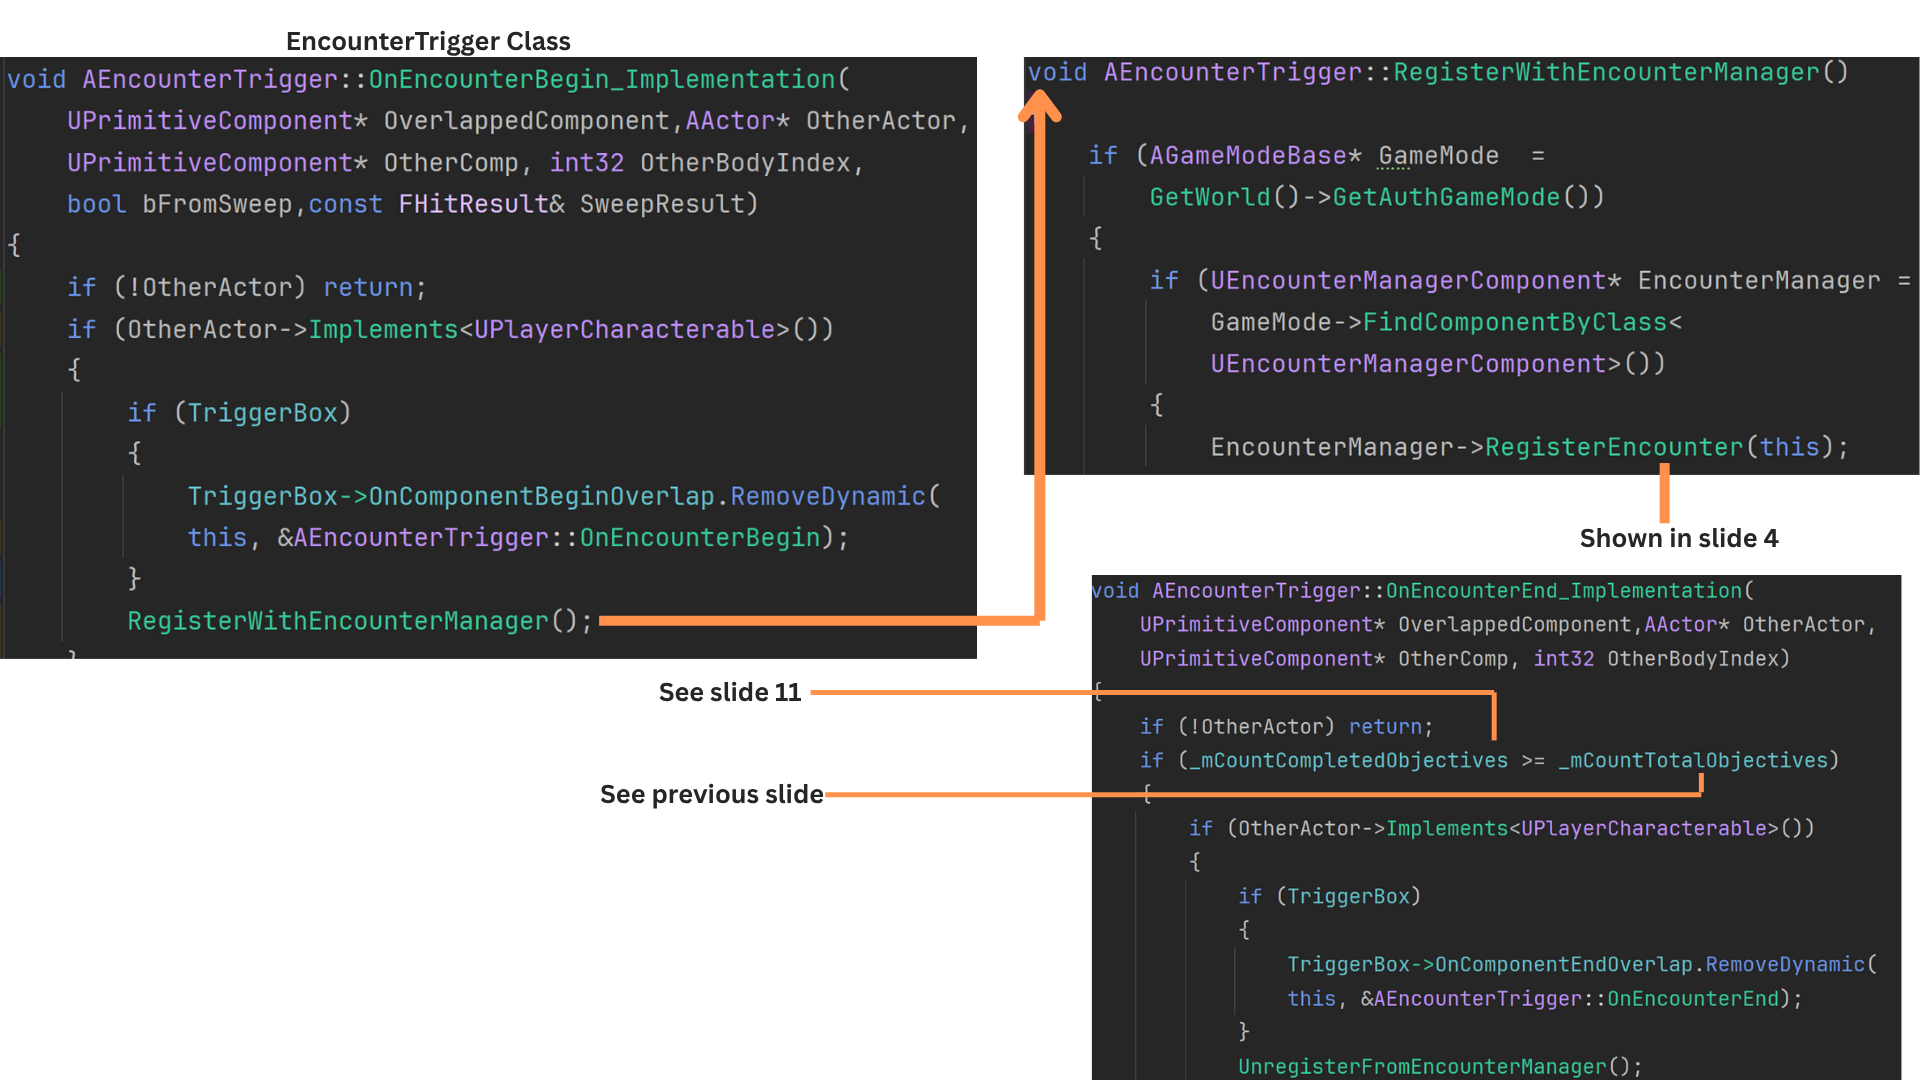
3. Even though the collision preset ignores all actors except the player, an exclusive interface ensures the overlapping actor is confirmed as the player.
RegisterEncounter then passes a reference to the EncounterTrigger into the EncounterManagerComponent.
The encounter concludes once all objectives are completed and the player exits the trigger box.
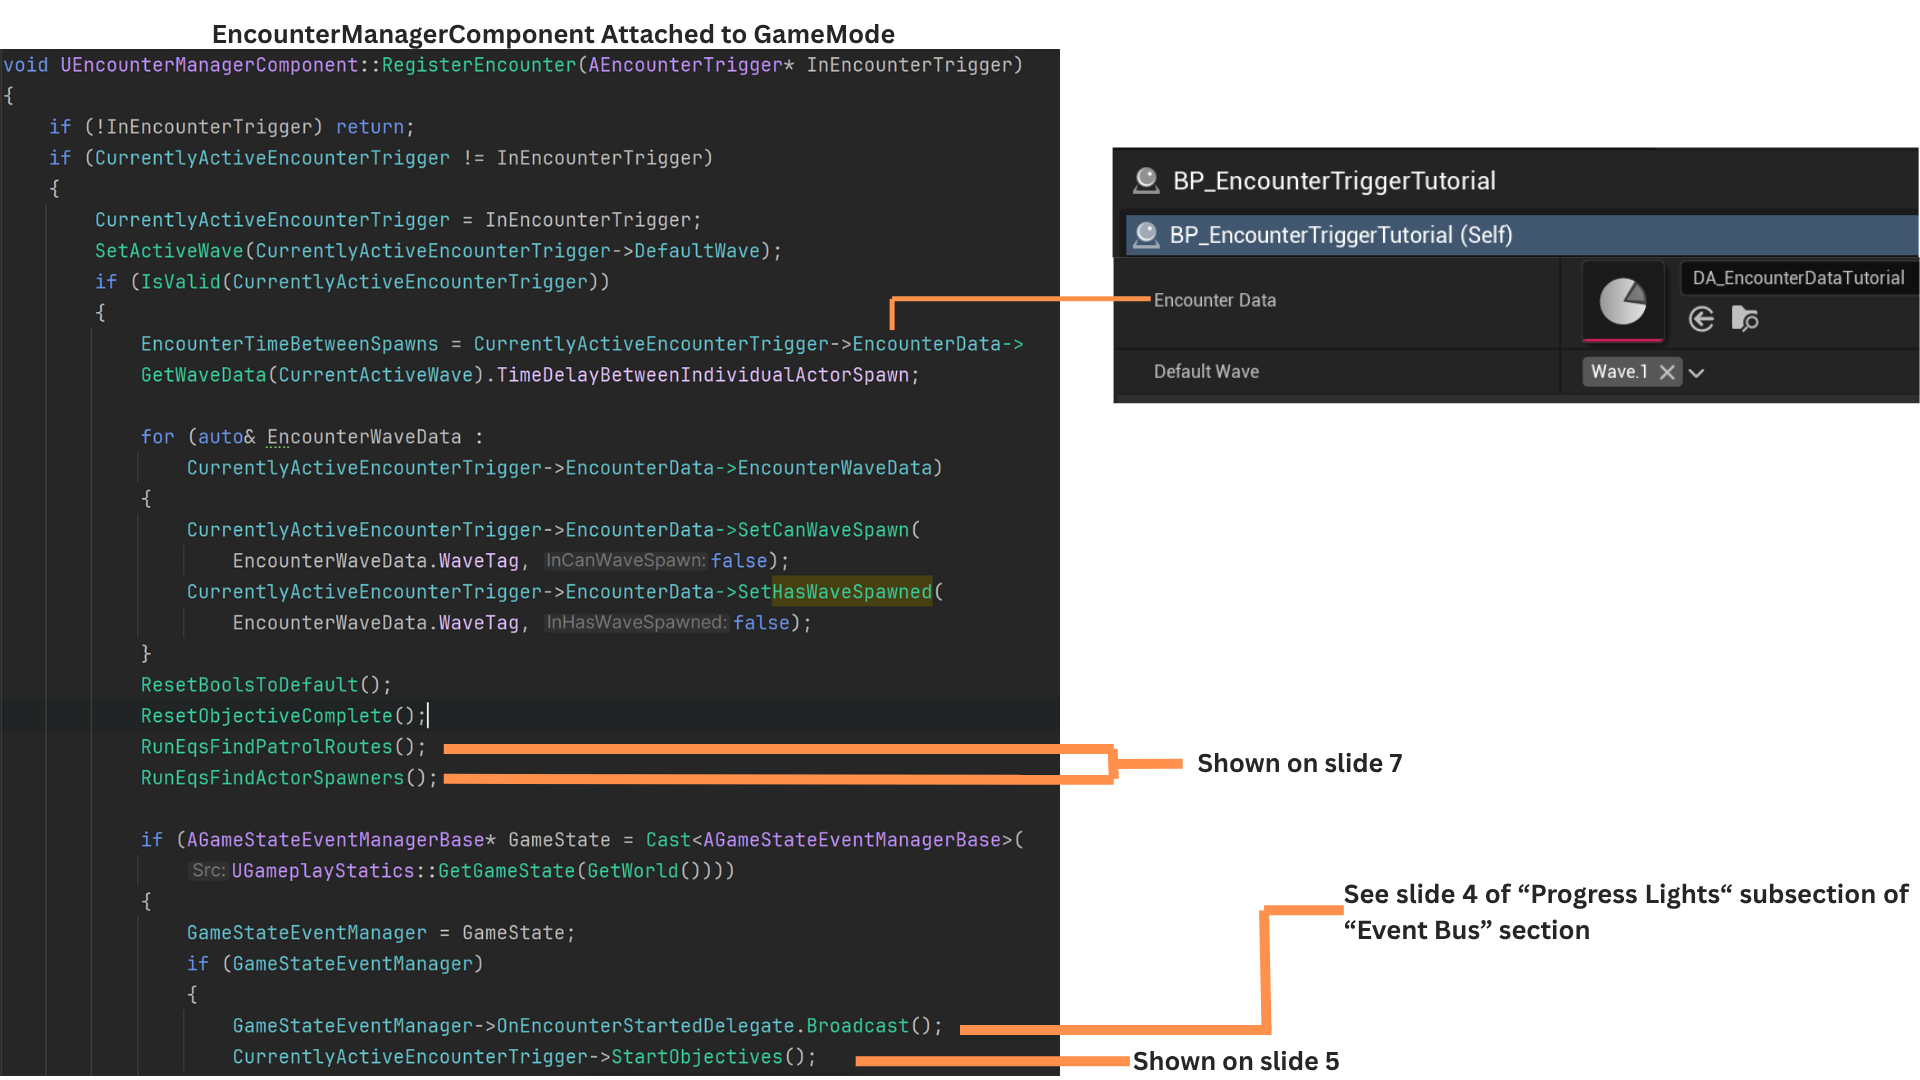
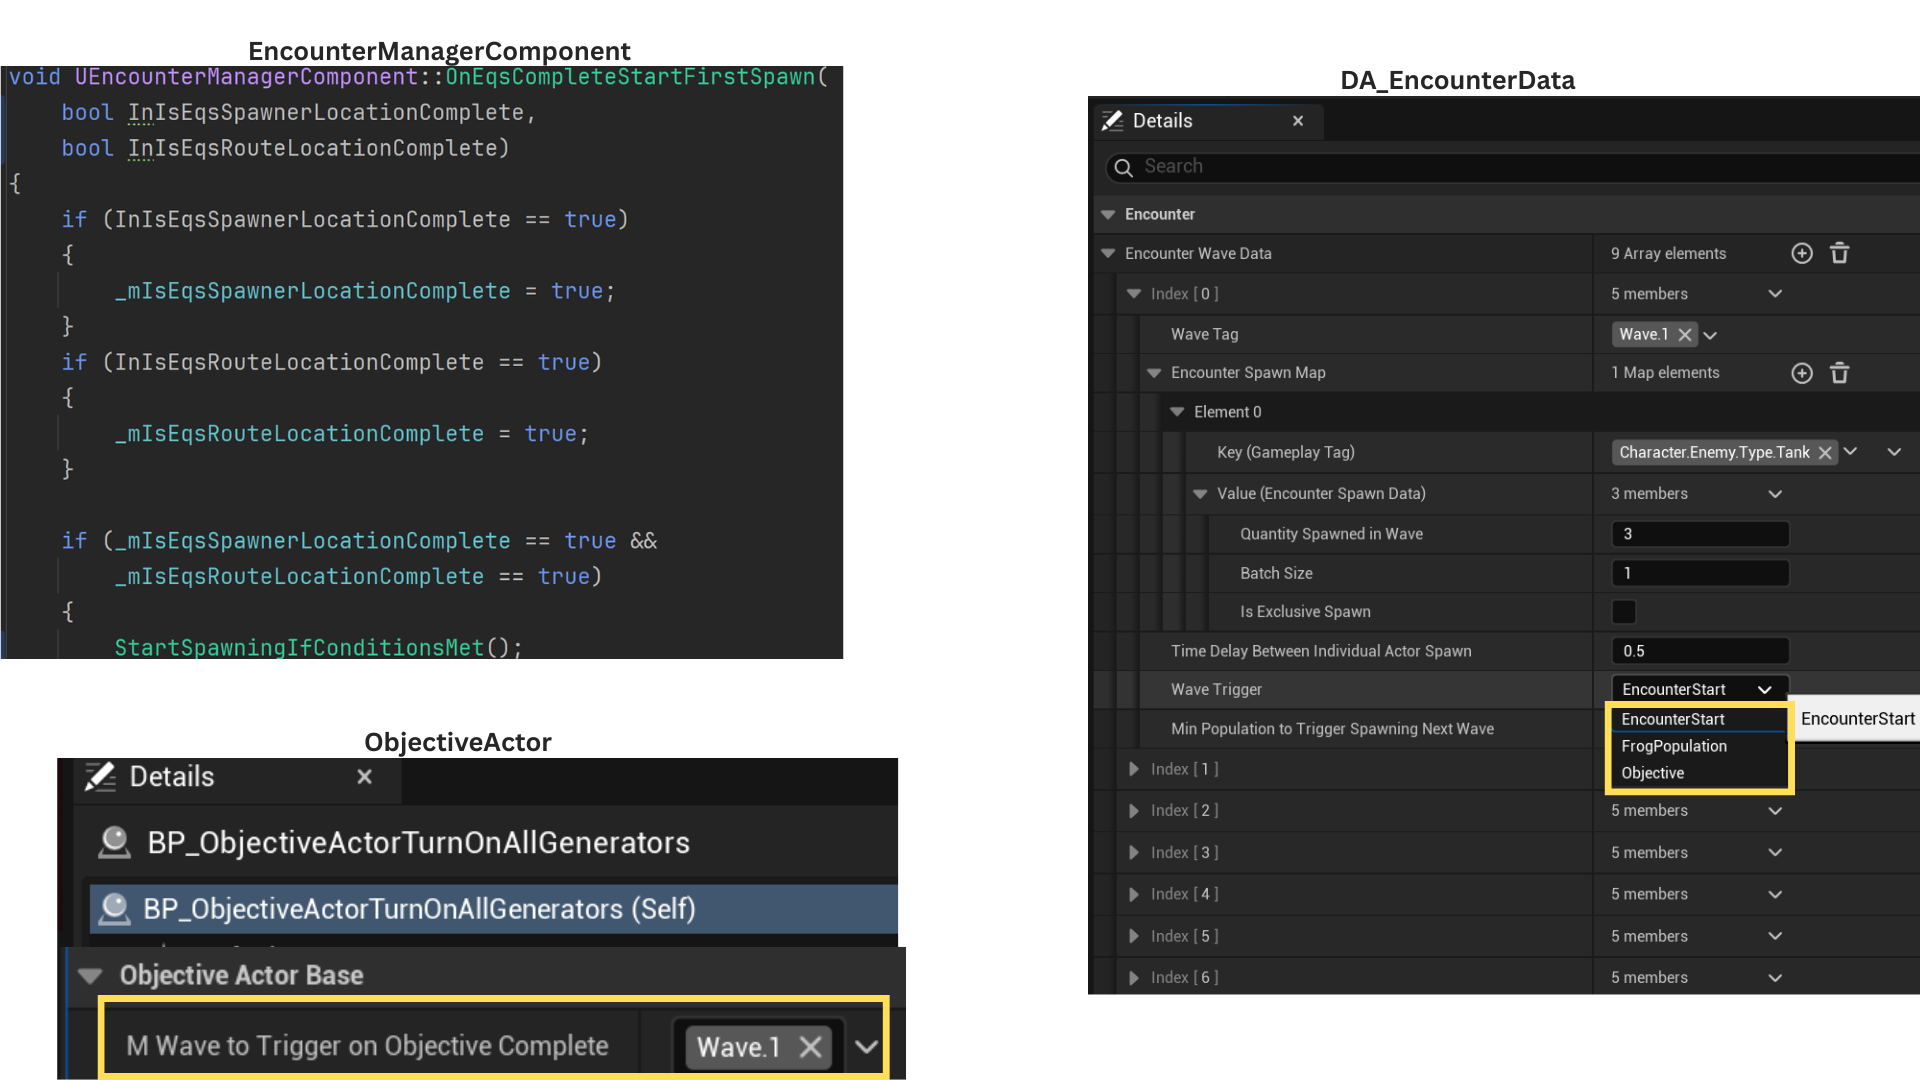
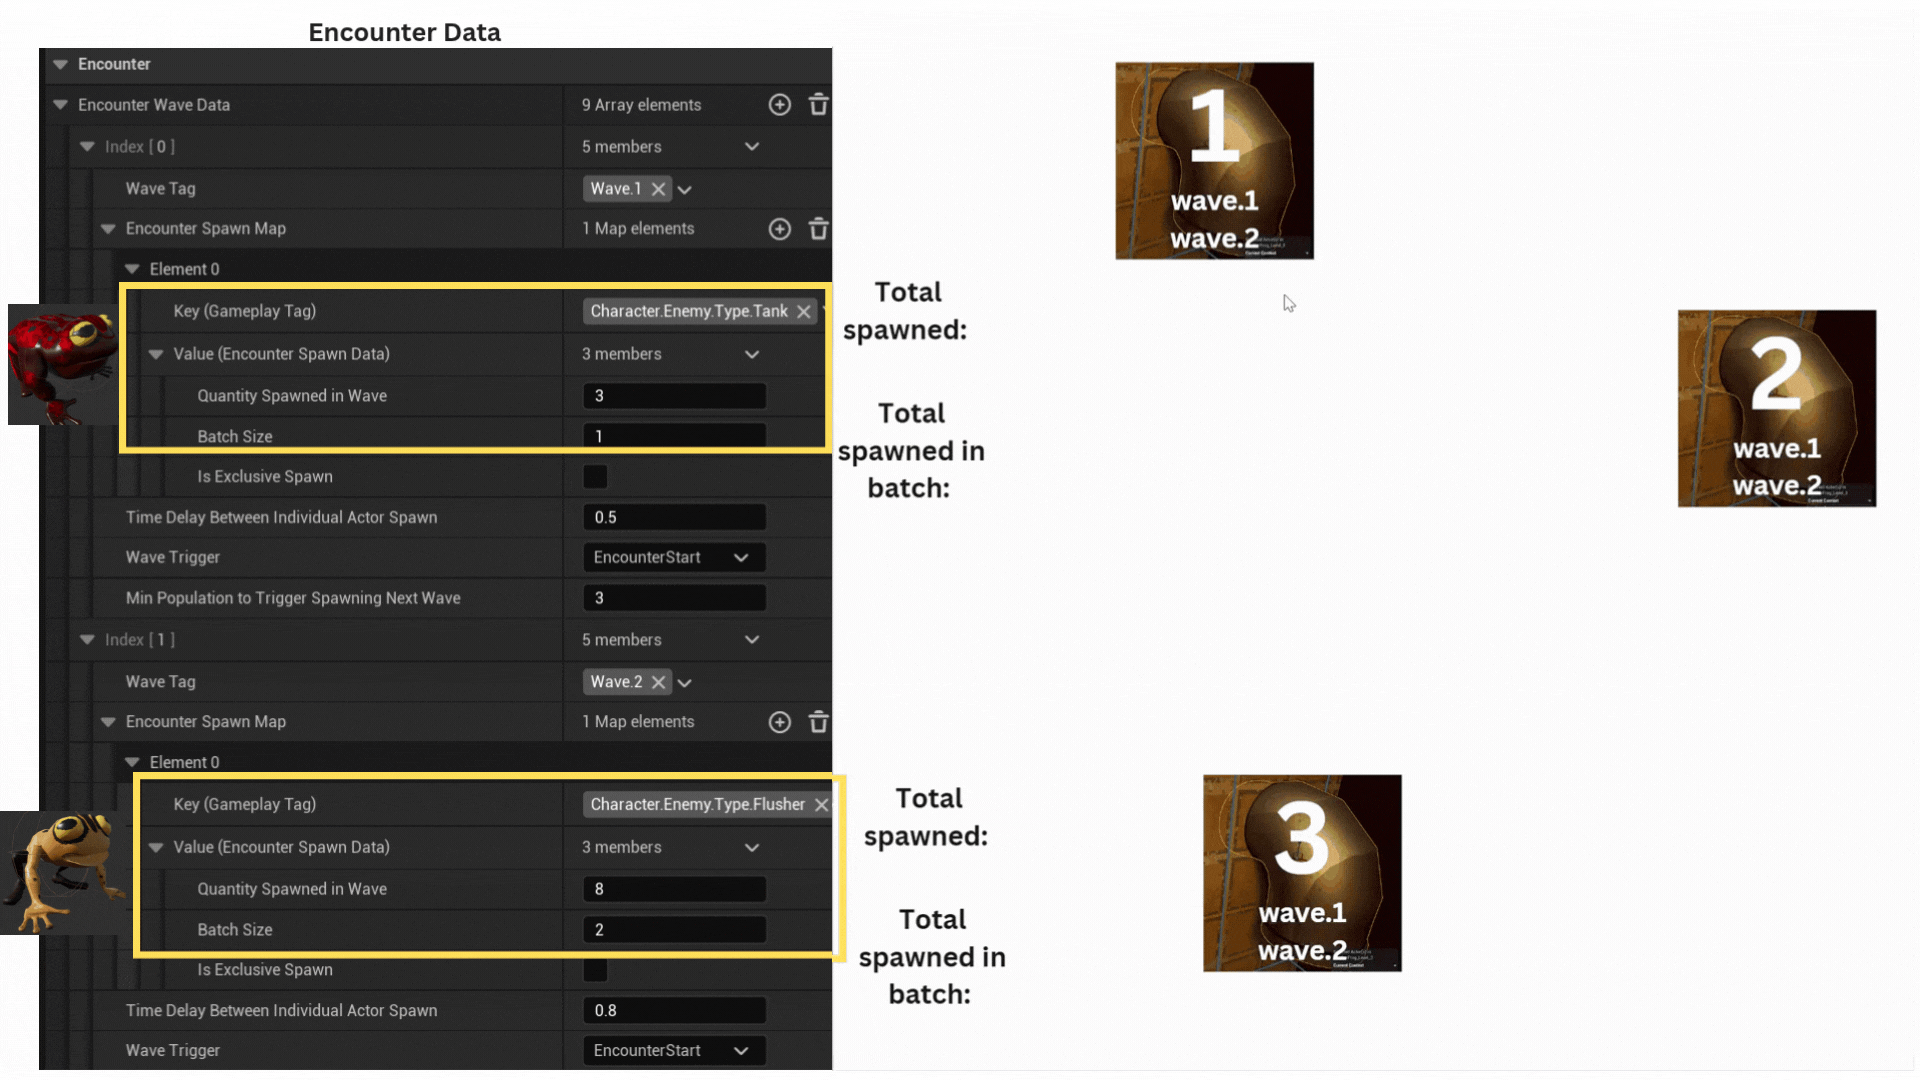
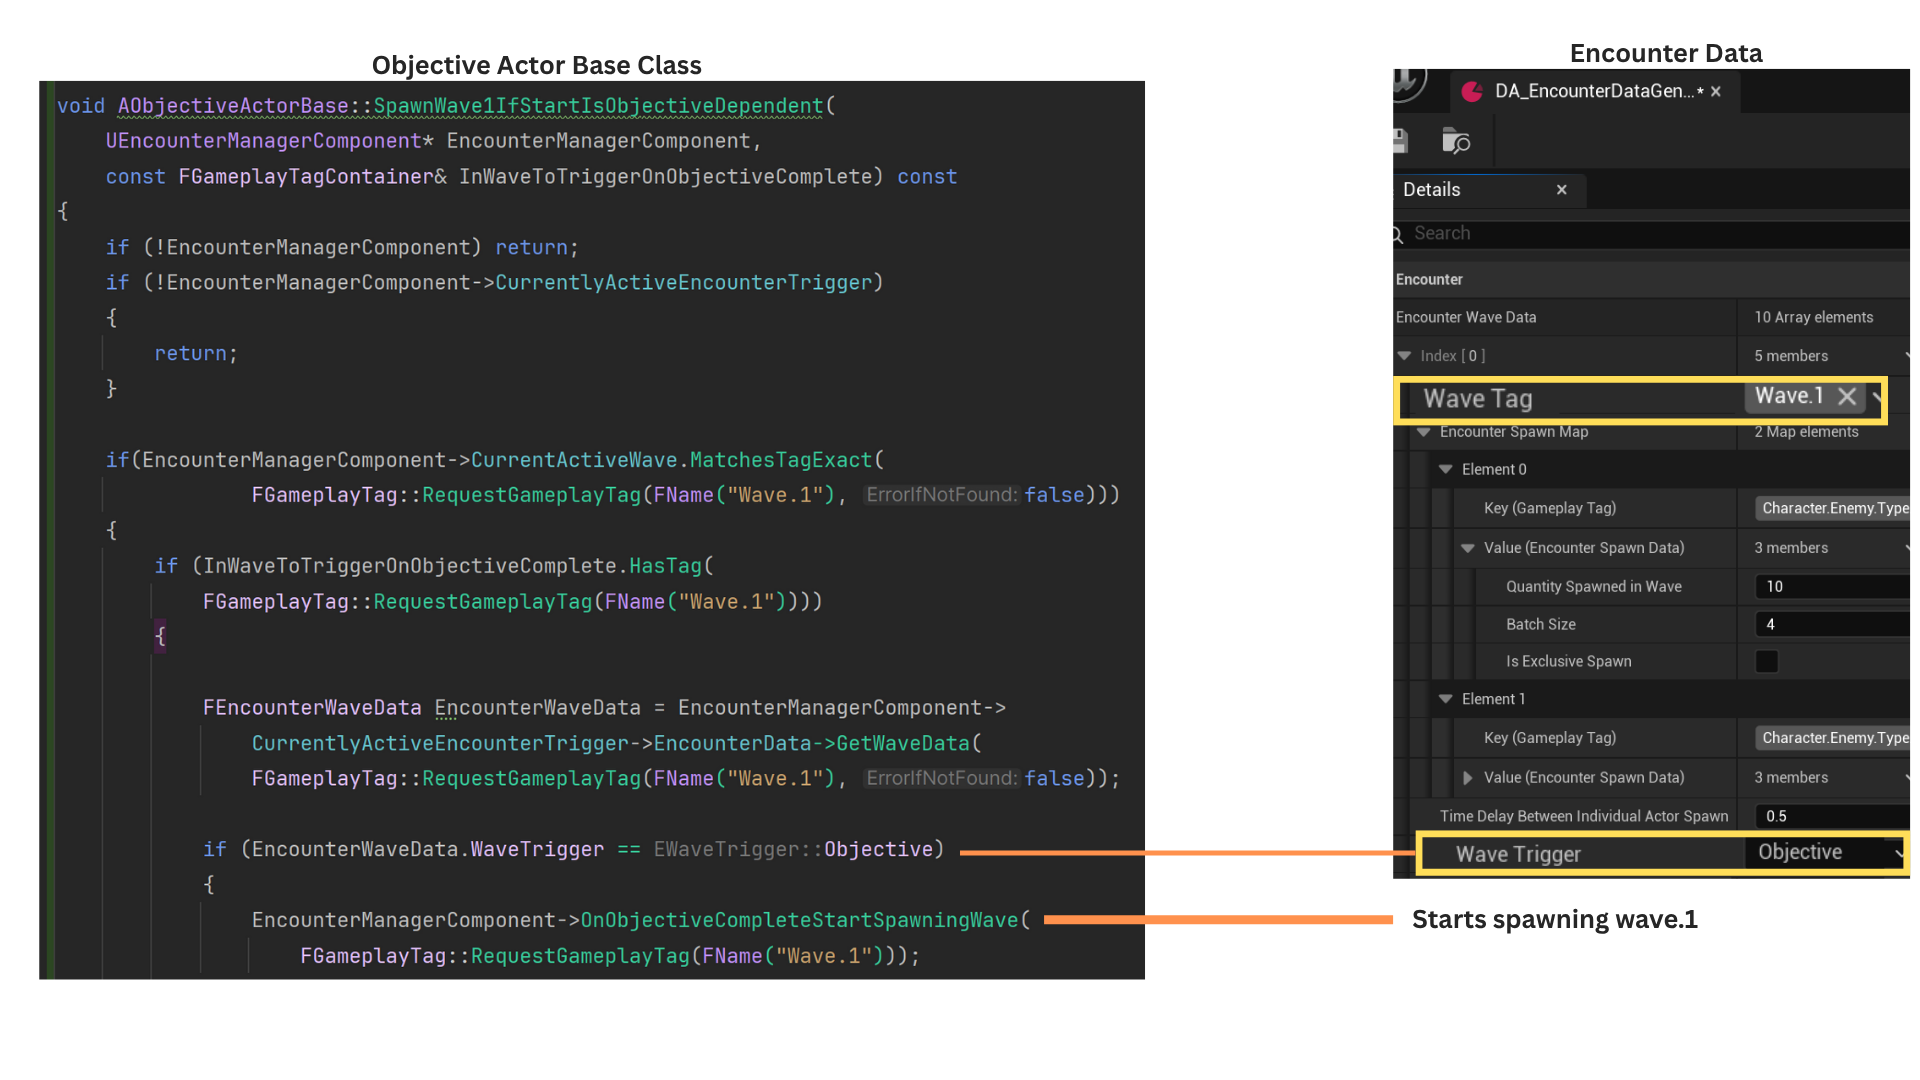
4. EncounterData is a DataAsset defining per-wave spawn rules.
Two booleans—CanWaveSpawn and HasWaveSpawned—track whether a wave’s conditions are met and whether it has already spawned. These are reset at runtime and hidden from designers.
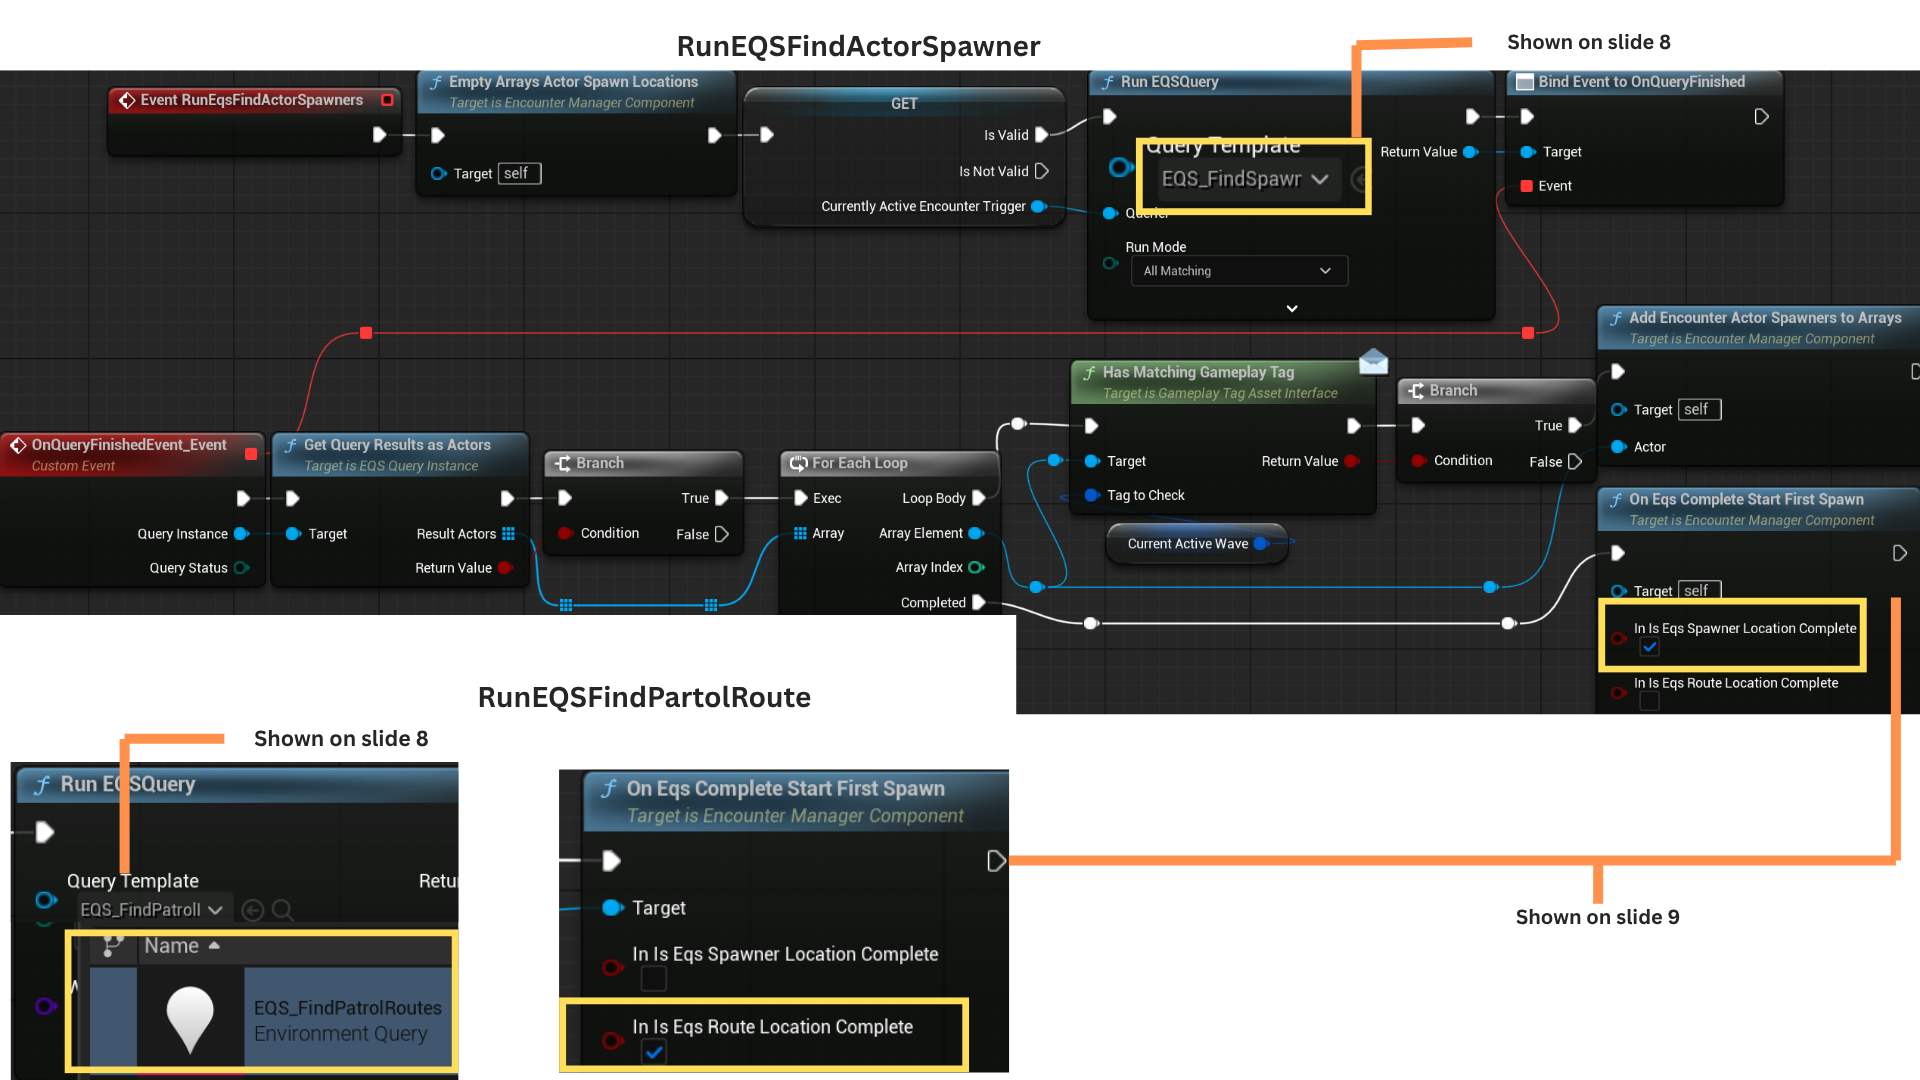
RunEqsFindPatrolRoutes and RunEqsFindActorSpawners populate arrays of valid actors, then trigger the first wave if Wave.1 is set to StartWithEncounterBegin.
The OnEncounterStartDelegate broadcasts events to other systems, such as activating progress lights when the encounter begins.
5. StartObjectives sets _mHasObjectiveStarted to true for all objectives marked StartWithEncounter, initializing their logic immediately when the encounter begins. (See Objective System section for additional details.)
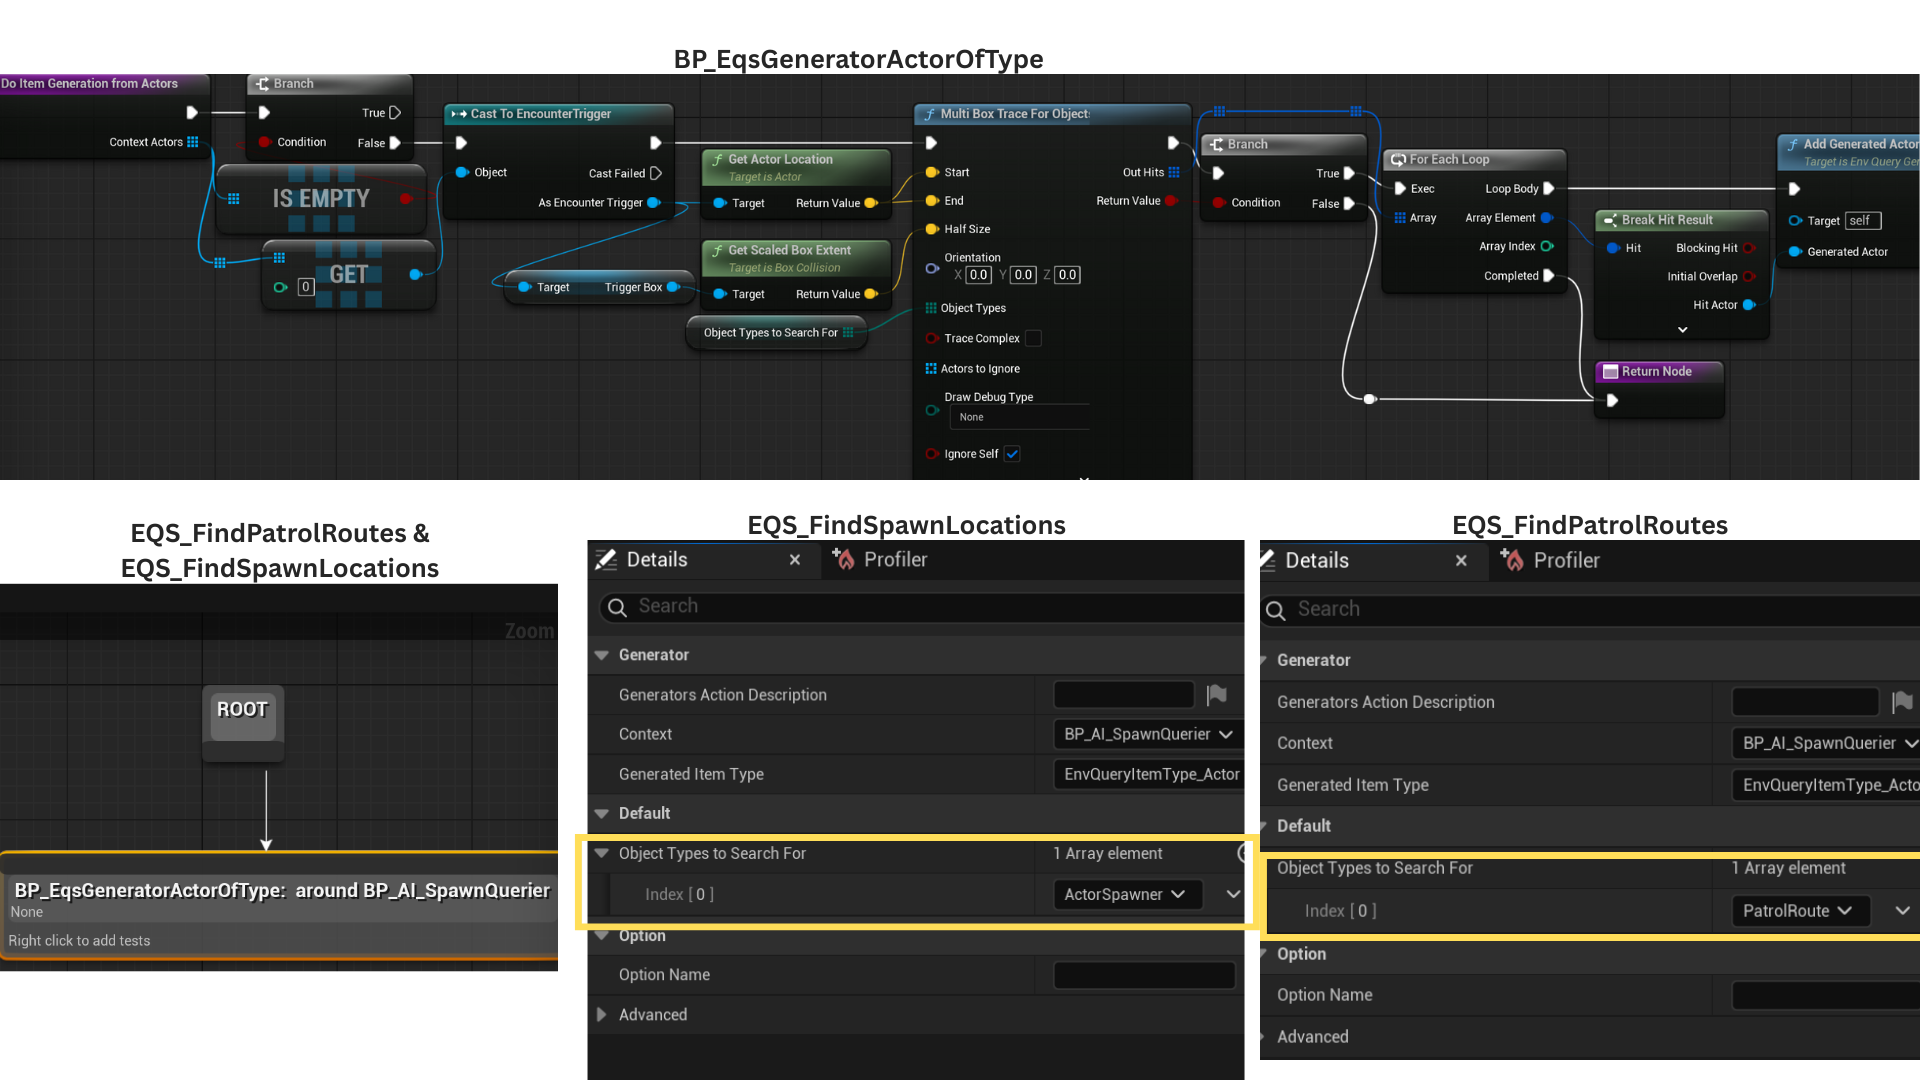
6. EQS queries use object types to locate PatrolRoutes and ActorSpawners whose gameplay tags match the current wave.
CurrentlyActiveWave stores the current wave tag, defaulting to Wave.1, and matching actors are added to the EncounterManagerComponent arrays.
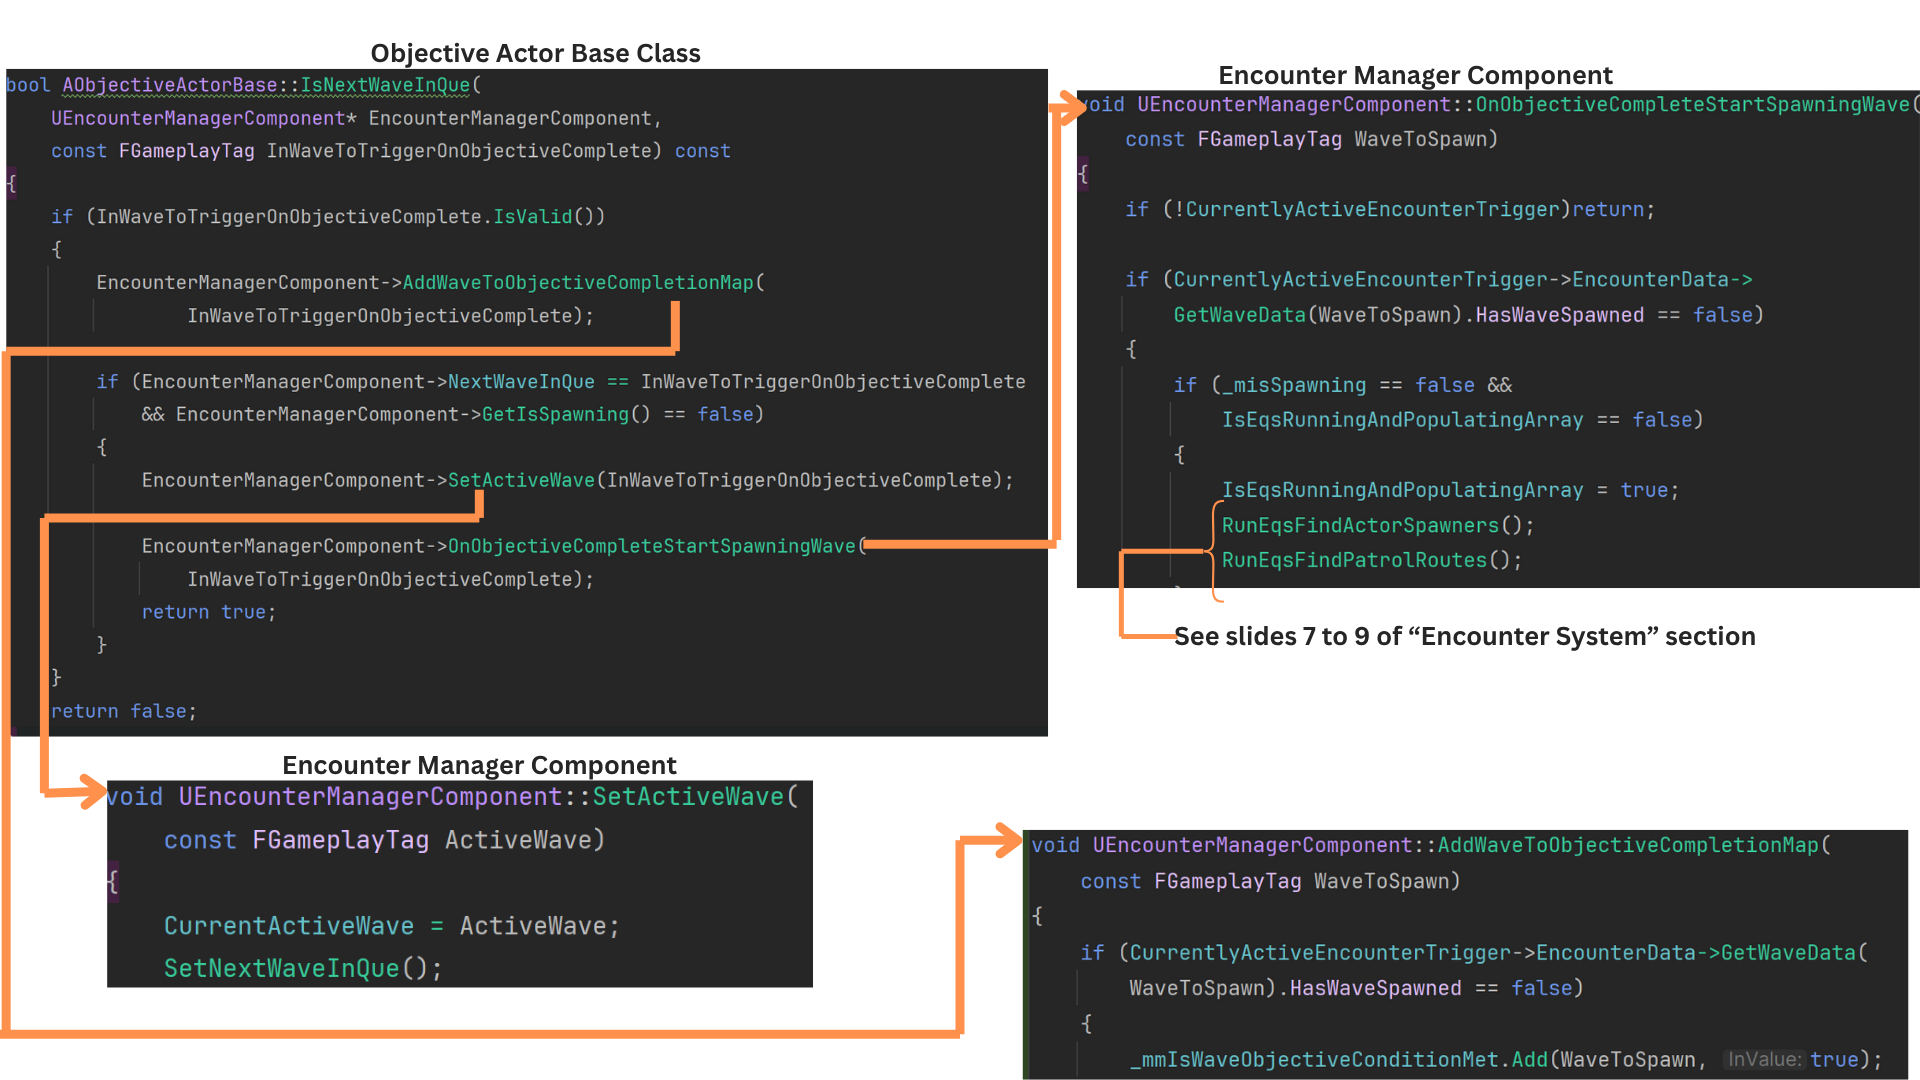
Both EQS queries run in parallel and invoke OnEqsCompleteStartFirstSpawn with different parameters. Spawning begins only after both EQS calls finish running.
7. To streamline iteration, EQS automatically populates PatrolRoute and ActorSpawner arrays instead of requiring manual designer updates.
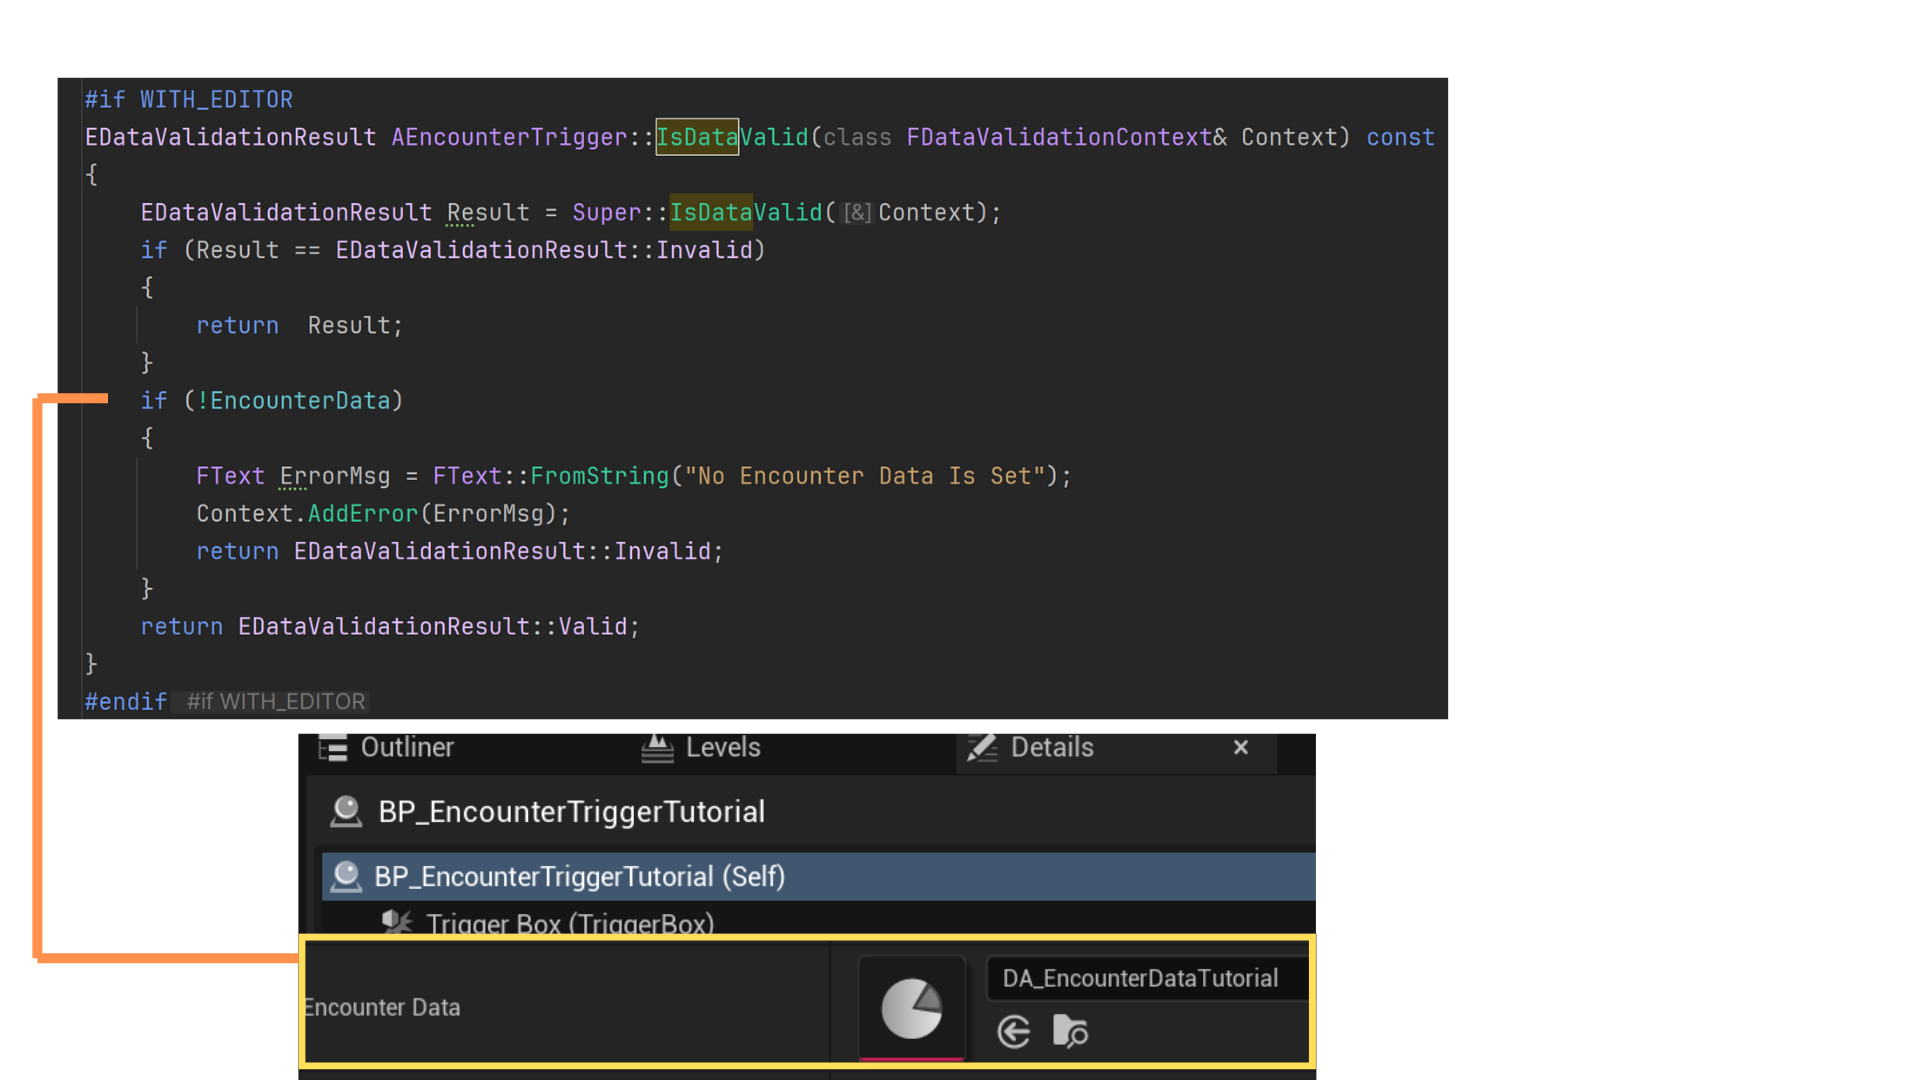
When a new EncounterTrigger child was created, it couldn't be save until a DA_EncounterData was assigned to it's member variable.
When a new DA_EncounterData was created, it could be saved until the gameplay tags and values were properly set.
8. Each EQS uses the EncounterTrigger as its context, setting search bounds based on the trigger’s dimensions via a box multi-trace.
ObjectTypesToSearchFor is an exposed, editable array specifying which types to locate—ActorSpawner for EQS_FindSpawnLocations, and PatrolRoute for EQS_FindPatrolRoutes.
All found actors are added to the generated actor array through AddGeneratedActors.
9. When both EQS_FindSpawnLocations and EQS_FindPatrolRoutes complete successfully, StartSpawningIfConditionsMet is called.
If Wave.1 uses the EncounterStart trigger, spawning begins immediately.
If Wave.1 is set to Objective, it waits until the corresponding ObjectiveActor with the matching gameplay tag is completed before initiating spawns.
10. When a wave starts, the ActorSpawner array from the EQS defines all valid spawn points.
Enemies spawn from one spawner until BatchSize is reached, then rotate to the next spawner in the list.
Once the total spawn count for an enemy type equals QuantitySpawned, either the next enemy type begins spawning, or—if none remain—HasSpawned is set to true, signaling the system to evaluate conditions for the next wave.
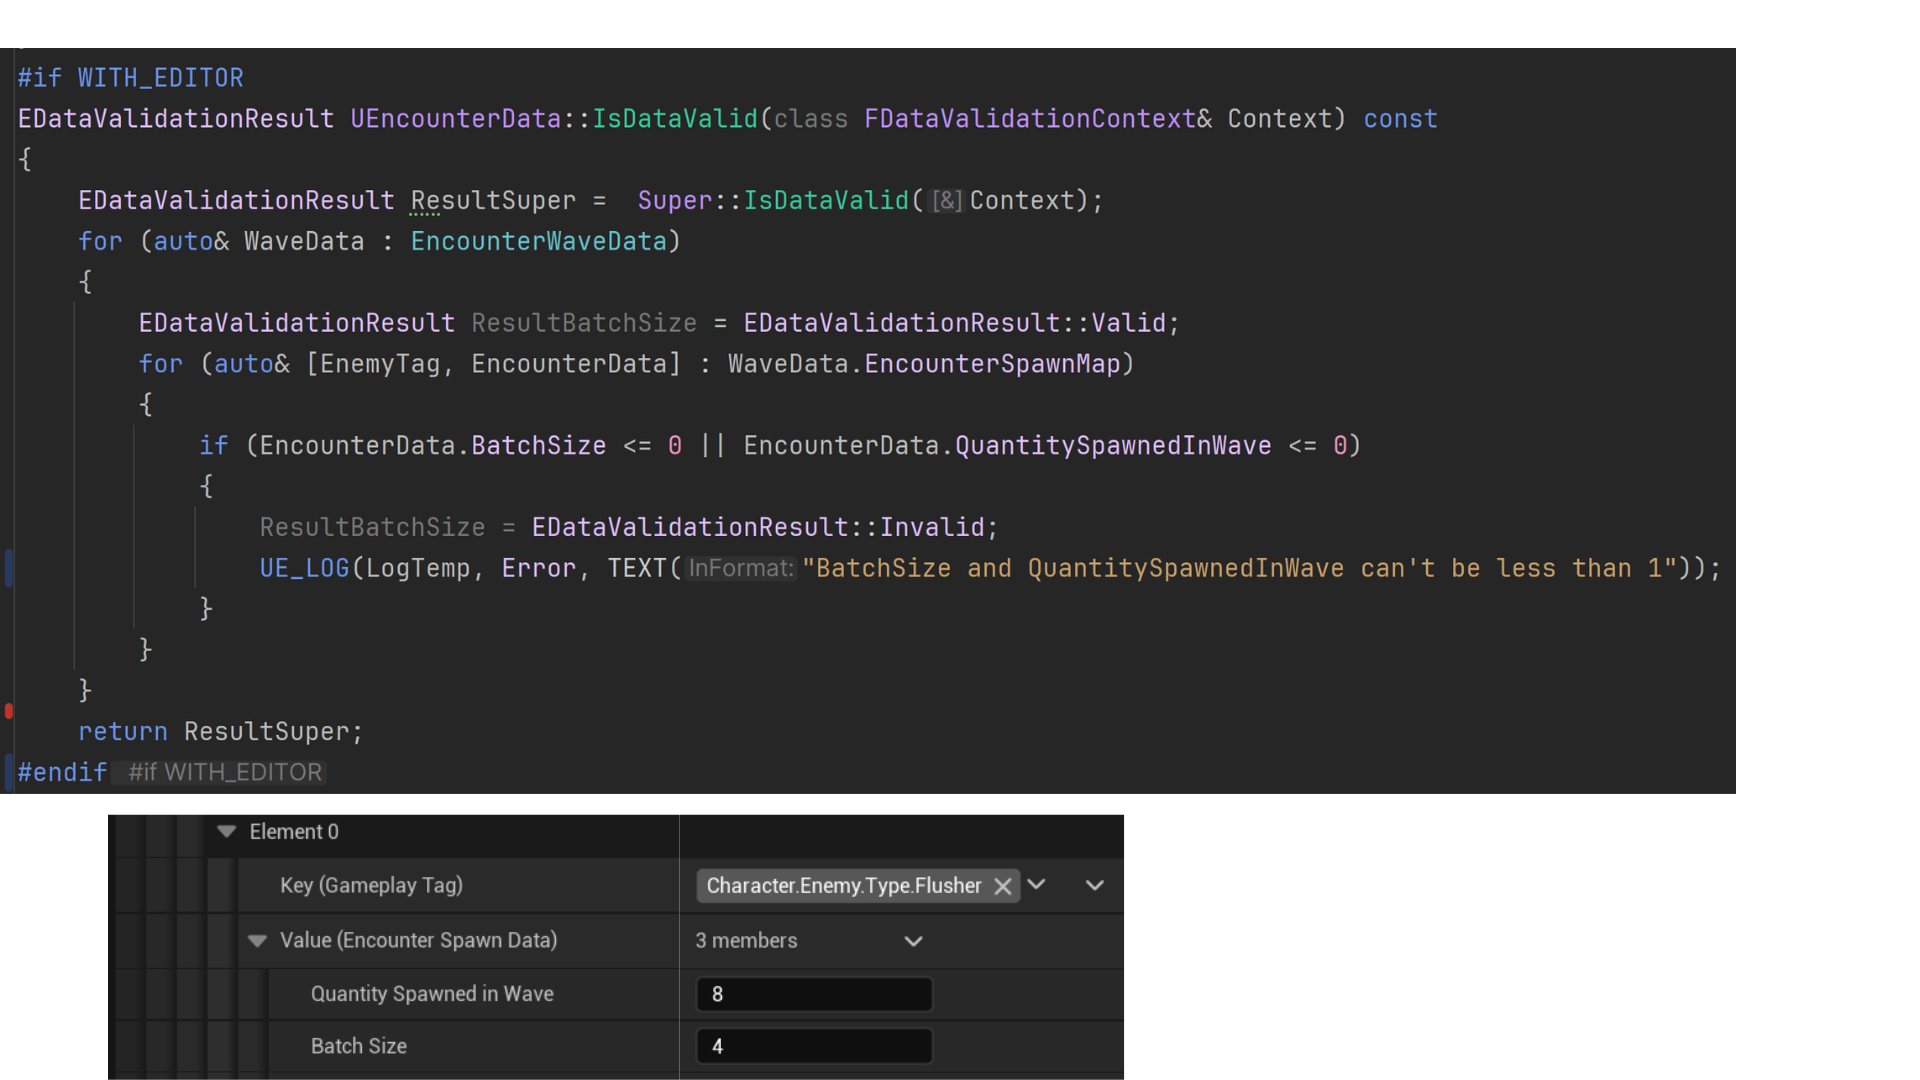
11. Automated unit tests ensured data validity during wave creation.
12. Automated unit text ensure that every EncounterTrigger has a DA_EncounterData assigned to the EncounterData property.
Tech
AI Perecption
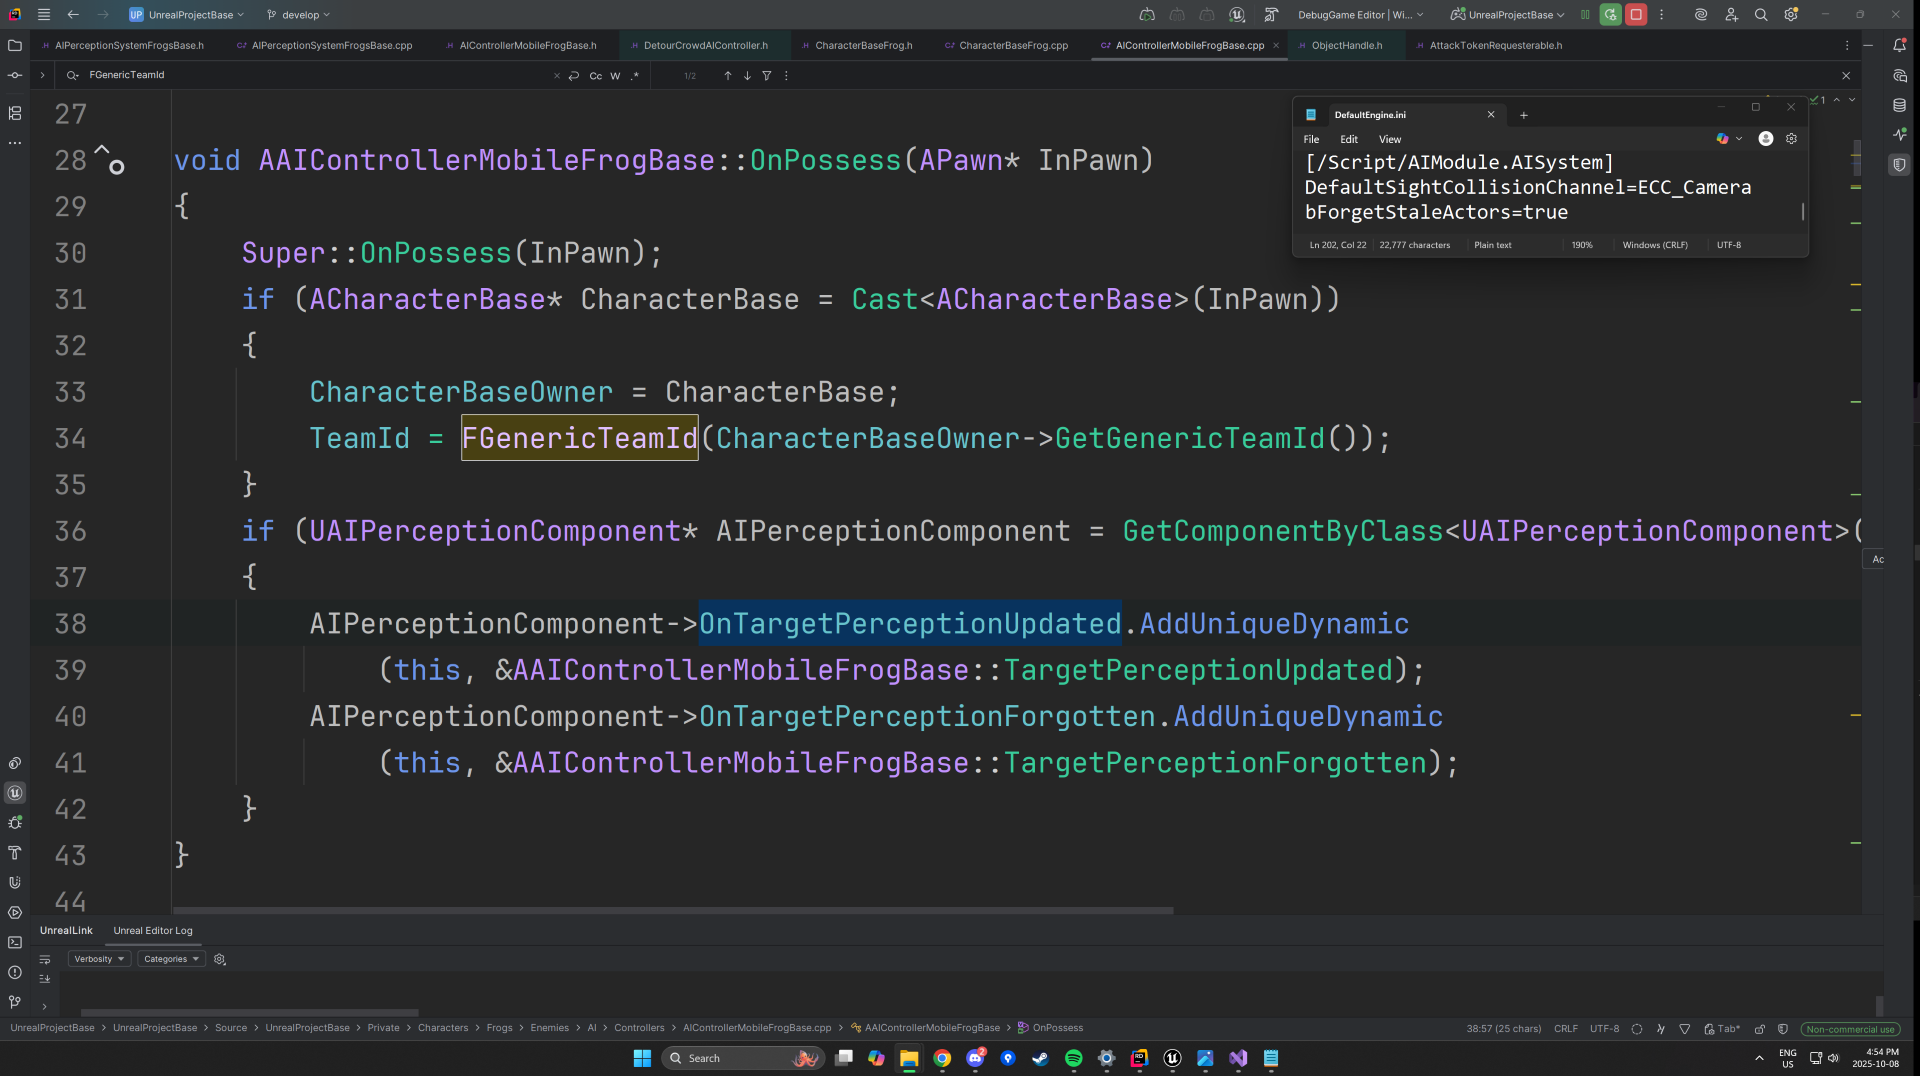
1. The AI Controller retrieves the TeamID from its possessed Character using the IGenericTeamAgentInterface, which defines team-based relationships between AI and player-controlled characters.
The controller binds to OnTargetPerceptionUpdated, triggered when a stimulus is detected, and OnTargetPerceptionForgotten, which fires once a stimulus exceeds its MaxAge.
For these delegates to function properly, the bForgetStaleActors property must be enabled in the Default.ini file
— otherwise, stale perception data is never invalidated and OnTargetPerceptionUpdated will not be called consistently.
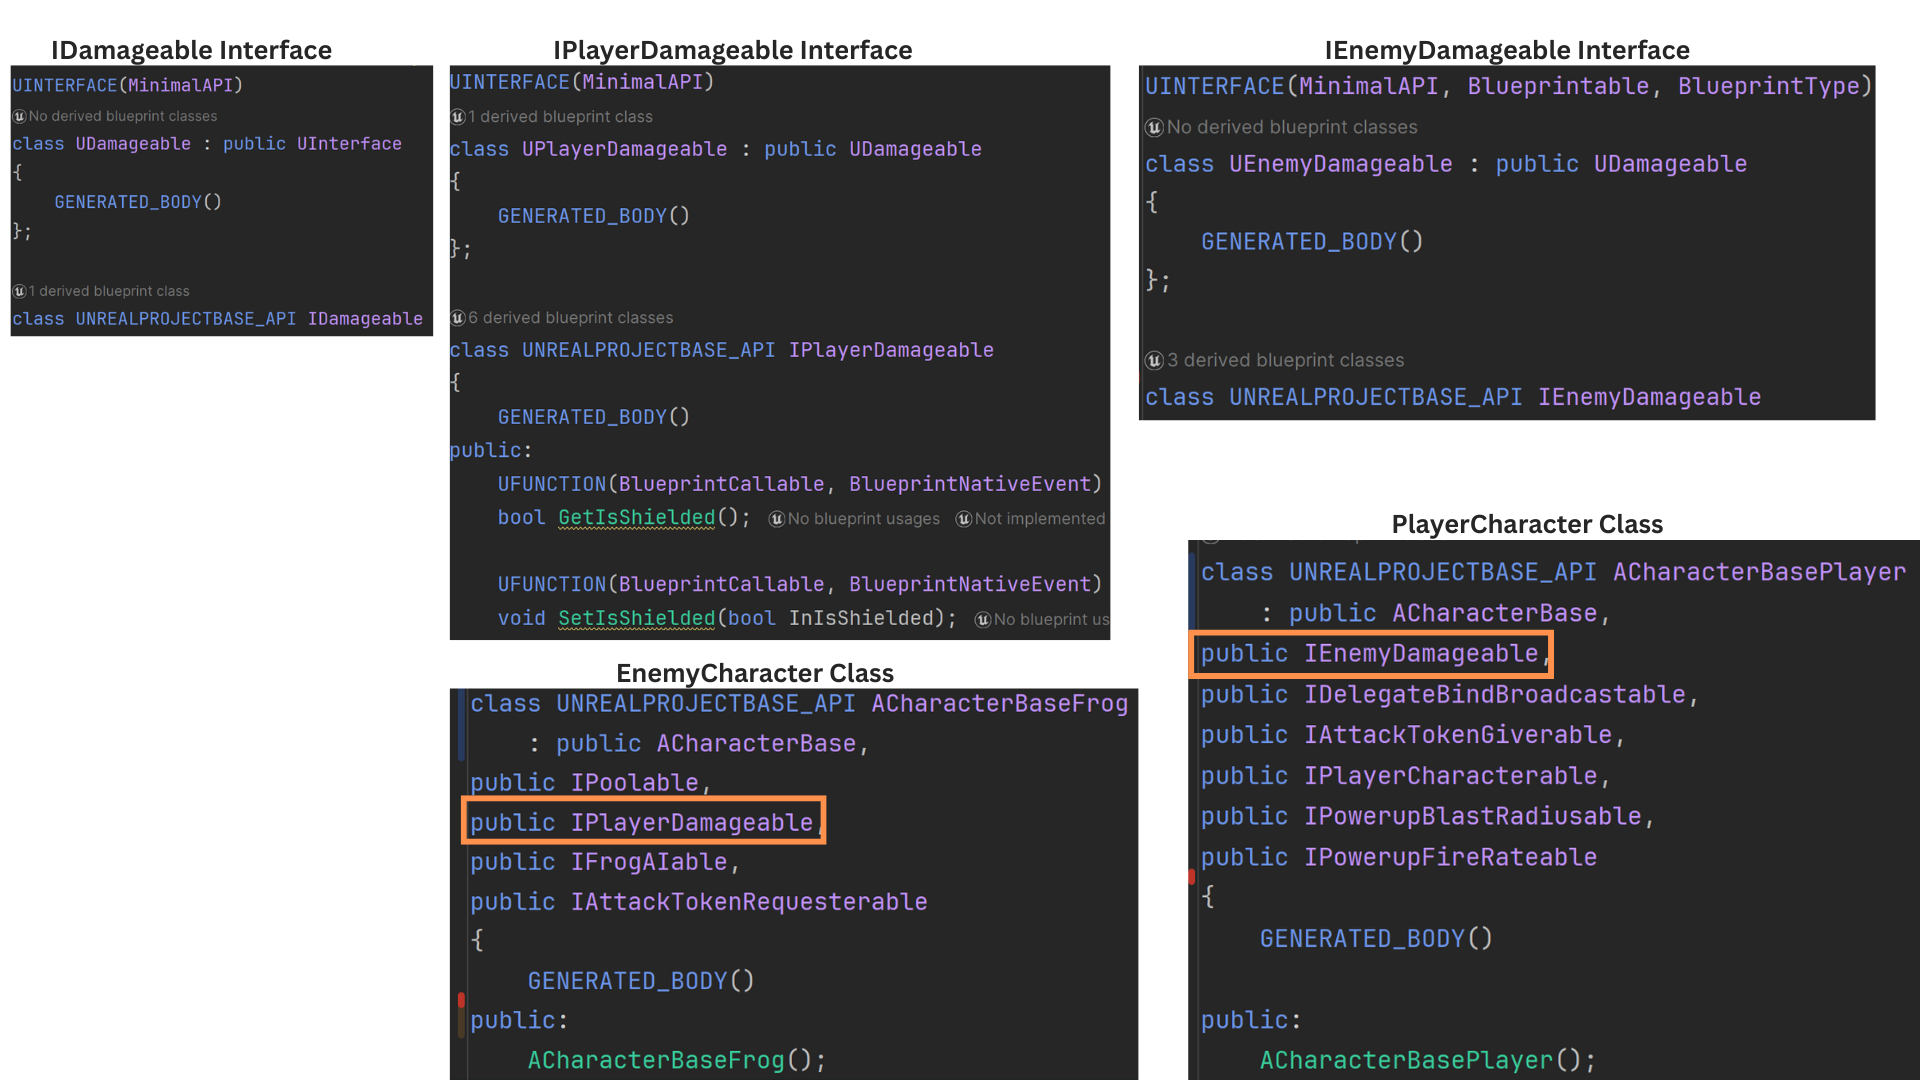
2. IGenericTeamAgentInterface is implemented in the ACharacterBase class, inherited by both the enemy and player character classes.
Because AAIController already implements this interface, each AI Controller can identify friend or foe automatically.
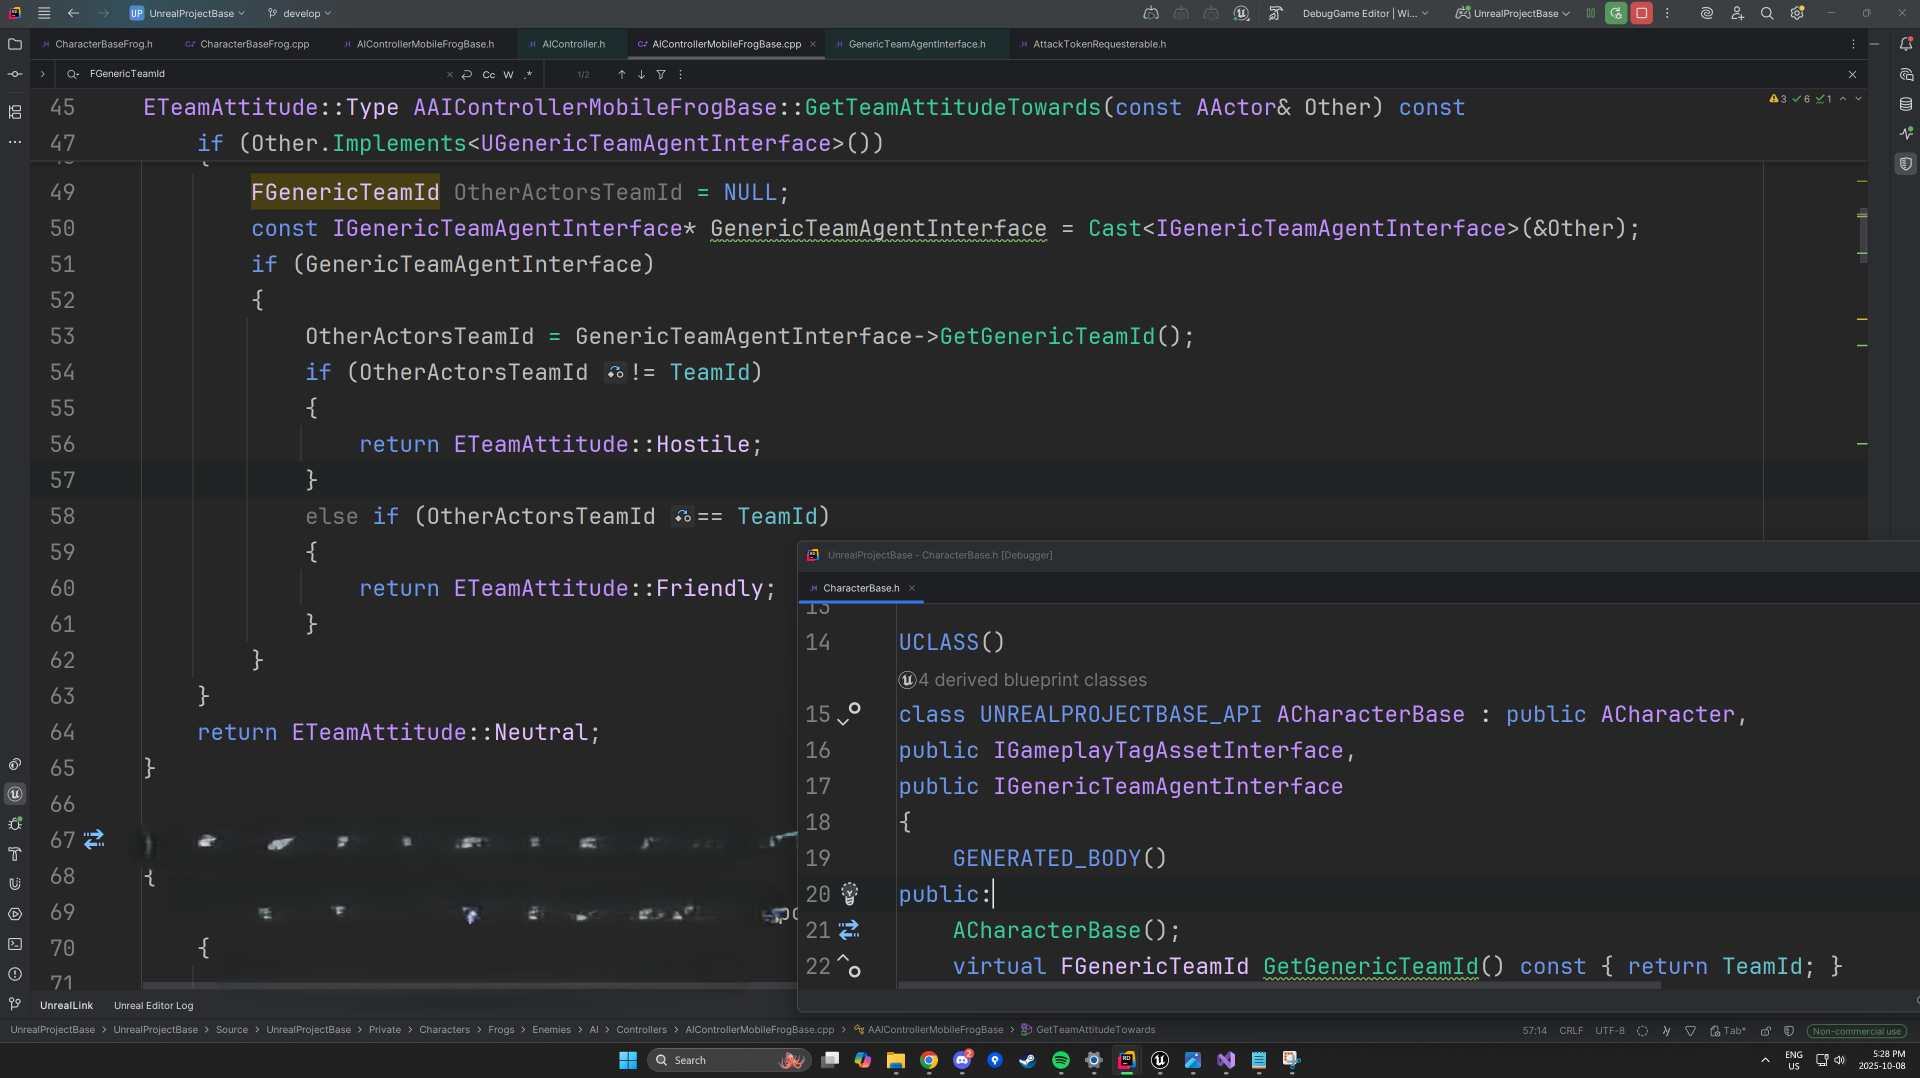
GetTeamAttitudeTowards() is overridden to compare the perceived AActor’s TeamID against the one belonging to the AI’s currently possessed pawn.
The function returns an ETeamAttitude value — Hostile, Friendly, or Neutral — which informs downstream behavior logic such as targeting and aggression.
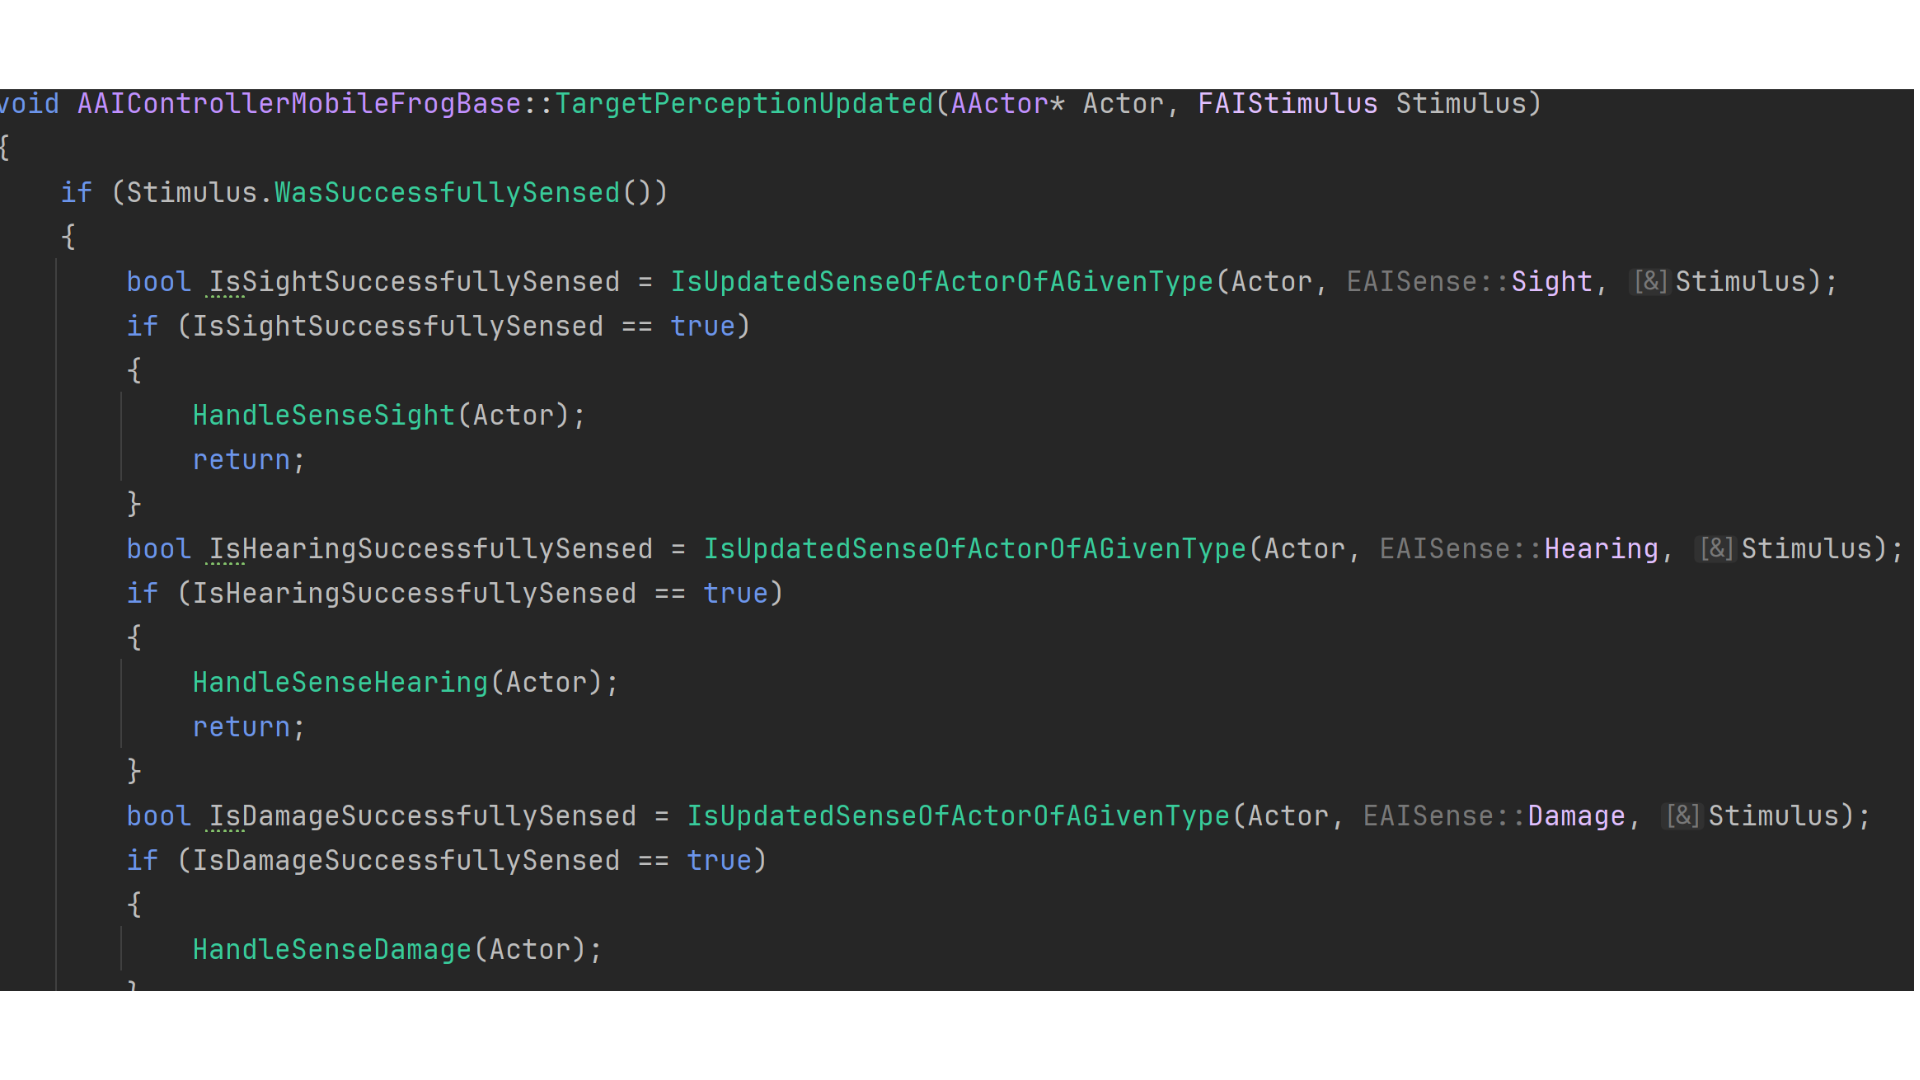
3. The AIPerceptionComponent is configured with three active senses — Sight, Hearing, and Damage.
Player characters (ACharacterBasePlayer) can be perceived through sight and damage, while objects such as generators (AGeneratorBase) are detectable via the hearing sense.
IsUpdatedSenseOfActorOfAGivenType() evaluates the sense type of each new stimulus and delegates processing to the appropriate handler function, ensuring that every sense type (sight, sound, or damage) is interpreted correctly and efficiently.
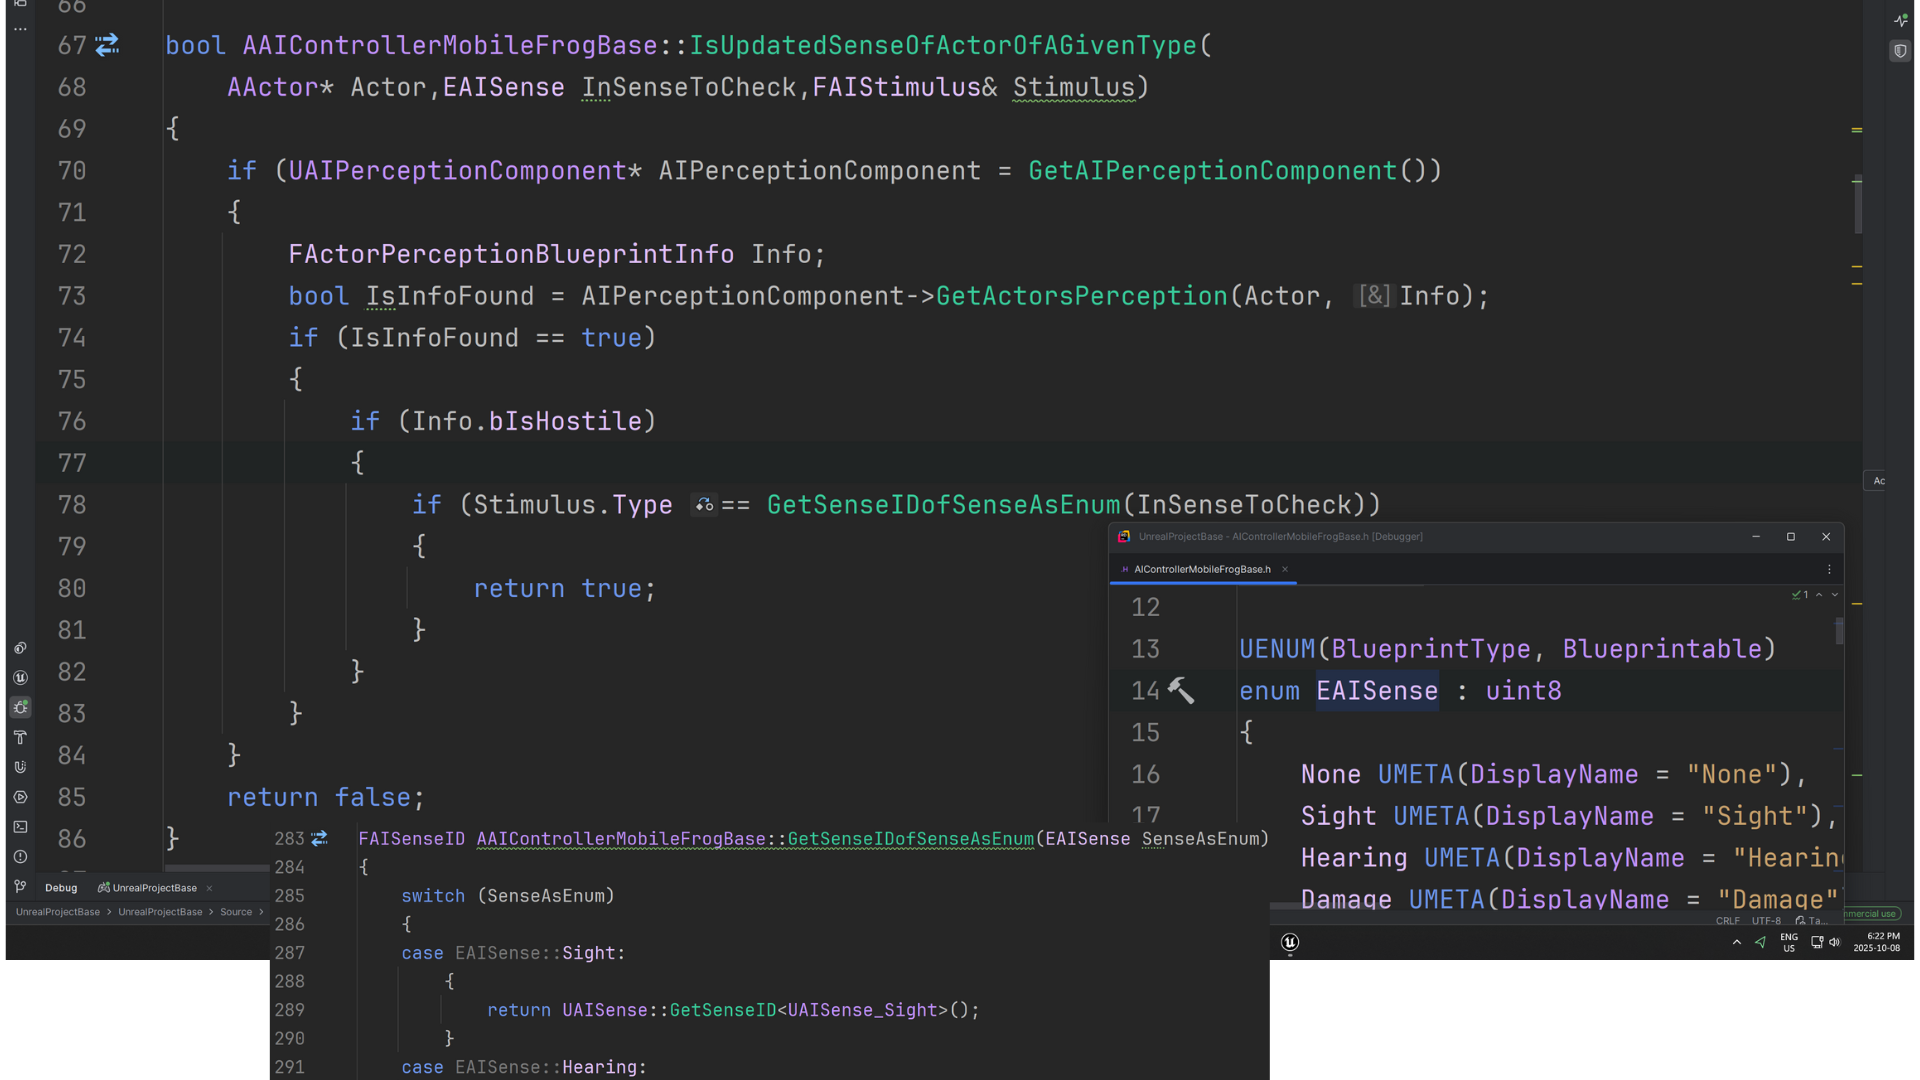
4. An internal enum EAISense is defined within AAIControllerMobileFrogBase to represent supported perception types (e.g., Sight, Hearing, Damage).
However, Unreal’s perception system uses FAISenseID internally, meaning EAISense cannot be compared directly to Stimulus.Type.
GetSenseIDofSenseAsEnum() bridges this gap by converting the custom EAISense value into a valid FAISenseID, allowing one-to-one comparisons between local sense types and engine-level stimuli.
5. To eliminate the need for casting, ACharacterBasePlayer implements a lightweight interface, UPlayerCharacterable, enabling the AI to verify whether a perceived actor is the player.
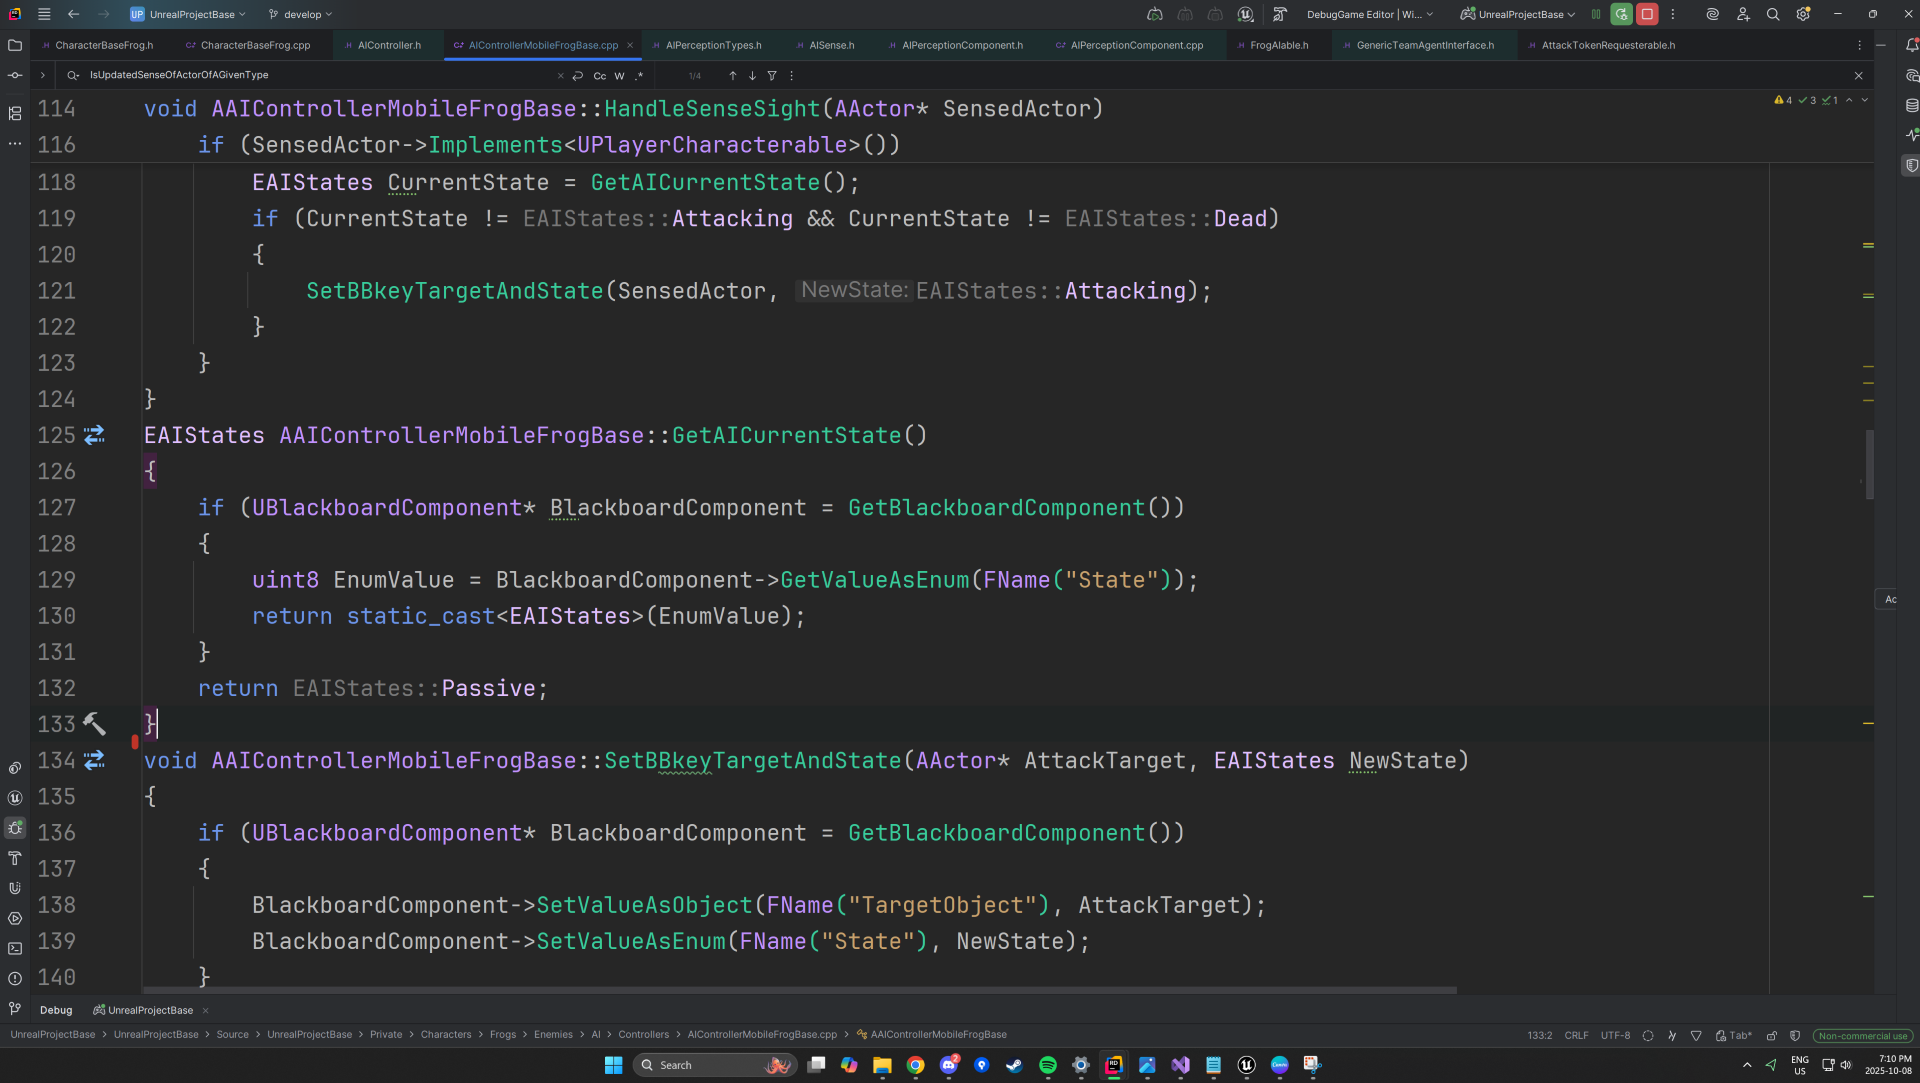
HandleSenseSight() updates the AI’s Blackboard “State” key to Attacking, provided the current state is different — preventing redundant writes.
Similarly, HandleSenseHearing() and HandleSenseDamage() transition the AI into corresponding reactive states.
GetAICurrentState() converts the stored Blackboard int8 value back into the strongly typed EAIStates enum via a static_cast.
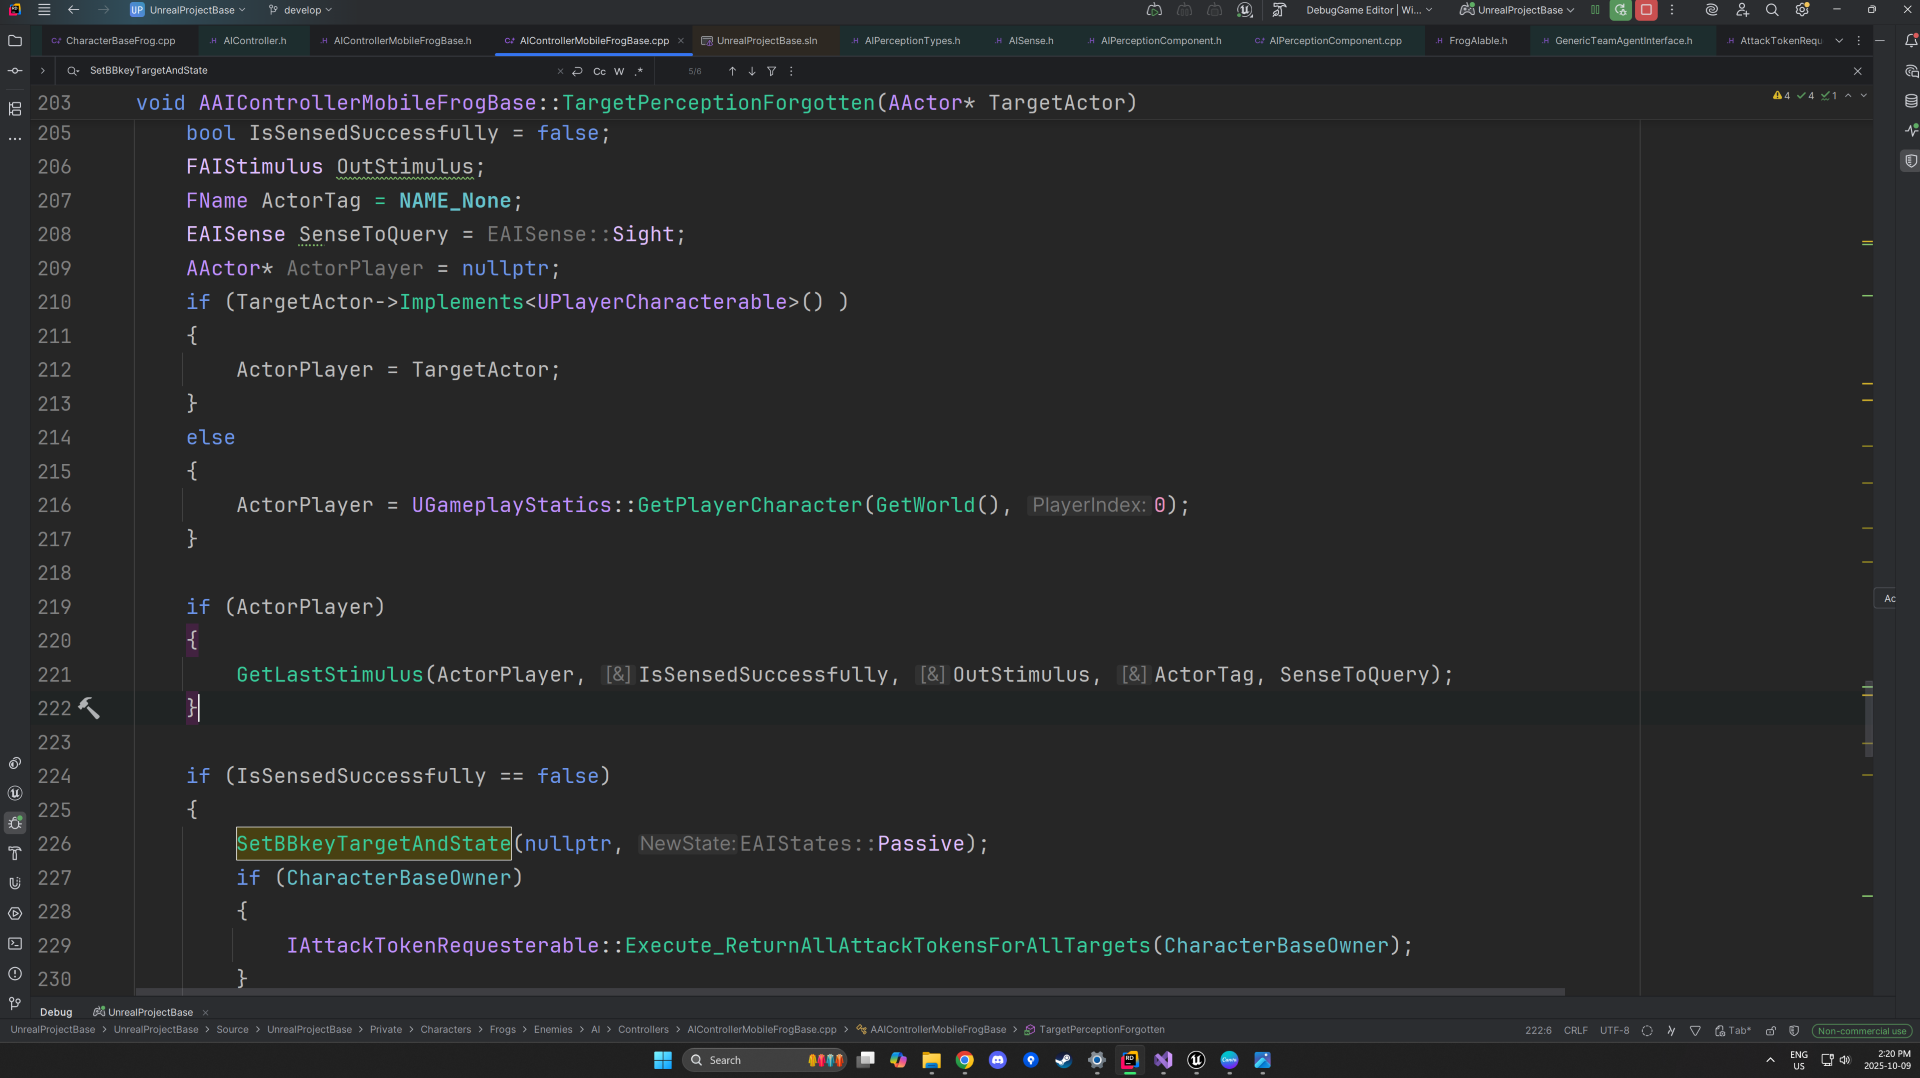
SetBBKeyTargetAndState() sets the TargetObject Blackboard key depending on the AI state —
assigning the sensed actor as the AttackTarget when entering Attacking or Investigate, and resetting it to nullptr when transitioning to Passive.
6. When an AI’s hearing or damage perception expires (exceeding MaxLife), the AI may still retain visual contact if sight data remains active — since only the player is detectable via sight.
GetLastStimulus() verifies whether the AI still perceives the player visually; if not, it resets the Blackboard “State” key to Passive and clears TargetObject.
Additionally, the perception logic ties into the Token System: enemy characters implement the
IAttackTokenRequesterable interface to request attack authorization, while the player character implements IAttackTokenGiverable to manage which AI can engage simultaneously.
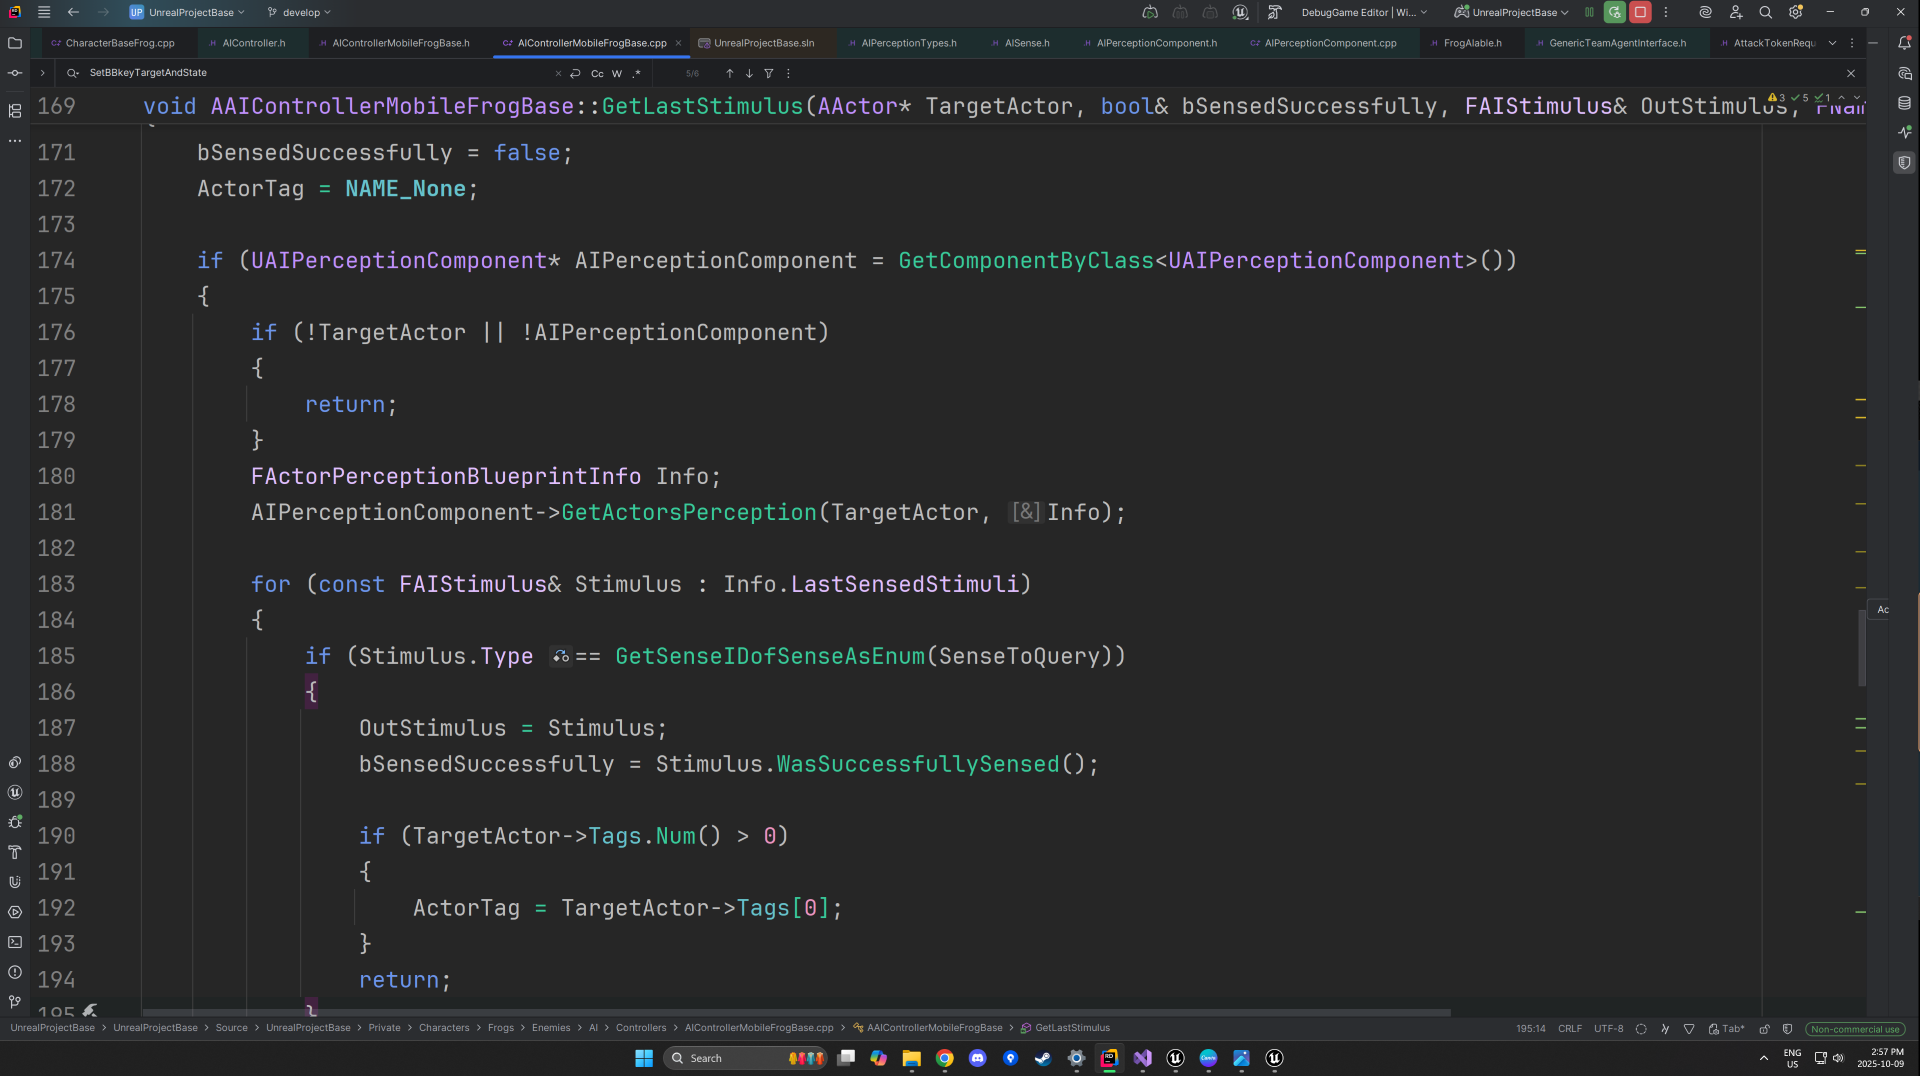
7. The AI retrieves its perception data on the player by querying GetActorsPerception(), which fills an FActorPerceptionBlueprintInfo structure with all current stimulus details.
The function outputs whether the player was successfully sensed (bSensedSuccessfully) and returns the corresponding FAIStimulus through OutStimulus.
etSenseIDofSenseAsEnum() is then used to confirm that the stored perception data corresponds to the sight sense, ensuring that subsequent behavior logic only executes for valid visual detections of the player.
Tech
AI Behvaiour
Behaviour Tree Overview and Passive State
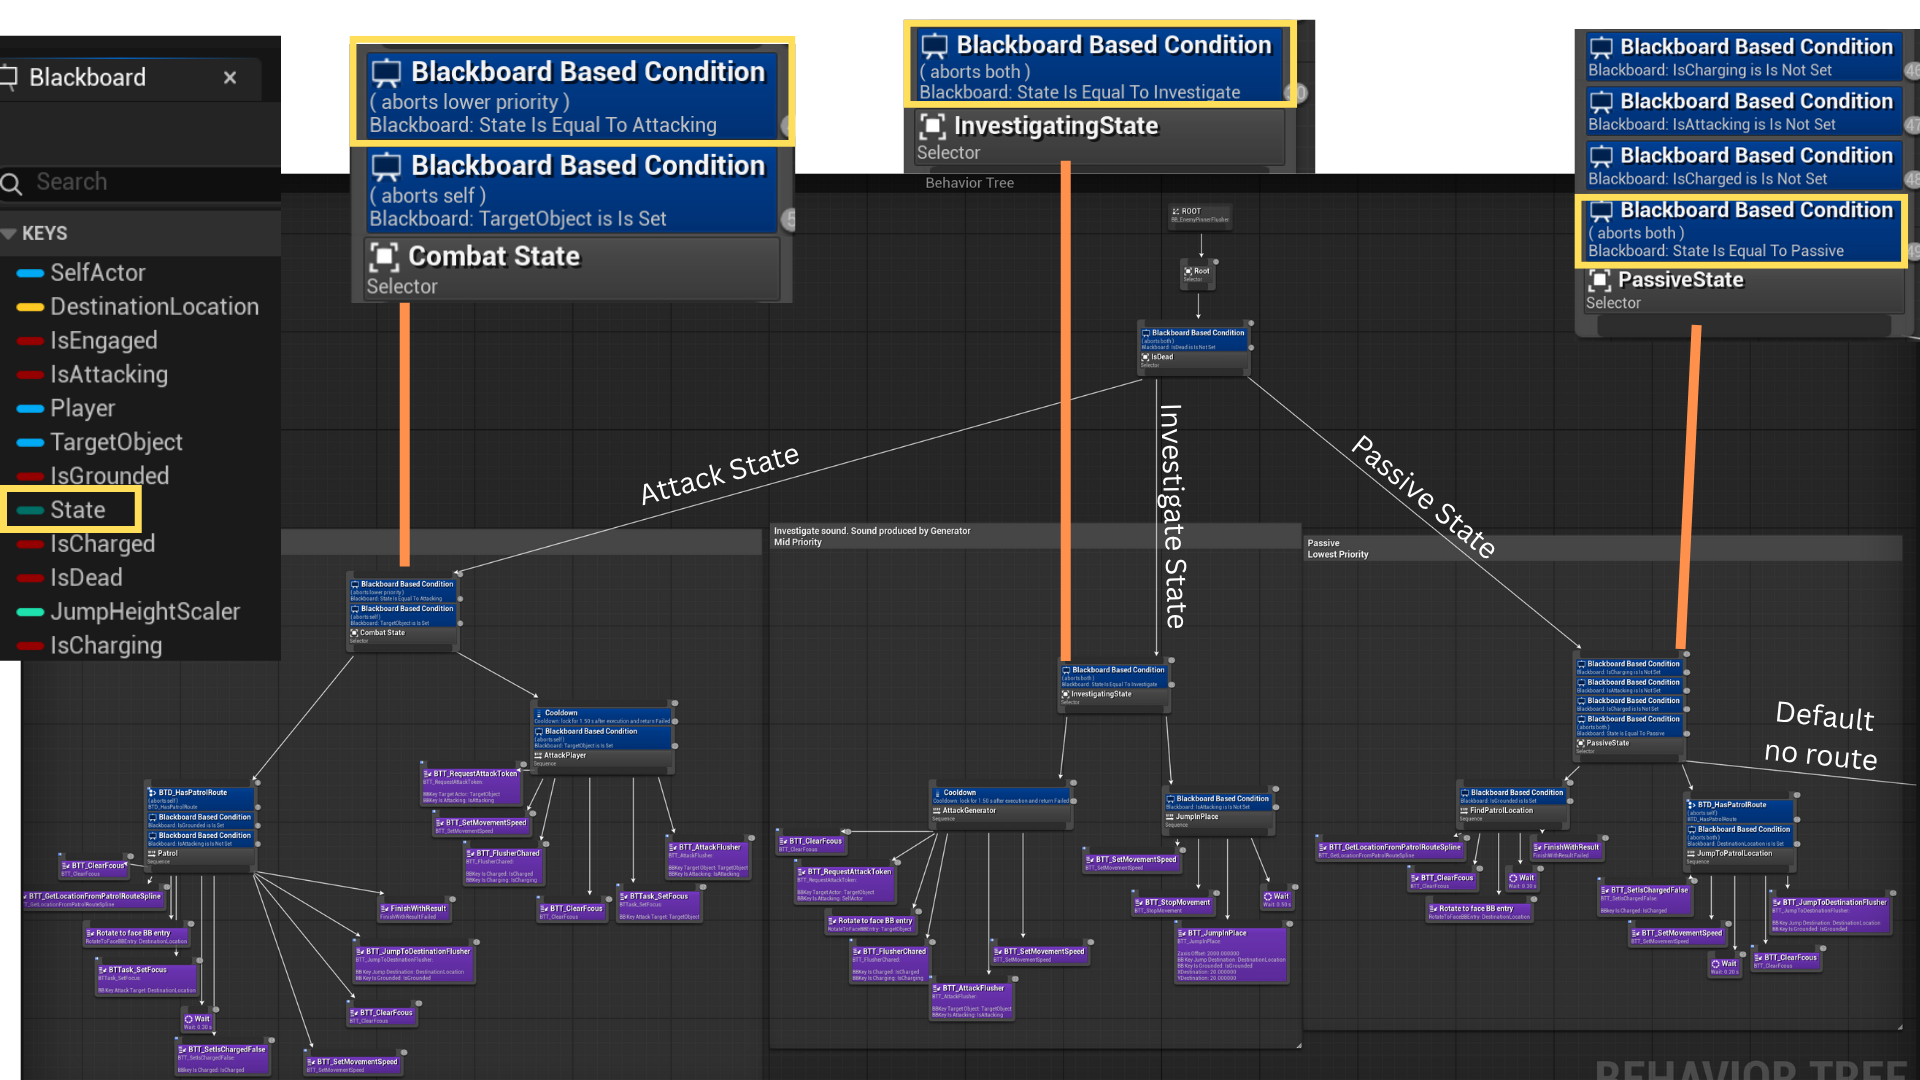
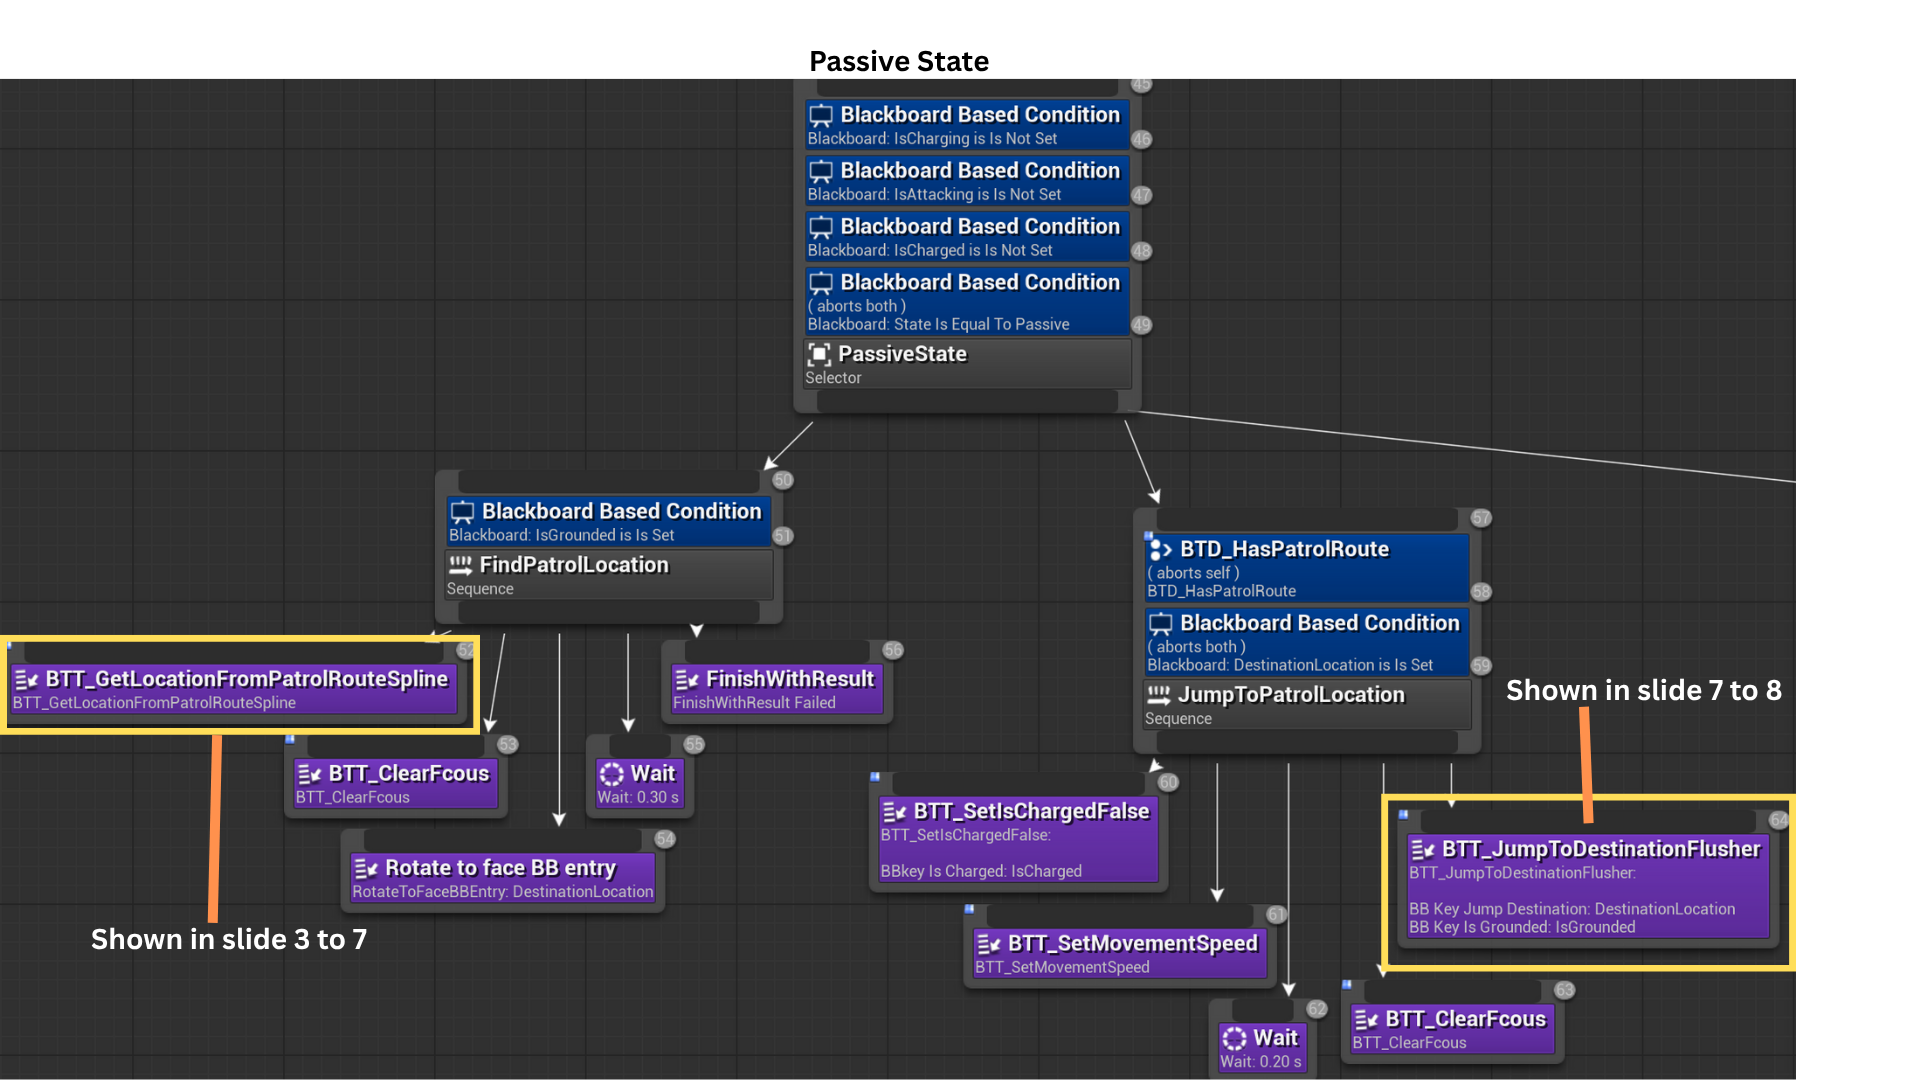
1. The Blackboard key State, an UEnum, selects between Passive, Combat, and Investigate modes.
When the AI sees the player or receives damage, it enters Combat and remains until sight/damage stimuli become stale.
If it only hears the Generator (and cannot see the player), it enters Investigate.
With no active stimuli, it defaults to Passive.
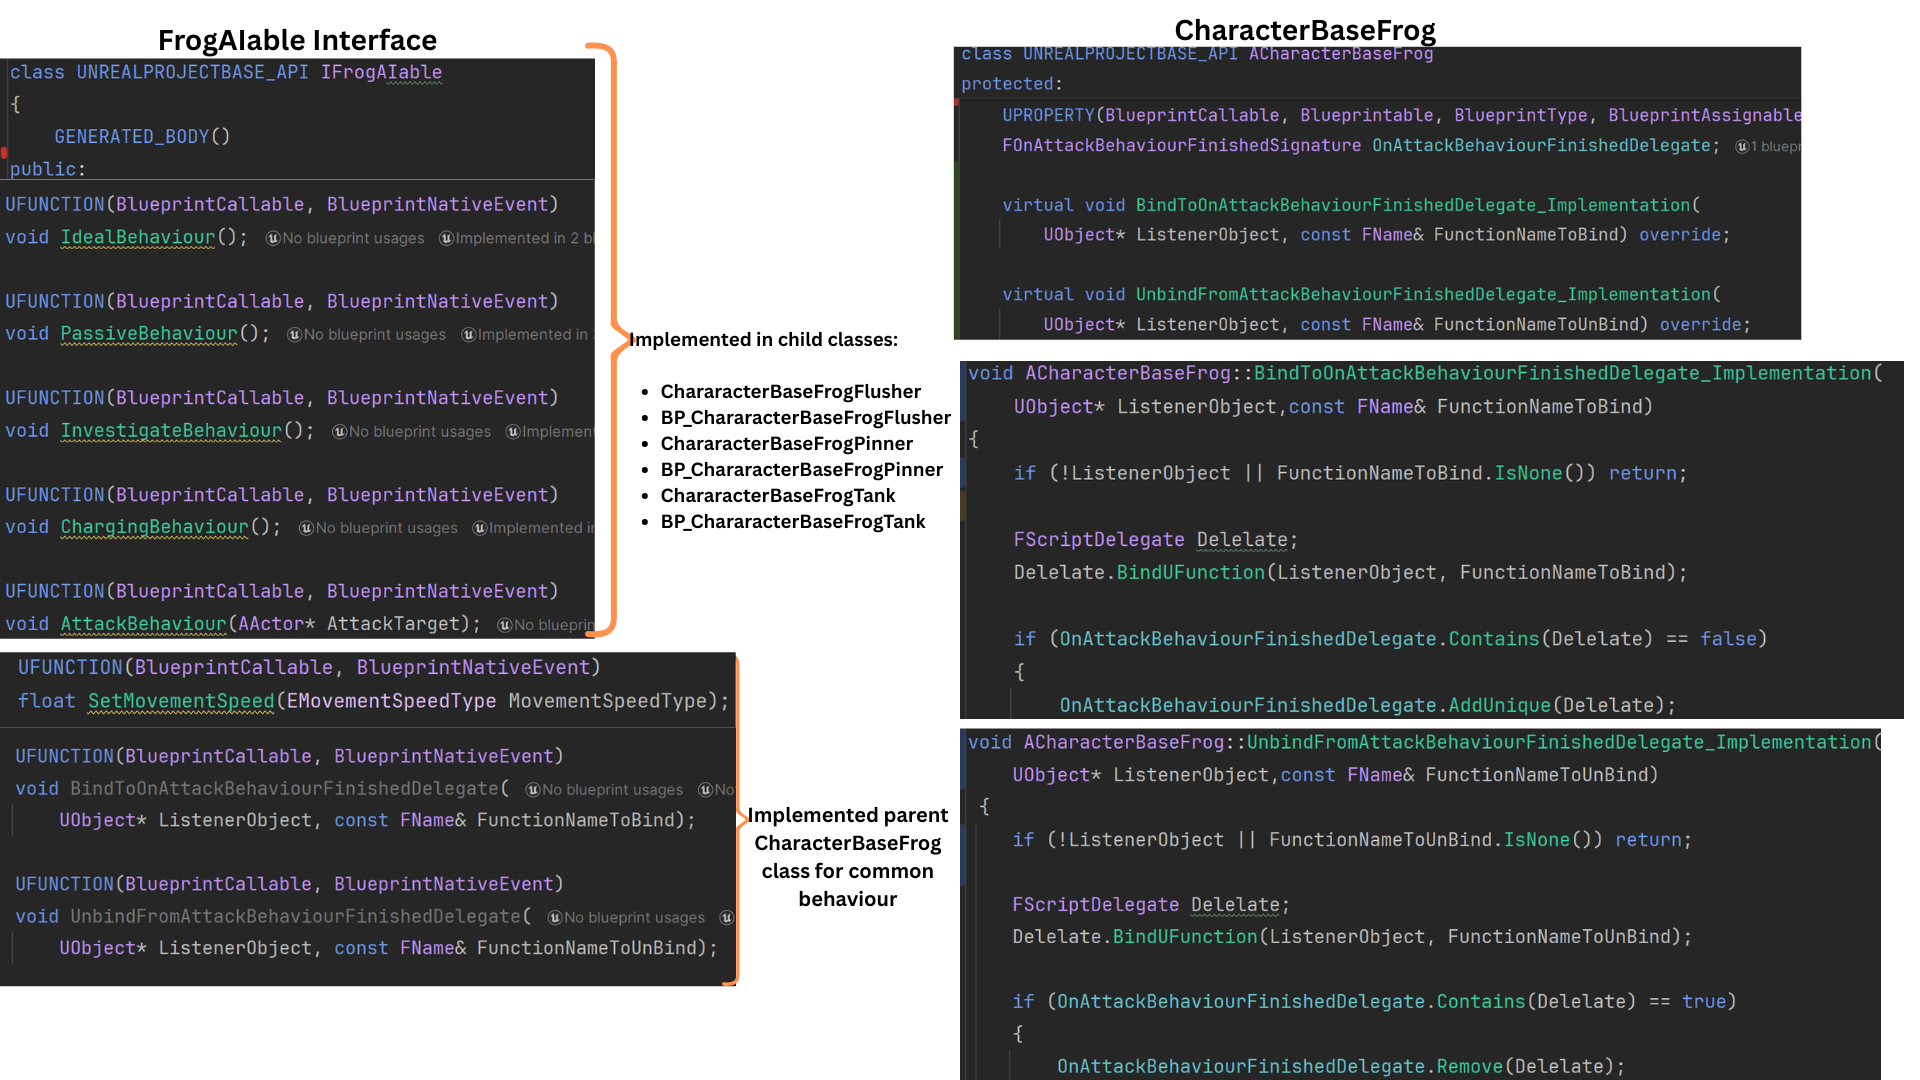
2. IFrogAIable centralizes AI behavior calls (e.g., Attack(), JumpSpecialToDestination()) and delegate binding helpers so Tasks can invoke behavior without casting.
Enemy-specific behaviors (attack logic, charge logic, etc.) are implemented in child classes or Blueprints
Shared functionality—movement speed, common helpers, and delegate management—resides in the parent class for reuse and consistency.
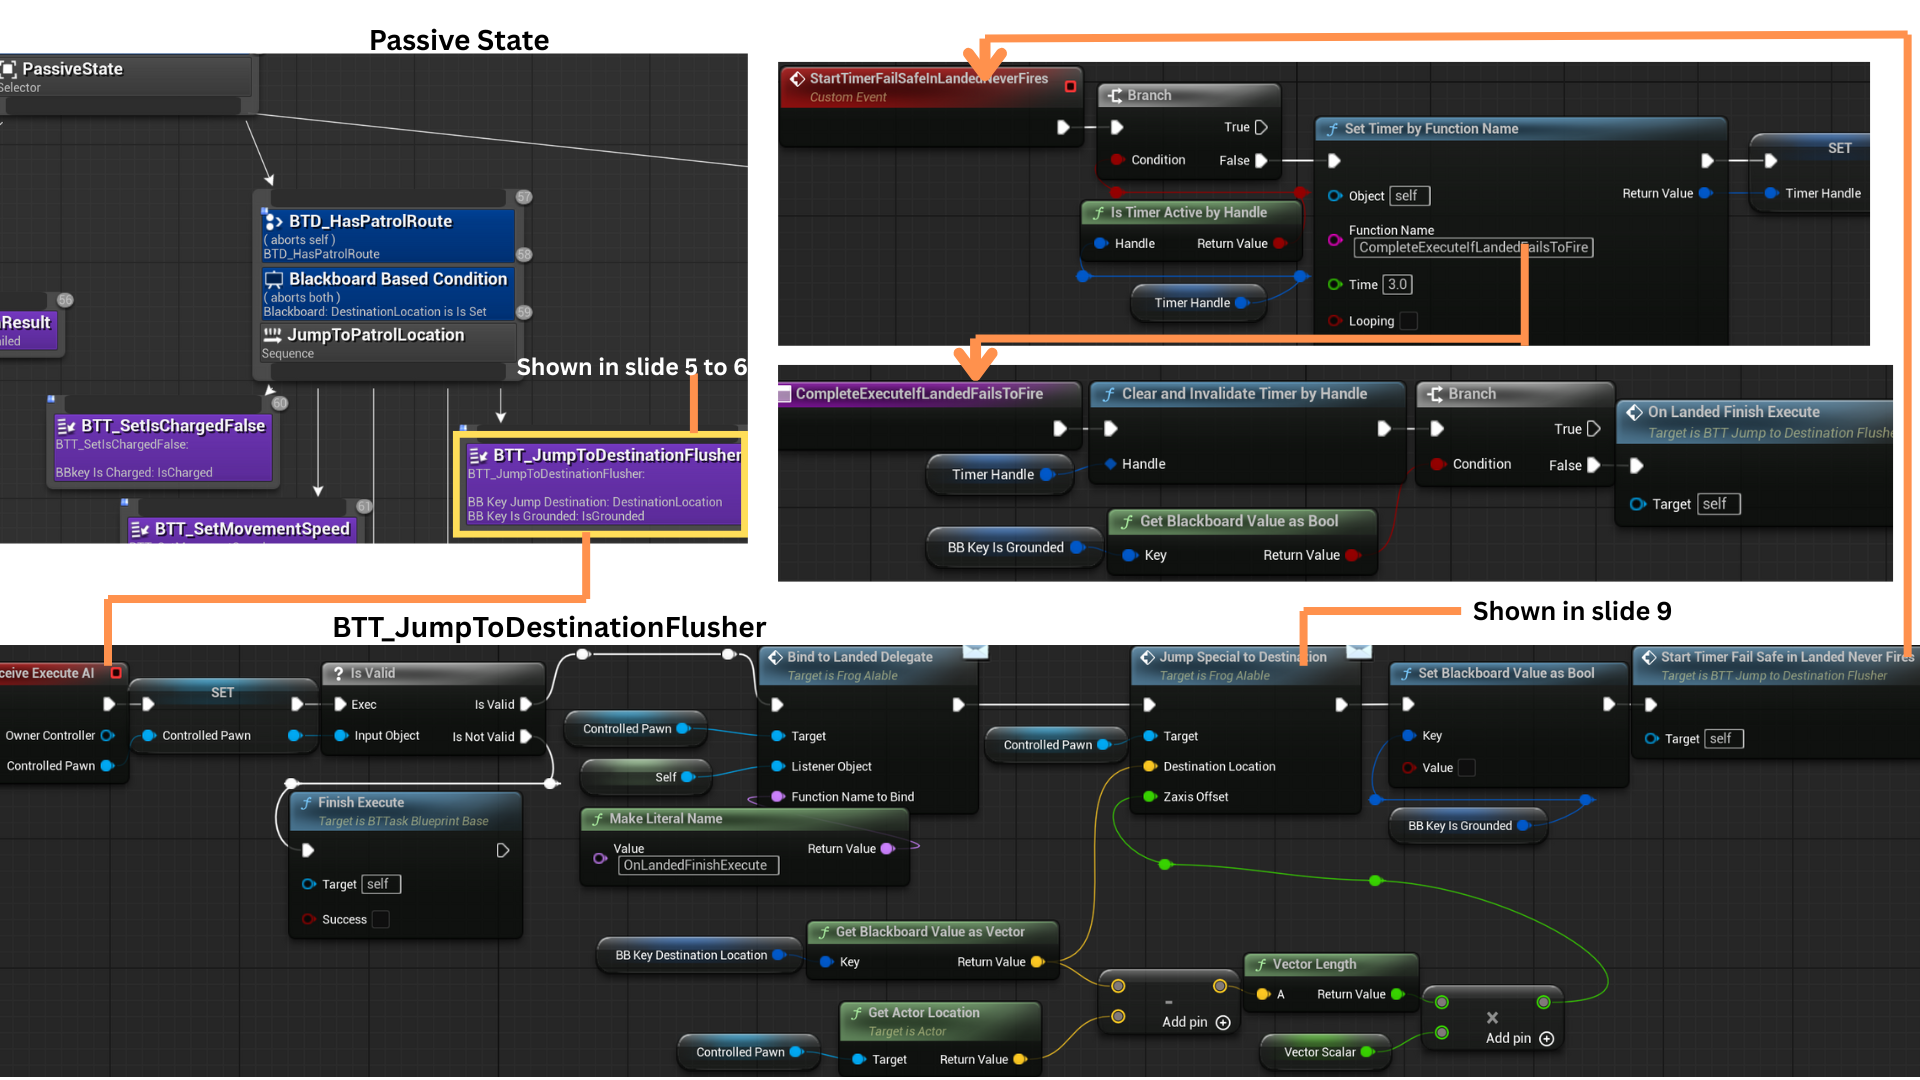
3. When an enemy is spawned or retrieved from the pool, it is assigned a patrol route (see Encounter System slides 6–8).
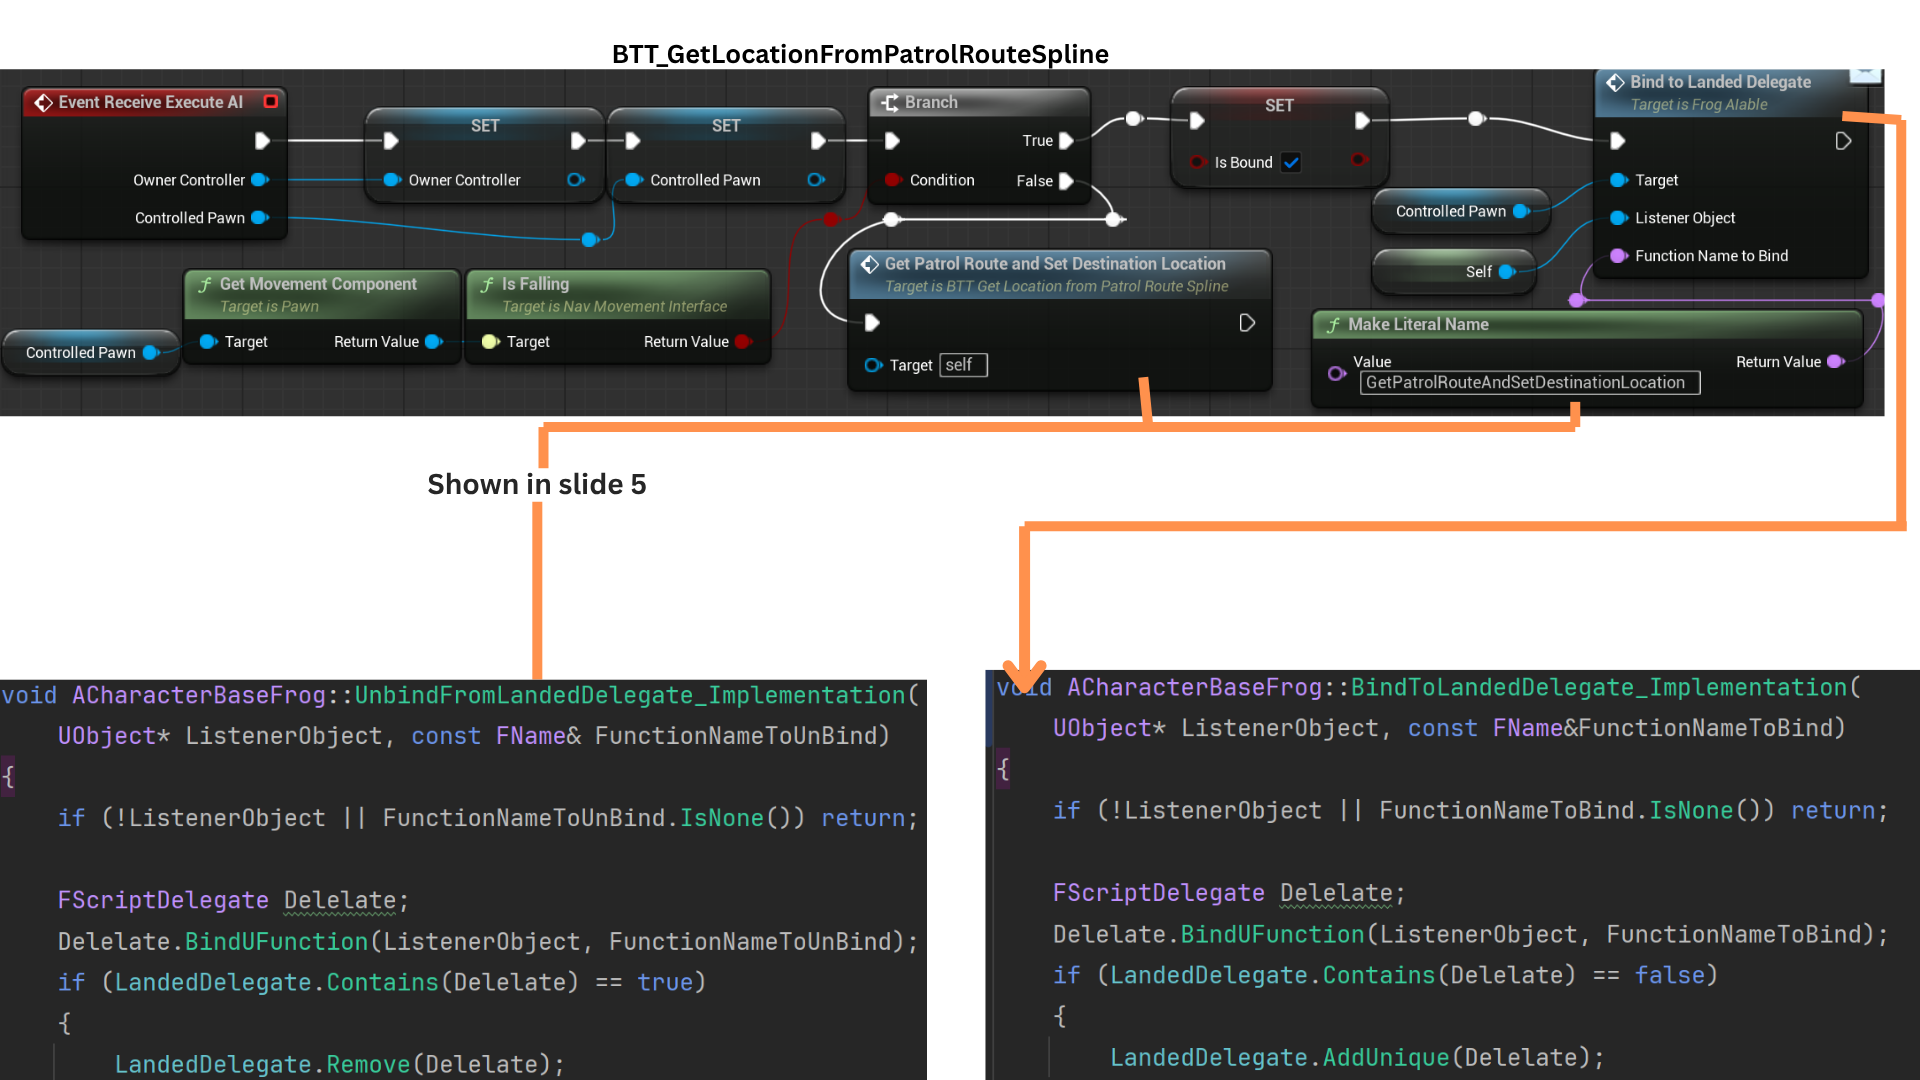
GetLocationFromPatrolRouteSpline() returns a spline point by index, runs an EQS to find a nearby unoccupied position, and writes the result to the DestinationLocation Blackboard key.
BTT_JumpToDestinationFlusher computes the launch vector from the AI’s current position to DestinationLocation and performs a physics-driven jump to that point.
4. The Behavior Tree is event-driven: nodes wait for delegate broadcasts or messages before continuing.
For example, GetPatrolRouteAndSetDestinationLocation() runs only after a landing event if the AI is airborne, halting task progression during jumps.
This design reduces polling and yields responsive, modular AI flow controlled by events rather than ticks.
As a result, the AI can dynamically jump to any valid EQS target location, enabling traversal across uneven terrain or complex environments with natural, frog-like motion.
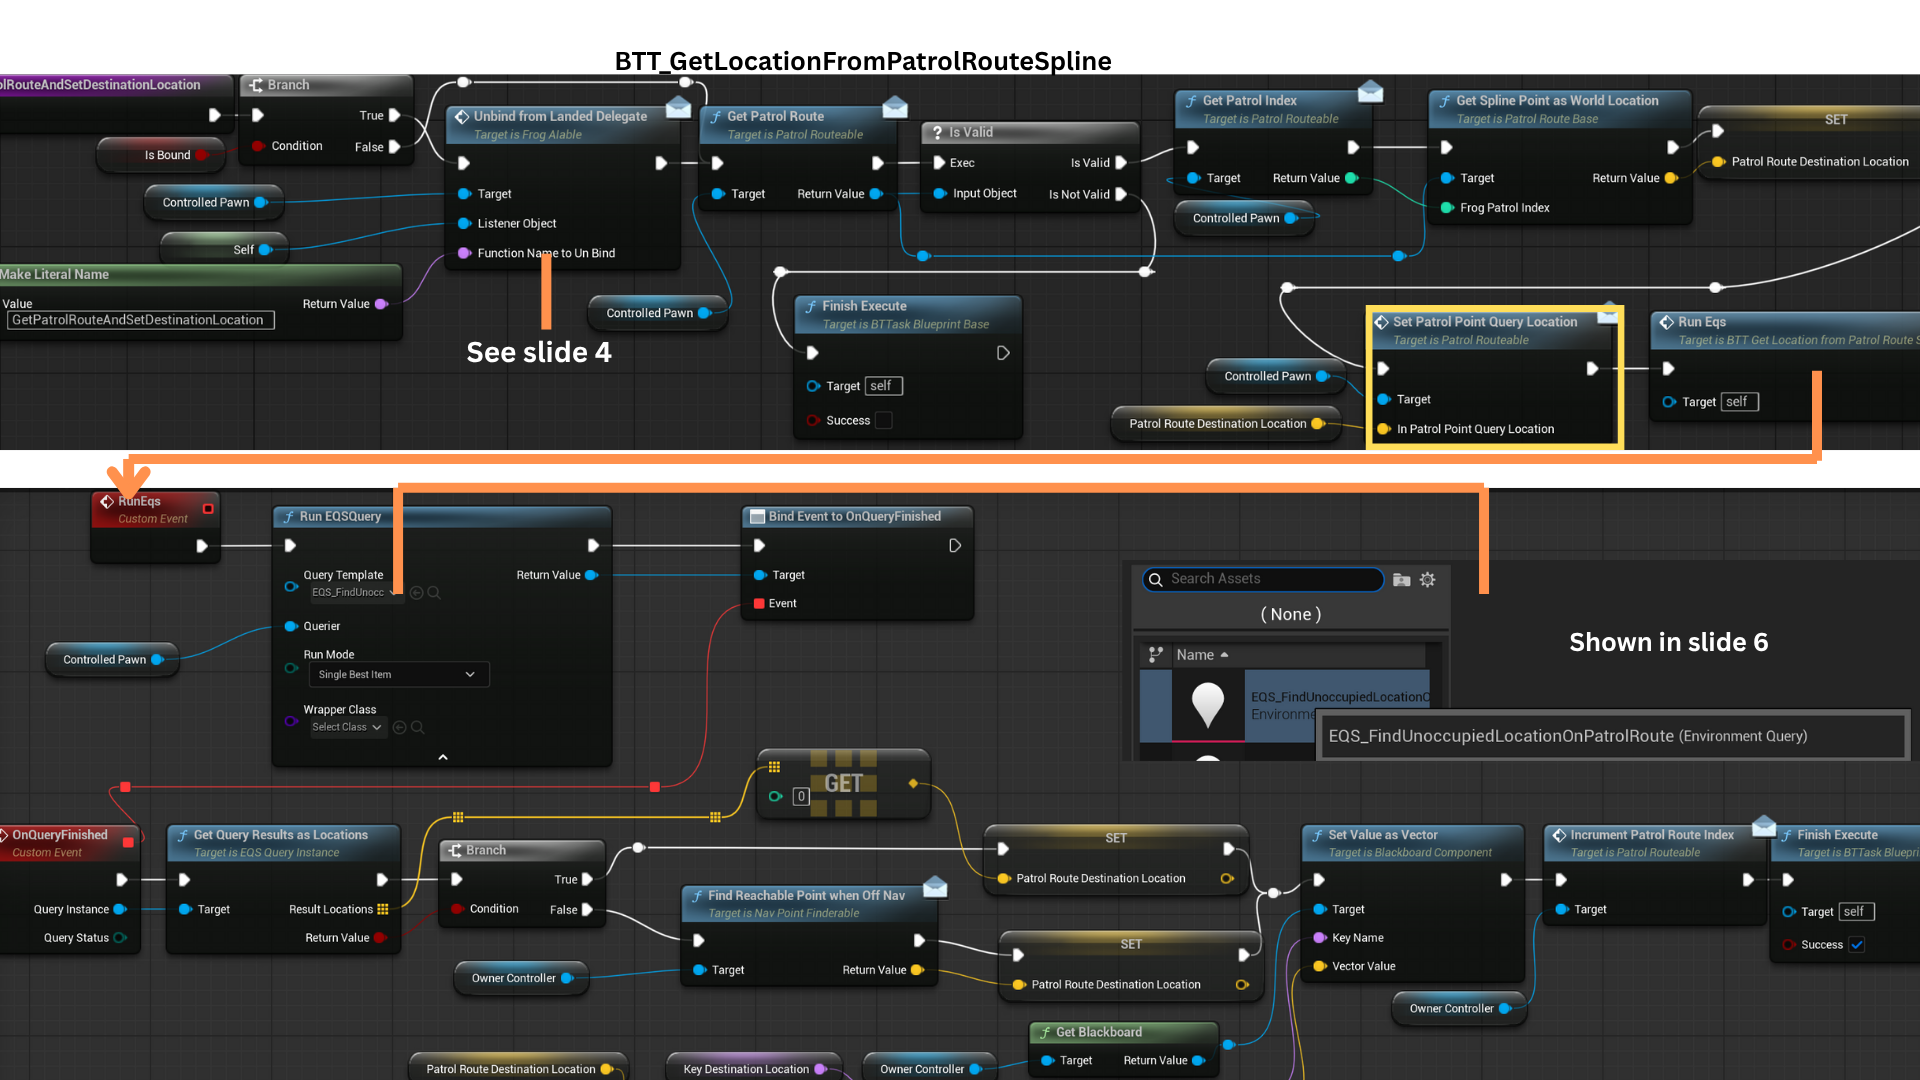
5. GetPatrolRoute() returns the spline assigned to the AI (assignment is done at spawn/pull from pool; see Encounter System for wave-based assignment).
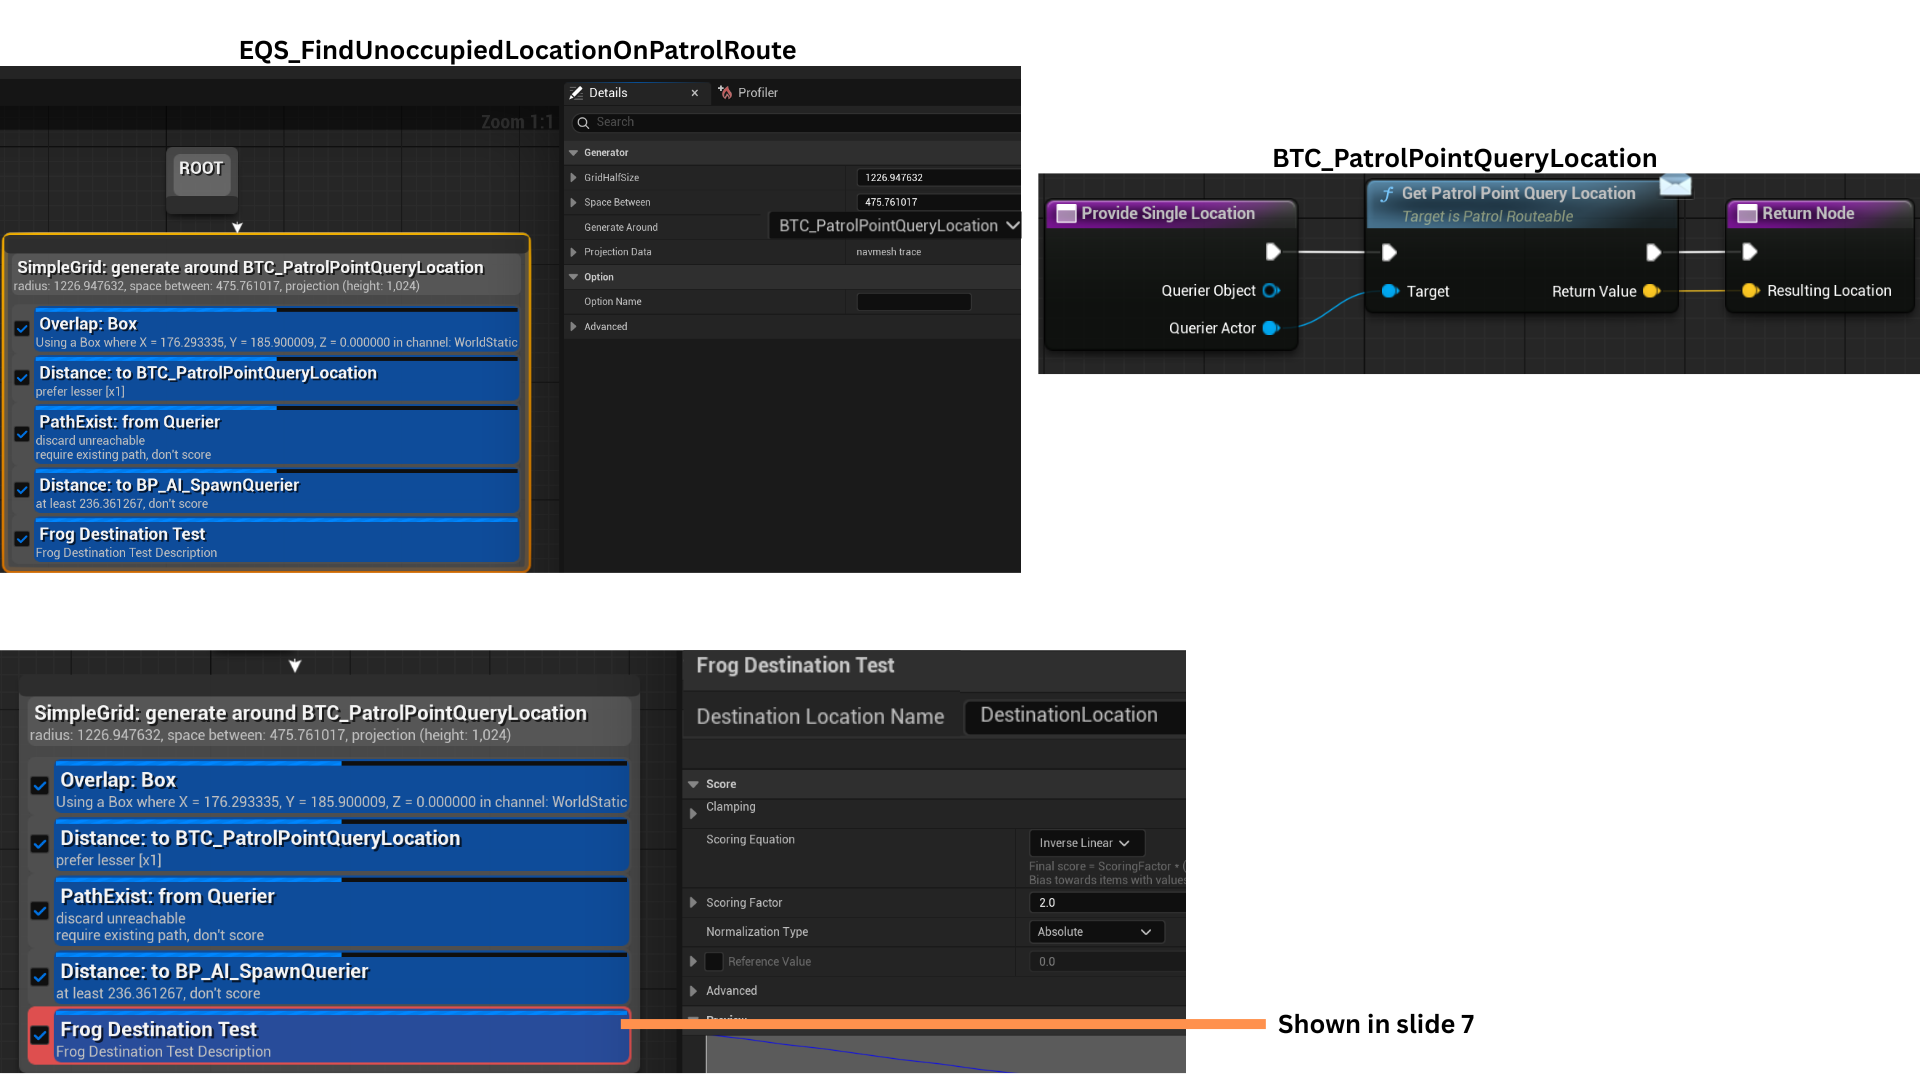
SetPatrolPointQueryLocation() forwards the target vector to CharacterBaseFrog via the PatrolRouteable interface; that vector becomes the EQS query context.
An EQS test at the current spline index finds a valid, unoccupied point with line of sight to avoid clustering.
If EQS returns no point (e.g., AI jumped or was displaced off-nav), FindReachablePointWhenOffNav() searches locally for a reachable fallback location.
SetPatrolPointQueryLocation() forwards the target vector to CharacterBaseFrog via the PatrolRouteable interface; that vector becomes the EQS query context.
6. SetPatrolPointQueryLocation() stores the query vector, which GetPatrolPointQueryLocation() later retrieves in the context function BTC_PatrolPointQueryLocation.
The EQS test checks for overlaps (walls/corners) and verifies path existence; NavLinks are considered to connect otherwise isolated navigation regions; test points are scored based on distance to CharacterBaseFrogs.
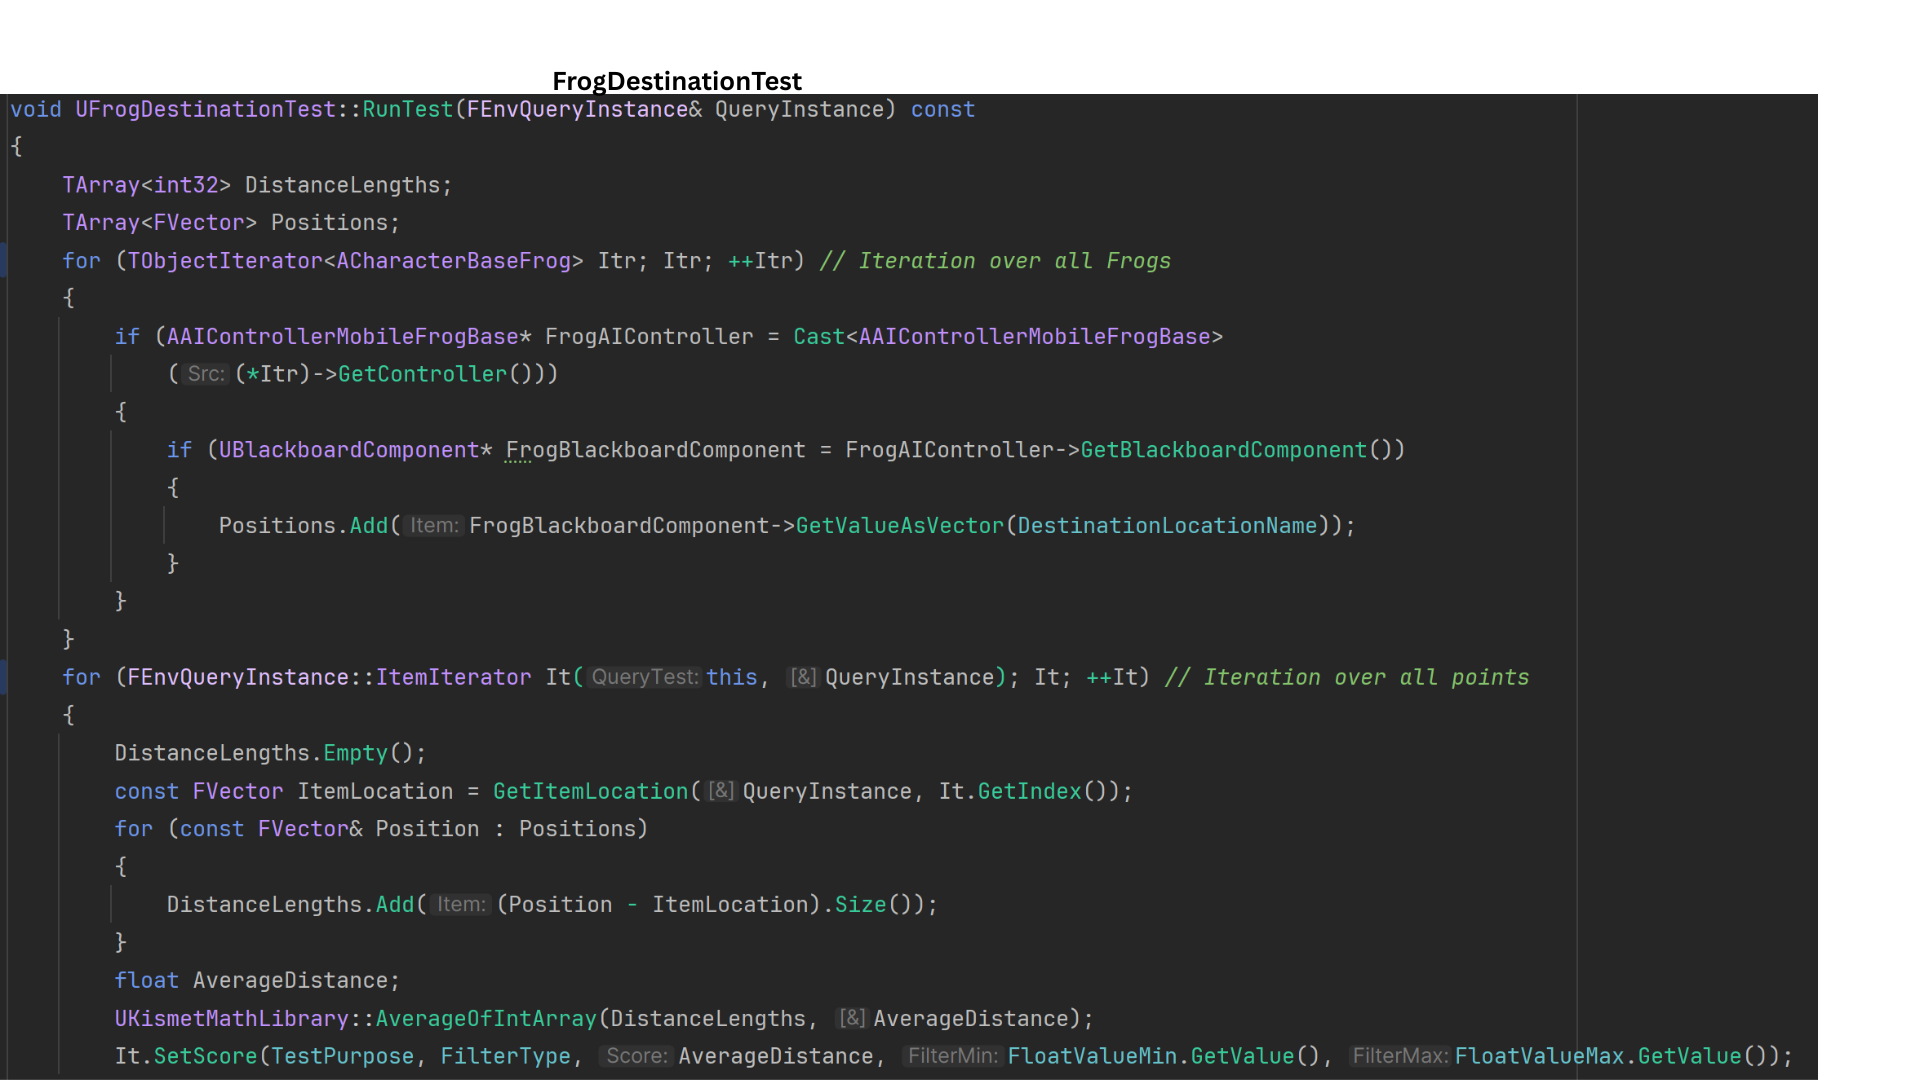
7. UFrogDestinationTest collects each AI’s DestinationLocation from the Blackboard, computes the average distance from each EQS candidate to all AI positions, and uses It.SetScore() to assign a normalized score based on mean separation—promoting even distribution across available points.
8. After DestinationLocation is set, the JumpToPatrolLocation sequence runs.
BTT_JumpToDestinationFlusher binds OnLandedFinished to the landed delegate, suspending the task until landing occurs.
As a fallback, StartTimerFailSafeInLandedNeverFires() starts a 3-second timer to complete the task if the delegate fails.
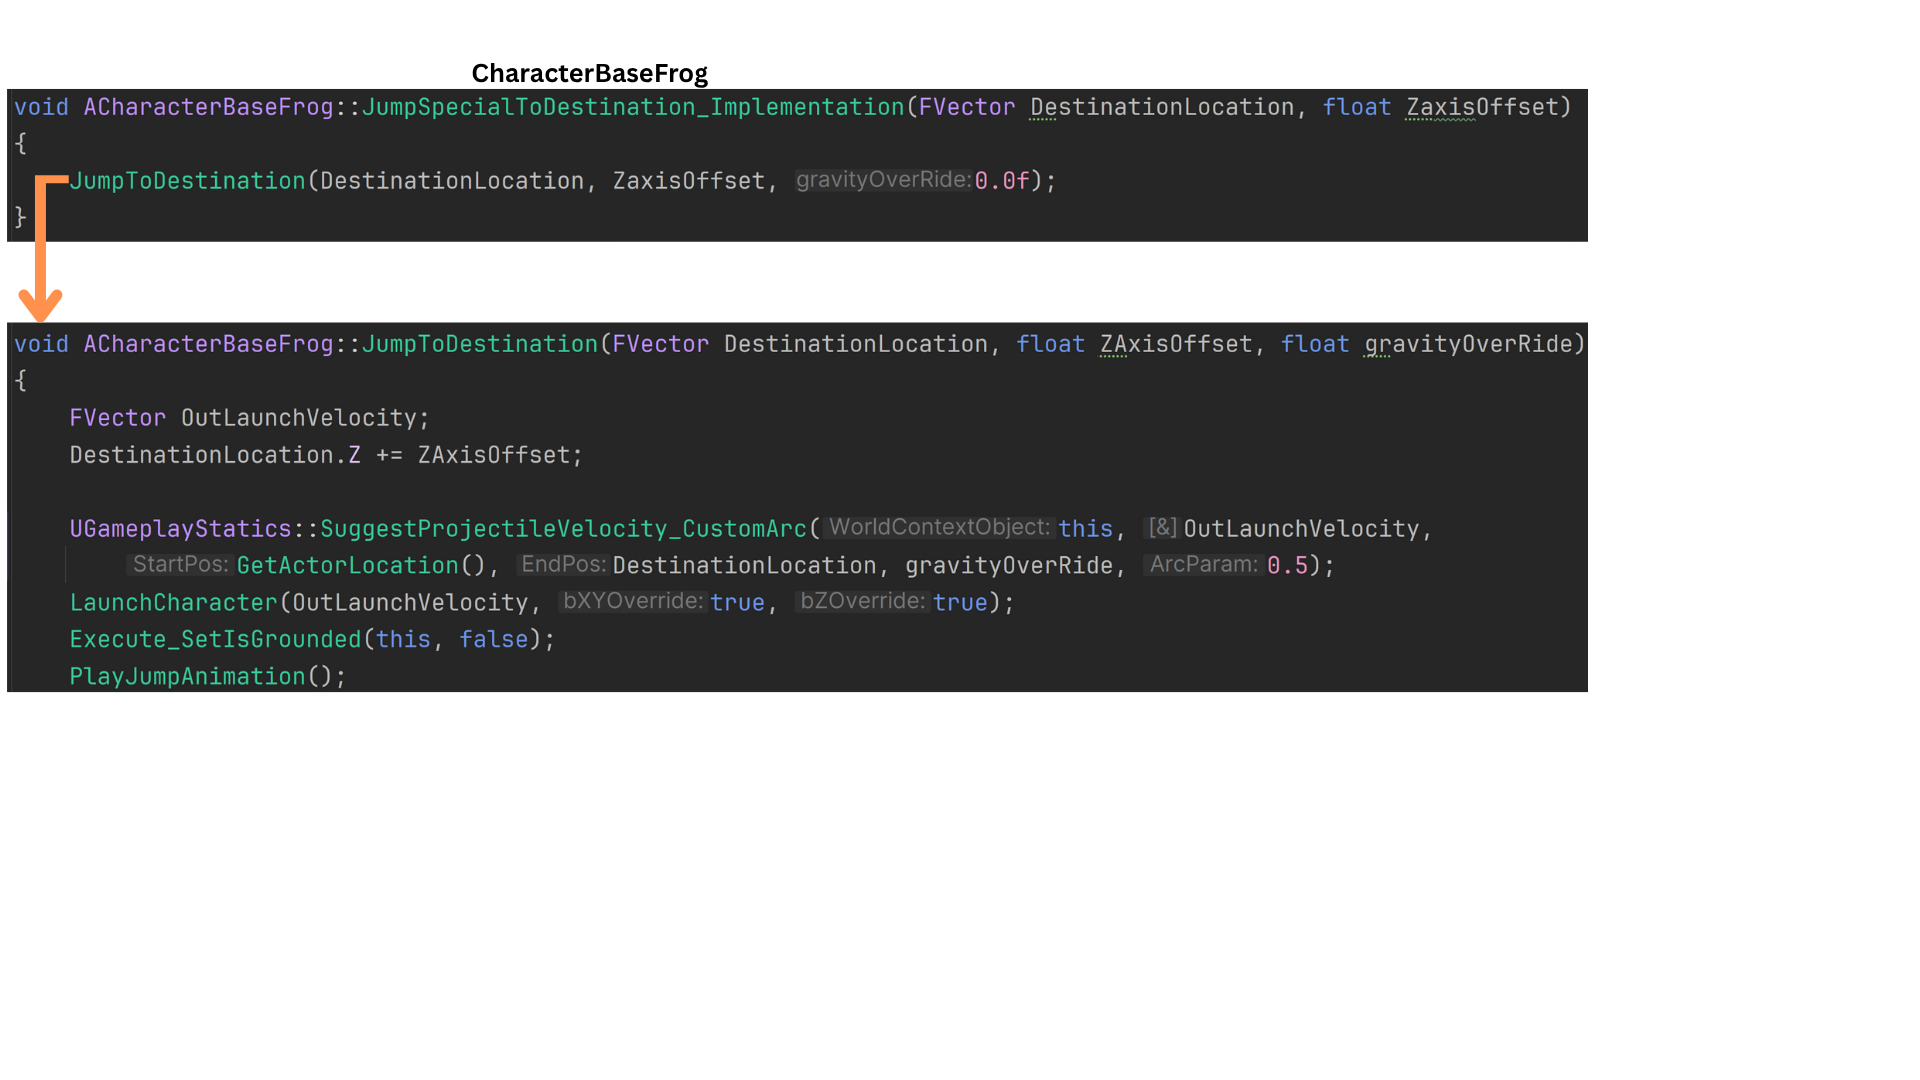
JumpSpecialToDestination() is the custom jump routine; a Z-axis offset is scaled by the horizontal distance to the target, increasing launch force for longer jumps.
9. DestinationLocation.Z is increased by a ZaxisOffset to raise the launch target height.
JumpToDestination() uses UGameplayStatics::SuggestProjectileVelocity() to compute OutLaunchVelocity, producing a physics-consistent trajectory for the jump.
Attack State
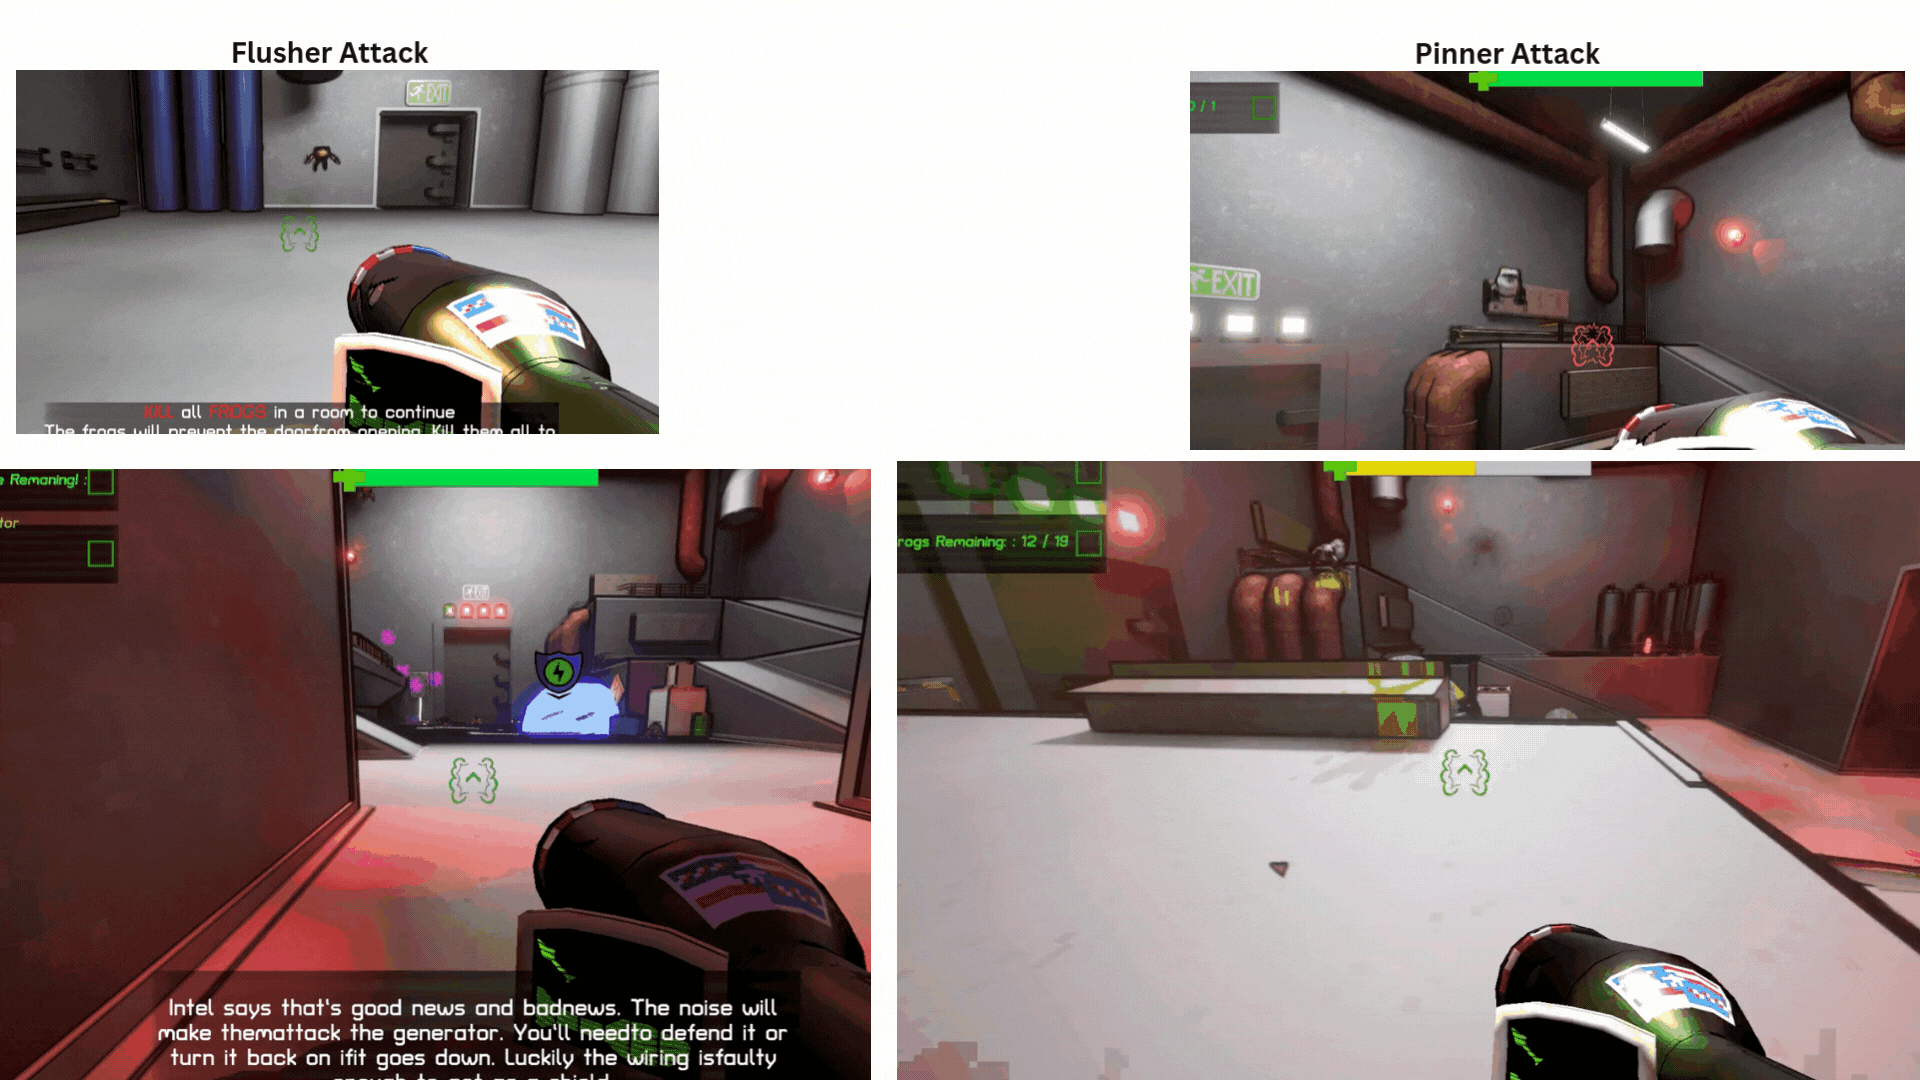
1. Example of enemy attacks. See AttackToken section for more details on the attack state.
Tech
Attack Tokens
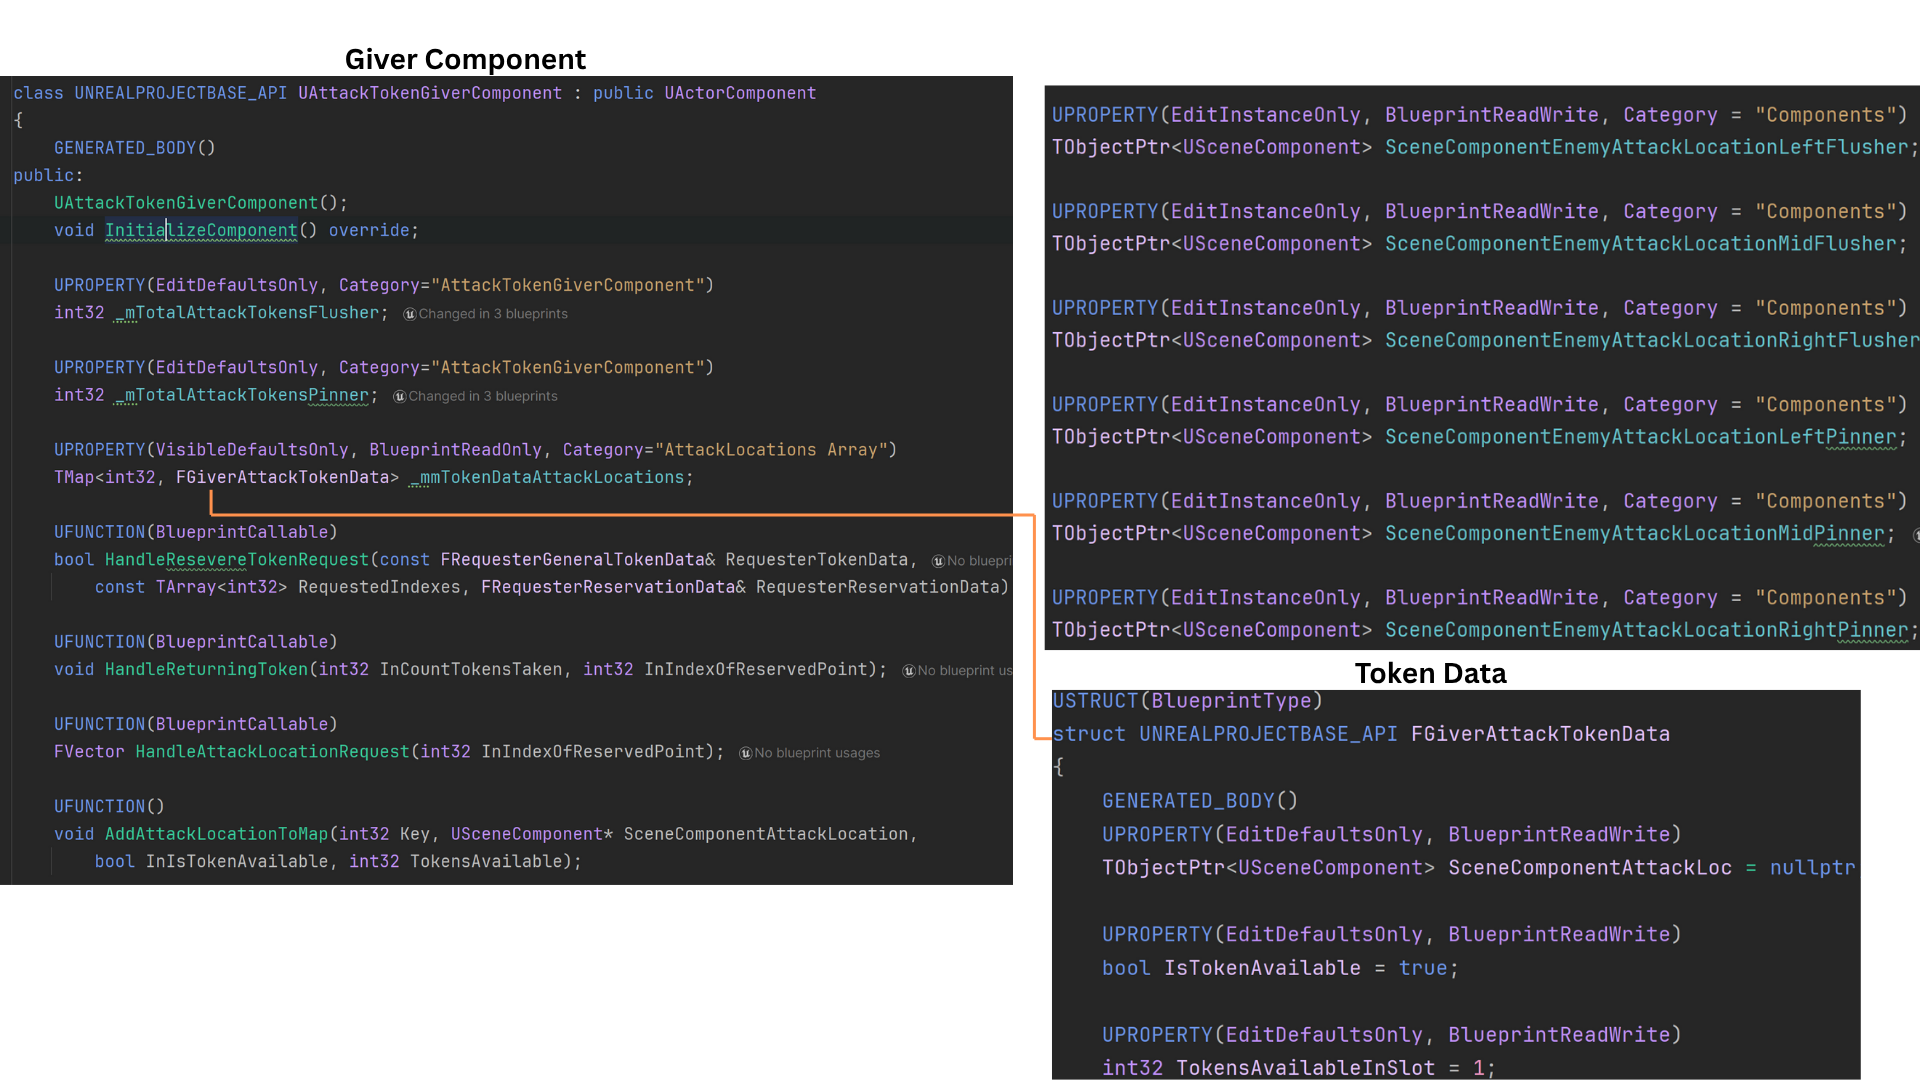
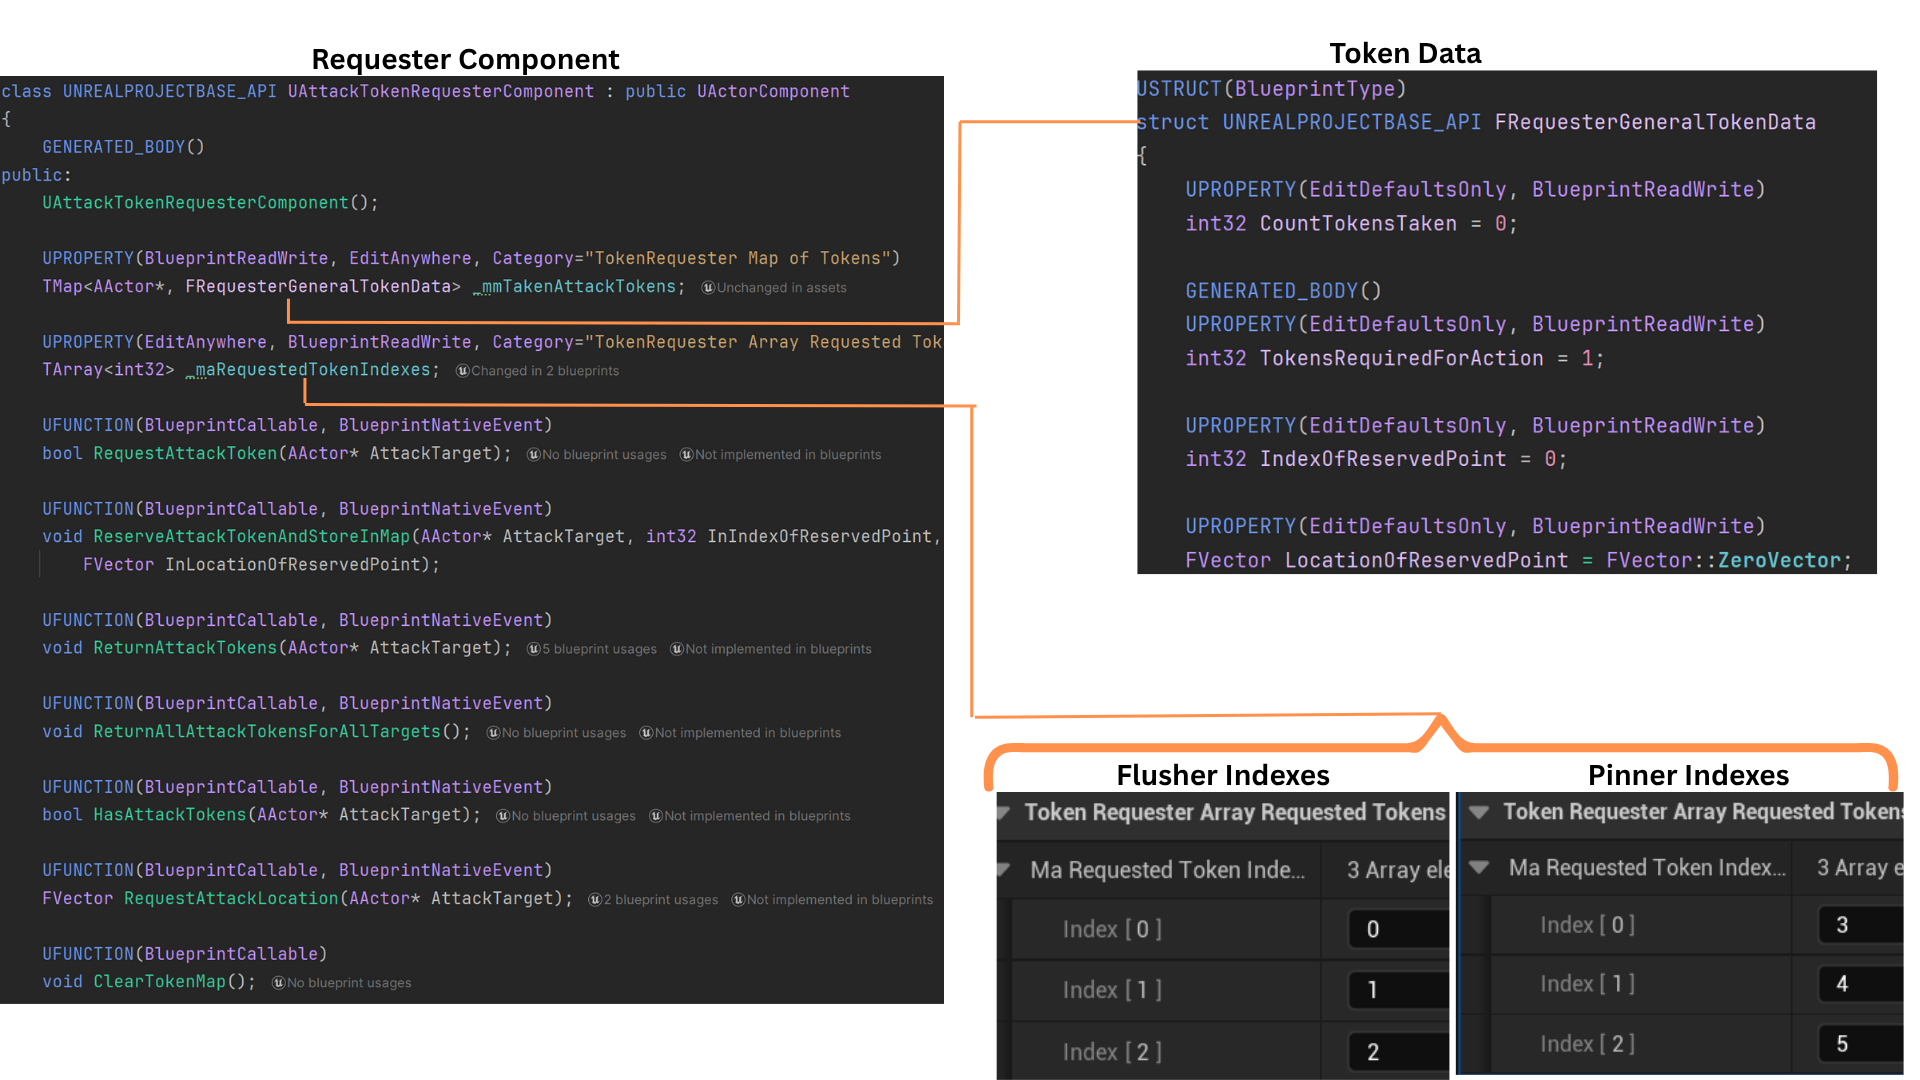


1. The Attack Token system consists of two core components: AttackTokenGiverComponent and AttackTokenRequesterComponent.
The GiverComponent is attached to any actor that can be attacked — typically ACharacterBasePlayer or AGenerator — and is responsible for distributing attack tokens.
Enemy classes that require a token to engage (such as Flushers and Pinners) use the RequesterComponent to request and return tokens.
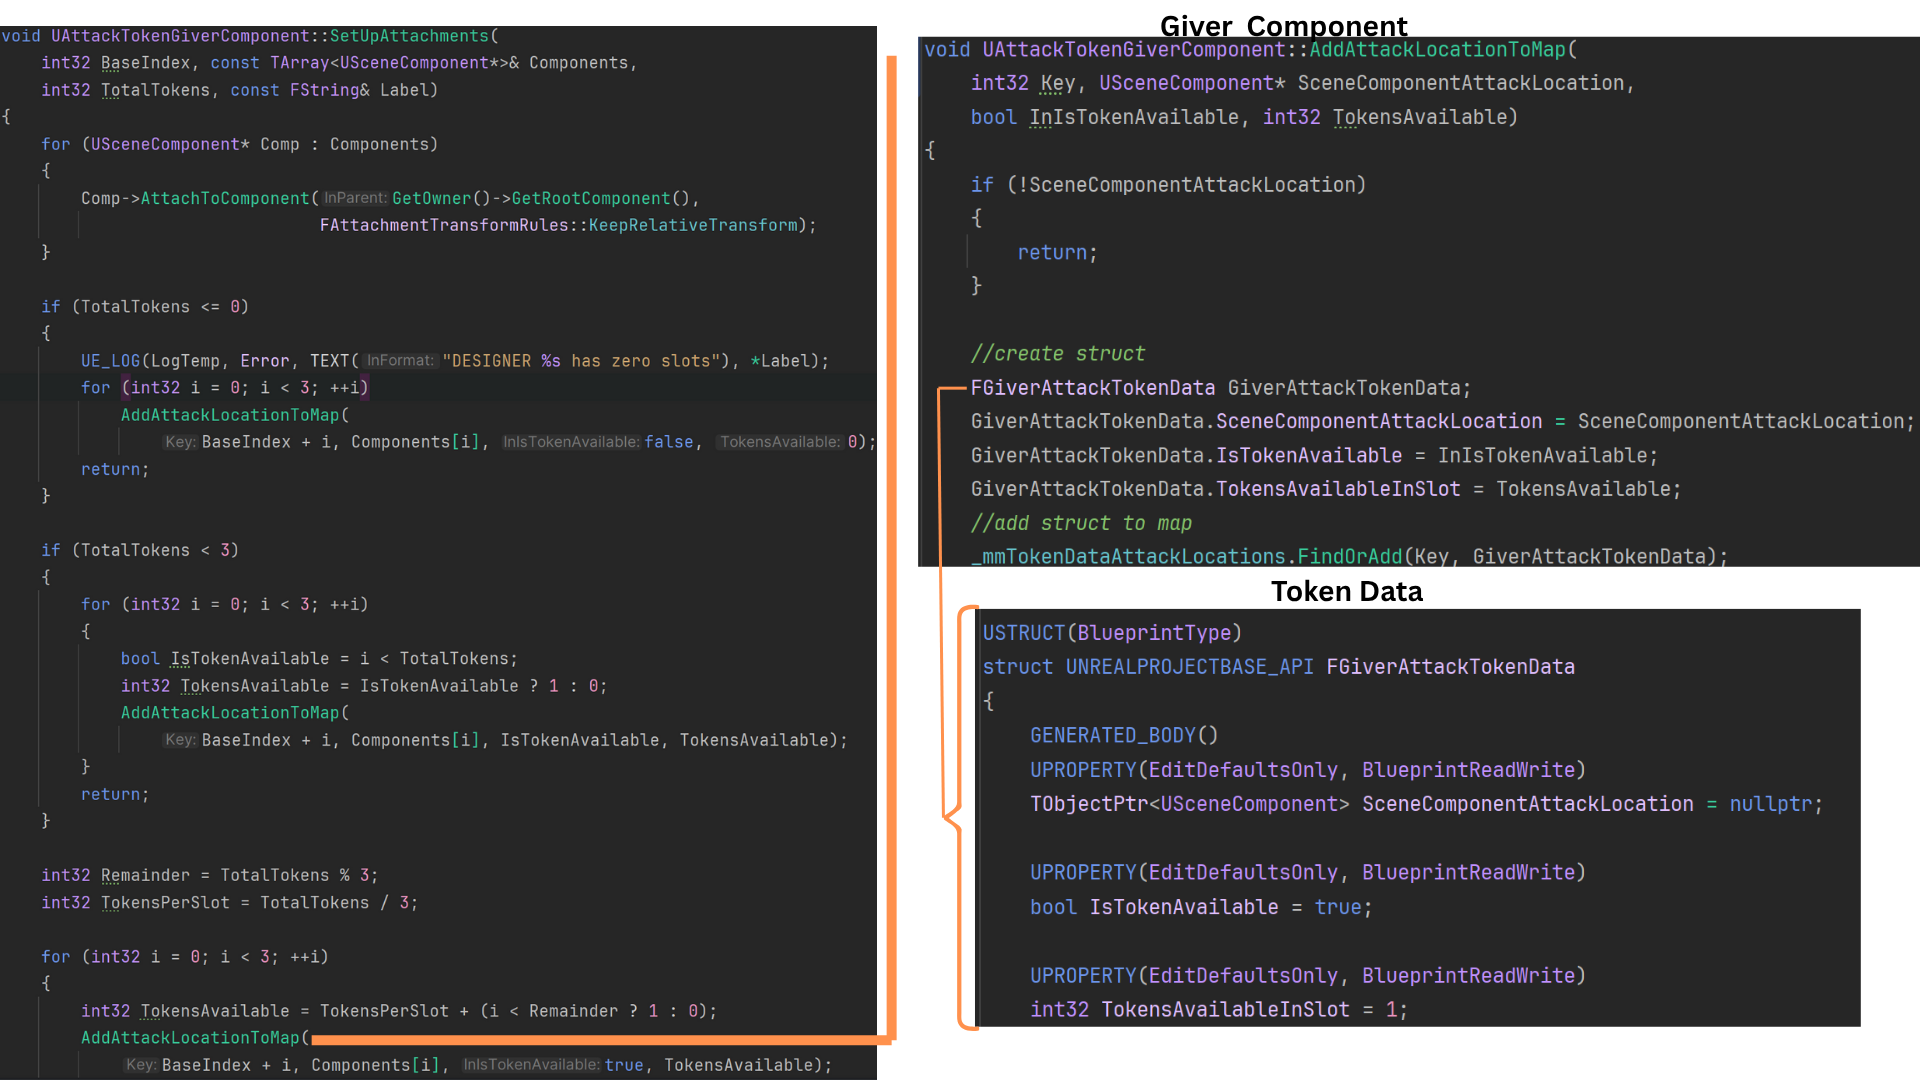
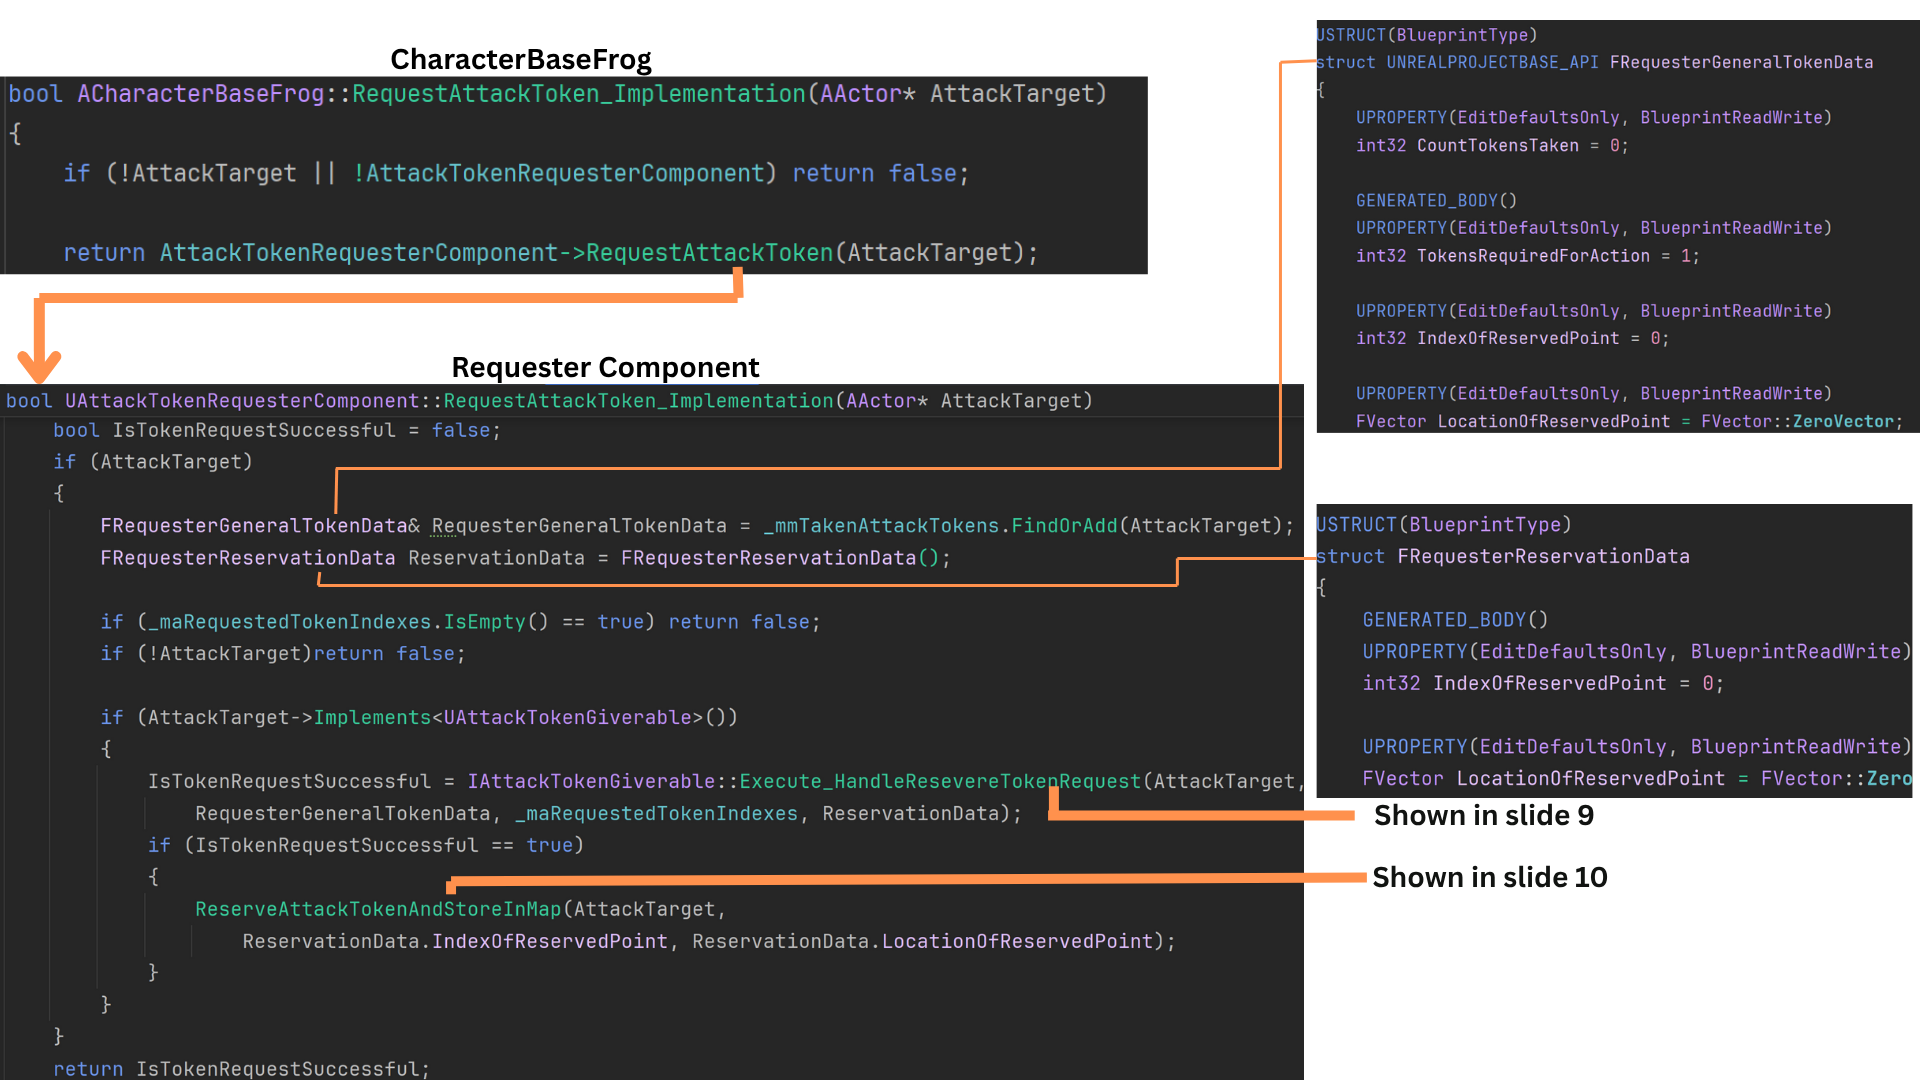
Underlying data is defined in TokenData.h, which includes FGiverAttackTokenData — a struct describing attack locations, token counts, and availability.
Each Giver maintains a map _mmTokenDataAttackLocations, which stores all token data indexed by attack location.
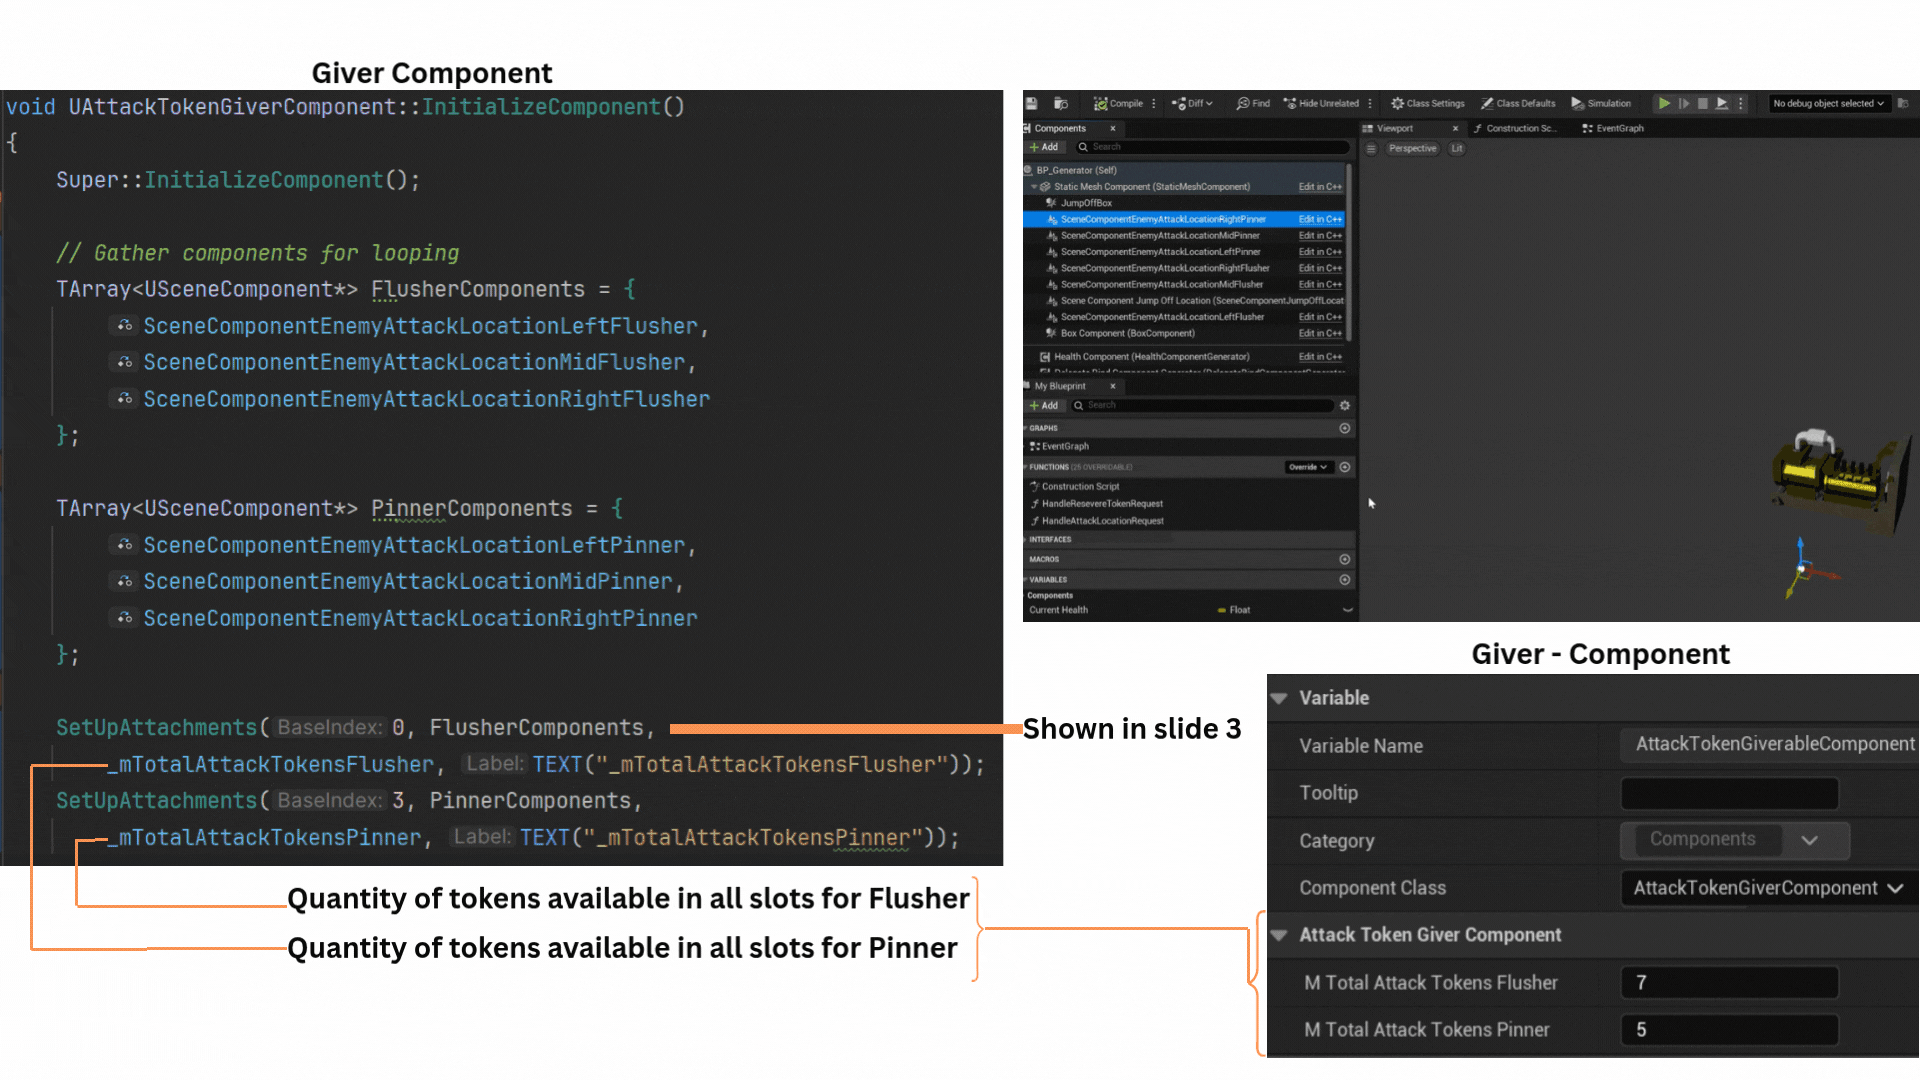
2. To prevent enemy overlap during combat, six USceneComponent endpoints are positioned in front of each actor with an AttackTokenGiverComponent. These points define valid attack locations.
_mTotalAttackTokensFlusher and _mTotalAttackTokensPinner specify how many tokens each enemy type may occupy per endpoint.
The setup function SetUpAttachments() initializes and populates the _mmTokenDataAttackLocations map with these scene component references, forming the foundation for all future attack token allocation.
3. SetUpAttachments() creates six keyed entries in _mmTokenDataAttackLocations: indices 0–2 for Flushers and 3–5 for Pinners.
AddAttackLocationToMap() then iterates over temporary arrays of these scene components, constructing a new FGiverAttackTokenData for each and setting its initial token capacity and availability.
This ensures every attack slot is defined, type-limited, and ready for runtime token assignment.
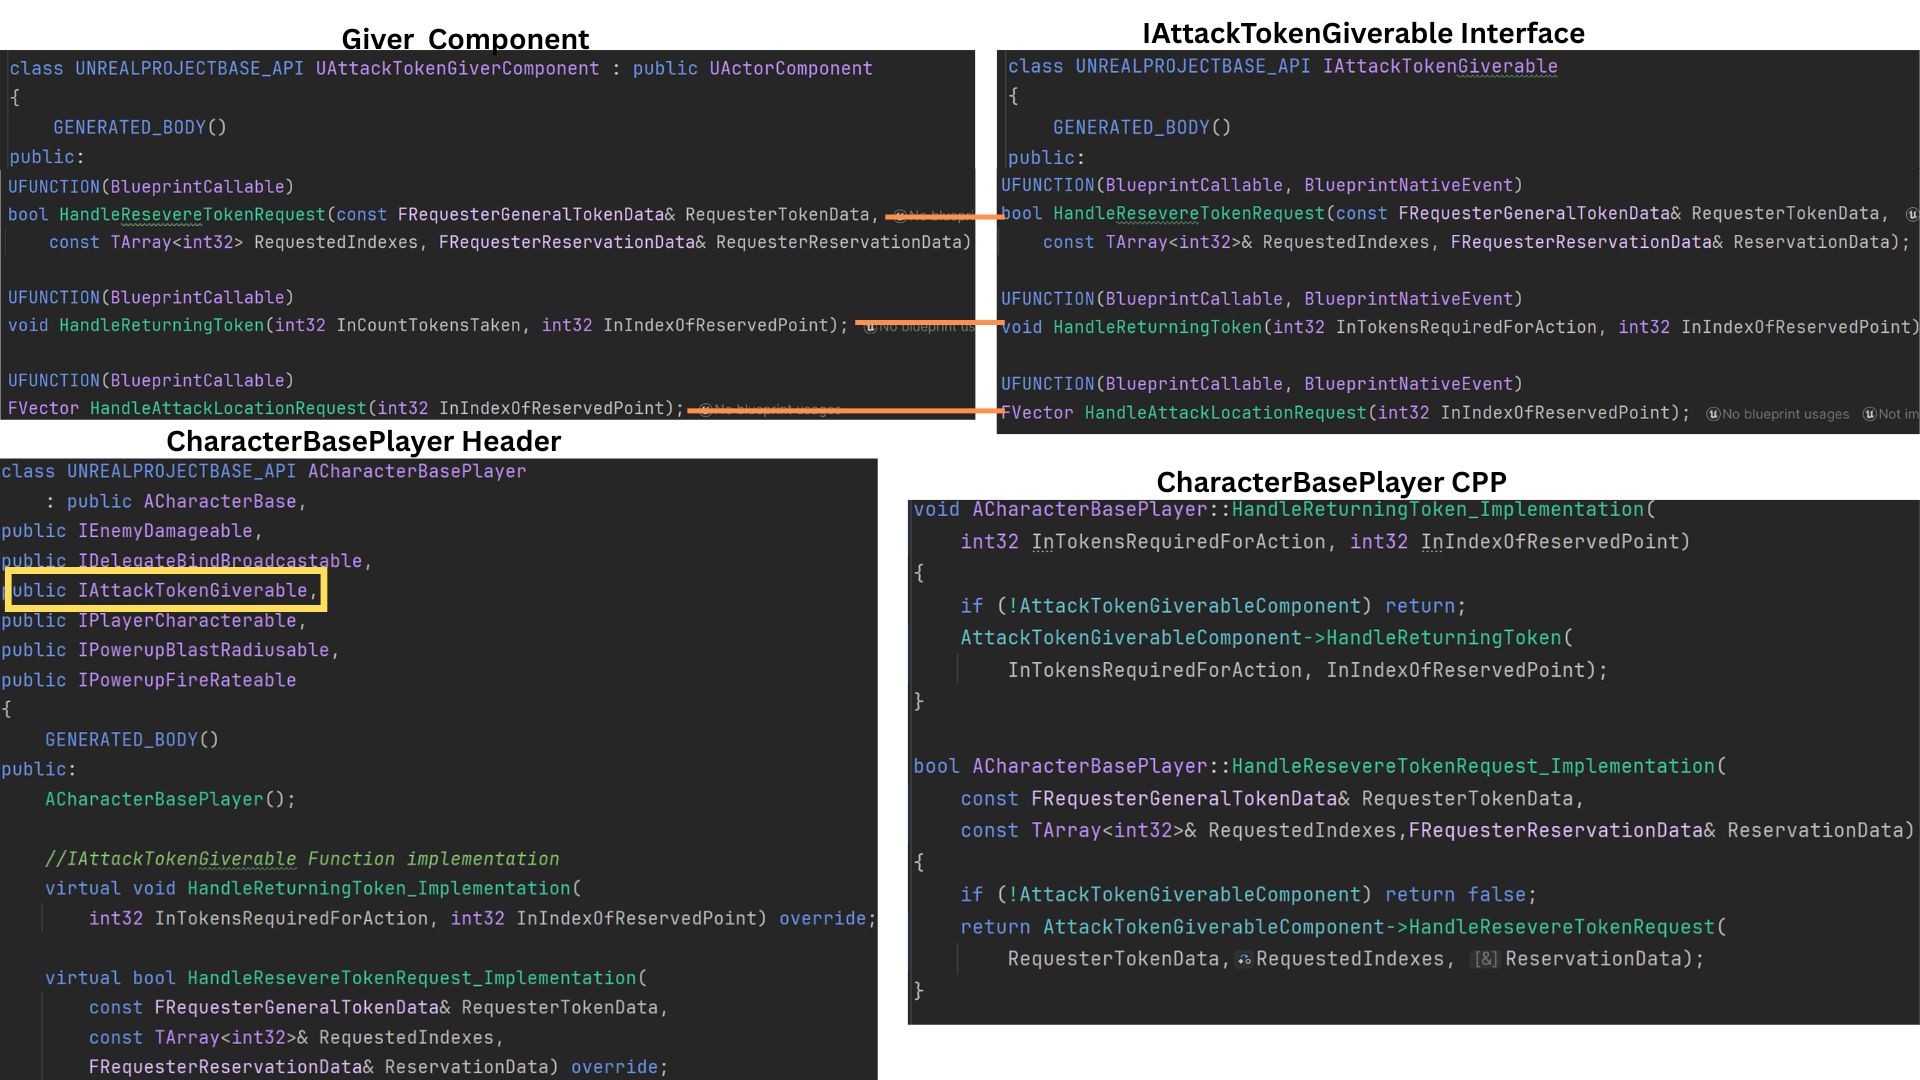
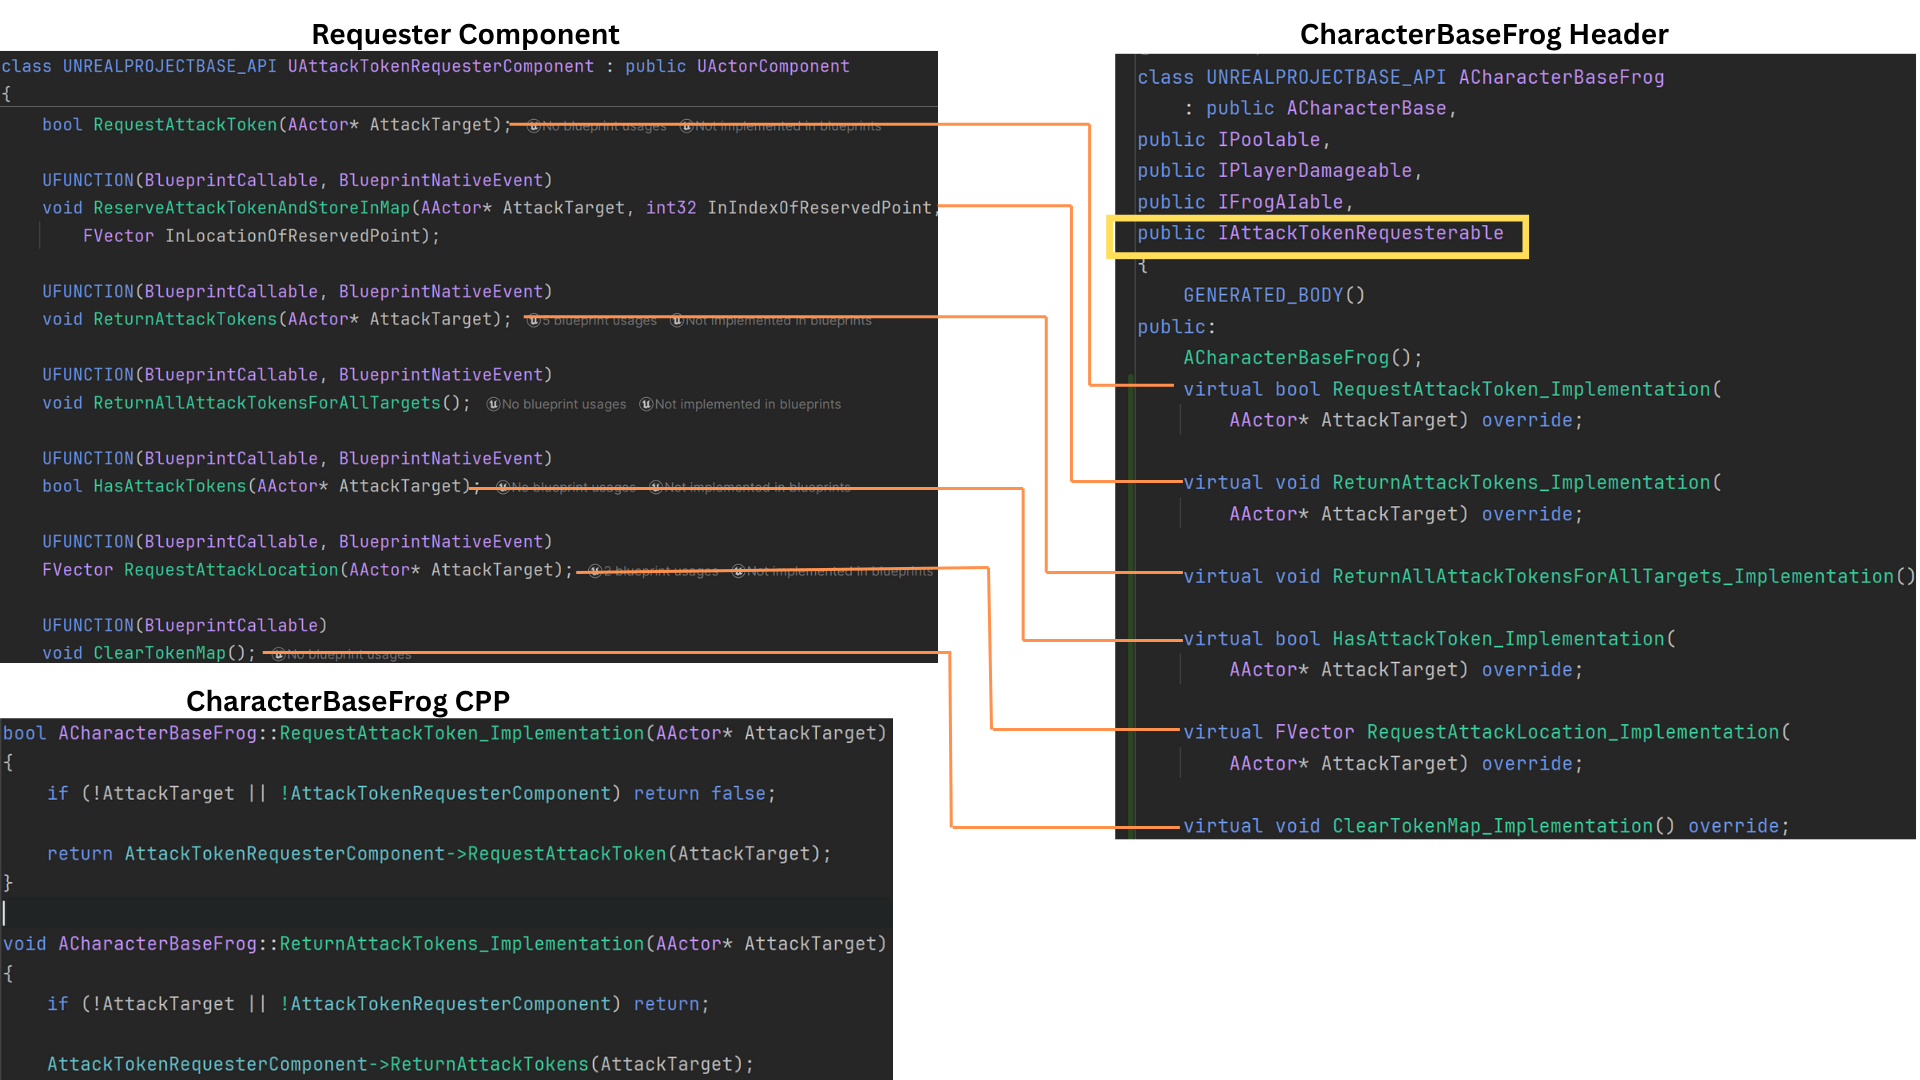
4. An interface complements the AttackTokenGiverComponent, enabling enemies to request and return tokens or query valid attack locations without direct coupling.
ACharacterBasePlayer implements this interface, using its helper functions to call the GiverComponent’s internal logic directly.
This interface-driven design ensures clean, modular communication between requesters and their attack targets.
5. The AttackTokenRequesterComponent is attached to both Flusher and Pinner enemies. Each type has its own maRequestedTokenIndex array, defining which attack endpoints (0–2 or 3–5) it may use.
The component also maintains a map _mmTakenAttackTokens, keyed by the attack target AActor, storing an FRequesterGeneralTokenData struct with all tokens the requester currently holds.
6.The RequesterComponent includes its own interface, used by both the Behavior Tree’s Blackboard tasks and the attack targets themselves.
This interface standardizes token request, reservation, and return workflows, streamlining AI communication during combat sequences.
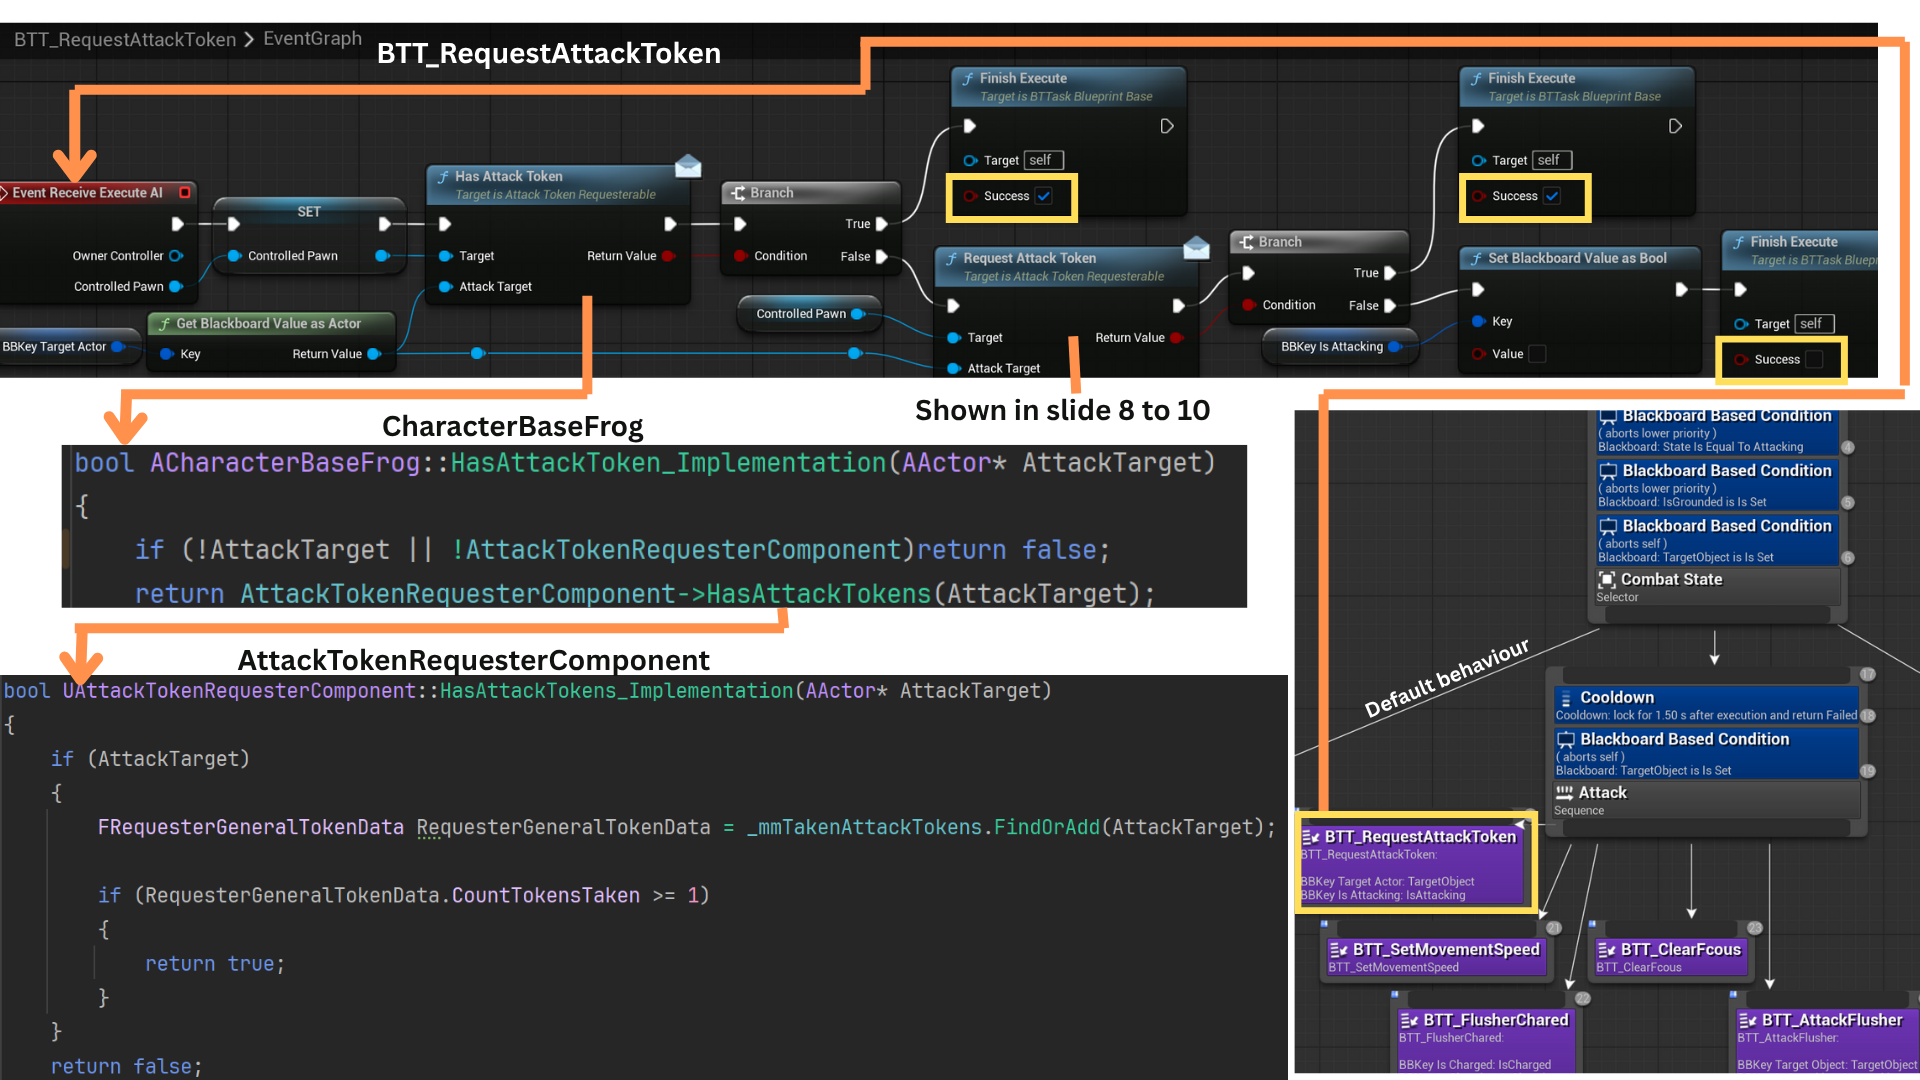
7. When an enemy successfully detects the player via sight, its Blackboard transitions to the Attack state.
The Behavior Tree task BTT_RequestAttackToken first checks whether the AI already holds a token for its current attack target. If not, it issues a new token request.
If the request succeeds (or the AI already possesses a token), FinishExecute returns success, enabling the attack sequence.
Otherwise, the task fails, and the tree reverts to its default behavior until the cooldown decorator permits another request attempt.
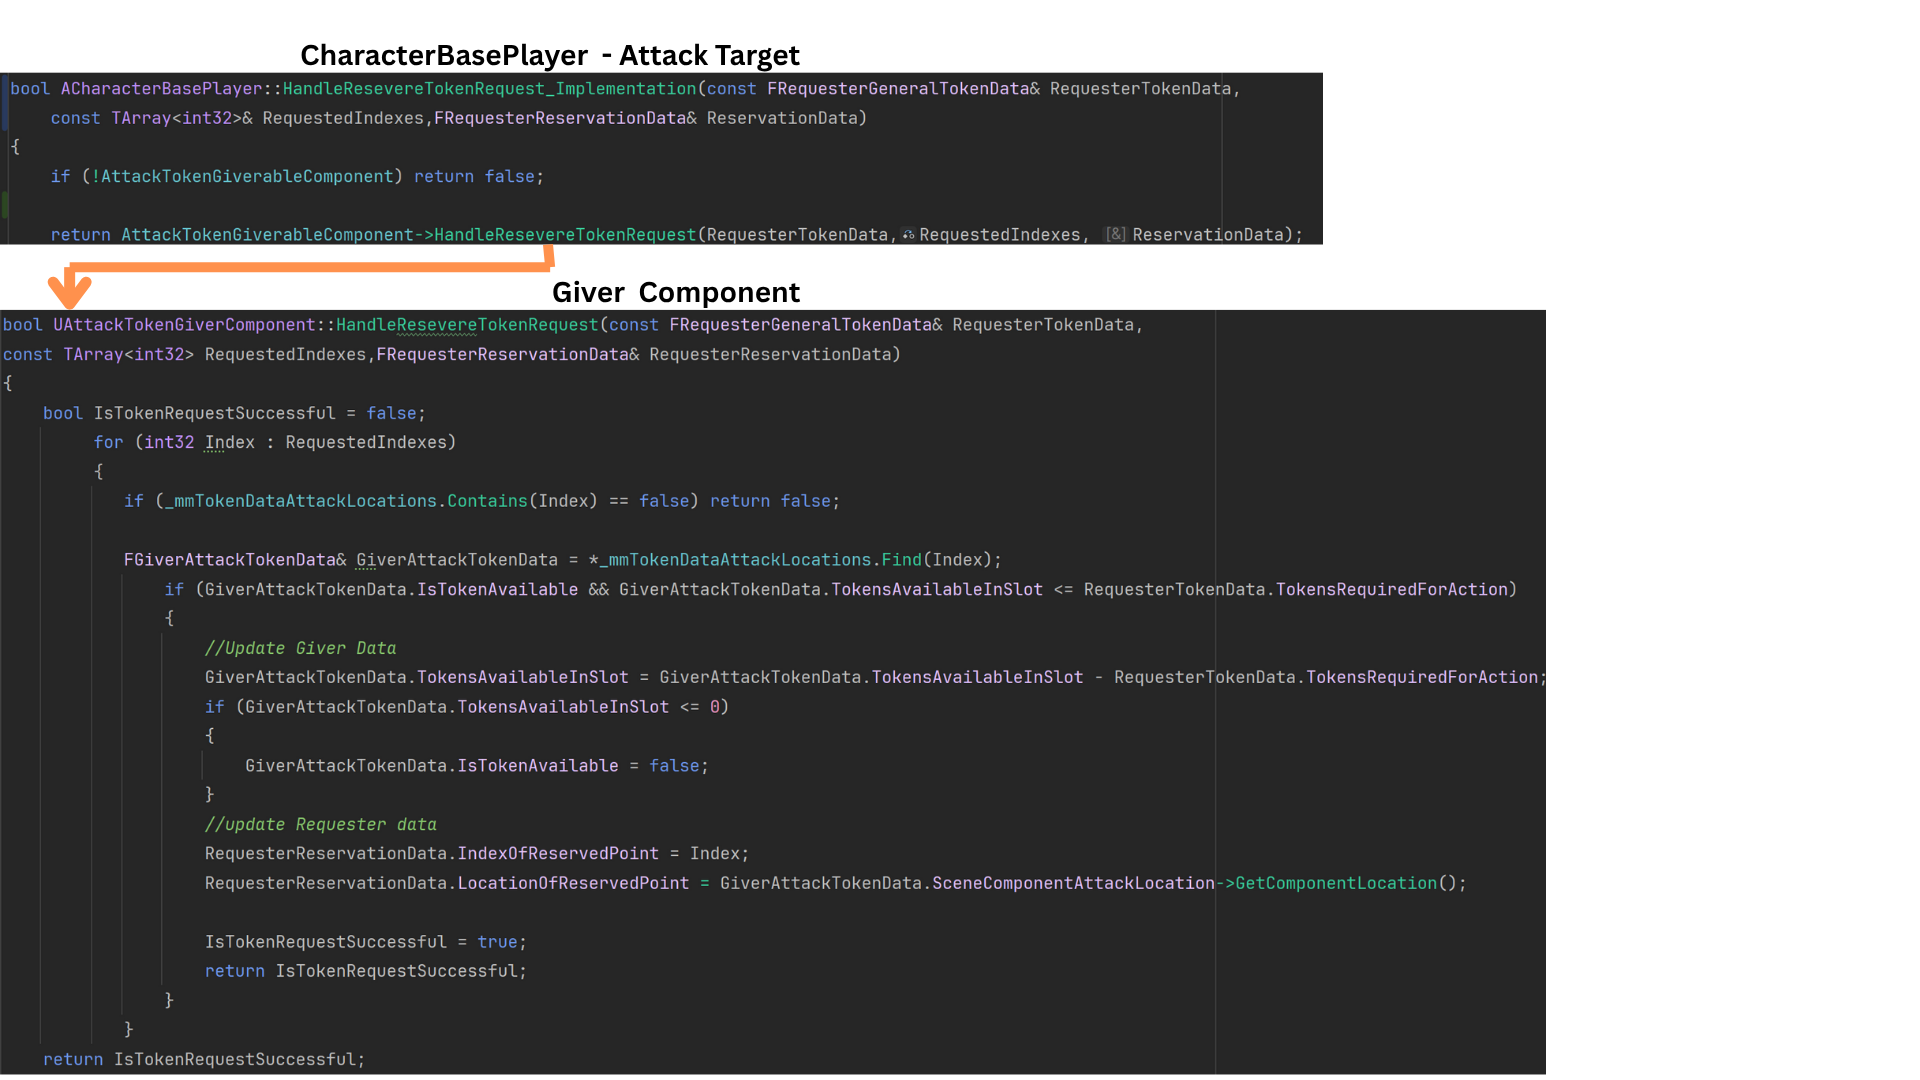
8. FRequesterGeneralTokenData represents each requester’s stored token data within _mmTakenAttackTokens.
When a request is made, HandleReserveTokenRequest() processes the attempt and returns a success flag.
GetSenseIDofSenseAsEnum(), checks if the AI has sight perception info on the player character.
If successful, IsTokenRequestSuccessful() updates the requester’s FRequesterReservation struct with the new token’s index and attack location.
The updated reservation is then saved back into _mmTakenAttackTokens via ReserveAttackTokenAndStoreInMap(), synchronizing local and giver-side data.
9. The attack target’s interface function HandleReserveTokenRequest() delegates to the GiverComponent’s internal method of the same name.
Flushers request attack indices 0–2, while Pinners use 3–5. Validation ensures team members never request invalid indices.
Each FGiverAttackTokenData entry stores a dereferenced pointer to its map data, allowing direct modification.
The Giver iterates through available slots, confirming capacity and token count.
If tokens are available, both the Giver’s map and the Requester’s reservation data are updated, returning true on success or false if the request fails.
10. Once a request succeeds, ReserveAttackTokenAndStoreInMap() records the AttackTarget, IndexOfReservationPoint, and LocationOfReservedPoint within _mmTakenAttackTokens.
The function either retrieves or creates a new entry for the AttackTarget, ensuring all token data is consistent.
RequestAttackToken() then returns a boolean result to the Behavior Tree task, which finishes execution based on whether the token was successfully reserved.
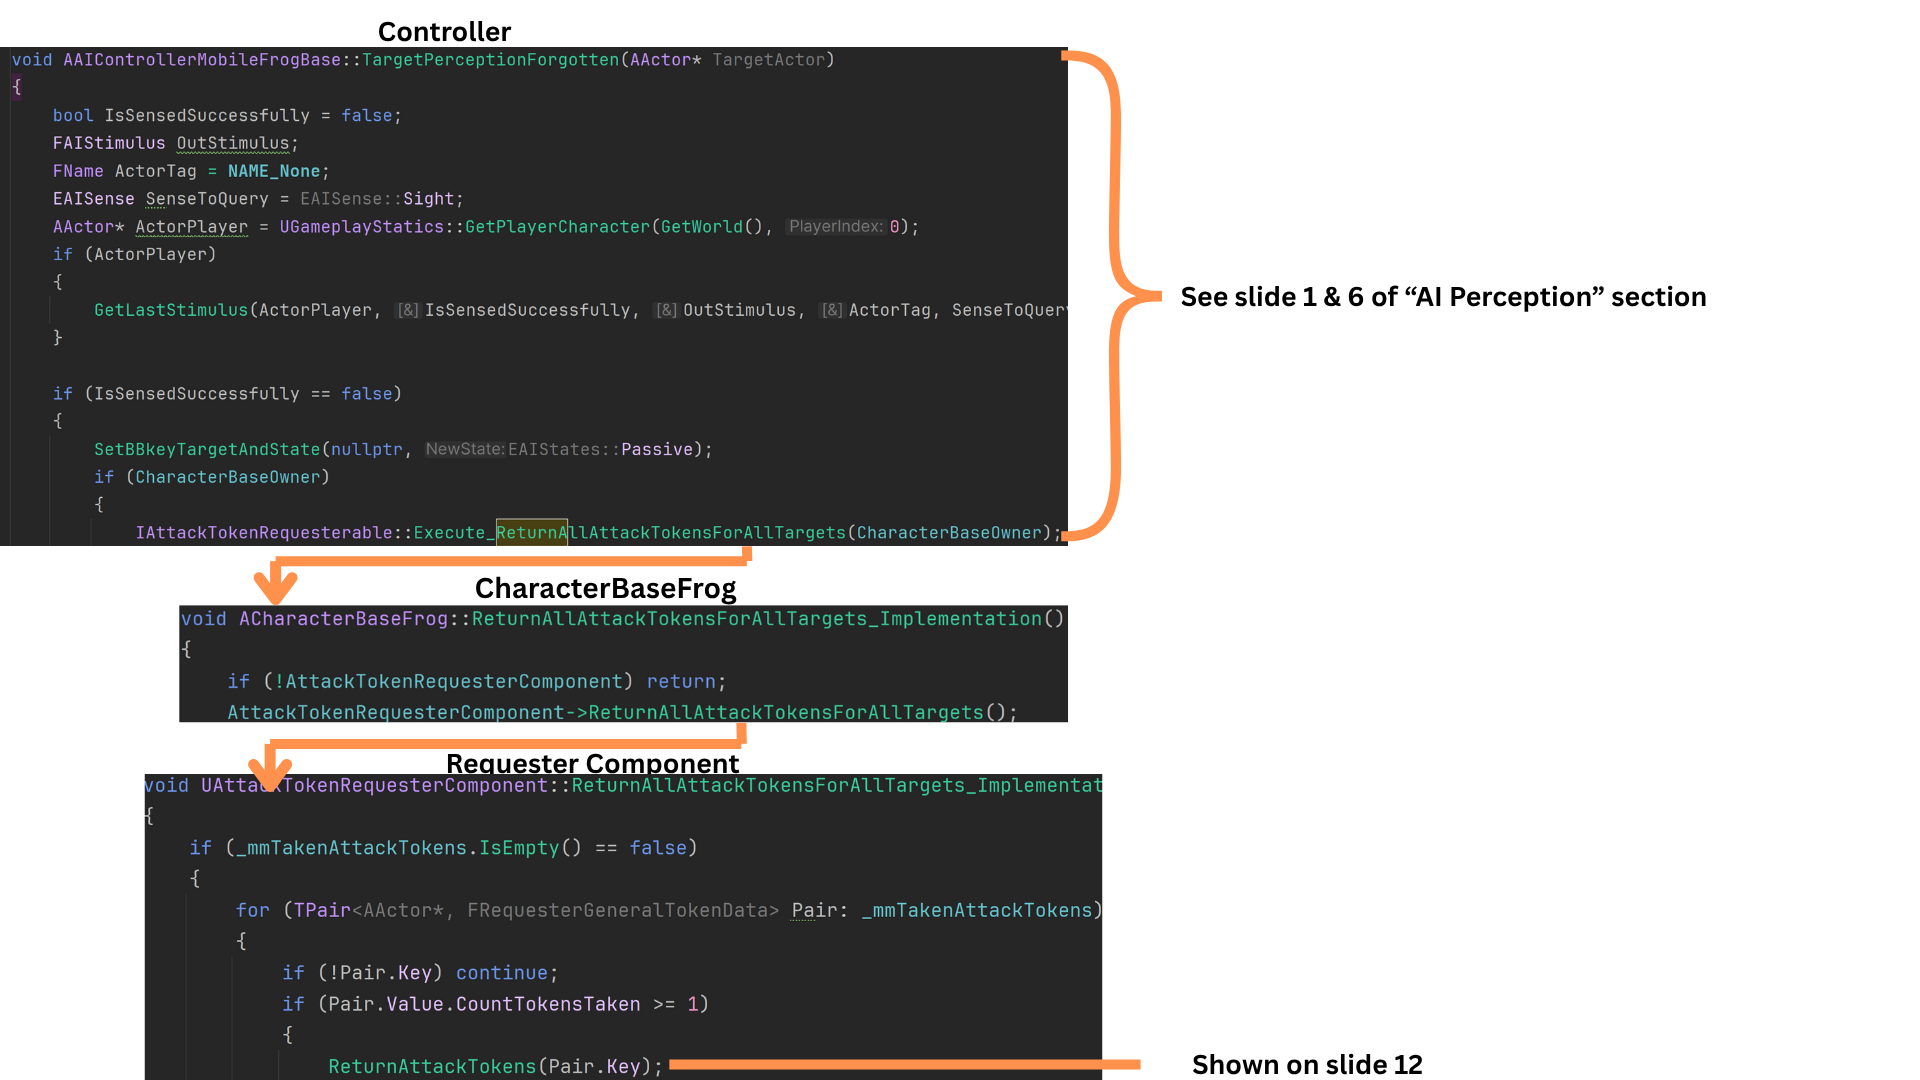
11. Tokens are returned either when an enemy completes its attack or when perception of the target becomes stale.
GetLastStimulus() checks whether the AI still perceives the player before clearing its state.
For instance, if an enemy switches perception from the Generator to the Player mid-attack, it retains the token until all valid perception ends.
When perception fully fades, the AI resets its state to Passive, clears its target reference, and calls ReturnAllAttackTokensForAllTarget(), which iterates through all owned tokens and returns them to their respective givers.
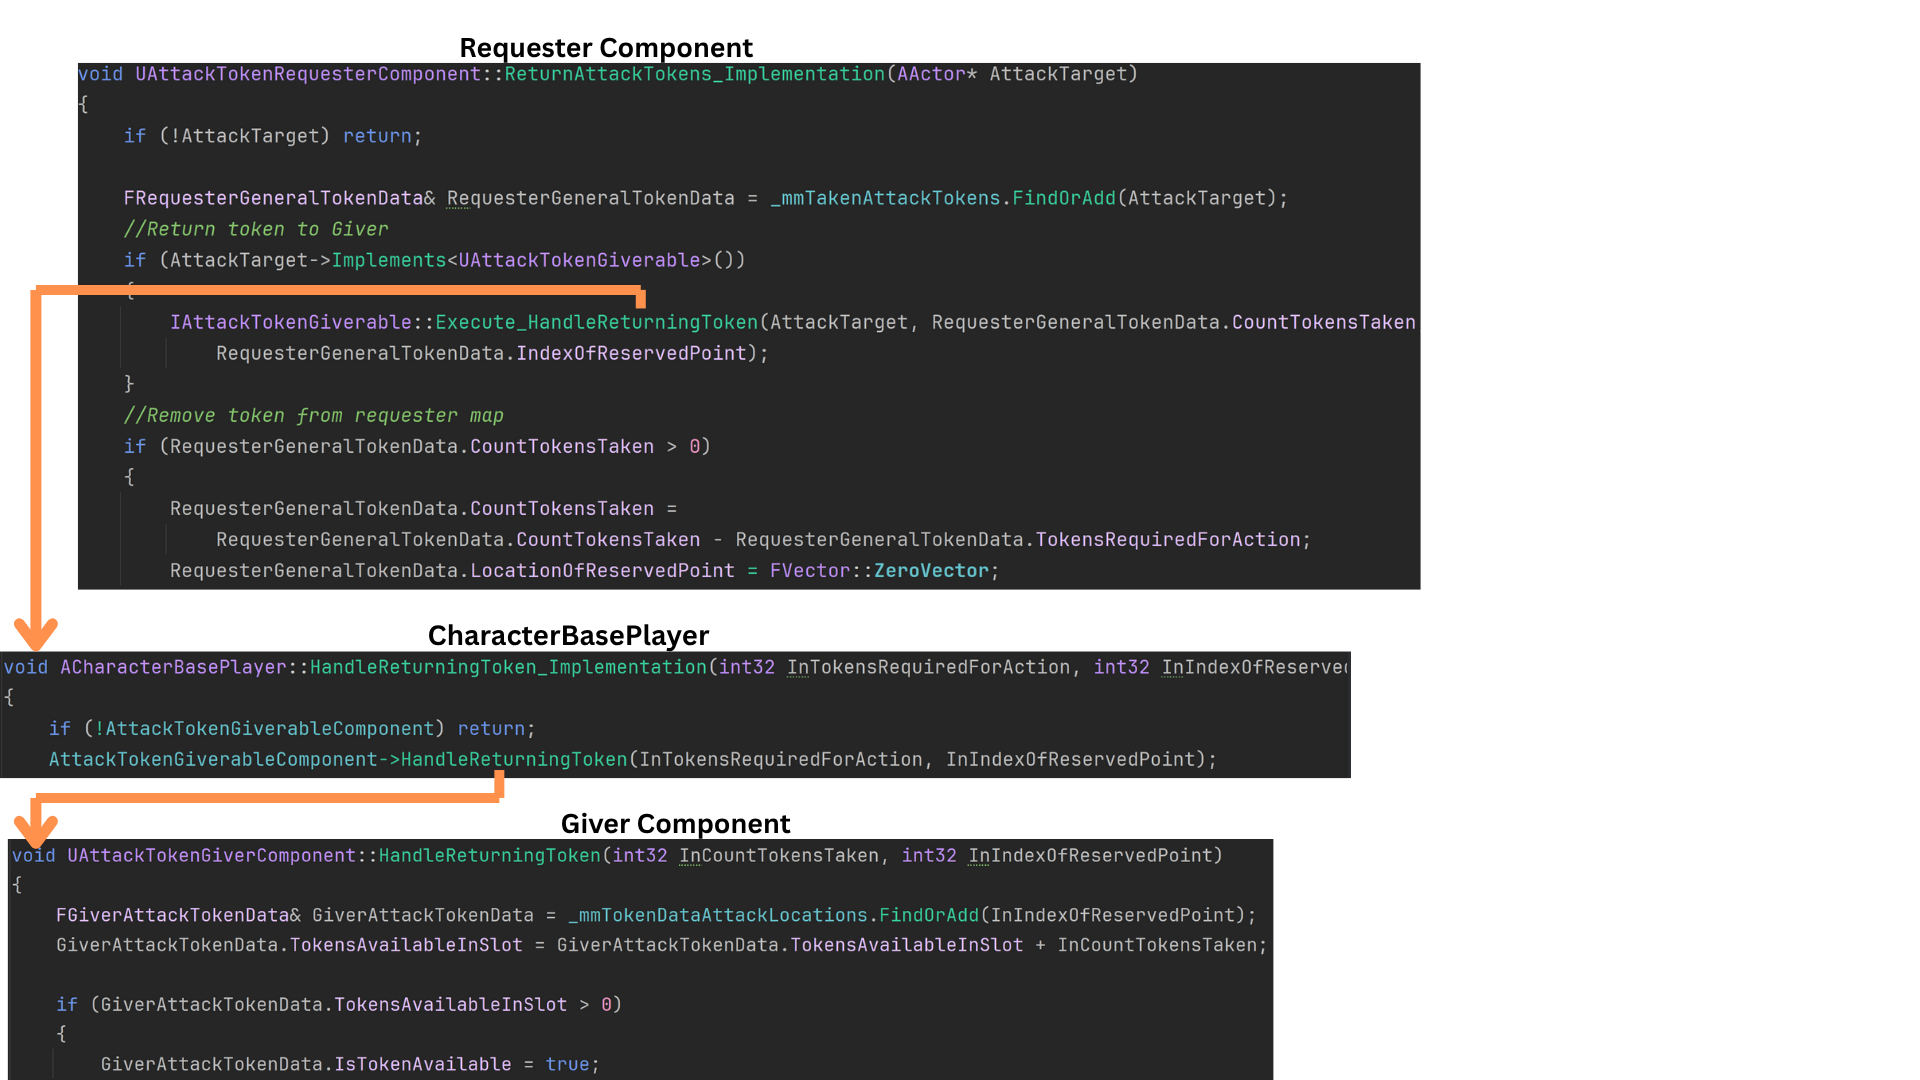
12. ReturnAttackTokens() retrieves the relevant FRequesterGeneralTokenData reference tied to the AttackTarget.
It then calls HandleReturningToken() on the target actor, specifying the index and quantity to return. The Giver’s map is updated accordingly.
Finally, the requester removes that token entry from its _mmTakenAttackTokens map, ensuring data integrity on both sides.
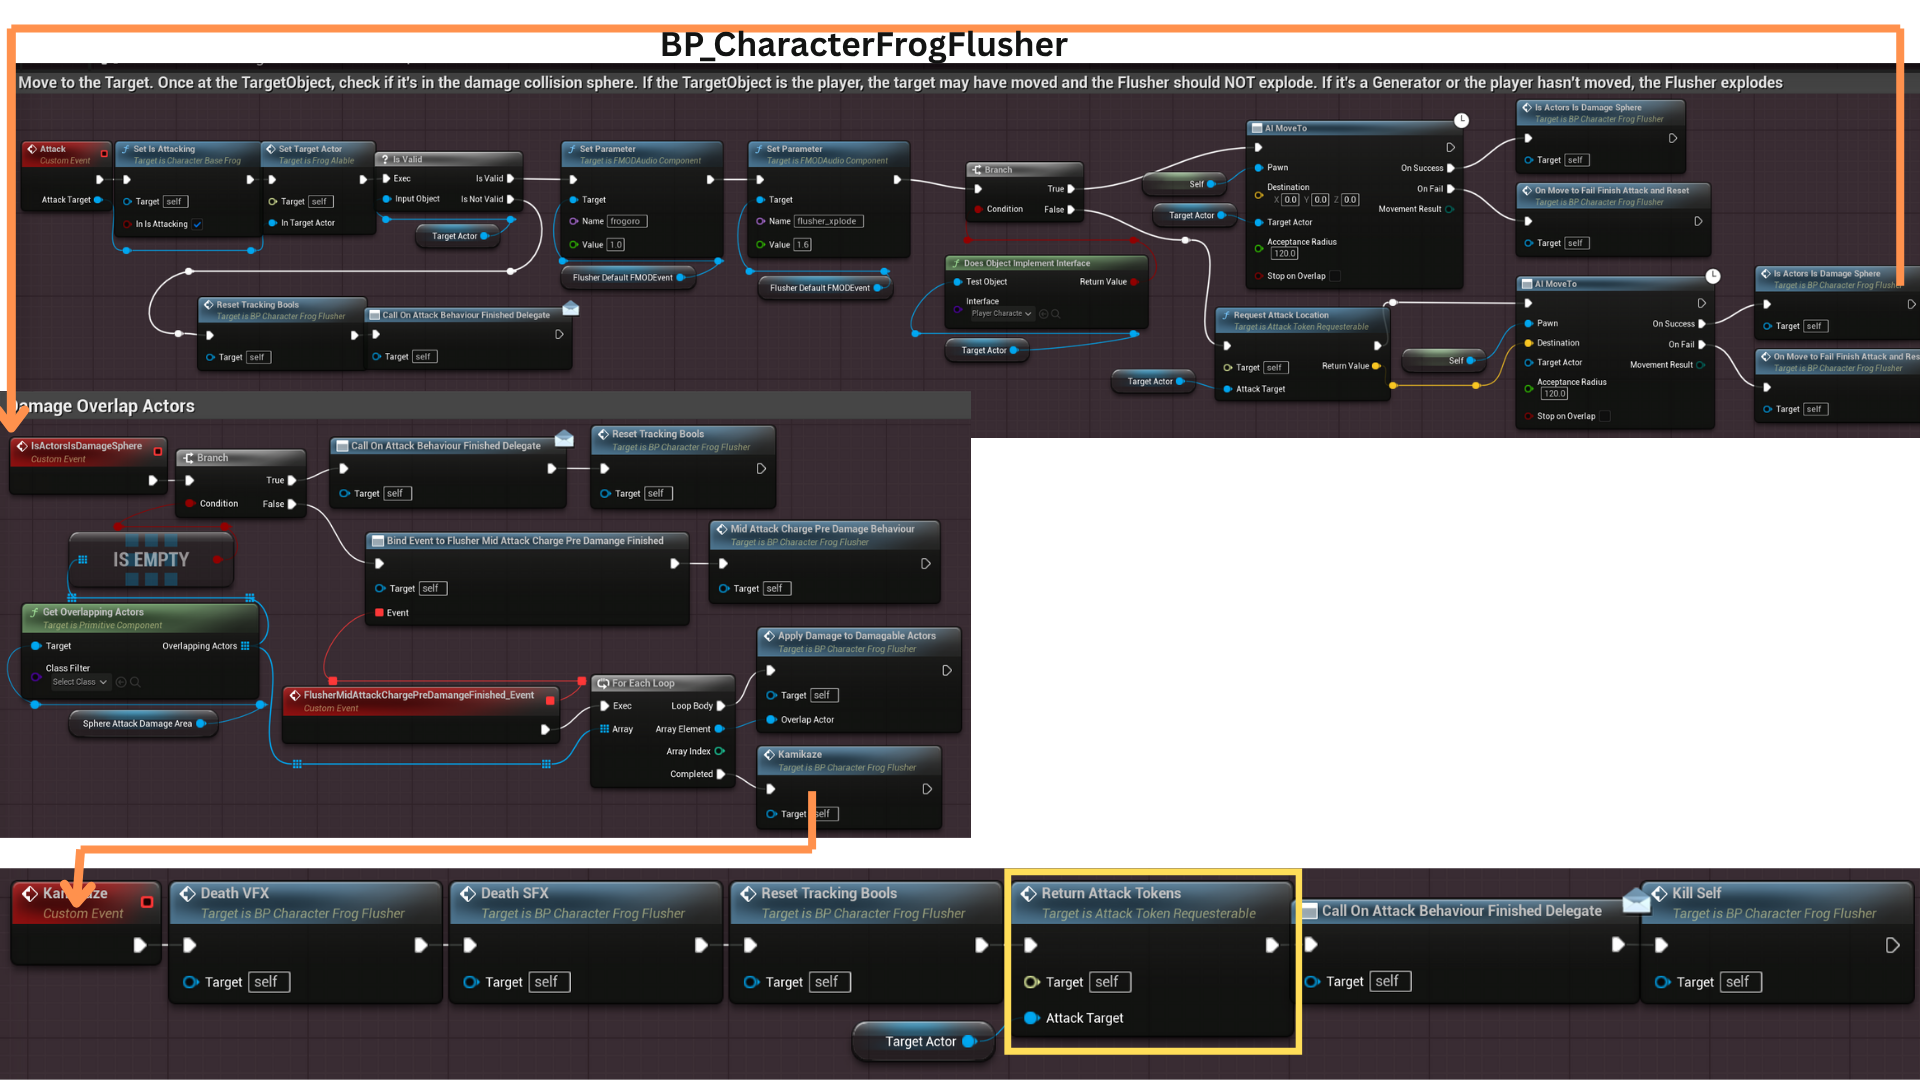
13. Tokens are also returned when an enemy finishes its attack sequence.
BTT_AttackFlusher calls AttackBehaviour() — an IFrogAIable interface function implemented at the child-class level — which in turn executes the enemy’s specific Attack() logic.
Once the attack concludes, the AI automatically returns its tokens before signaling completion through the appropriate delegate.
14. After a Flusher successfully reaches its reserved attack location, it immediately returns its tokens via ReturnAttackTokens().
It then broadcasts AttackBehaviourFinishedDelegate to inform the Behavior Tree that the attack cycle is complete.
The AI subsequently despawns and returns to the object pool, ready for reuse in future encounters.
Tech
Objective System
Object Actor Base Class, Base Logic and Child Class Reach Point
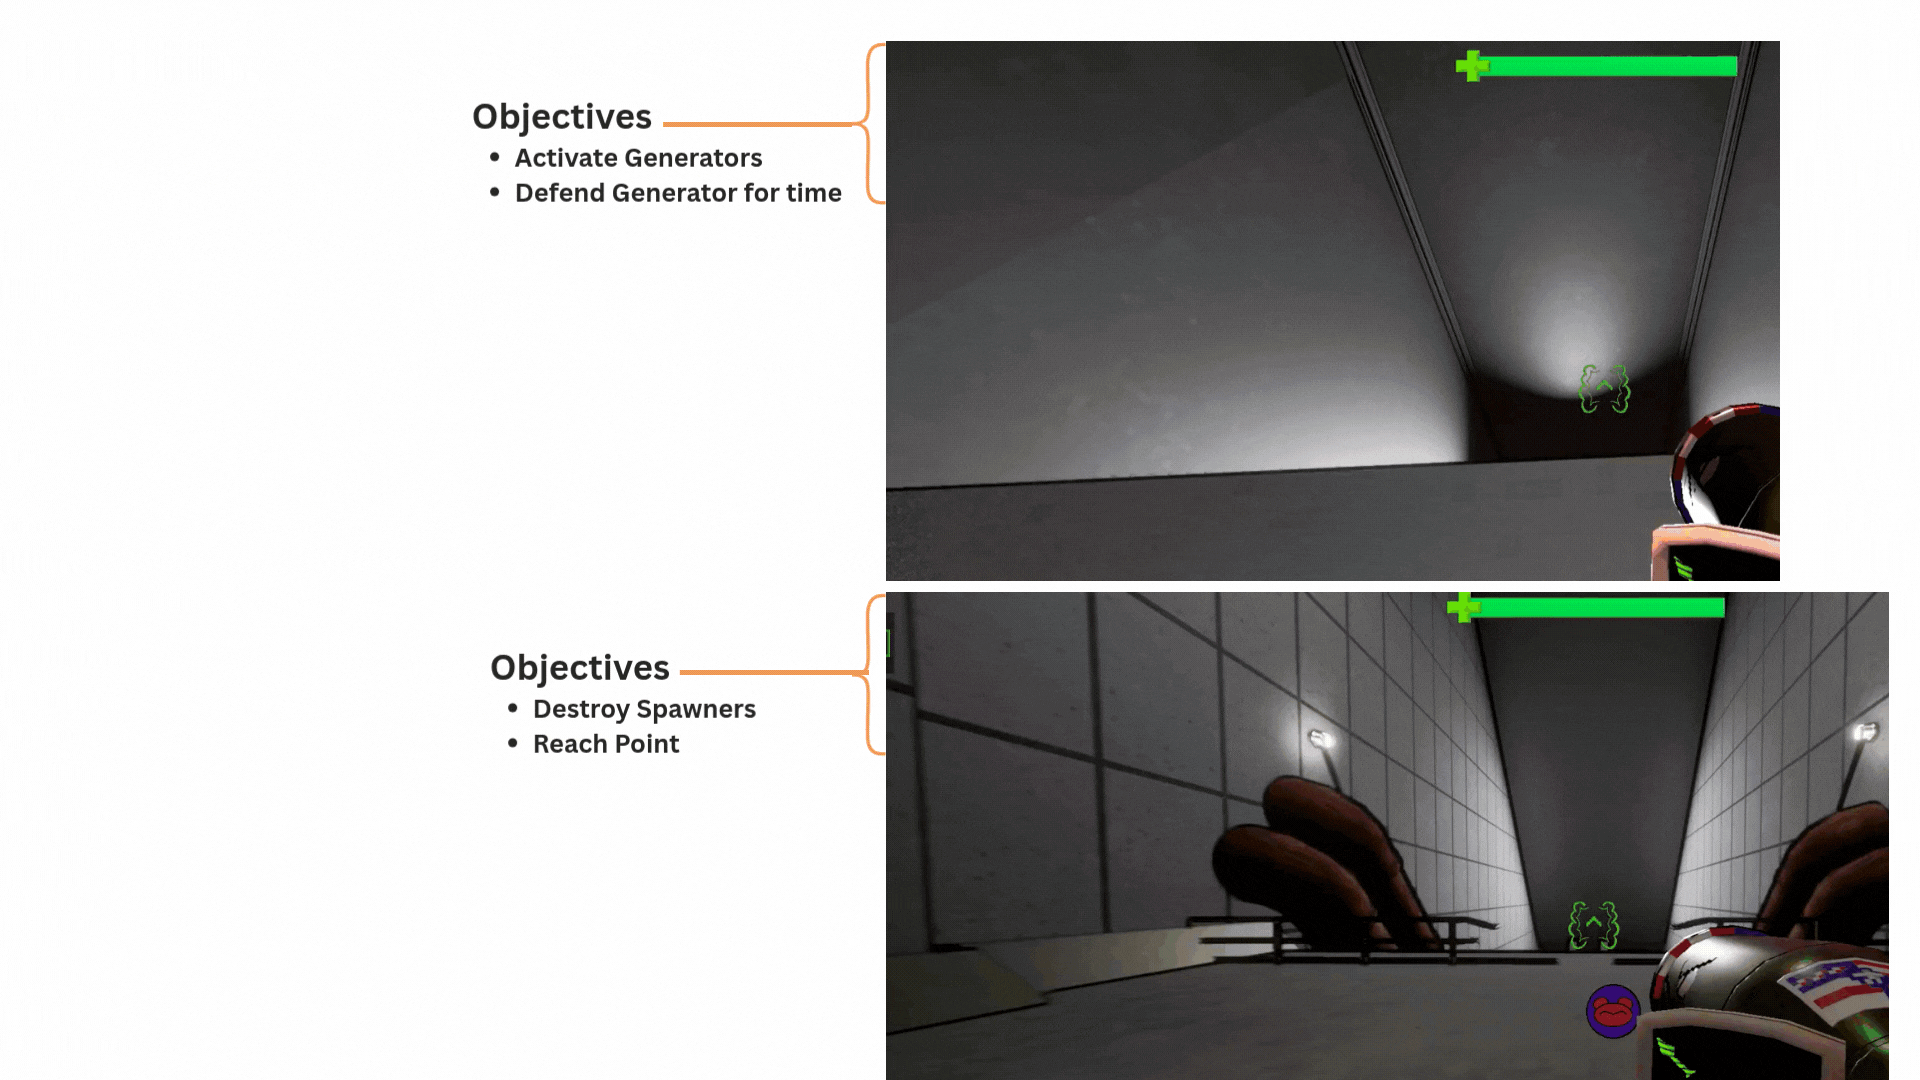
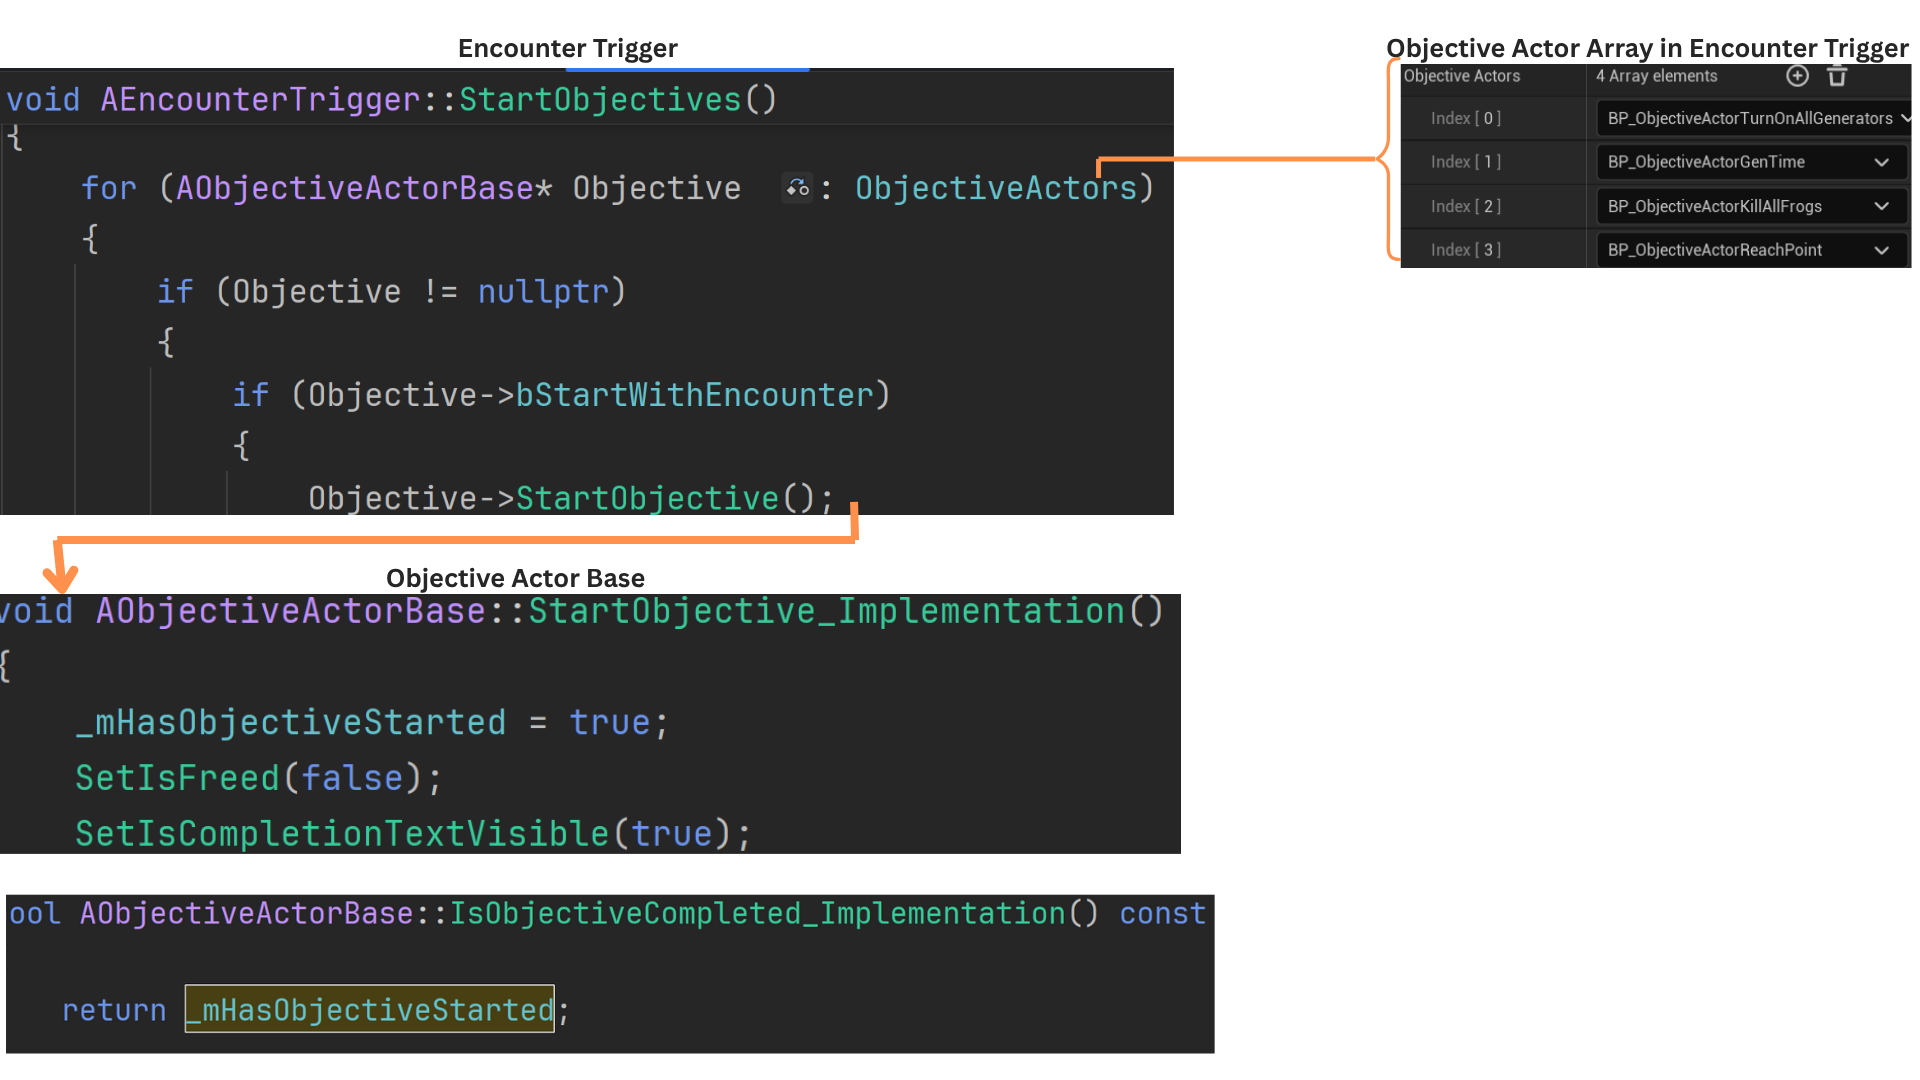
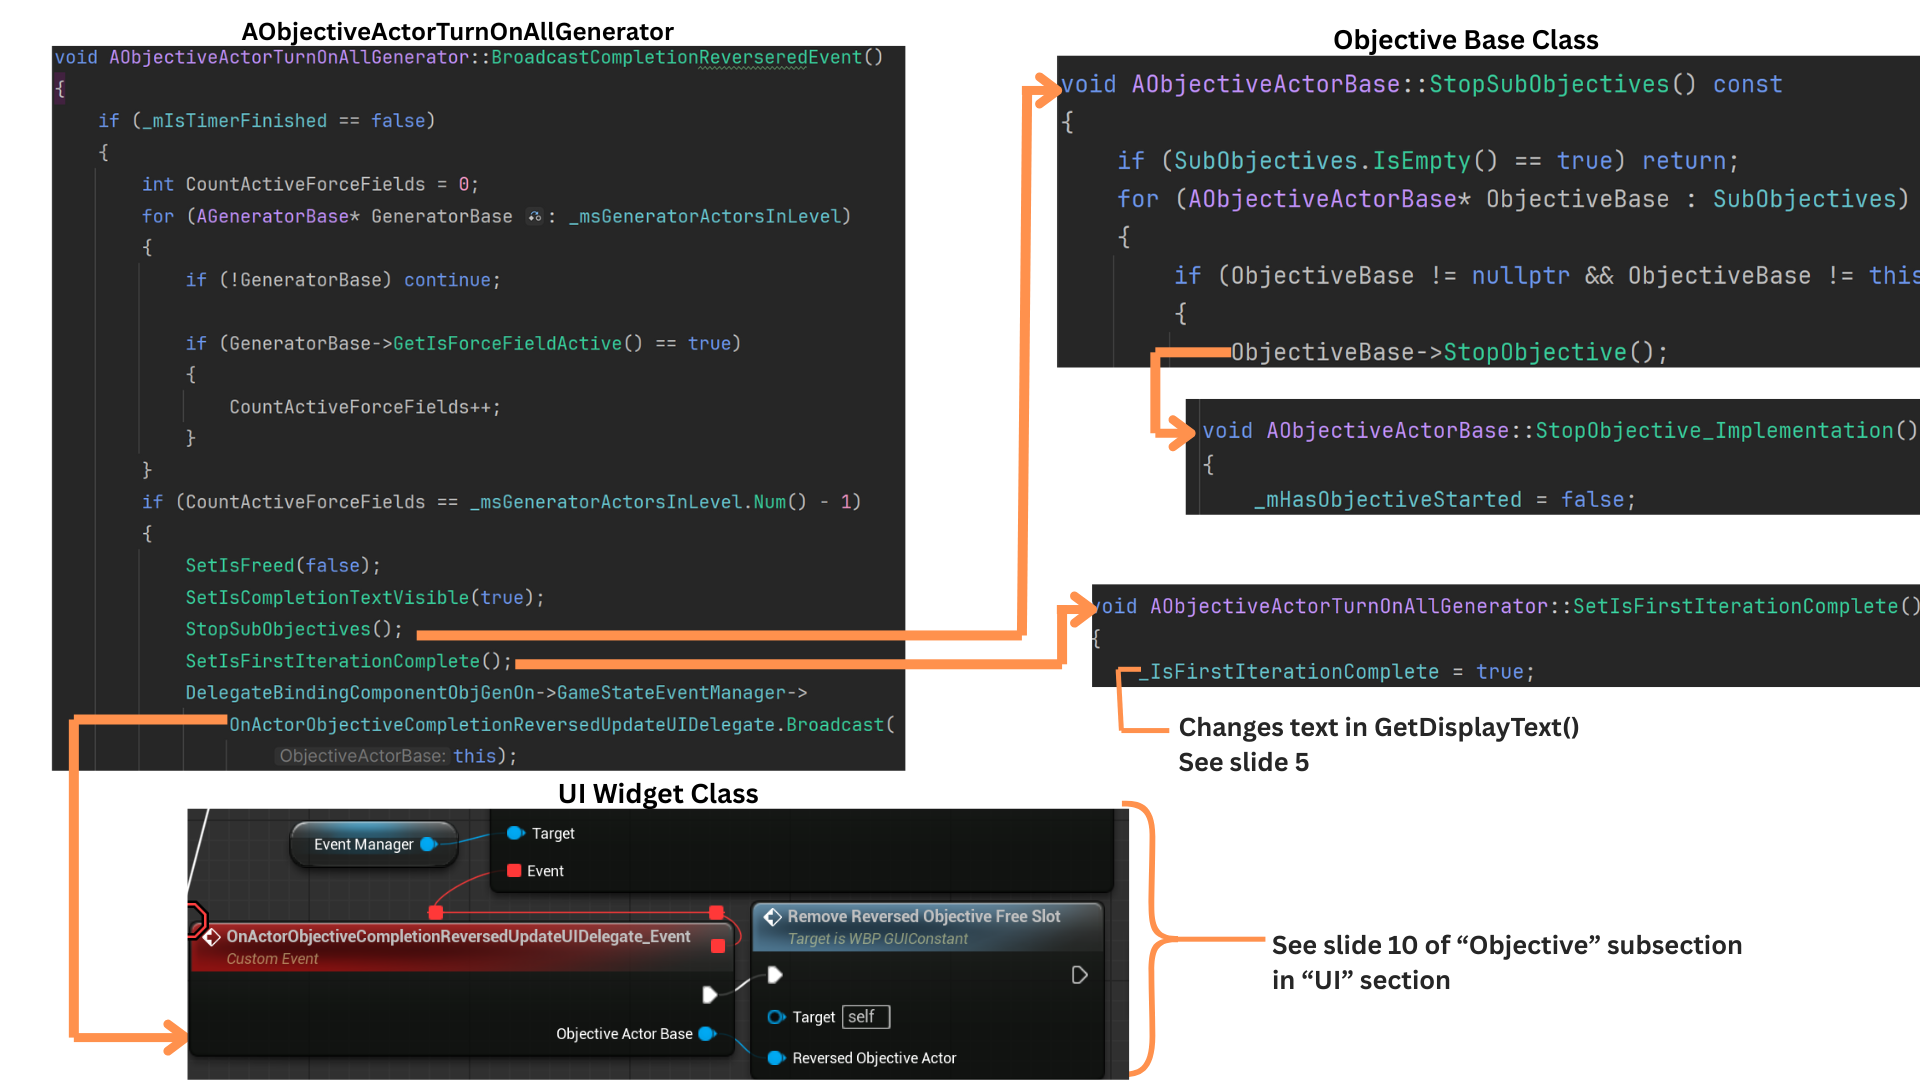
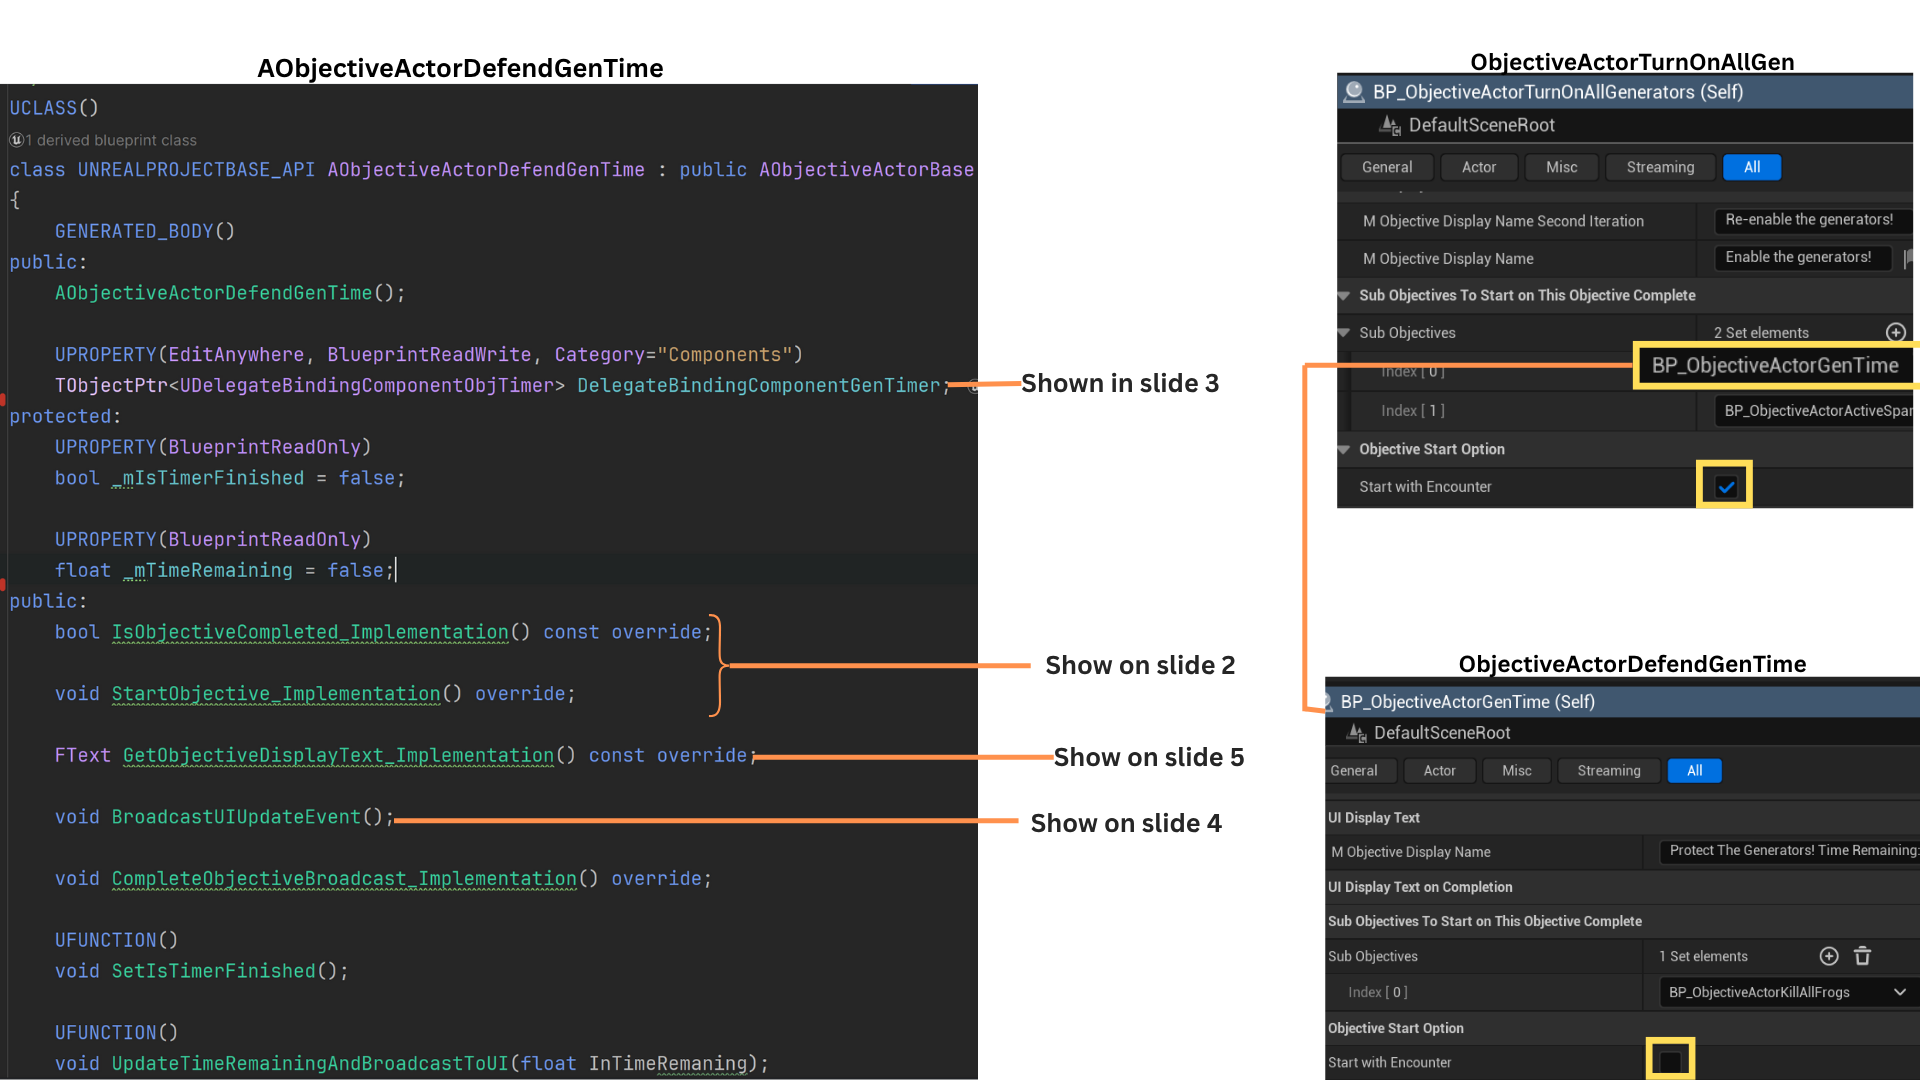
1. ObjectiveActor manages all core objective flow: determining start/completion, formatting UI text, sequencing follow-up objectives, and broadcasting start, update, and completion events.
Five child classes inherit from it:
--Reach Point
--Kill All Frogs
--Defend Generator for Time
--Turn On All Generators
--Destroy All Frog Spawners
Each implementing their own completion logic.
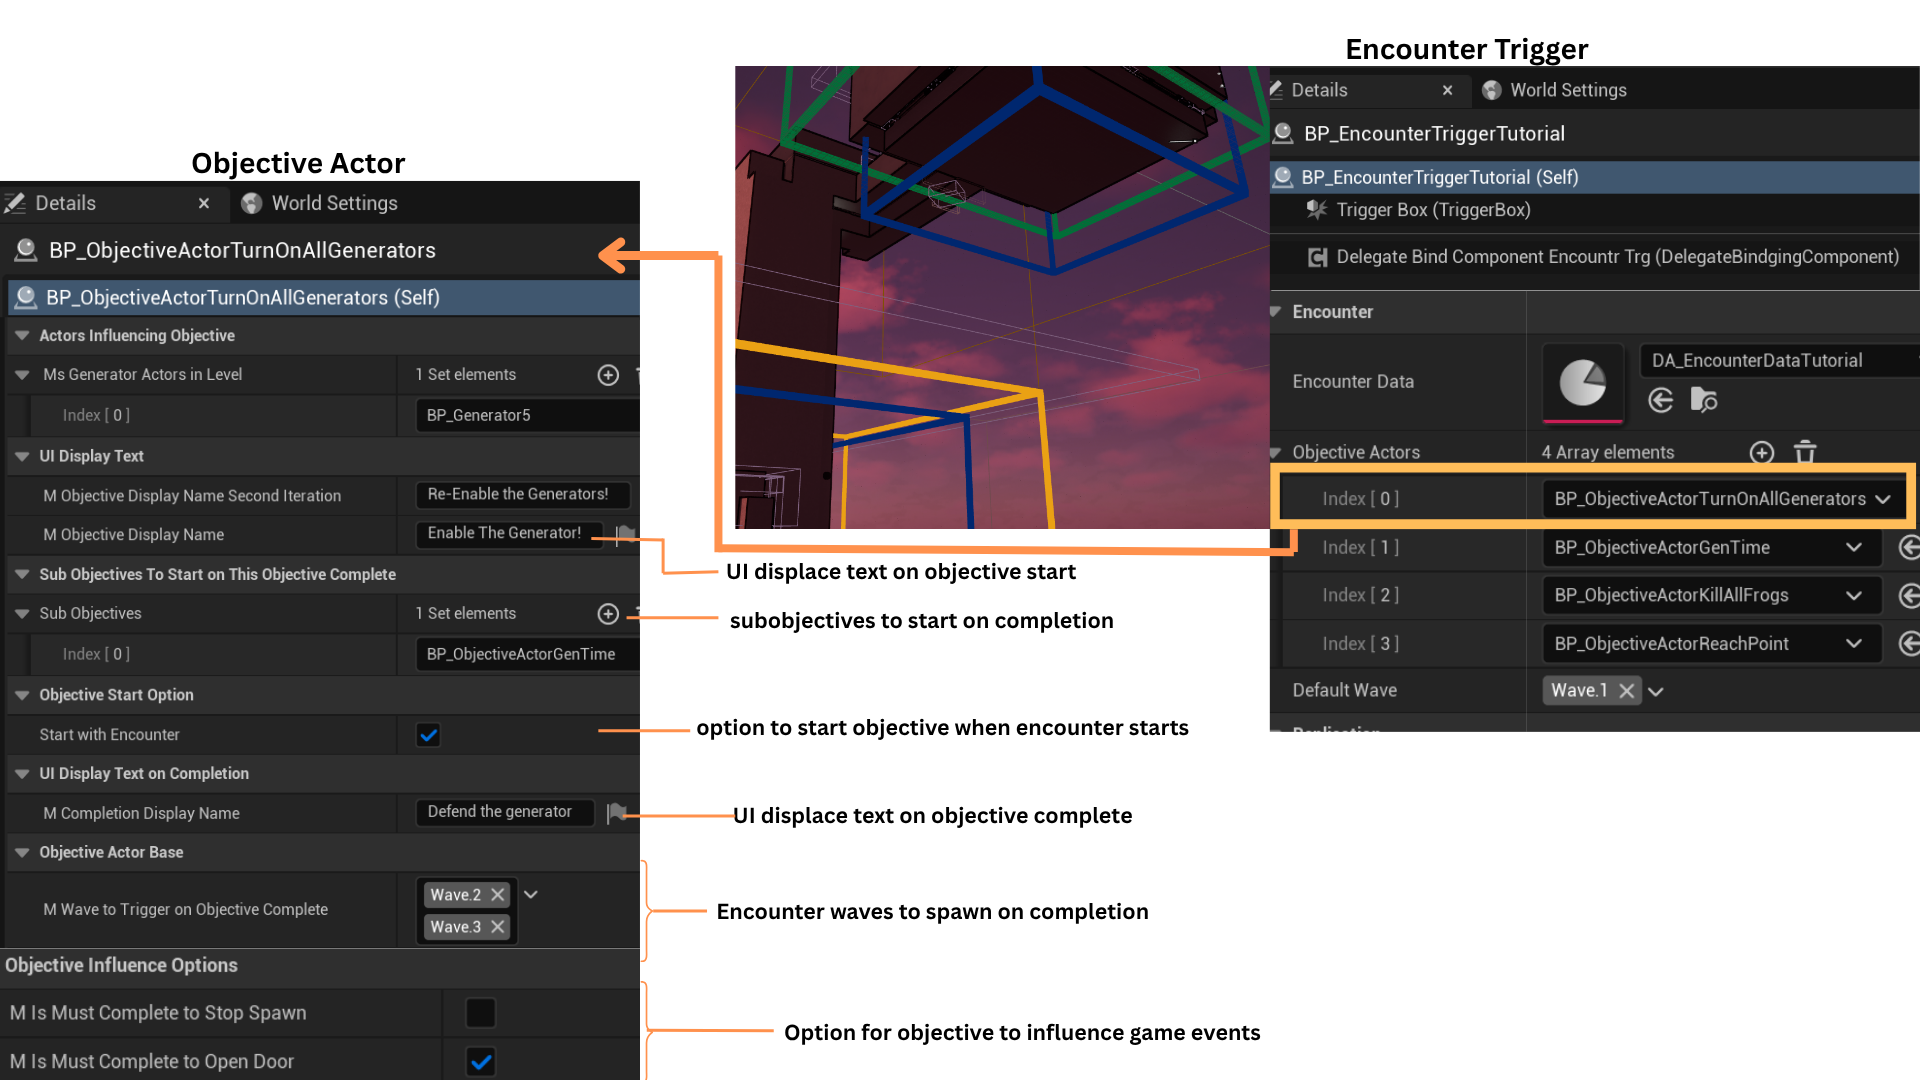
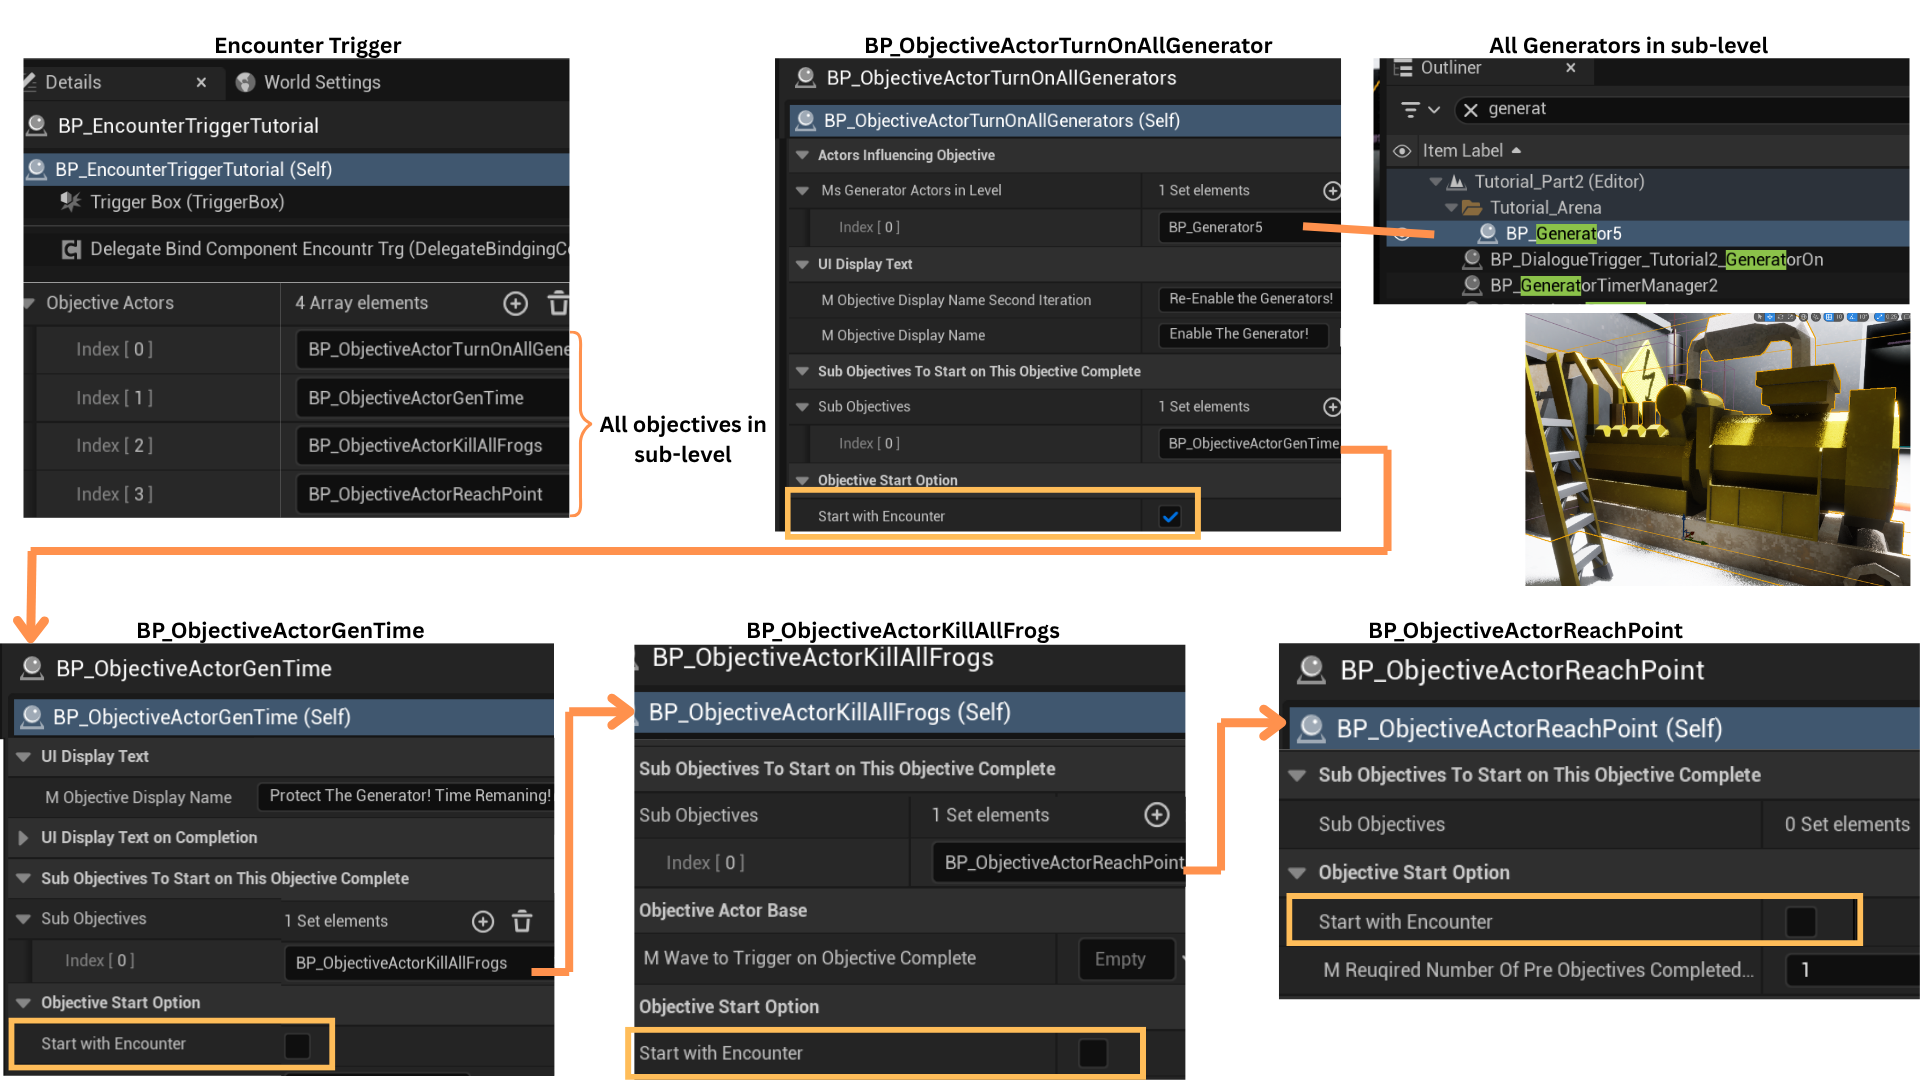
2. Each sublevel’s EncounterTrigger owns an array of ObjectiveActors, representing all objectives within that encounter.
ObjectiveActor provides shared properties such as display names, sequence management, and formatted UI text.
-- ObjectiveDisplayName is shown at start;
-- CompletionDisplayName is shown on completion.
-- SubObjectives lists which objectives begin once this one completes
-- StartWithEncounter allows objectives to auto-start as soon as the player enters the trigger.
-- WaveToTriggerOnObjectiveComplete contains wave gameplay tags that activate once the objective finishes.
-- ObjectiveInfluenceOptions define whether completion contributes to opening progression doors or halting enemy spawns.
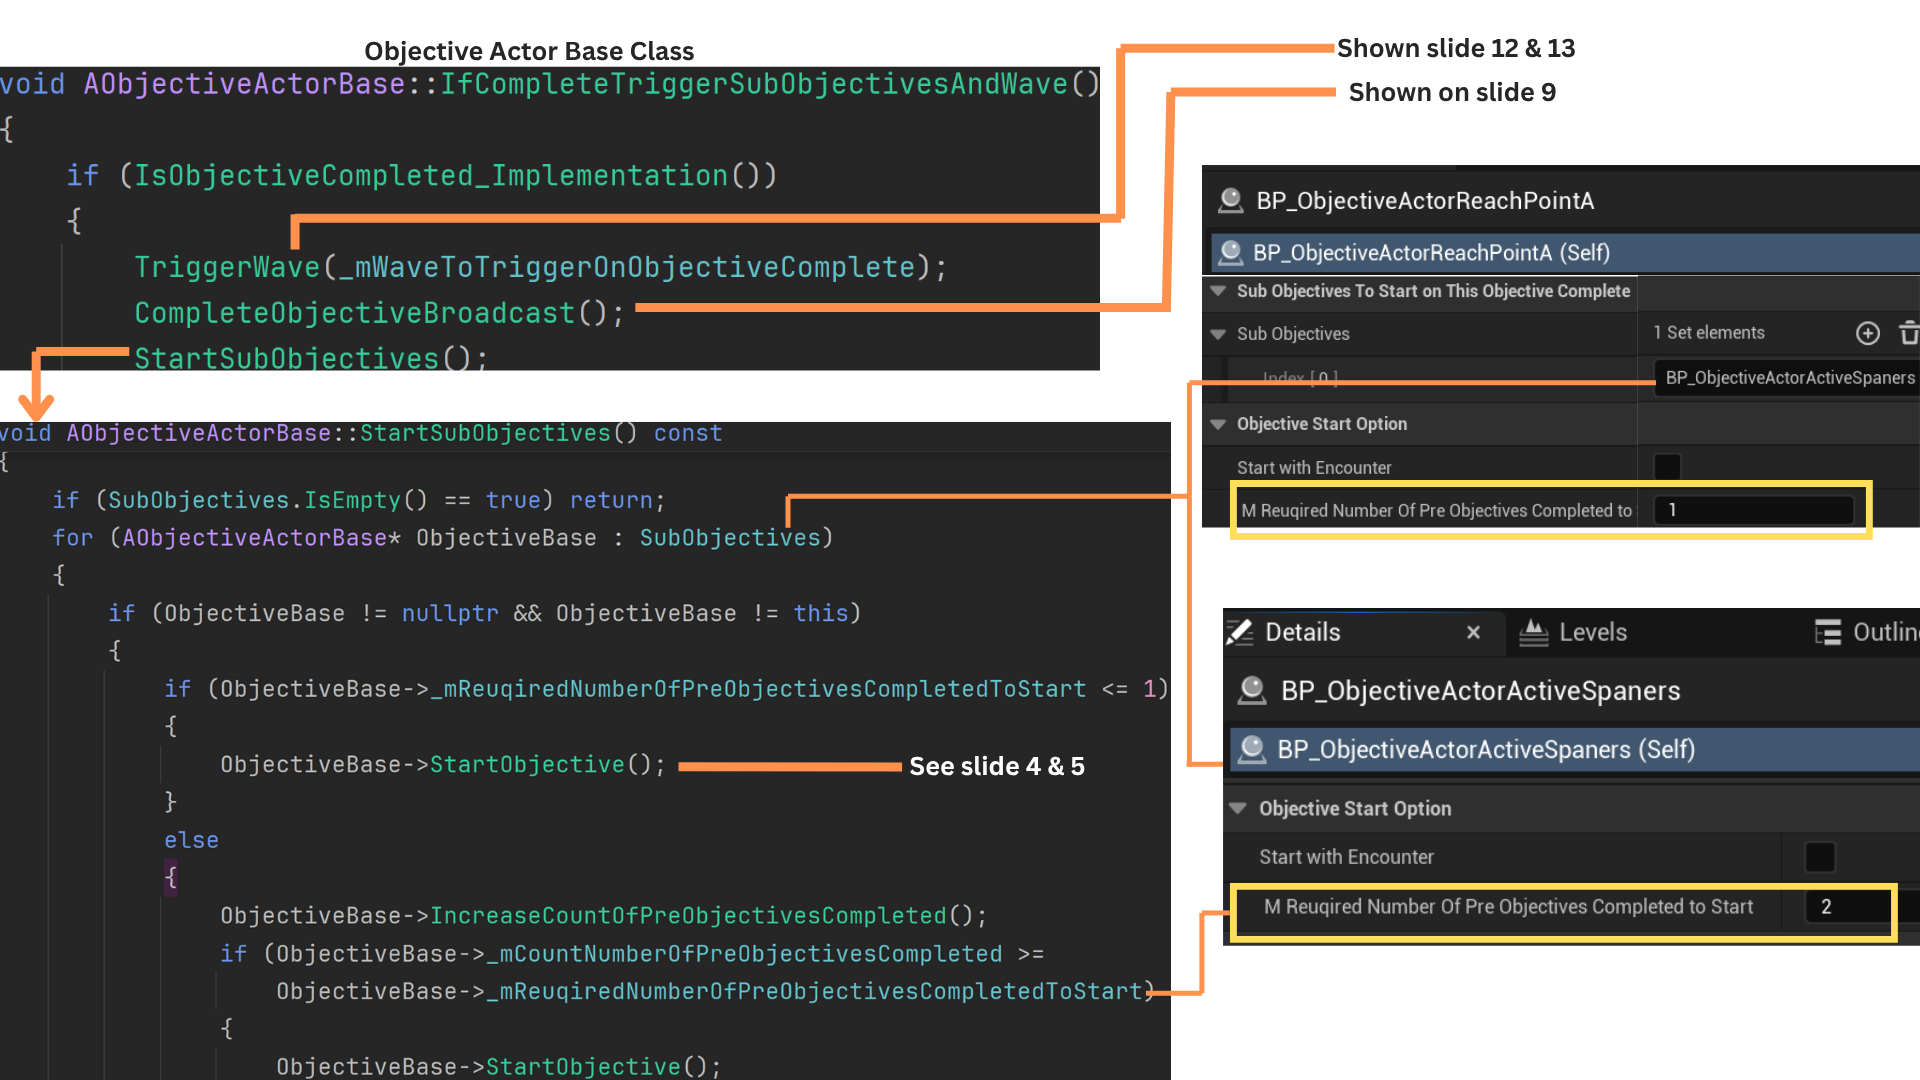
3. At most two objectives can use StartWithEncounter = true. All others begin as subobjectives triggered when their parent objective completes, which sets IsStarted = true for each entry in its SubObjectives array.
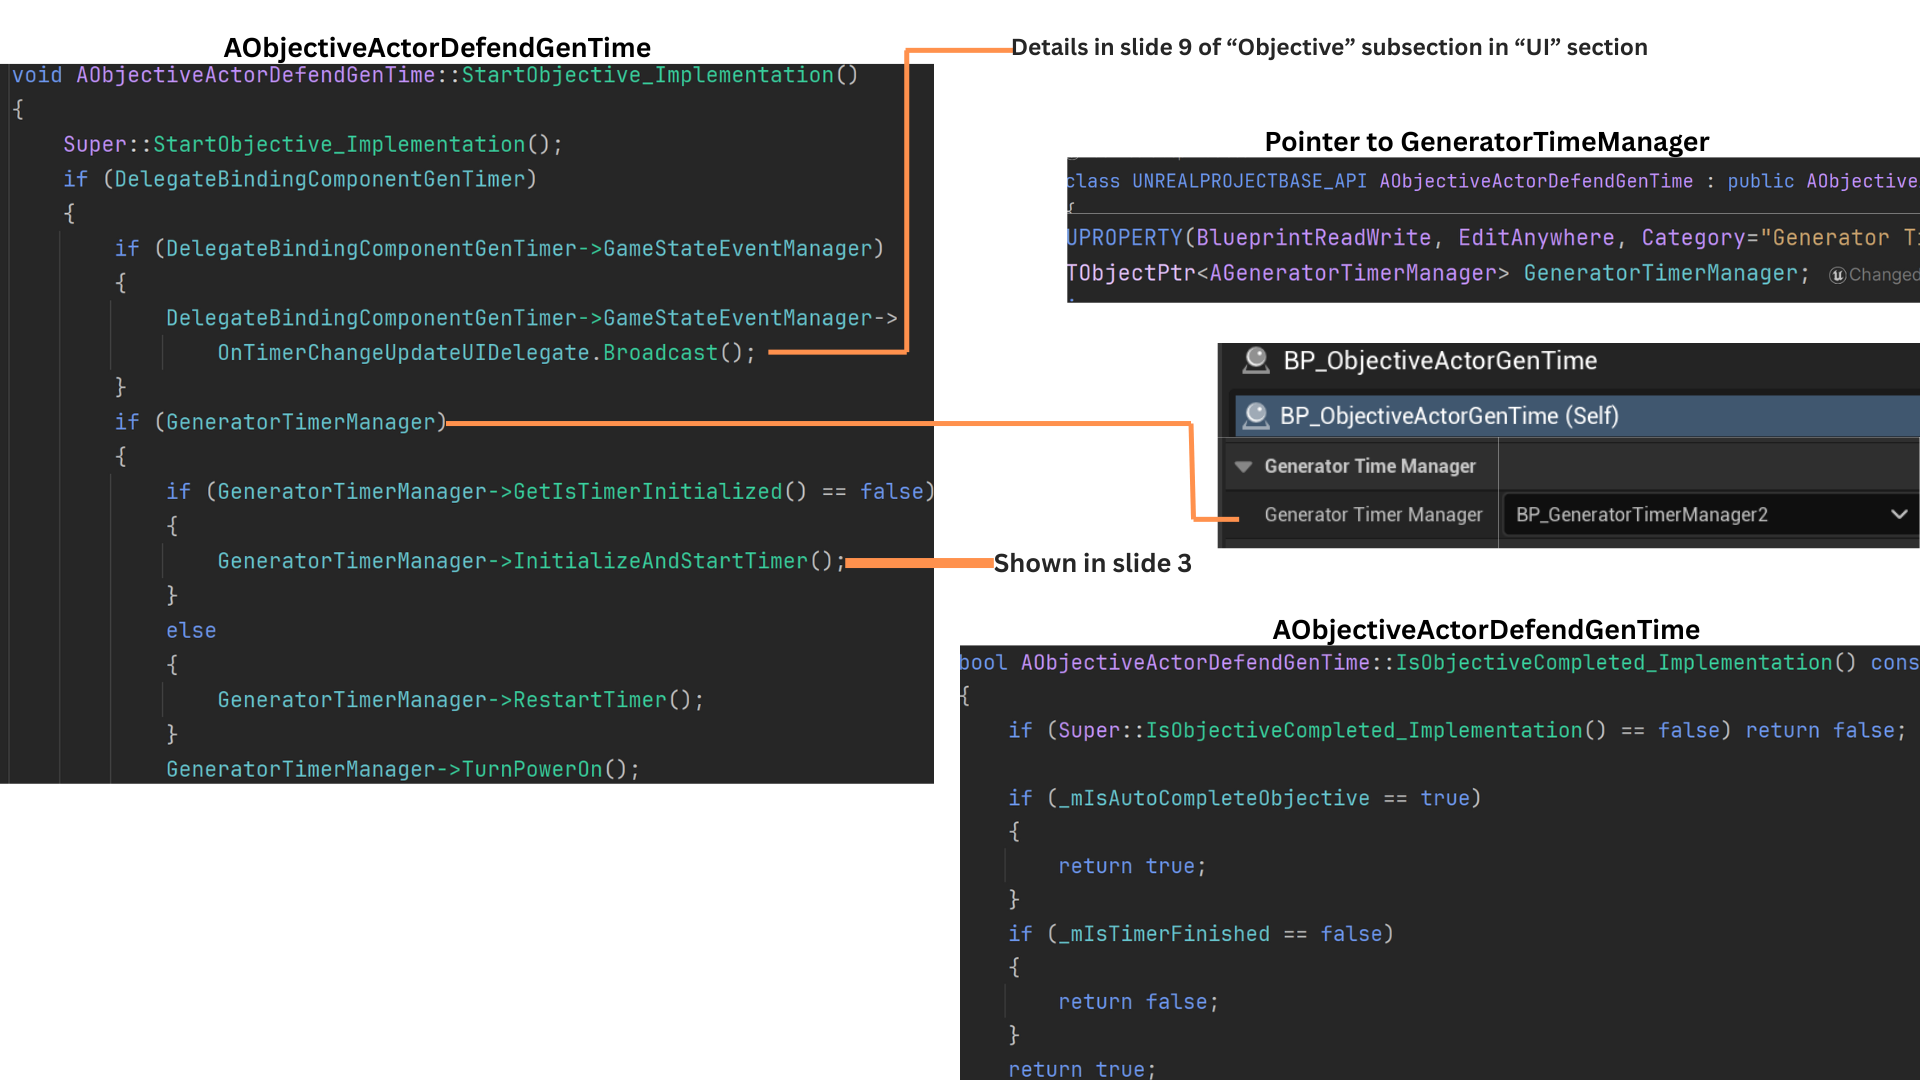
Child classes implement their own completion logic—for example, ObjectiveActorTurnOnAllGenerators tracks generator activation counts using an array of AGenerator references in the sublevel.
4. When the player enters the EncounterTrigger, OnEncounterBegin registers the trigger with the EncounterManagerComponent in the GameMode.
After patrol routes, spawn locations, and wave data are initialized (see Encounter System), the trigger calls StartObjectives() to begin any objectives flagged to start with the encounter.
5. Objectives marked StartWithEncounter invoke StartObjective(), which sets HasObjectiveStarted = true and resets UI-related state.
Child classes override StartObjective() but still call Super, allowing them to dispatch the appropriate start delegates.
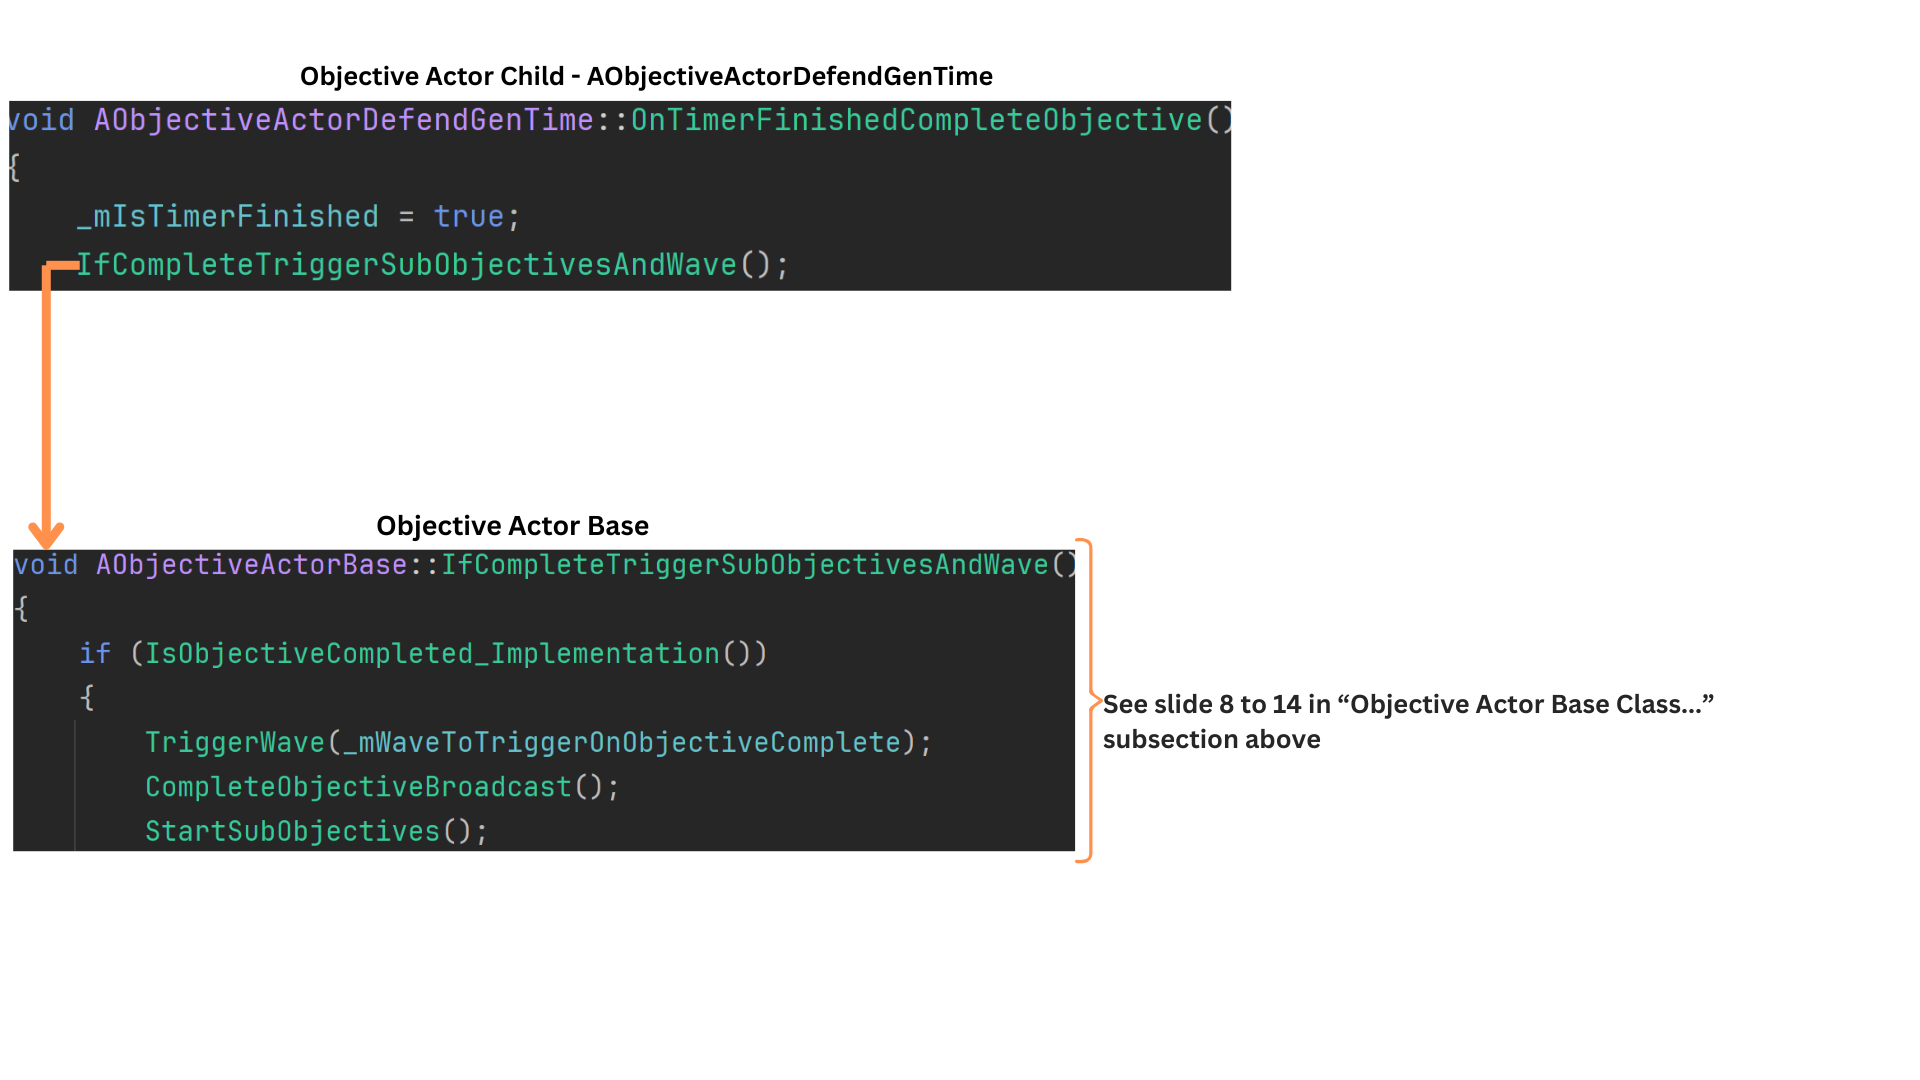
IsObjectiveComplete() provides base validation (checking if the objective has started), while each child overrides it with objective-specific completion logic.
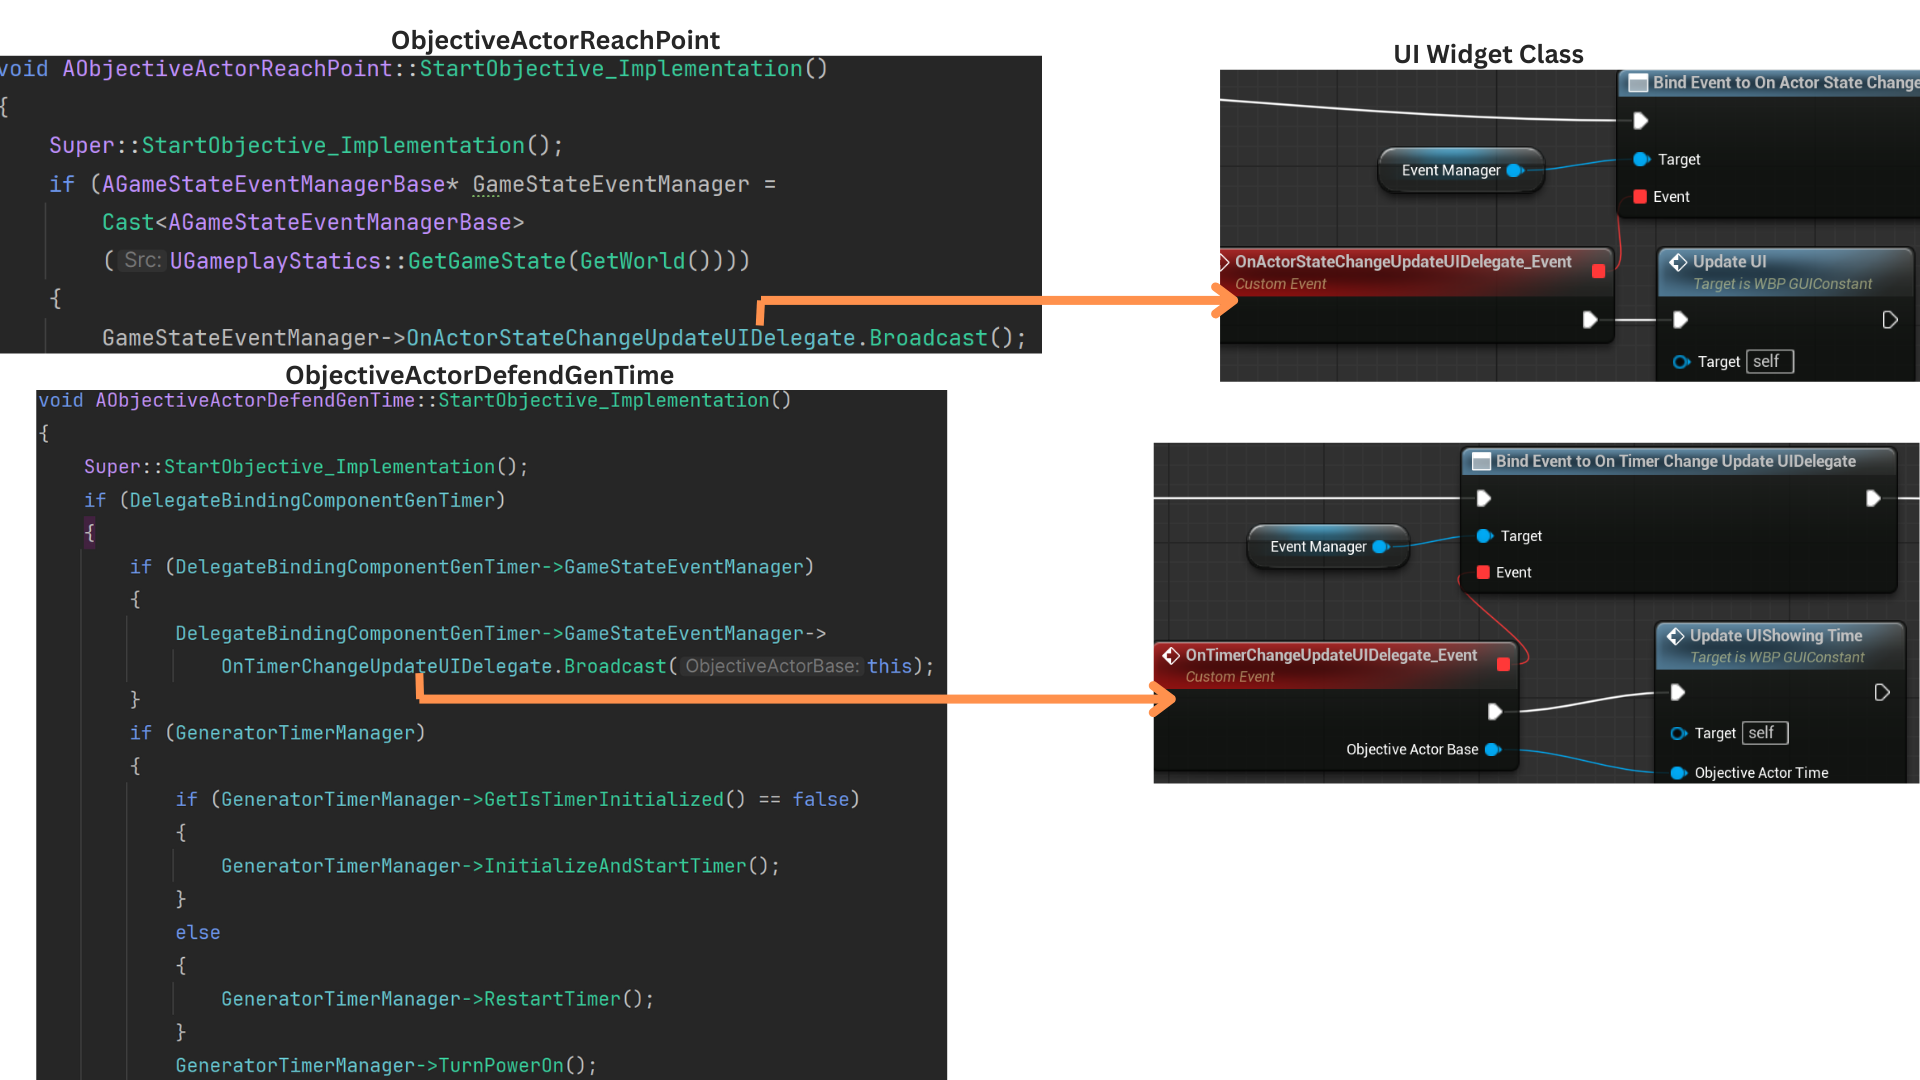
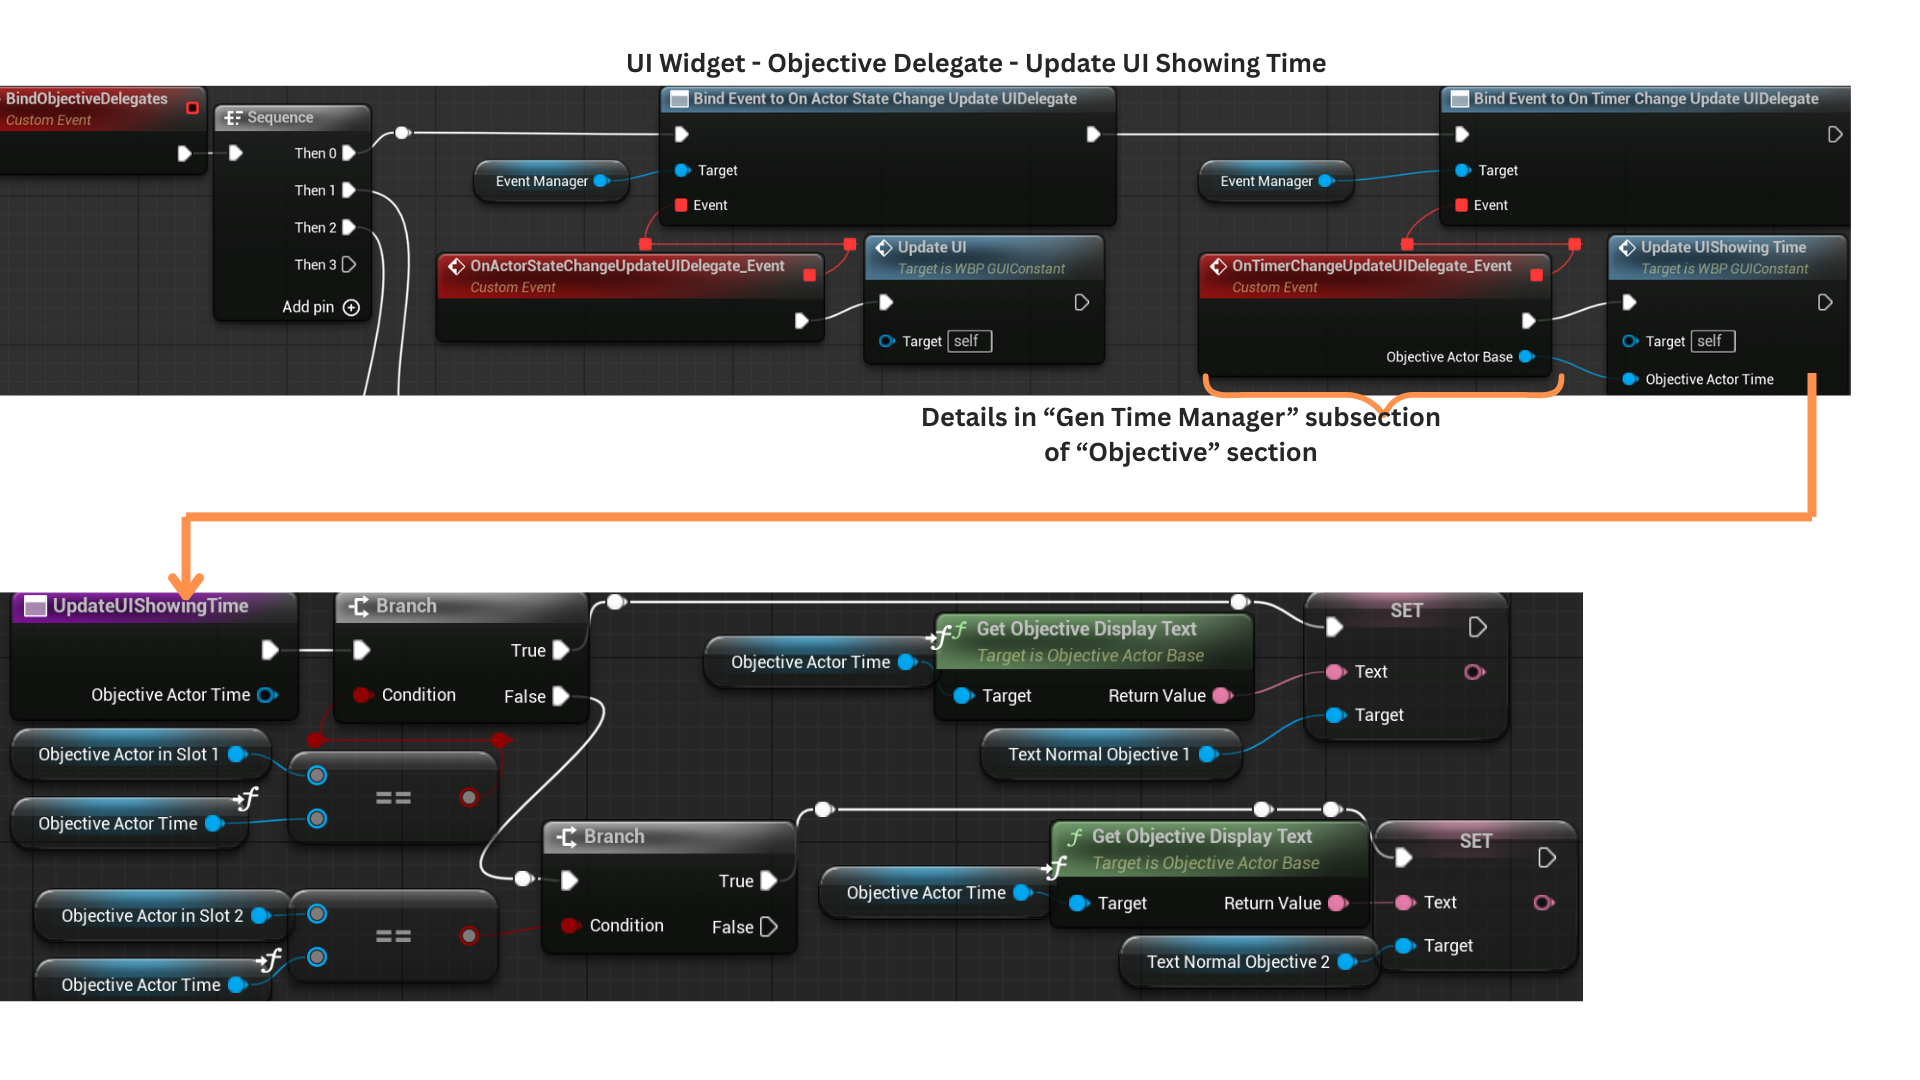
6. Objectives that update via a timer broadcast OnTimerChangeUpdateUIDelegate, which refreshes only the UI slot associated with timed objectives, avoiding unnecessary UI iteration.
All other objectives broadcast OnActorStateChangeUpdateUIDelegate for non-timer-based updates.
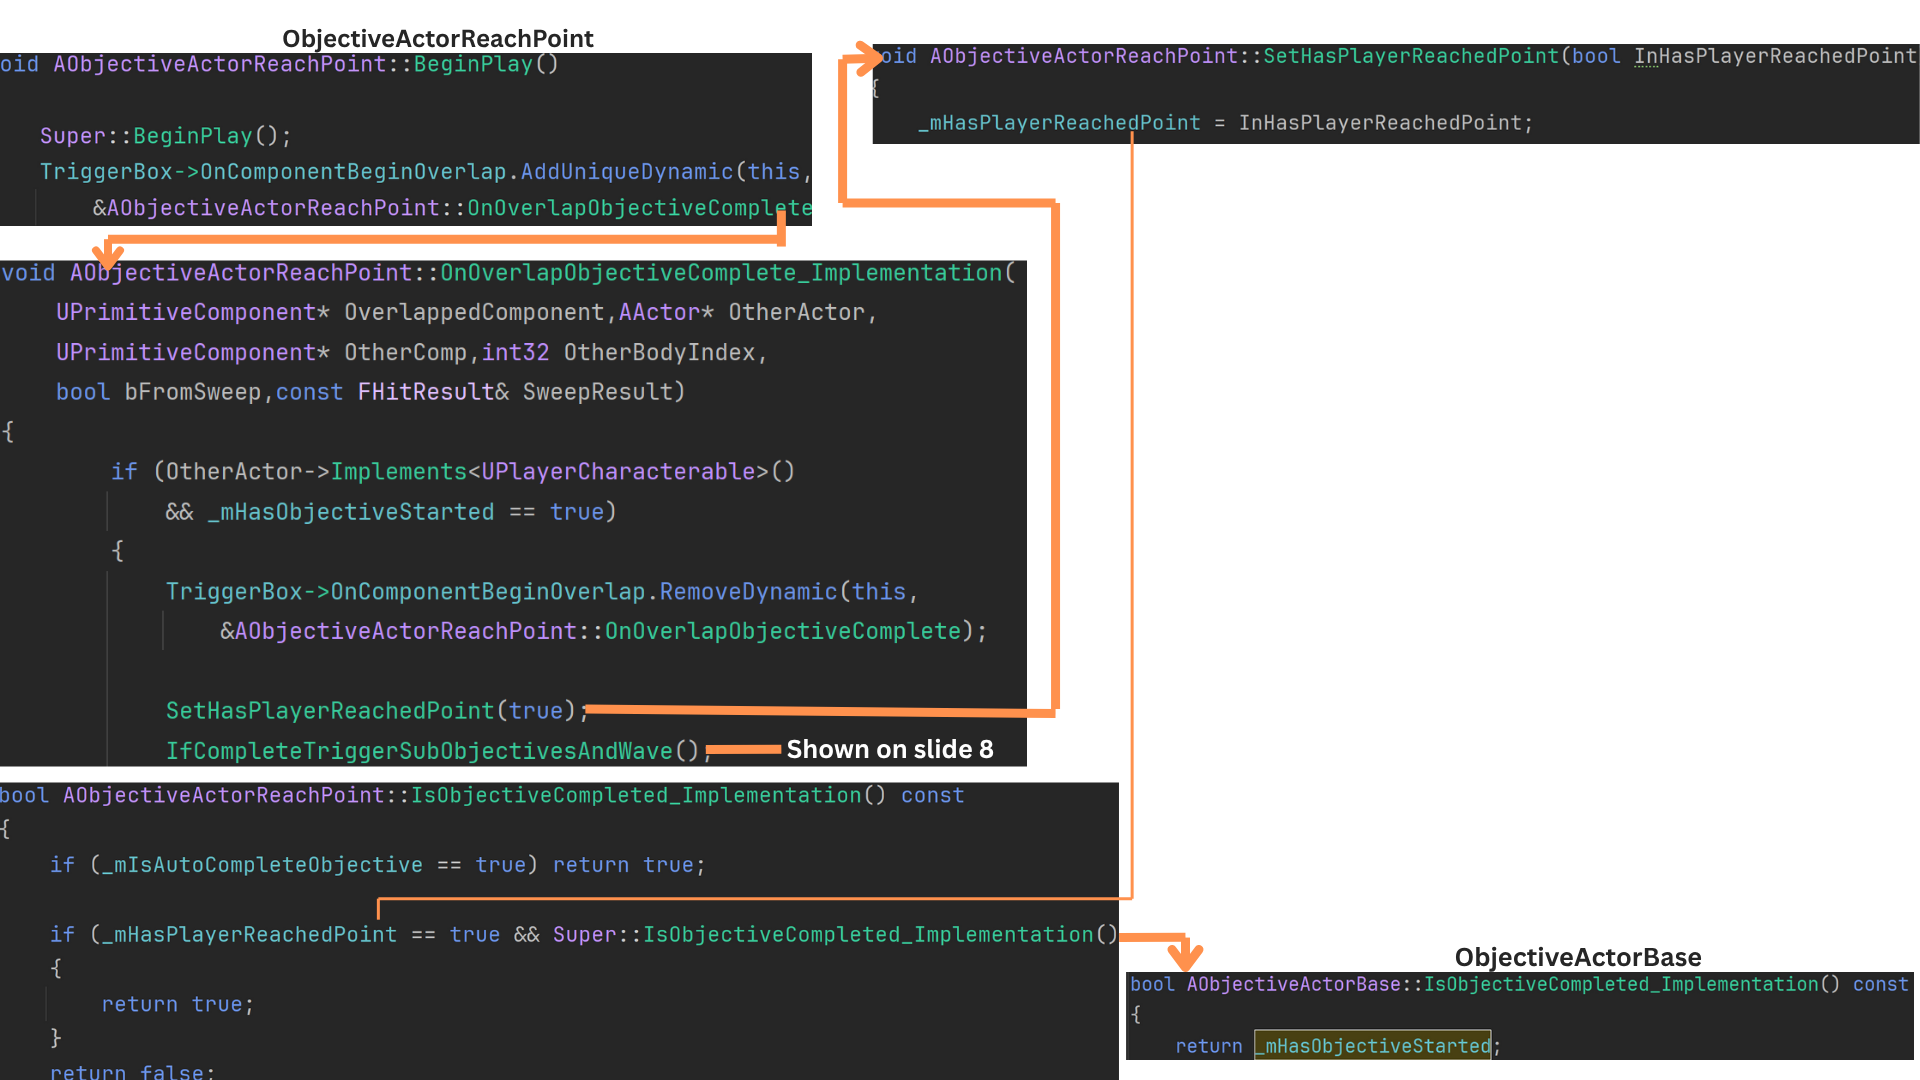
7. ObjectiveActorReachPoint completes when the player overlaps its trigger volume after the objective has started.
Upon completion, IfCompleteTriggerSubobjectivesAndWave() starts any subobjectives that qualify, triggers related waves, and broadcasts the completion delegate.
8. TriggerWave() starts the next wave if its gameplay tag matches the expected wave-in-queue and no wave is currently spawning; otherwise, it marks the wave as “released” for later spawning once the current wave finishes.
StartSubobjectives() iterates through the subobjective list and calls StartObjective() when requirements are met.
RequiredNumberOfPreObjectivesCompletedToStart determines how many parent objectives must complete before this objective may begin—typically one.
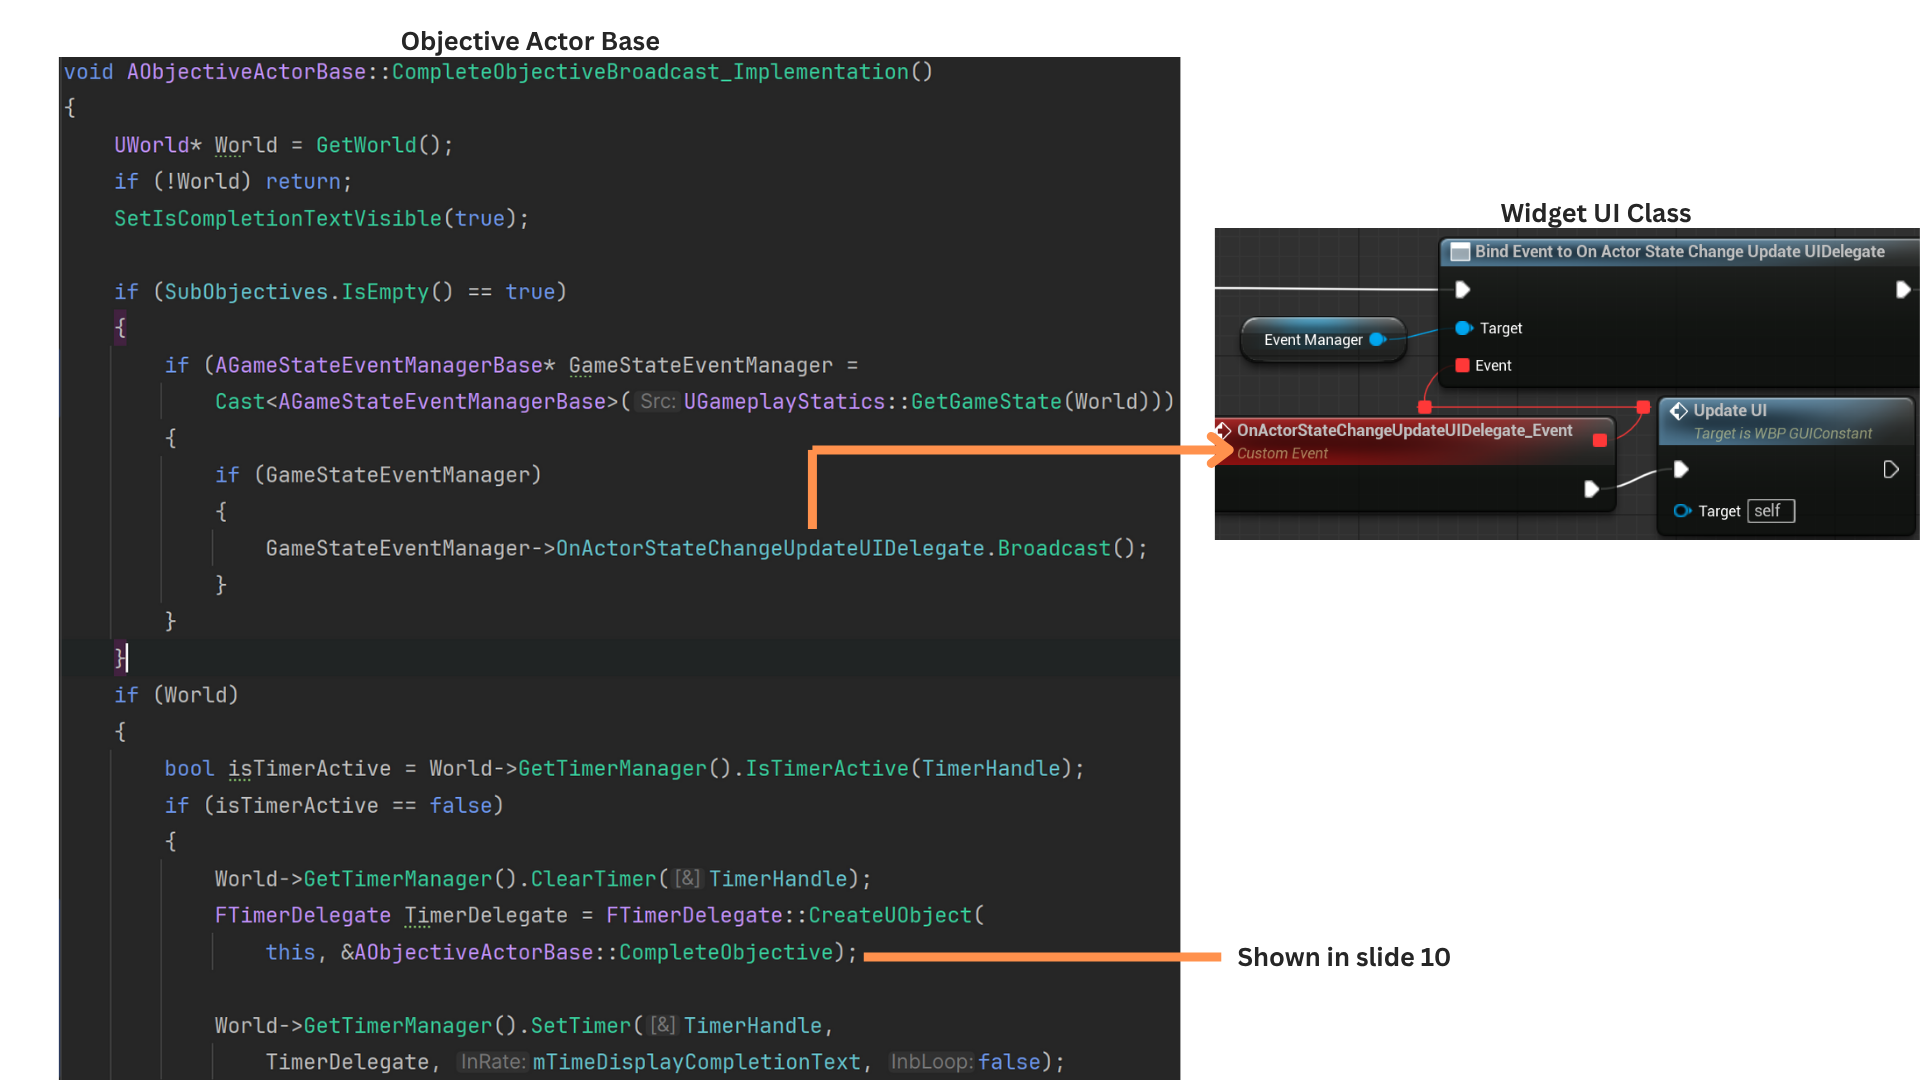
9. CompleteObjectiveBroadcast() shows the completion display text and starts a timer.
When the timer expires, CompleteObjective() hides the text, broadcasts completion, and releases the objective so it no longer participates in completion checks.
Since ActorStateChangeUpdateUIDelegate fires when starting an objective, it is only sent on completion when no subobjectives will follow.
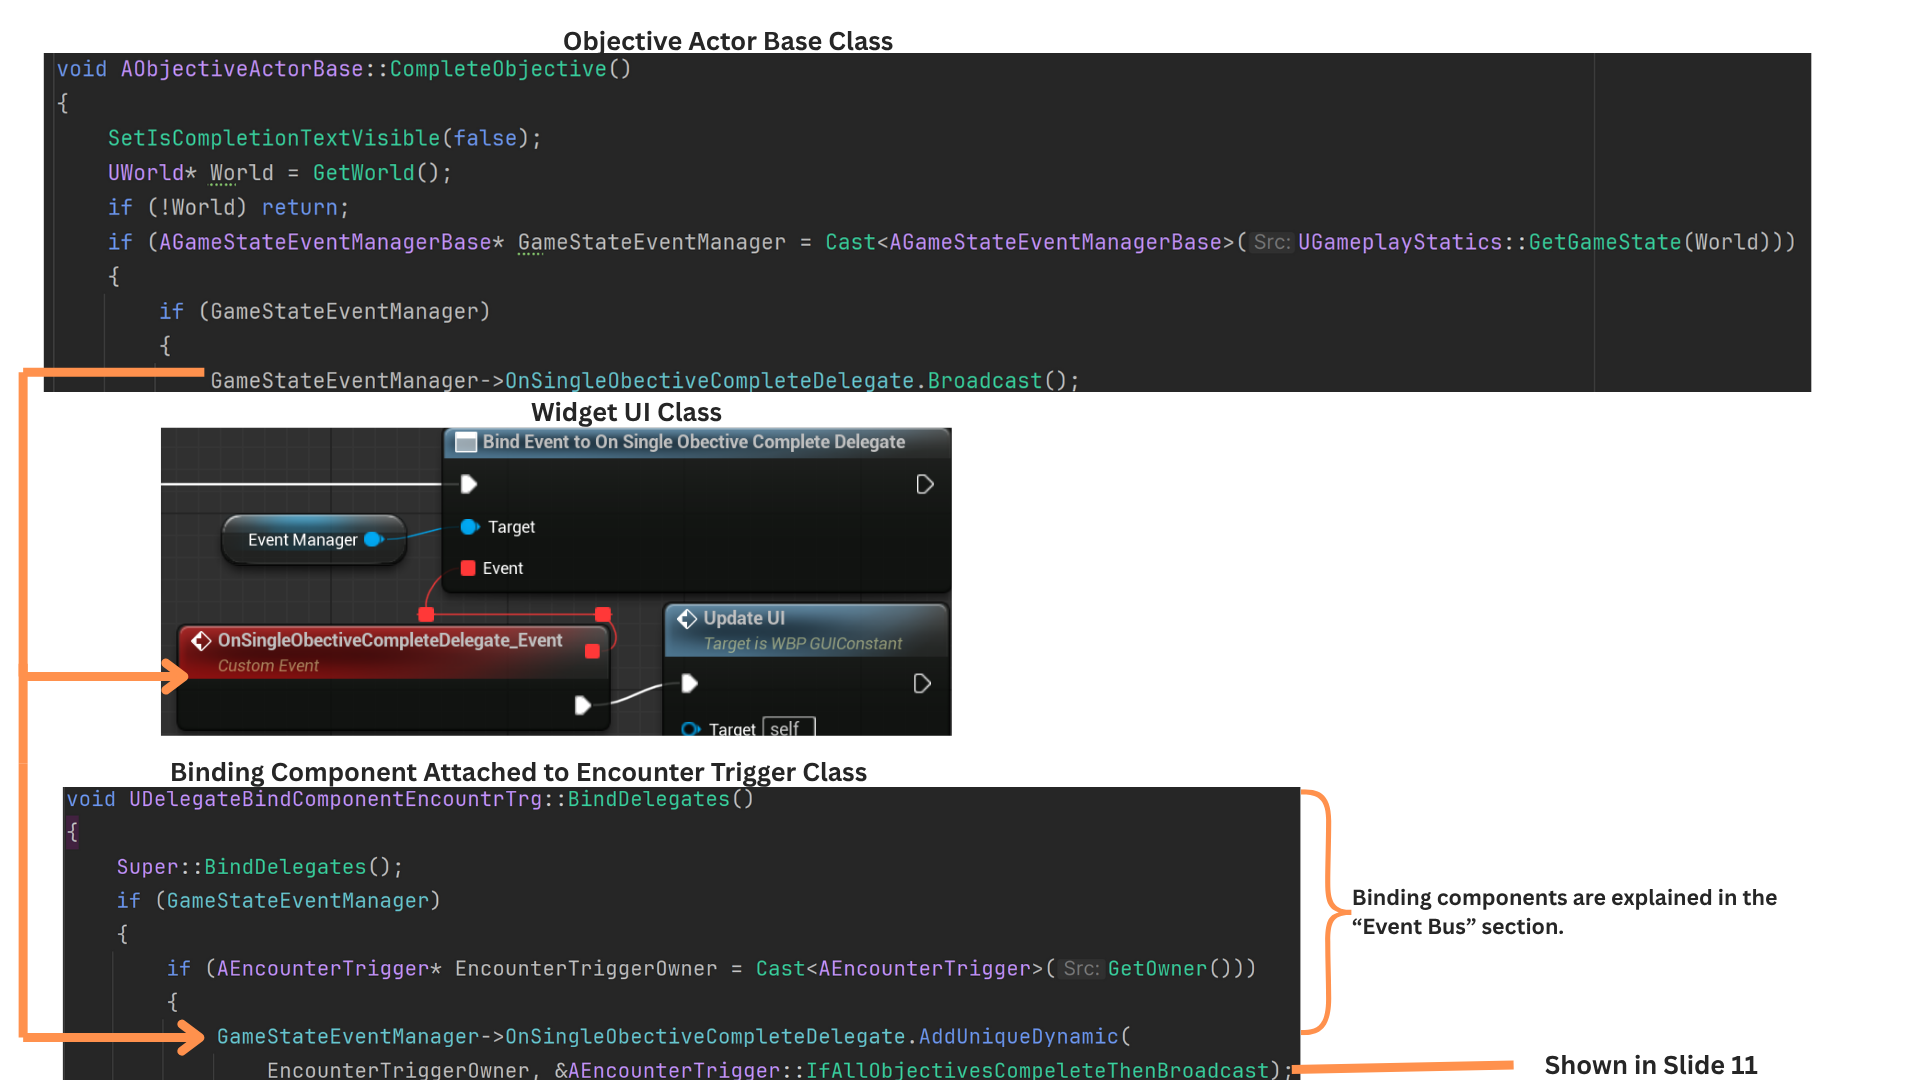
10. CompleteObjective() disables the completion display text and broadcasts a delegate used both to refresh the UI and to notify the EncounterTrigger that objective totals must be recalculated.
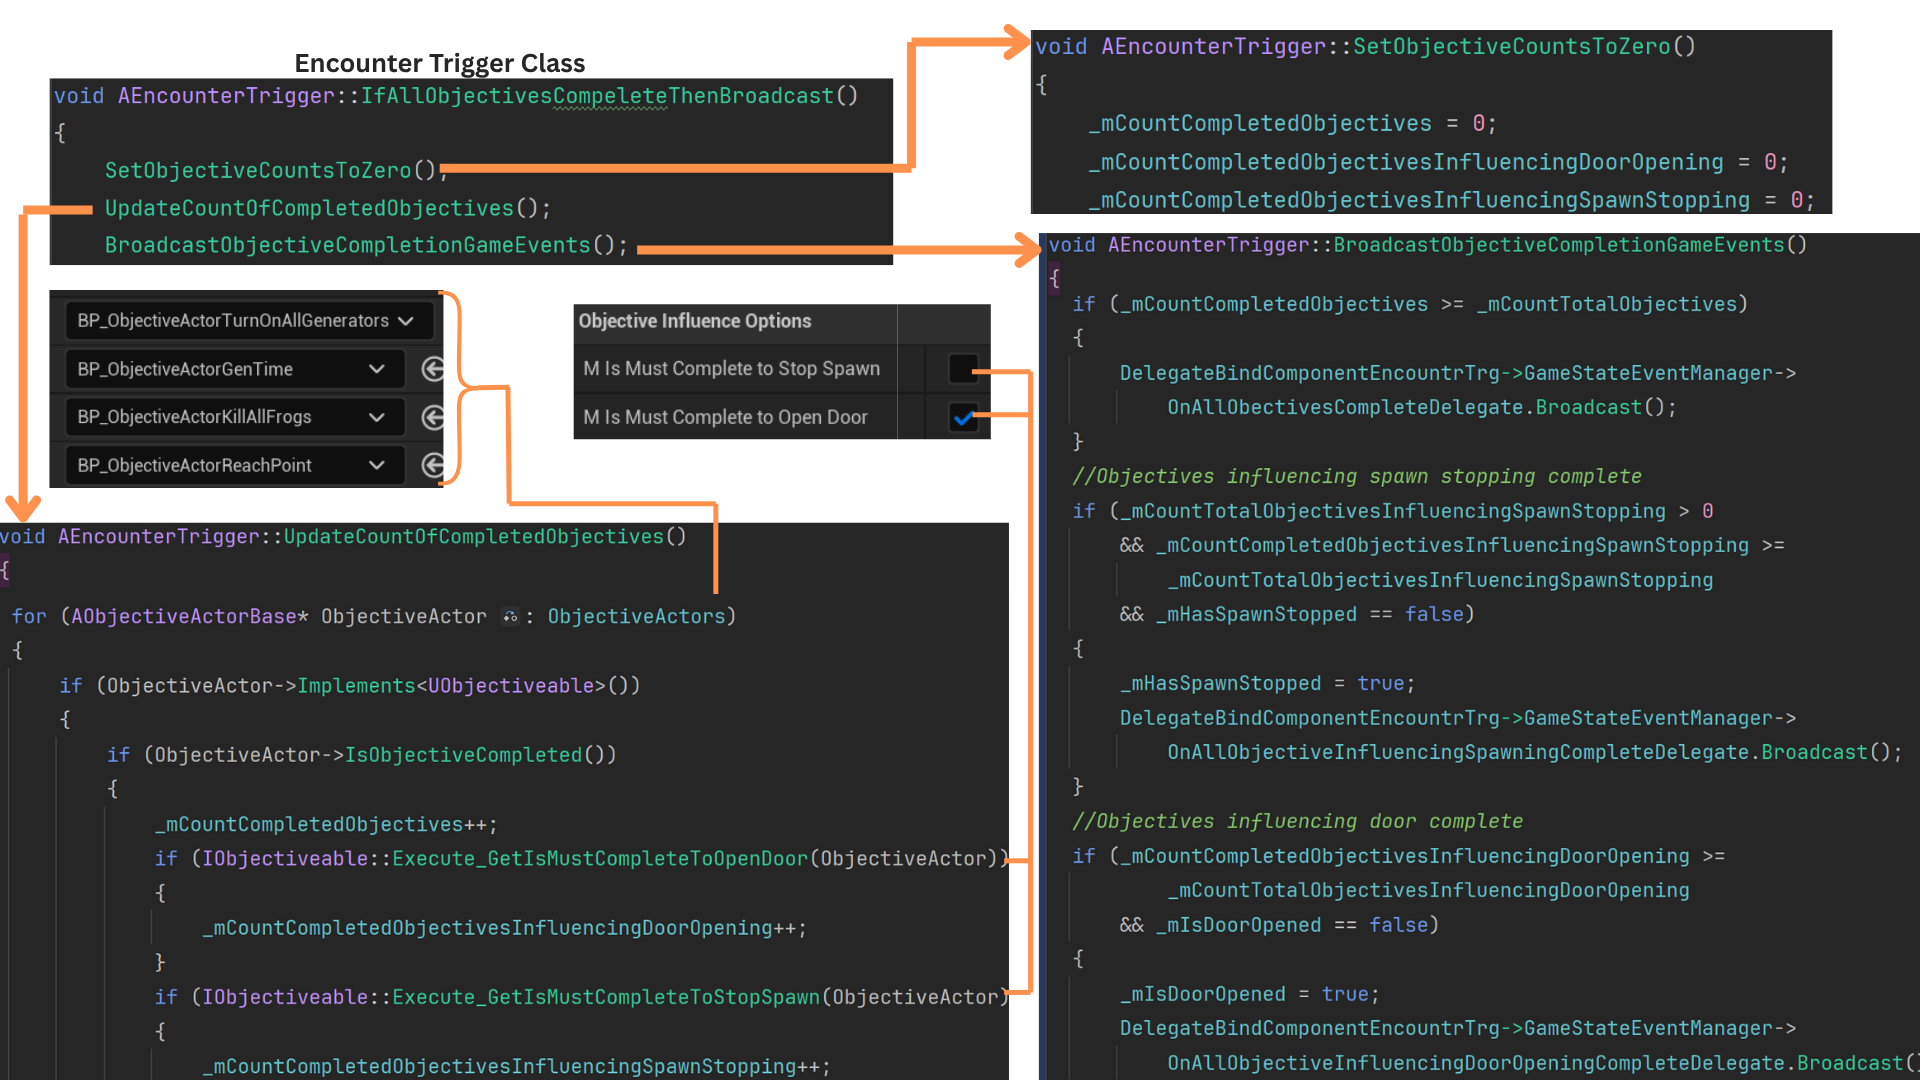
11. Upon receiving the completion delegate, IfAllObjectivesCompleteThenBroadcast() resets internal counters. This is necessary because some objectives—such as generator activation—can revert from completed to incomplete.
UpdateCountOfCompletedObjectives() iterates through all objectives, counting both total completions and those that influence door-opening or spawn-stopping.
BroadcastObjectiveCompletionGameEvents() compares required totals against current completion counts and fires appropriate delegates when all required objectives are fulfilled.
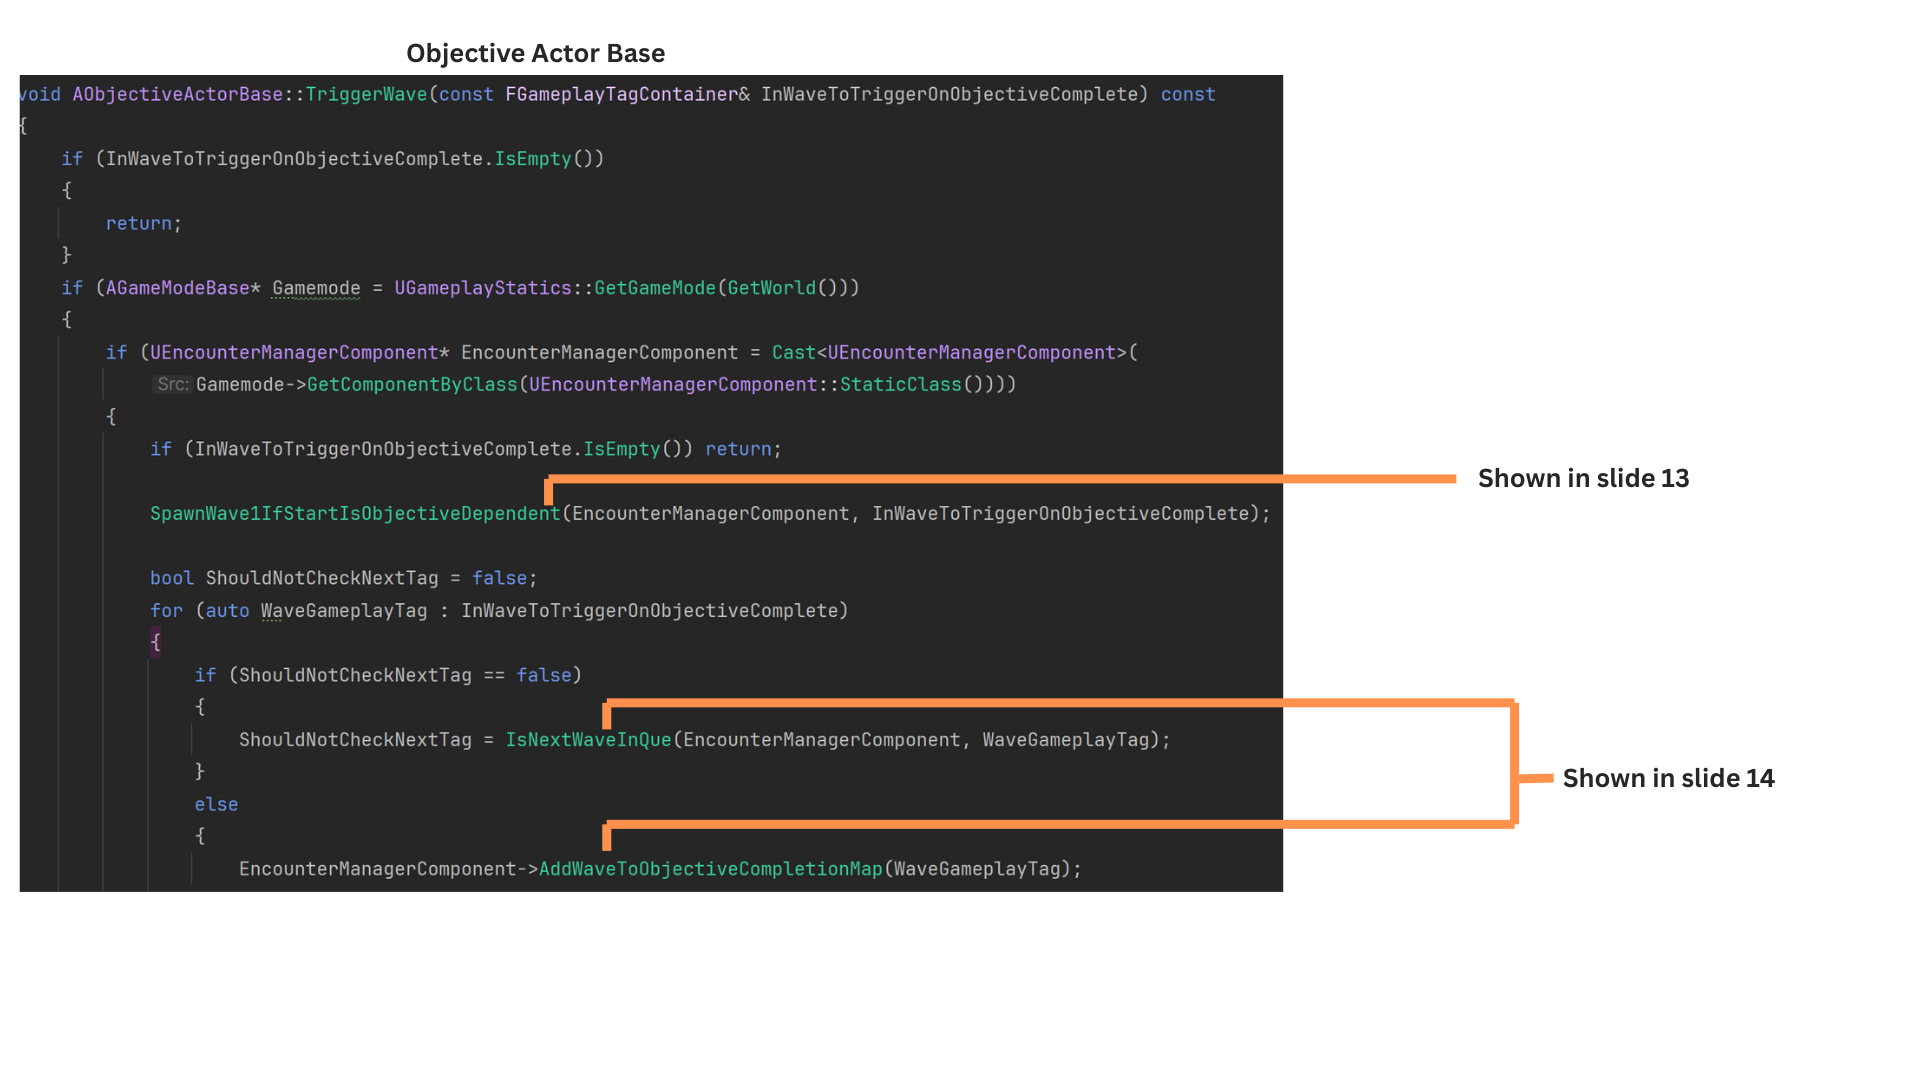
12. TriggerWave() first checks whether the currently active wave is Wave 1 and whether Wave 1 is objective-triggered.
It then iterates through the objective’s gameplay tags, spawning the wave that matches NextWaveInQueue and marking the others as “released” for later spawning.
When multiple waves are listed, only one may spawn at a time; the rest are queued in the released-waves map.
13. SpawnWave1IfStartIsObjectiveDependent() checks whether Wave 1 is active and whether this objective’s gameplay tags include Wave 1.
It then retrieves Wave 1’s data asset entry into a temporary EncounterWaveData struct and verifies that its trigger type is “Objective.” If so, Wave 1 begins spawning.
14.When a wave begins spawning, it sets NextWaveInQueue numerically (e.g., Wave 1 → Wave 2) and marks IsSpawning = true. No subsequent wave can start until the current wave clears this flag.
IsNextInQueue() adds the wave’s gameplay tag to the released-wave map, then checks whether it matches NextWaveInQueue and whether no wave is currently spawning.
If both conditions are met—and no EQS test is running—the wave begins spawning.
If spawning or EQS evaluation is already in progress, the wave waits until the current wave finishes and the released-waves map is reevaluated.
Child Class Turn On All Generators
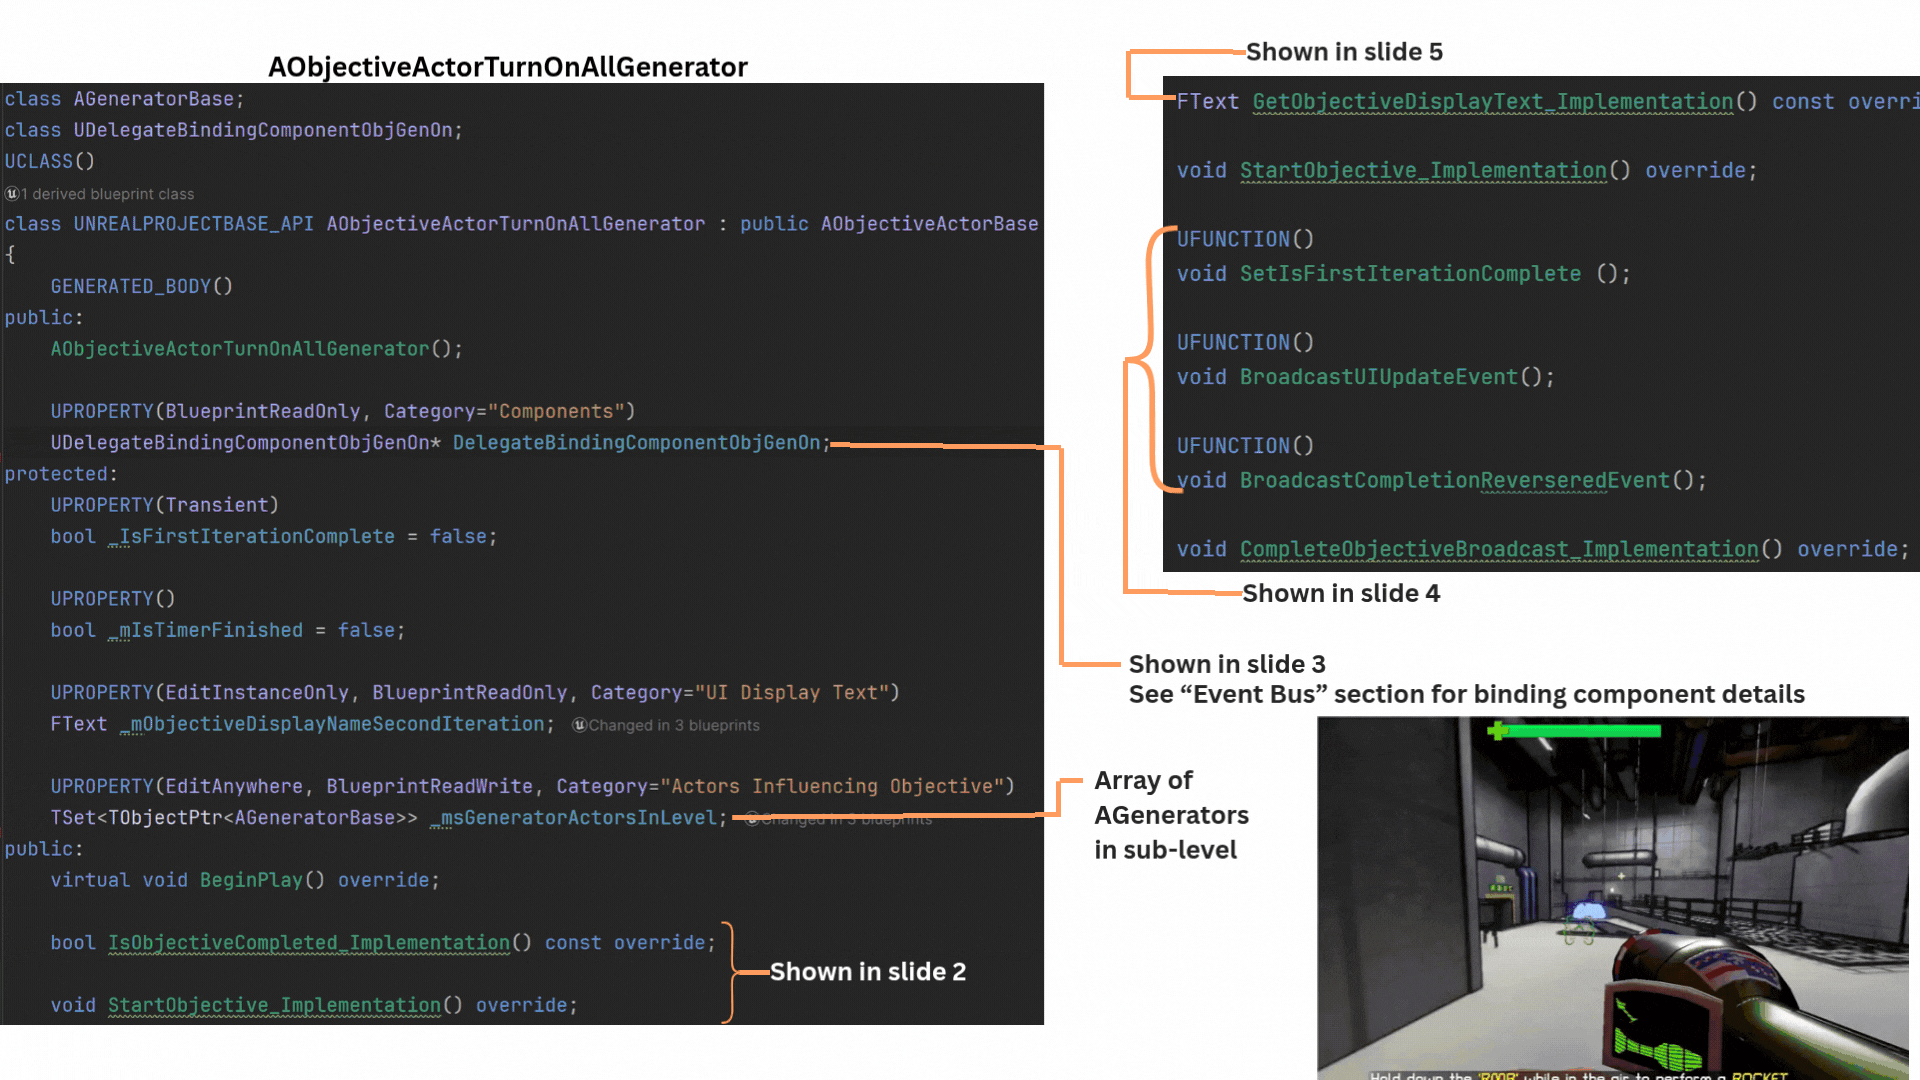
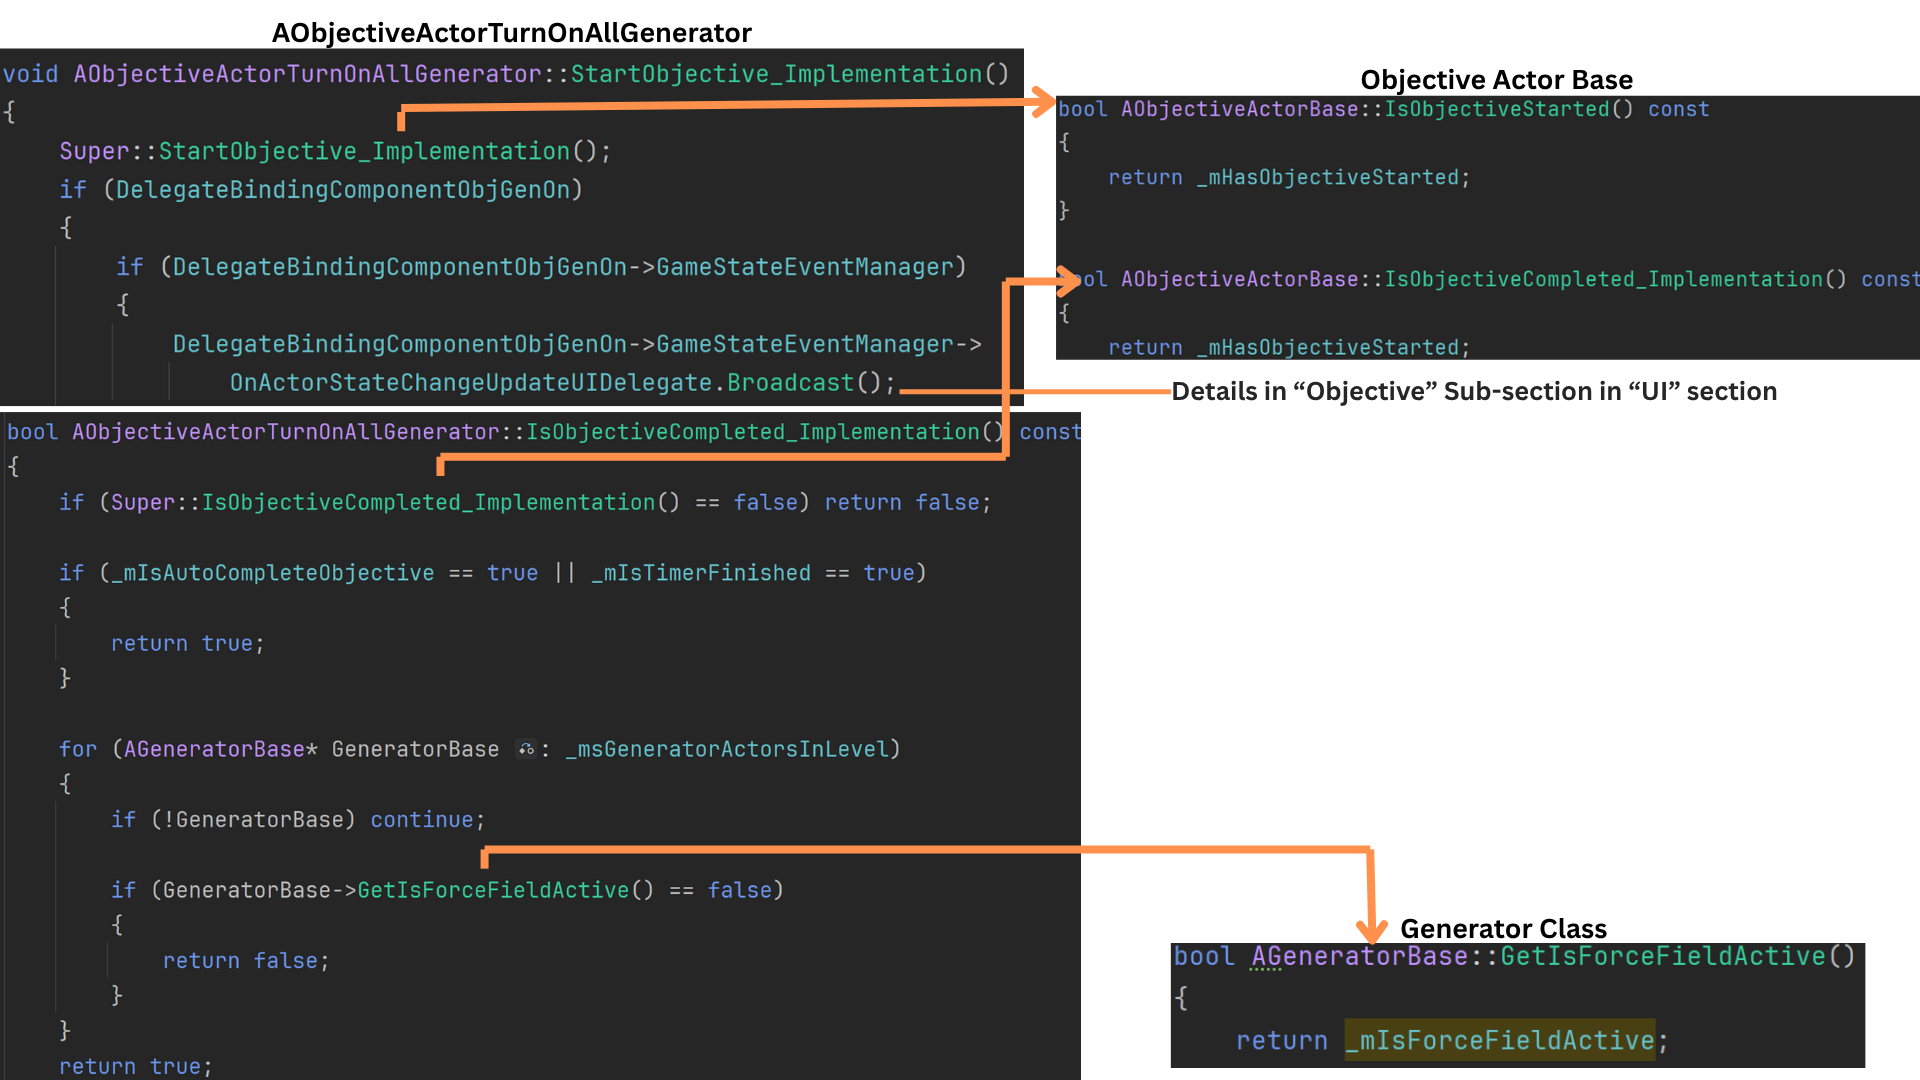
1. ObjectiveActorTurnOnAllGenerators stores a set of all AGenerators in the sub-level set by the designer, using a set to avoid duplicates. The objective completes once every generator in the set reaches the “active” state.
Generators can activate automatically when the encounter begins (via an exposed bool set by the designer) or through player interaction by holding E near a generator.
2. StartObjective calls Super to set HasObjectiveStarted to true and broadcast OnActorStateChangeUpdateUIDelegate, which informs the UI of state changes for non-timer-based objectives.
IsObjectiveComplete is kept const so the UI can poll it efficiently. The base implementation verifies the objective has started, then iterates through all stored generator references, returning false if any generator is inactive.
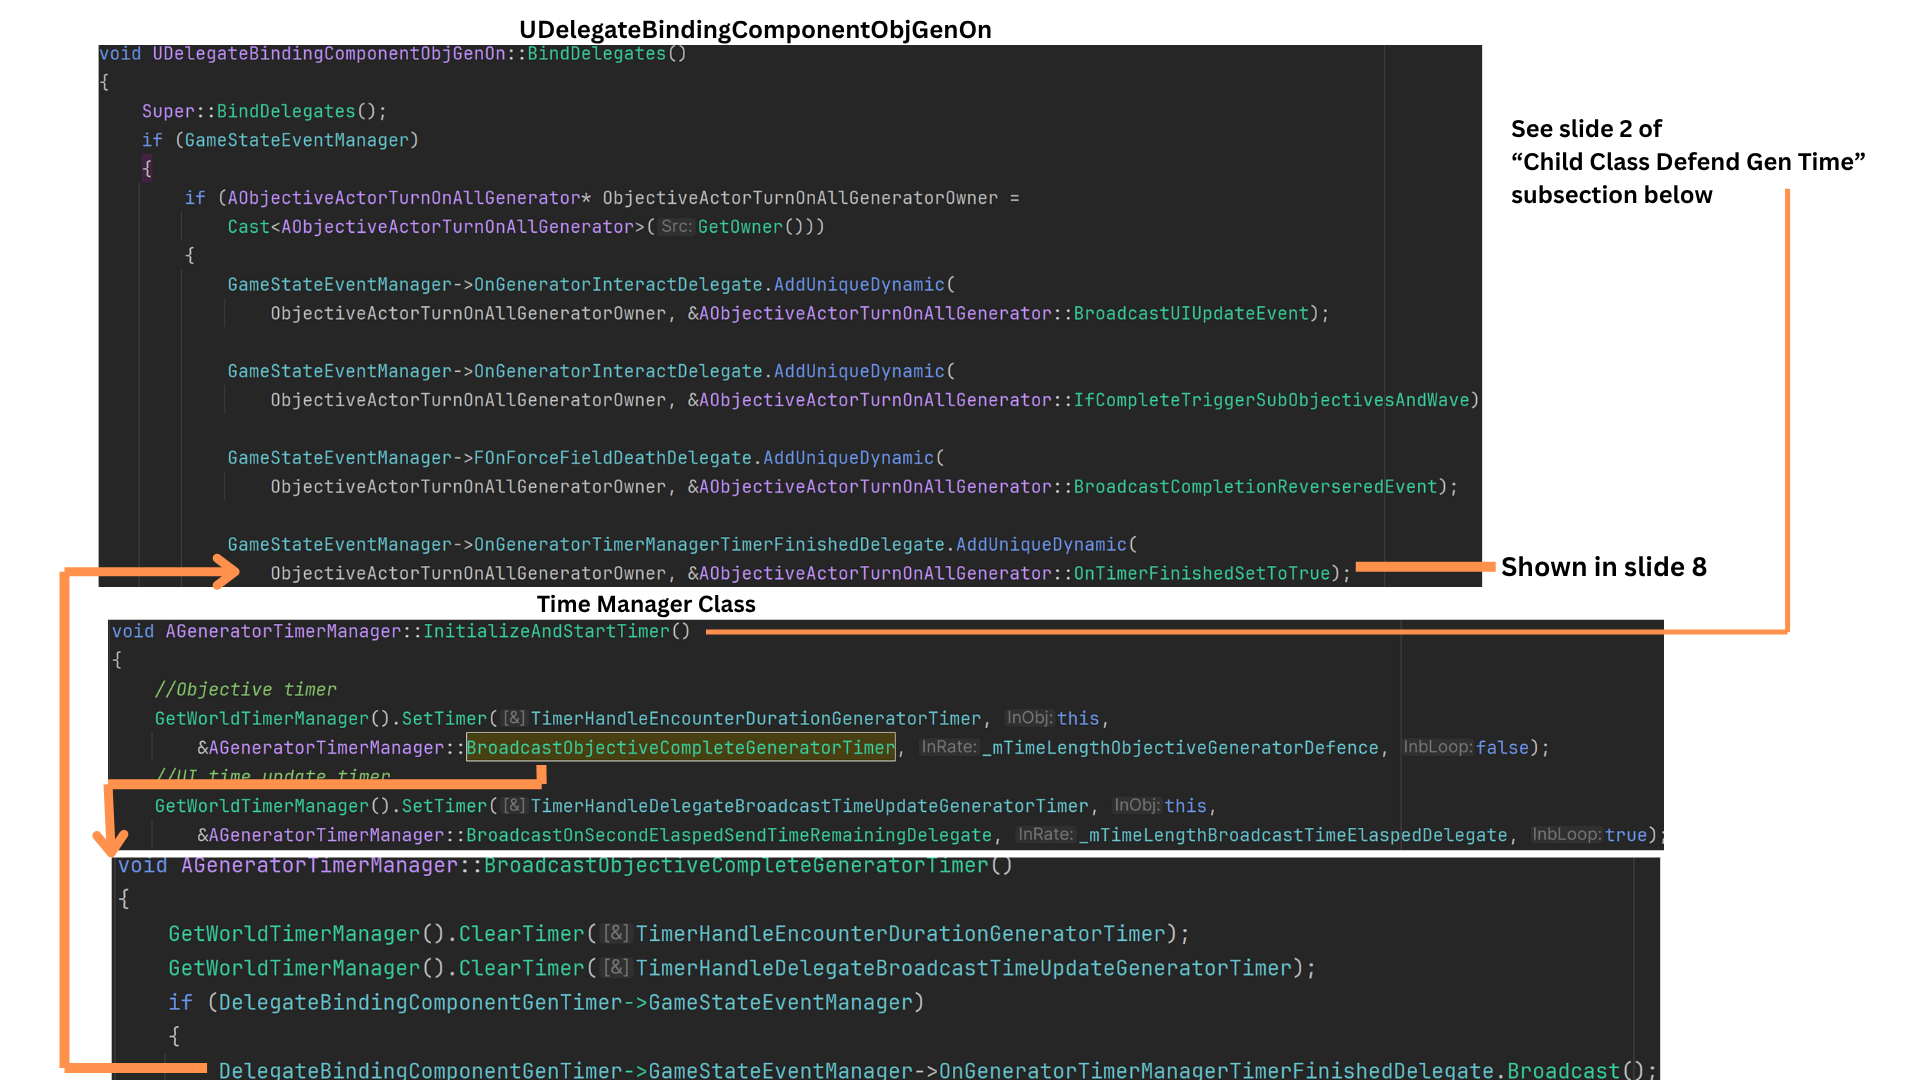
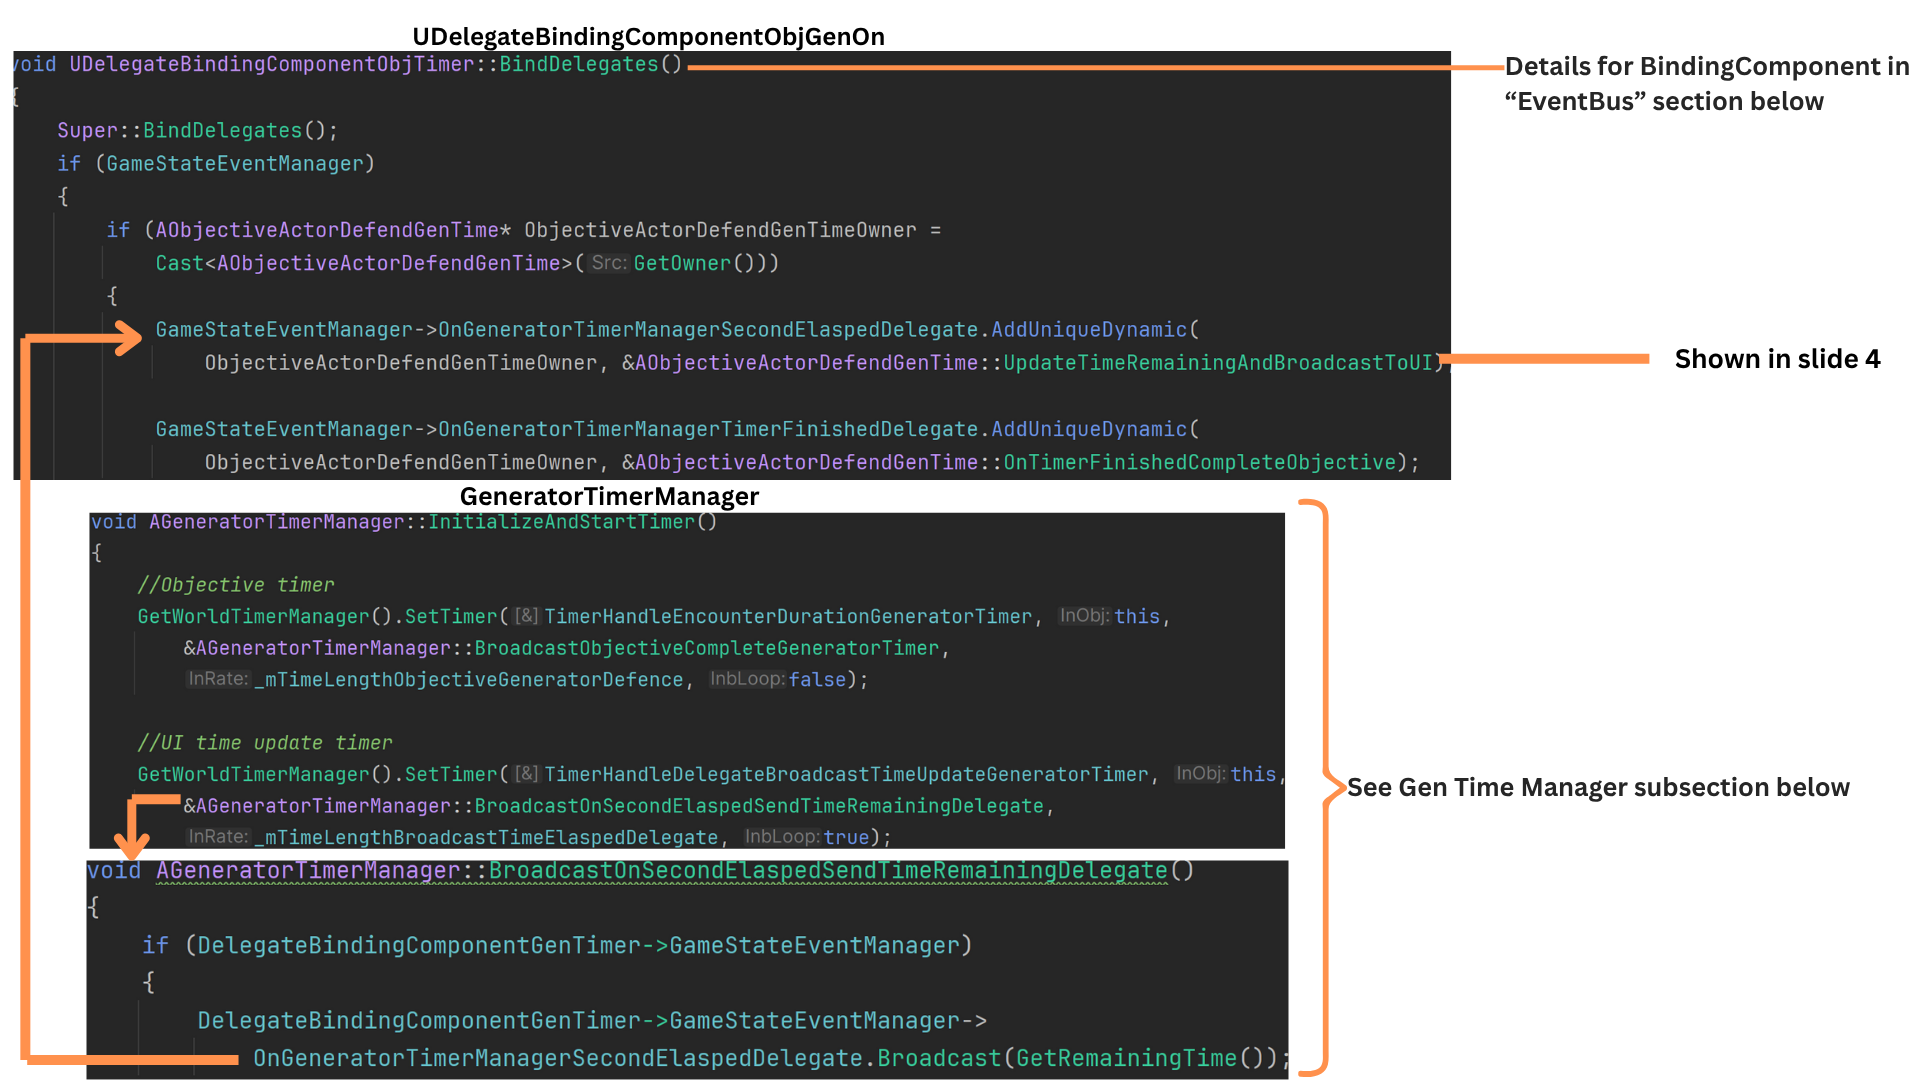
3. BindingComponentBase caches a reference to the GameState and binds its delegates during InitializeComponent so all event links exist before BeginPlay. (See the EventBus section for details.)
The binding component on ObjectiveActorTurnOnAllGenerators binds two functions to the AGenerator’s OnGeneratorInteractDelegate, allowing the objective to react immediately when any generator is interacted with.
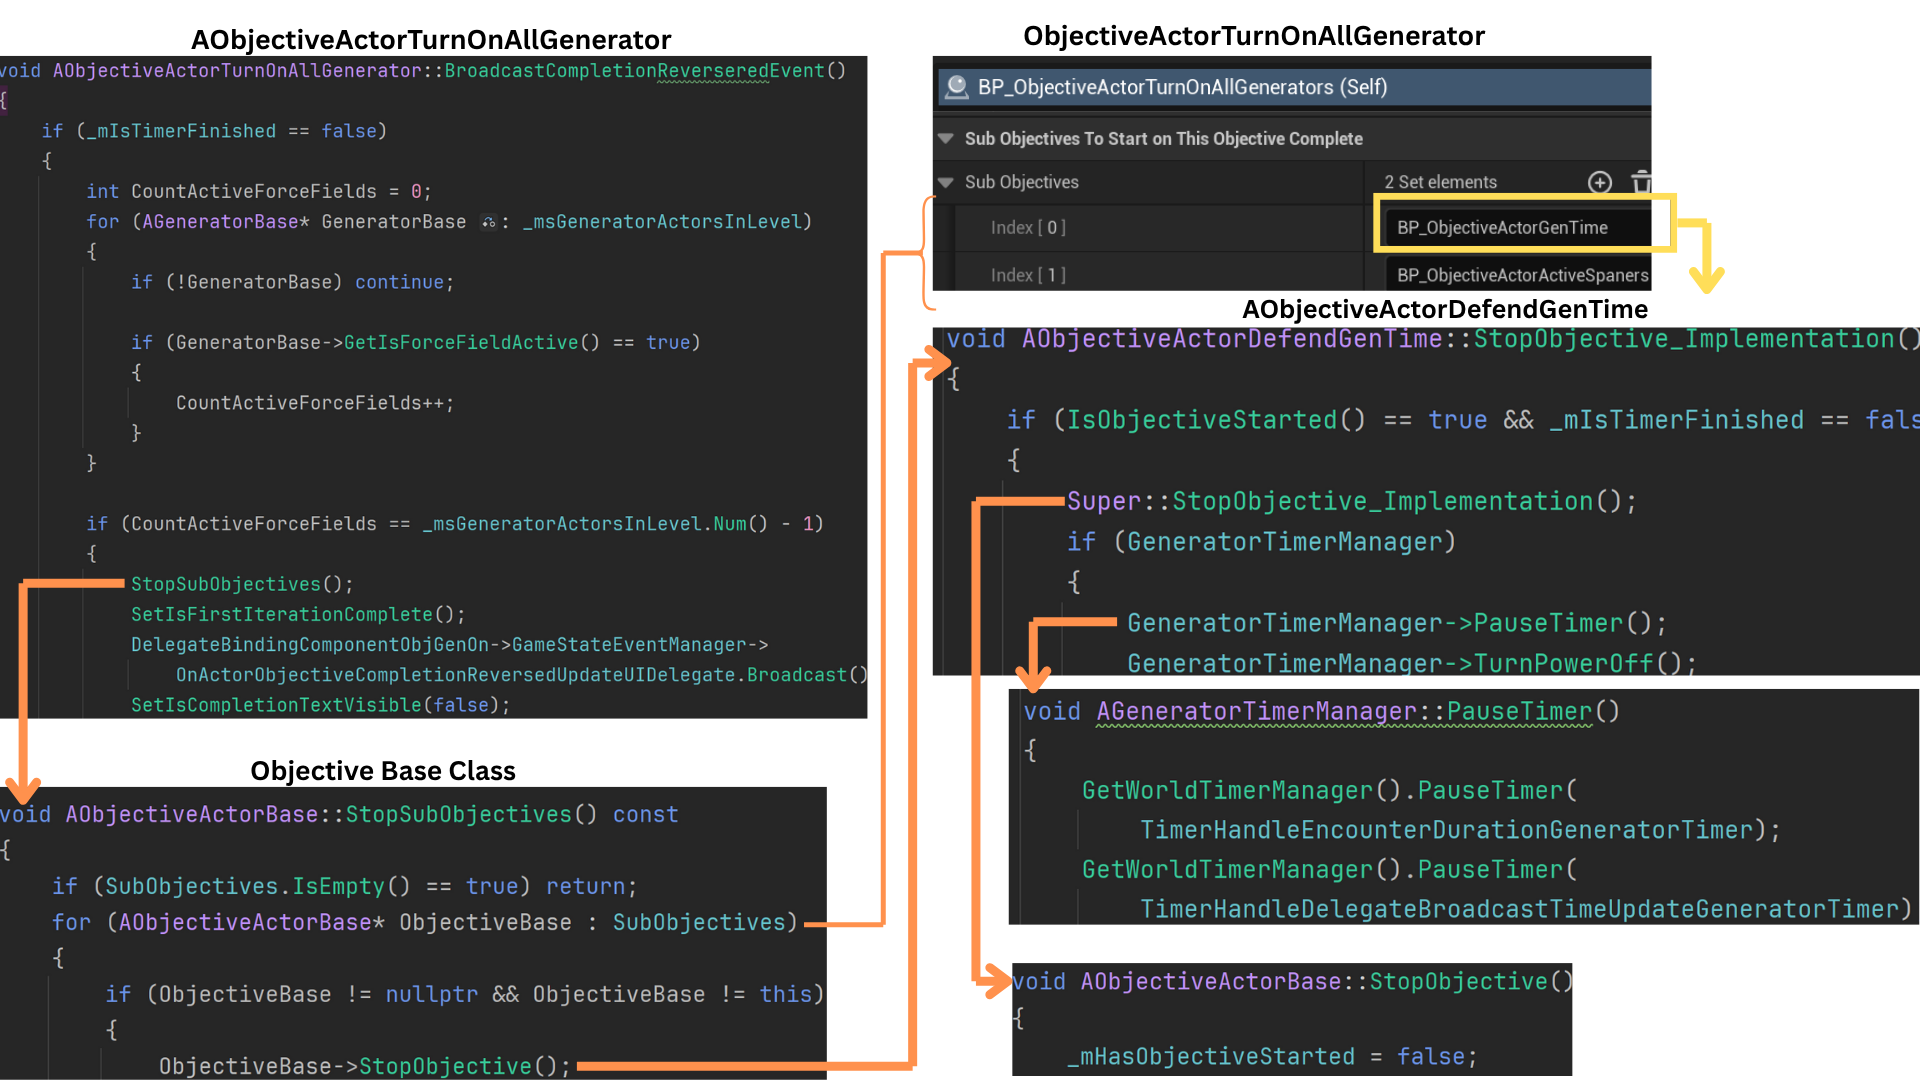
4. IfCompleteTriggerWave determines whether the objective is both started and fully complete (all generators active).
If so, it triggers any associated waves, broadcasts the completion delegate, and begins subobjectives. (See slides 8–14 of the previous section for the full wave-triggering sequence.)
BroadcastUpdateUI triggers a delegate notifying the UI that the objective state changed and needs refreshing.
5. The default GetObjectiveDisplayText returns ObjectiveDisplayText, and because it is const, no input pins are needed.
Each child objective overrides this function.
ObjectiveActorTurnOnAllGenerators provides a secondary text variant used when completion is reversed. It formats the UI string by combining the base display text with the count of active generators versus total generators.
The UI receives fully formatted text, requiring no further processing.
6. This example illustrates the UI flow for each objective stage.
When an objective starts or completes, the UI displays the appropriate text, then hides the completion text once its timer ends. IsObjectiveFreed prevents further checks once an objective finishes.
IsStarted determines whether the UI should display ObjectiveDisplayText. It may be reset to false if the objective is a subobjective whose parent has had its completion reversed.
When the objective completes, IsObjectiveComplete becomes true and the UI shows CompletionDisplayText until its visibility timer ends, at which point the objective is freed.
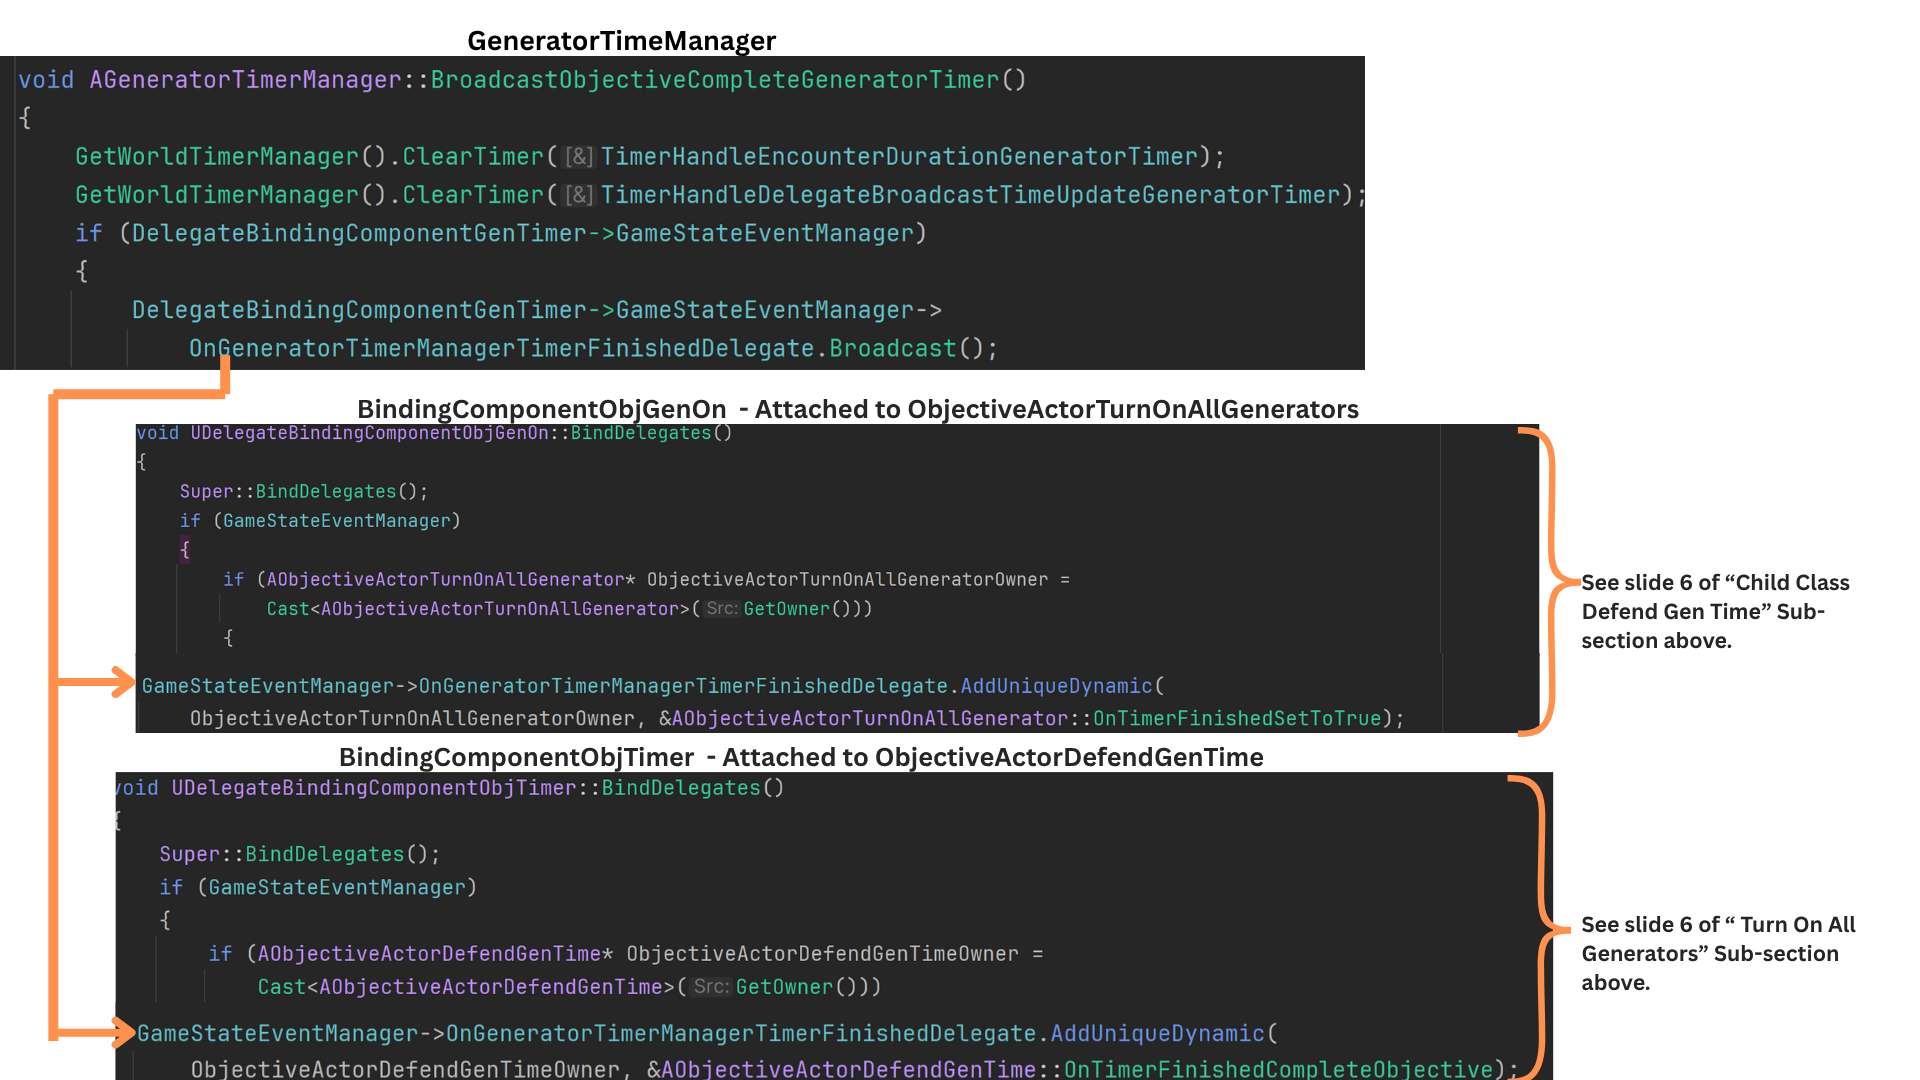
7. TurnOnAllGenerators pairs with the DefendGenTime objective, which always appears as its subobjective. If a generator becomes inactive, DefendGenTime stops and TurnOnAllGenerators reverts from complete to incomplete.
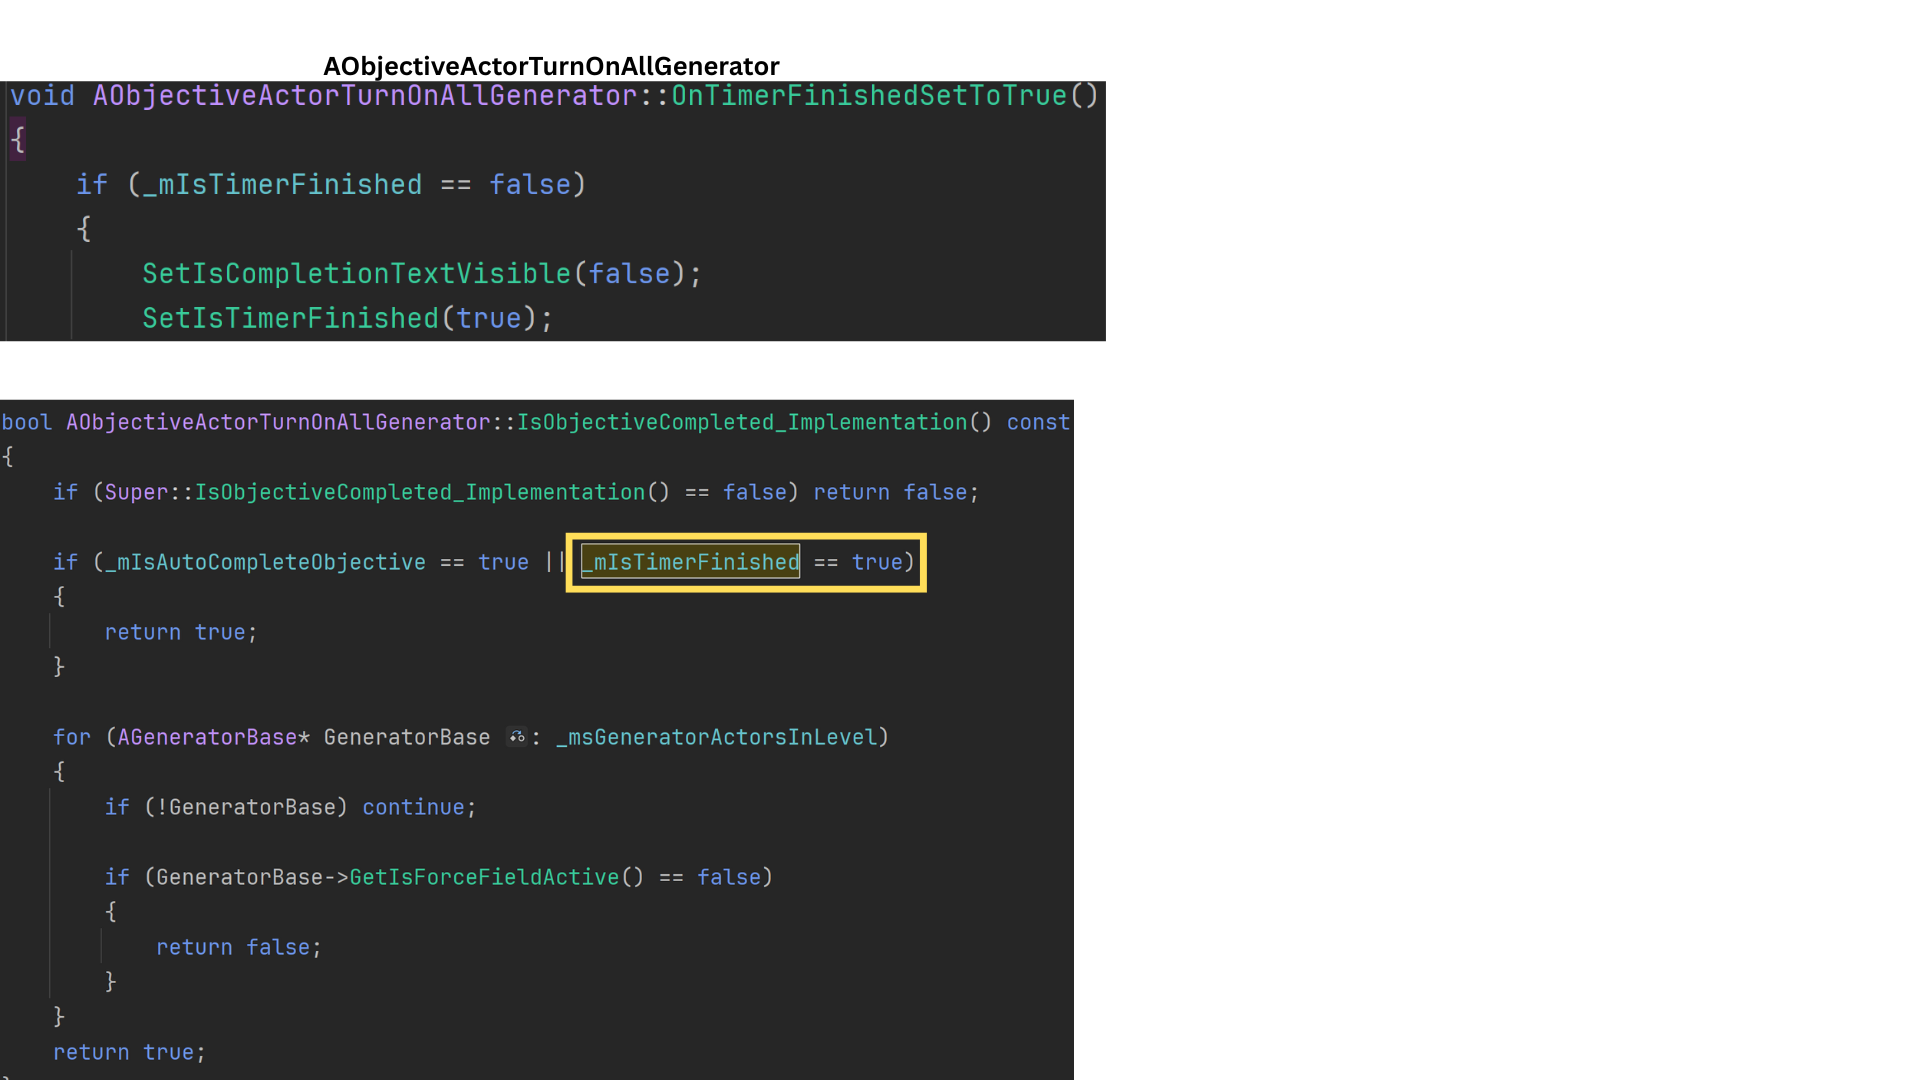
Once the generator-defense timer finishes, the GeneratorTimeManager broadcasts OnGeneratorTimerManagerFinishedDelegate, triggering OnTimerFinishedSetToTrue.\
This locks the objective, preventing any further reversal of completion.
8. OnTimerFinished sets IsTimerFinished to true, immediately finalizing the TurnOnAllGenerators objective and preventing any further reversal. Generator activity is no longer checked once the timer has finished.
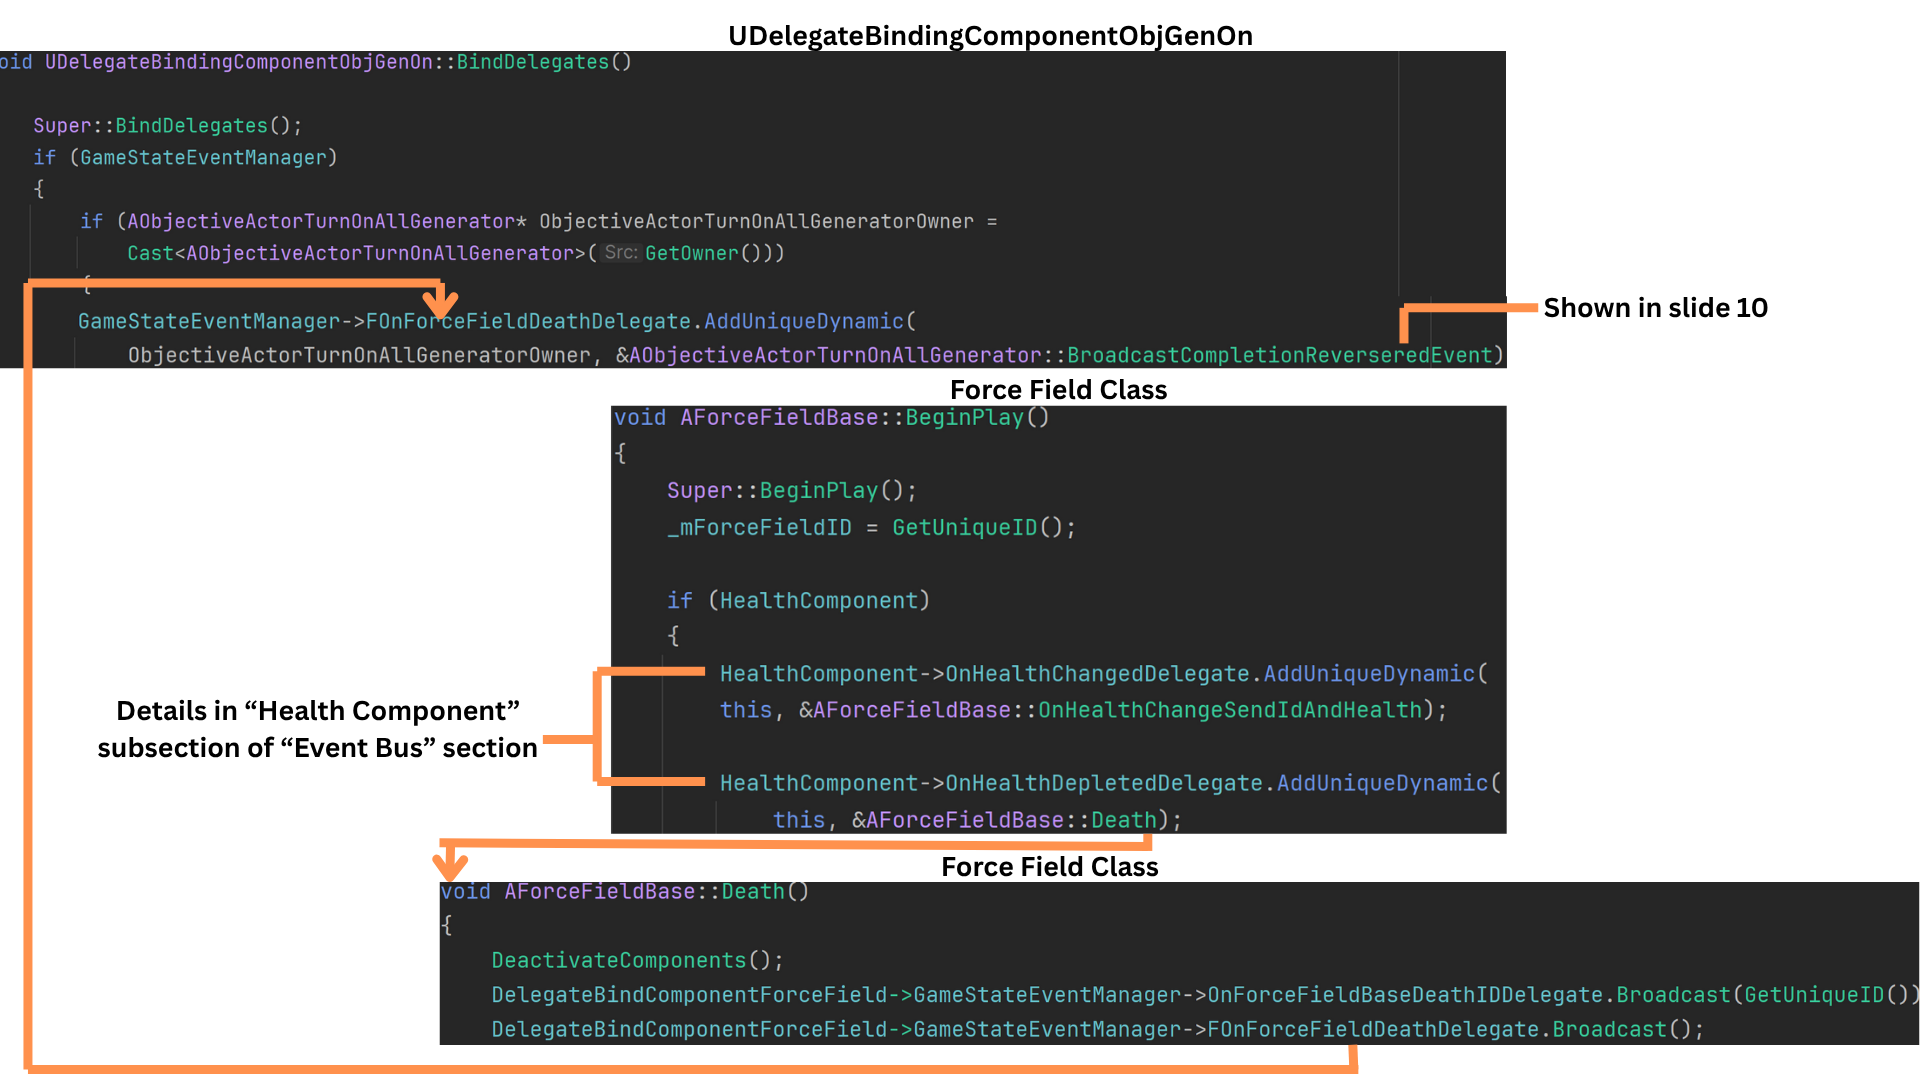
9. TurnOnAllGenerators reverses completion if the force field protecting a generator is destroyed.
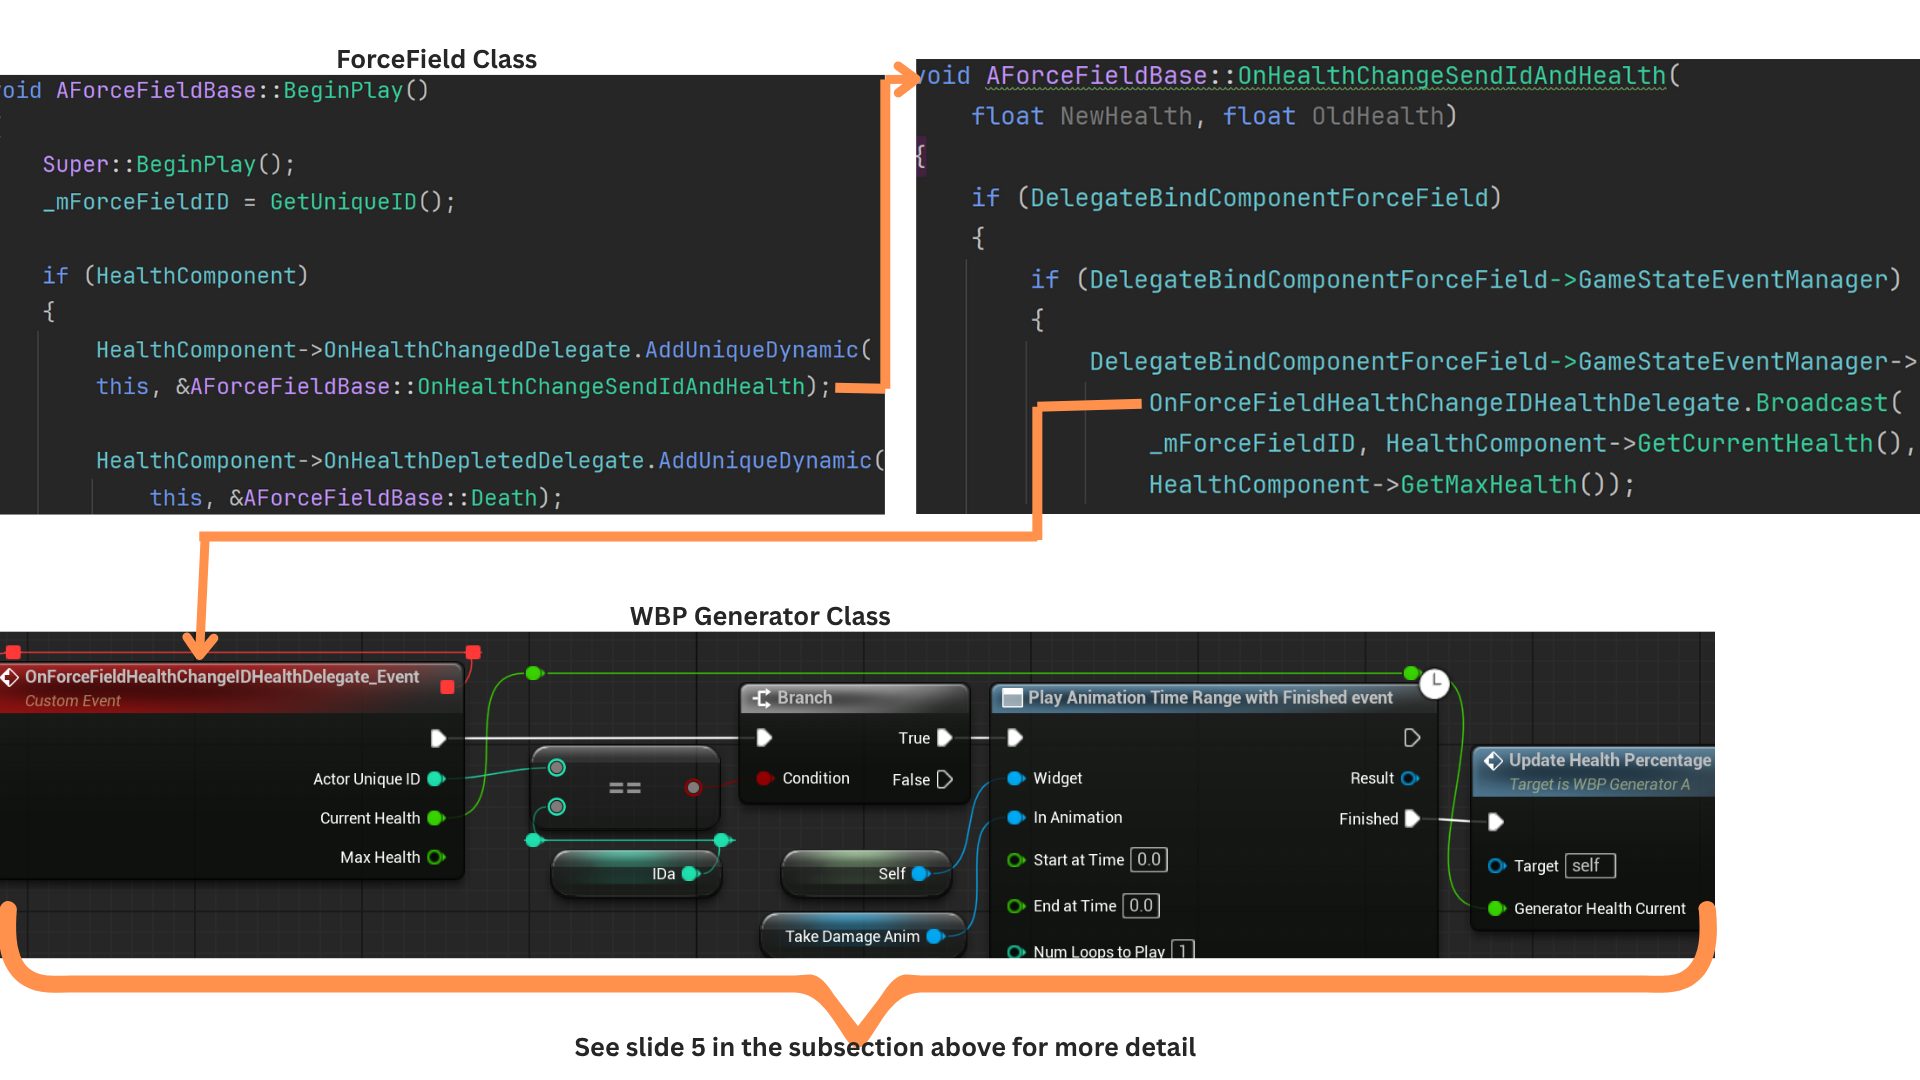
AForceFieldBase includes a HealthComponent that processes damage and broadcasts events such as health changes and death. When its health reaches zero, it broadcasts OnHealthDepleted.
AForceFieldBase binds its Death function to that delegate, which then fires OnForceFieldDeathDelegate.
BindingComponent listens for this delegate and triggers BroadcastCompletionReversedEvent, which handles reverting the objective’s completion state.
10. Reversal only occurs if all generators were previously active and then one becomes inactive.
The system checks the active state of all generators, and only when one of them drops from active to inactive is the reversal broadcast and its logic executed.
StopSubobjectives sets HasObjectiveStarted to false for DefendGenTime and any additional subobjectives.
SetIsFirstIterationComplete updates the internal flag that determines which display text variant is shown.
OnActorObjectiveCompletionReversedUpdateUIDelegate notifies the UI to clear the slot and remove the reversed objective from the map that tracks completed objectives.
Child Class Defend Gen Time
1. DefendGenTime is a subobjective of TurnOnAllGenerators.
When all generators activate, it starts a countdown; if any generator loses power, the objective stops until all are active again.
A distinctive aspect of this objective is its once-per-second UI update, handled by a dedicated delegate that updates only its assigned UI slot, ensuring the countdown is responsive without affecting other objectives.
2. The timer logic is handled by the GeneratorTimeManager, and the DefendGenTime objective stores a pointer to the instance associated with its sub-level.
If the timer is uninitialized, it is set up and started; if the objective stops and later restarts, the timer unpauses accordingly. (See the Gen Time Manager subsection for full details.)
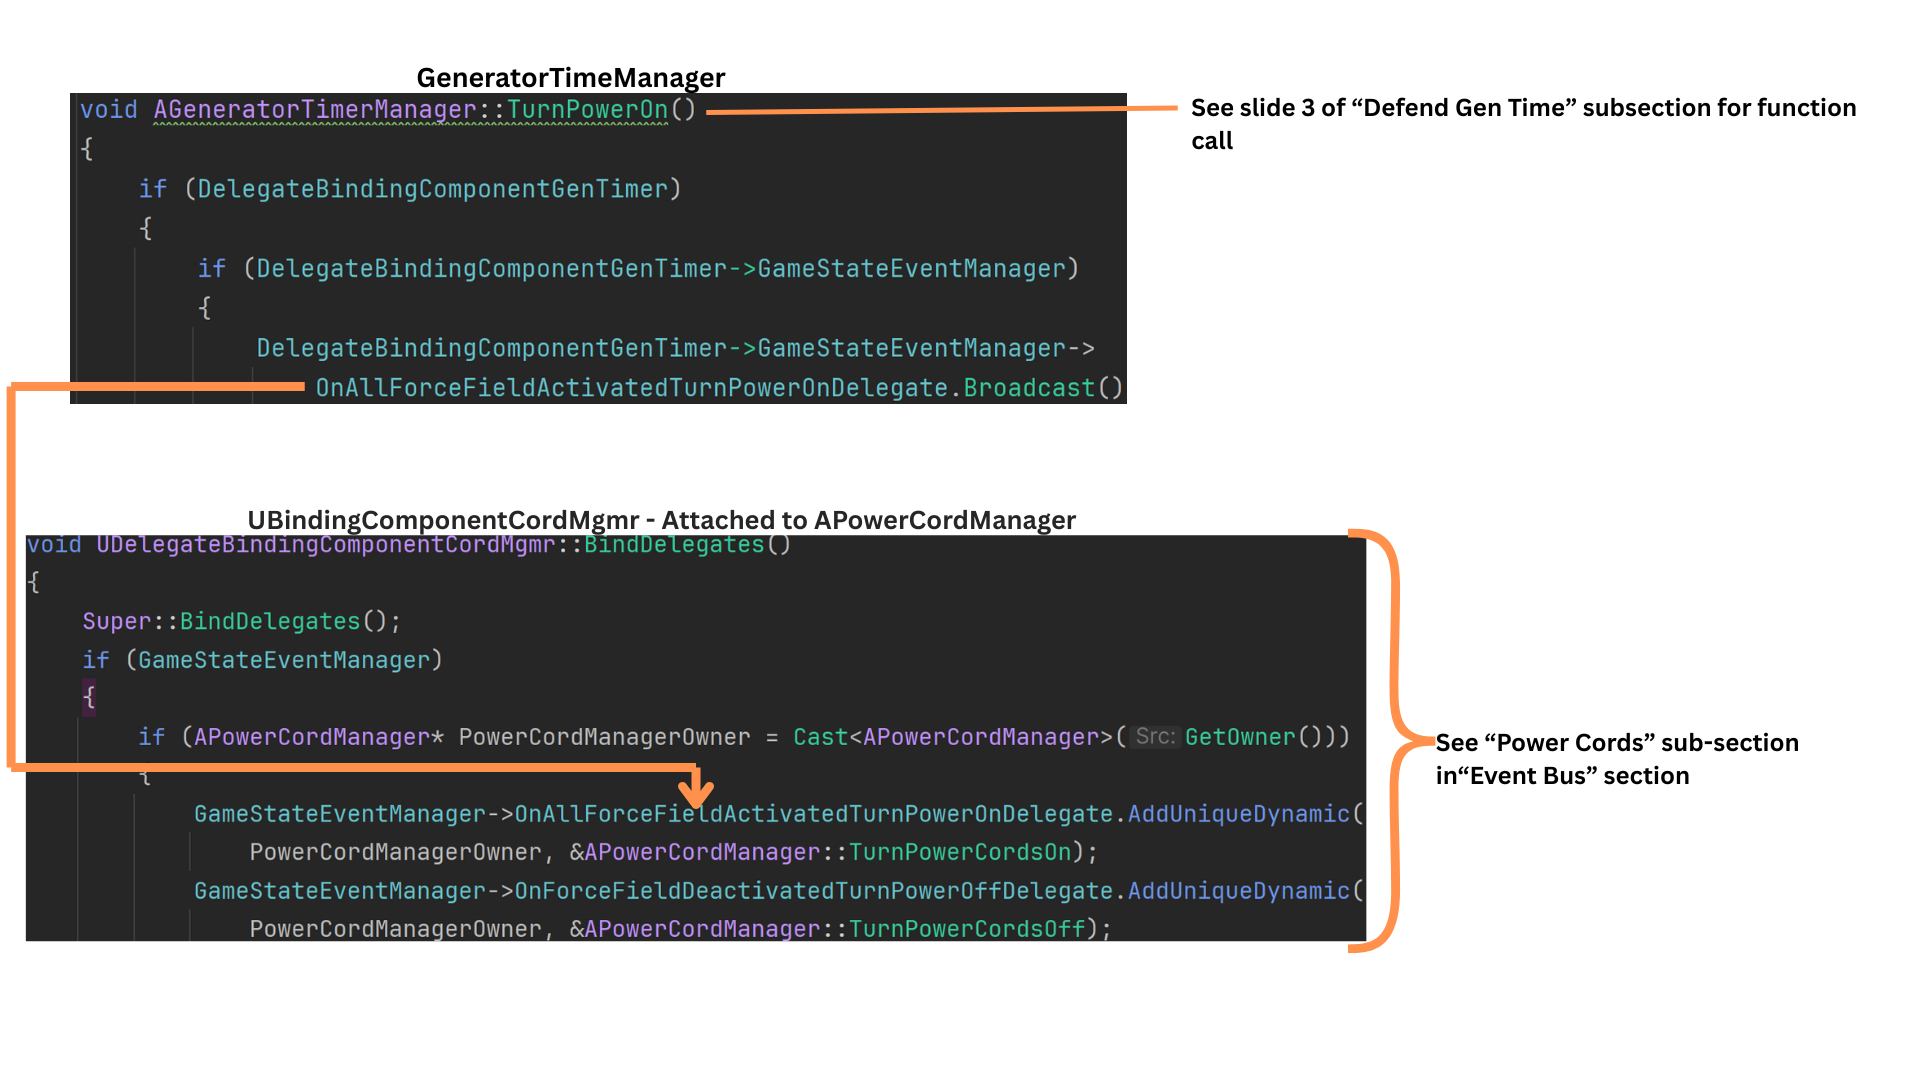
When the timer begins, TurnPowerOn broadcasts a delegate that activates all connected power-cord visuals from the generators to the door.
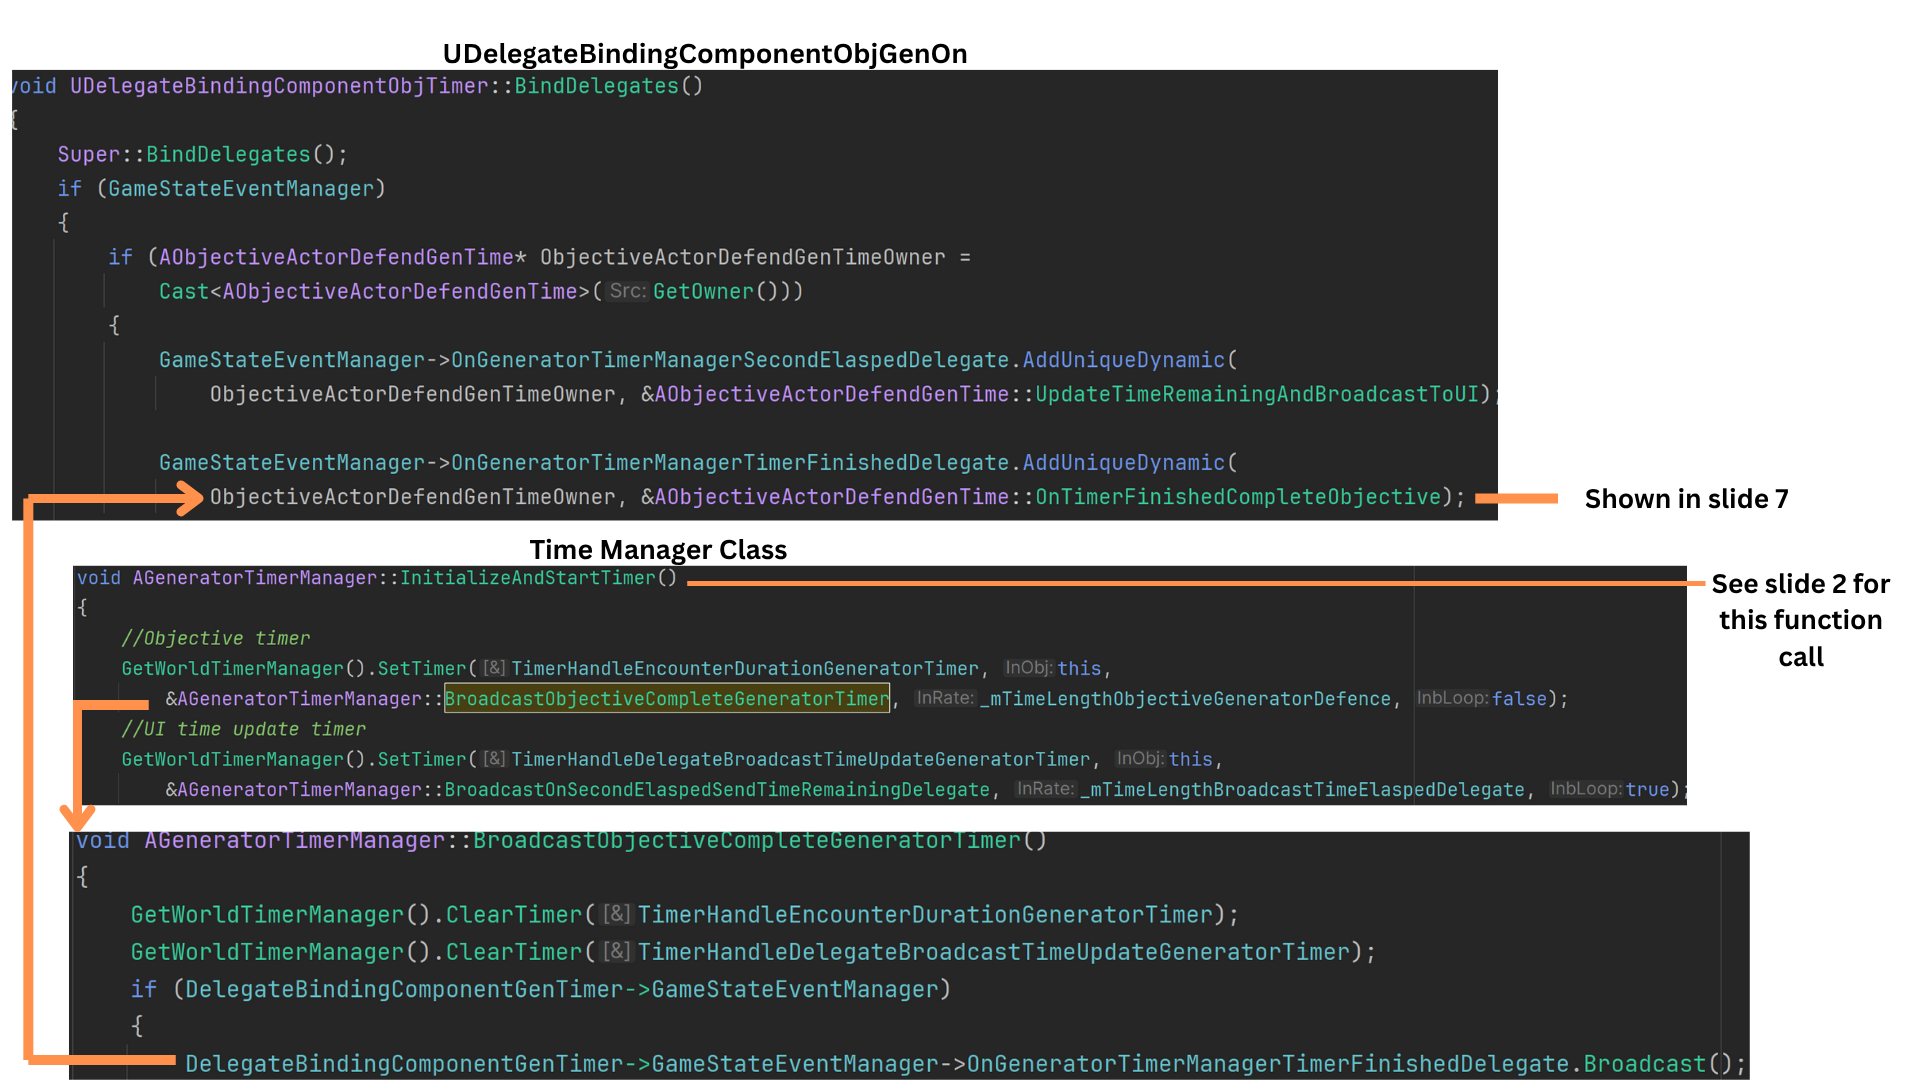
3. GeneratorTimeManager::InitializeAndStartTime sets two timers:
-- one for the total duration required to complete the objective
-- one that fires every second to update UI state.
Each second, BroadcastOnSecondElapsedTimeRemainingDelegate triggers OnGeneratorTimerManagerSecondElapsedDelegate.
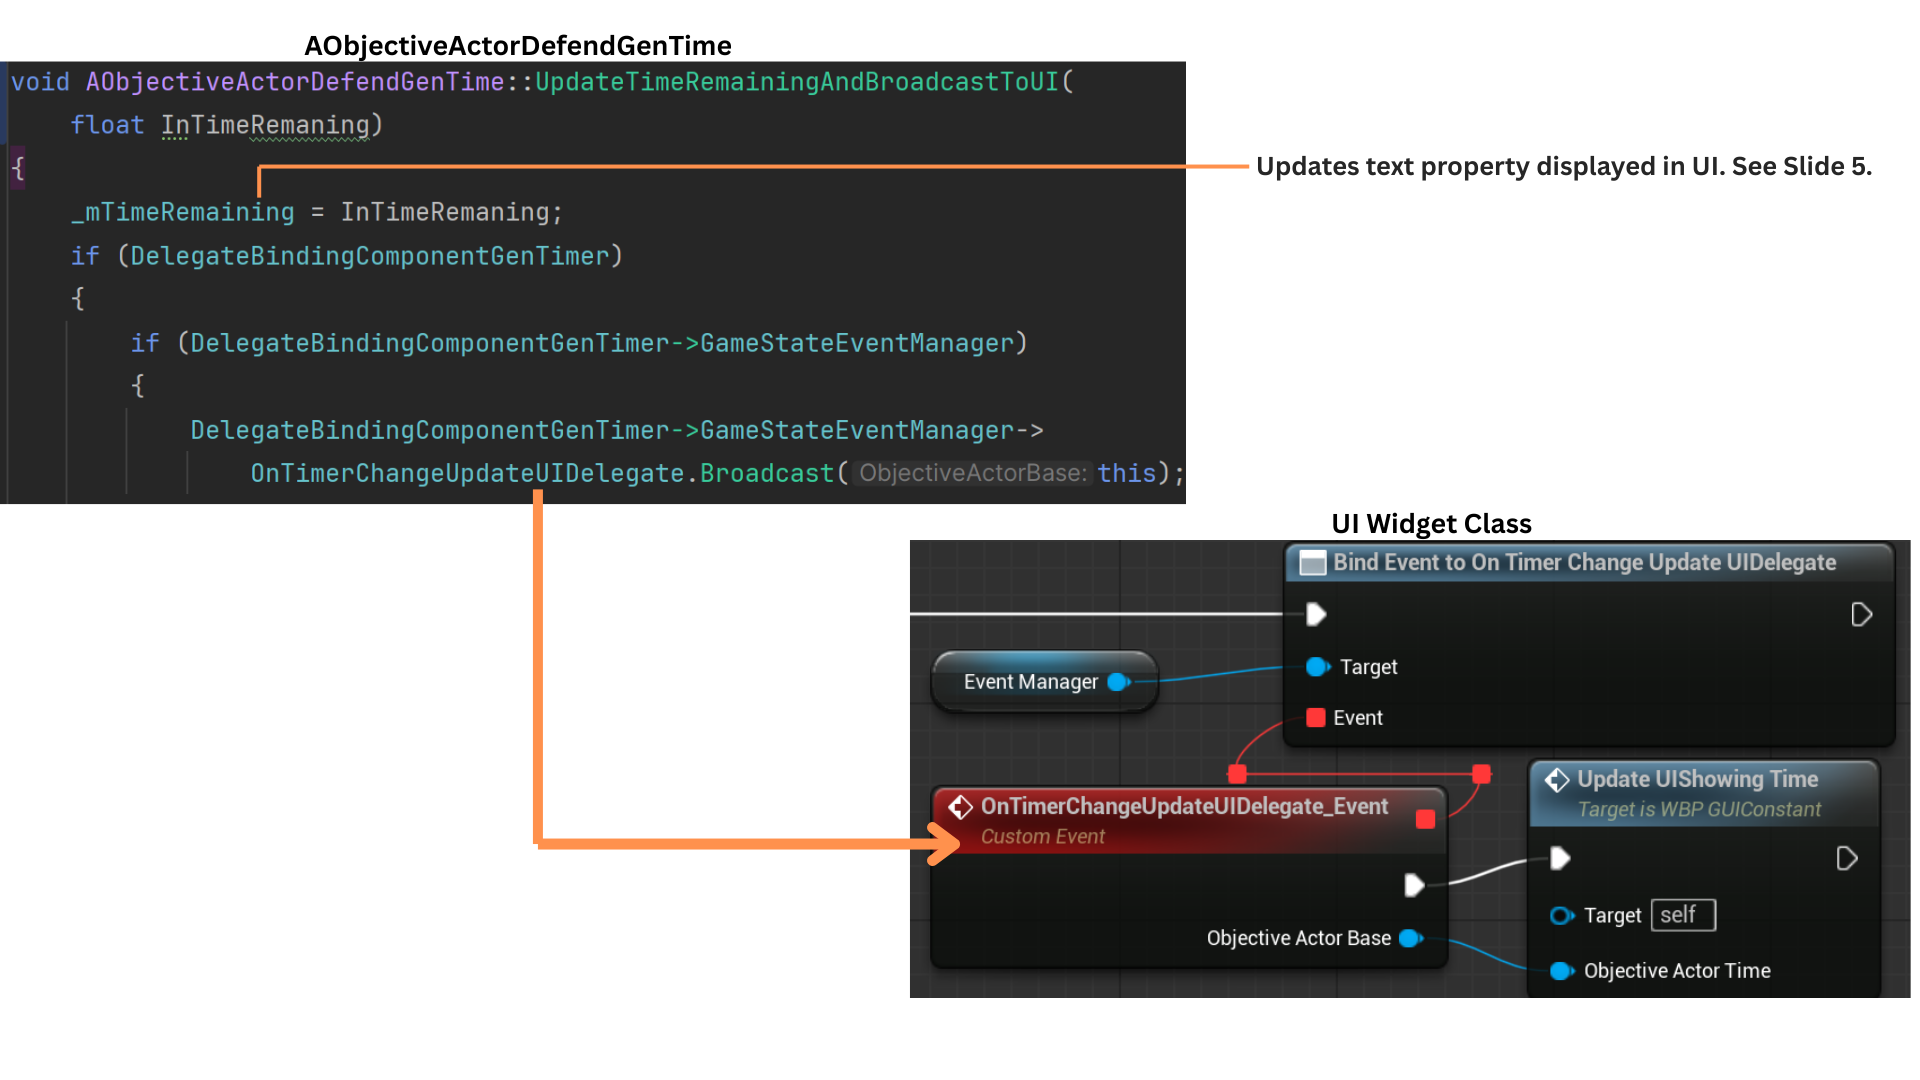
The binding component on DefendGenTime listens to this delegate and calls UpdateTimeRemainingAndBroadcastToUI.
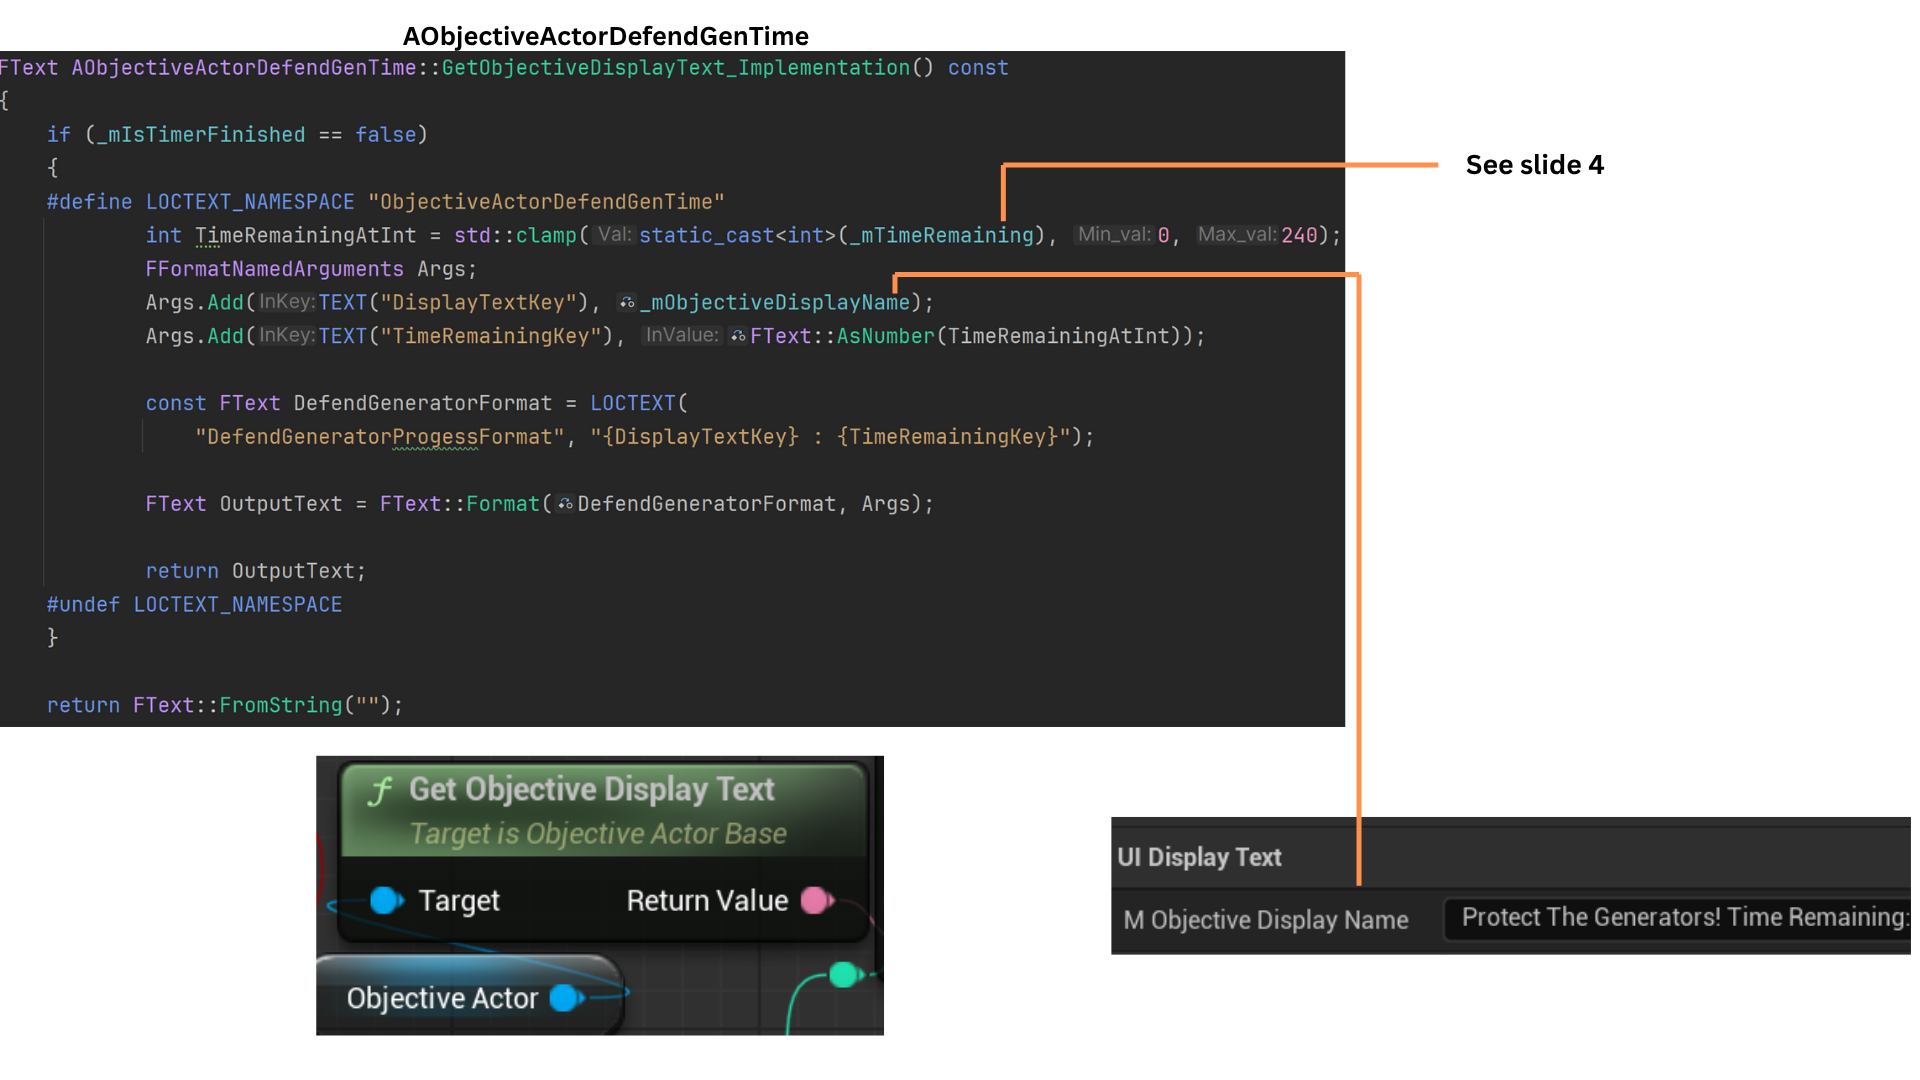
4. UpdateTimeRemainingAndBroadcastToUI constructs the updated display text and broadcasts the delegate responsible for updating the specific UI slot owned by this objective.
The OnTimerChangeUpdateUIDelegate includes a pointer to the objective.
Because the UI tracks which objective occupies each display slot, only the slot with a matching pointer updates, ensuring efficient per-second UI refreshes.
5. The TimeRemaining value provided by the TimerManagerDelegate is merged with the base ObjectiveDisplayText to produce the full UI string shown during the countdown.
6. The second timer—responsible for detecting when the defense duration ends—fires BroadcastObjectiveCompleteGeneratorTimer once the required time elapses.
Both timers are then cleared, and OnGeneratorTimeManagerTimerFinishedDelegate is broadcast. DefendGenTime receives this delegate and calls OnTimerFinishedCompleteObjective.
7. OnTimerFinishedCompleteObjective marks the objective as complete and triggers IfCompleteTriggerSubobjectiveAndWave, enabling any chained logic such as wave release or subobjective activation.
8. If TurnOnAllGenerators is reversed, it calls StopSubobjectives, which iterates through all of its subobjectives—including DefendGenTime—and calls StopObjective.
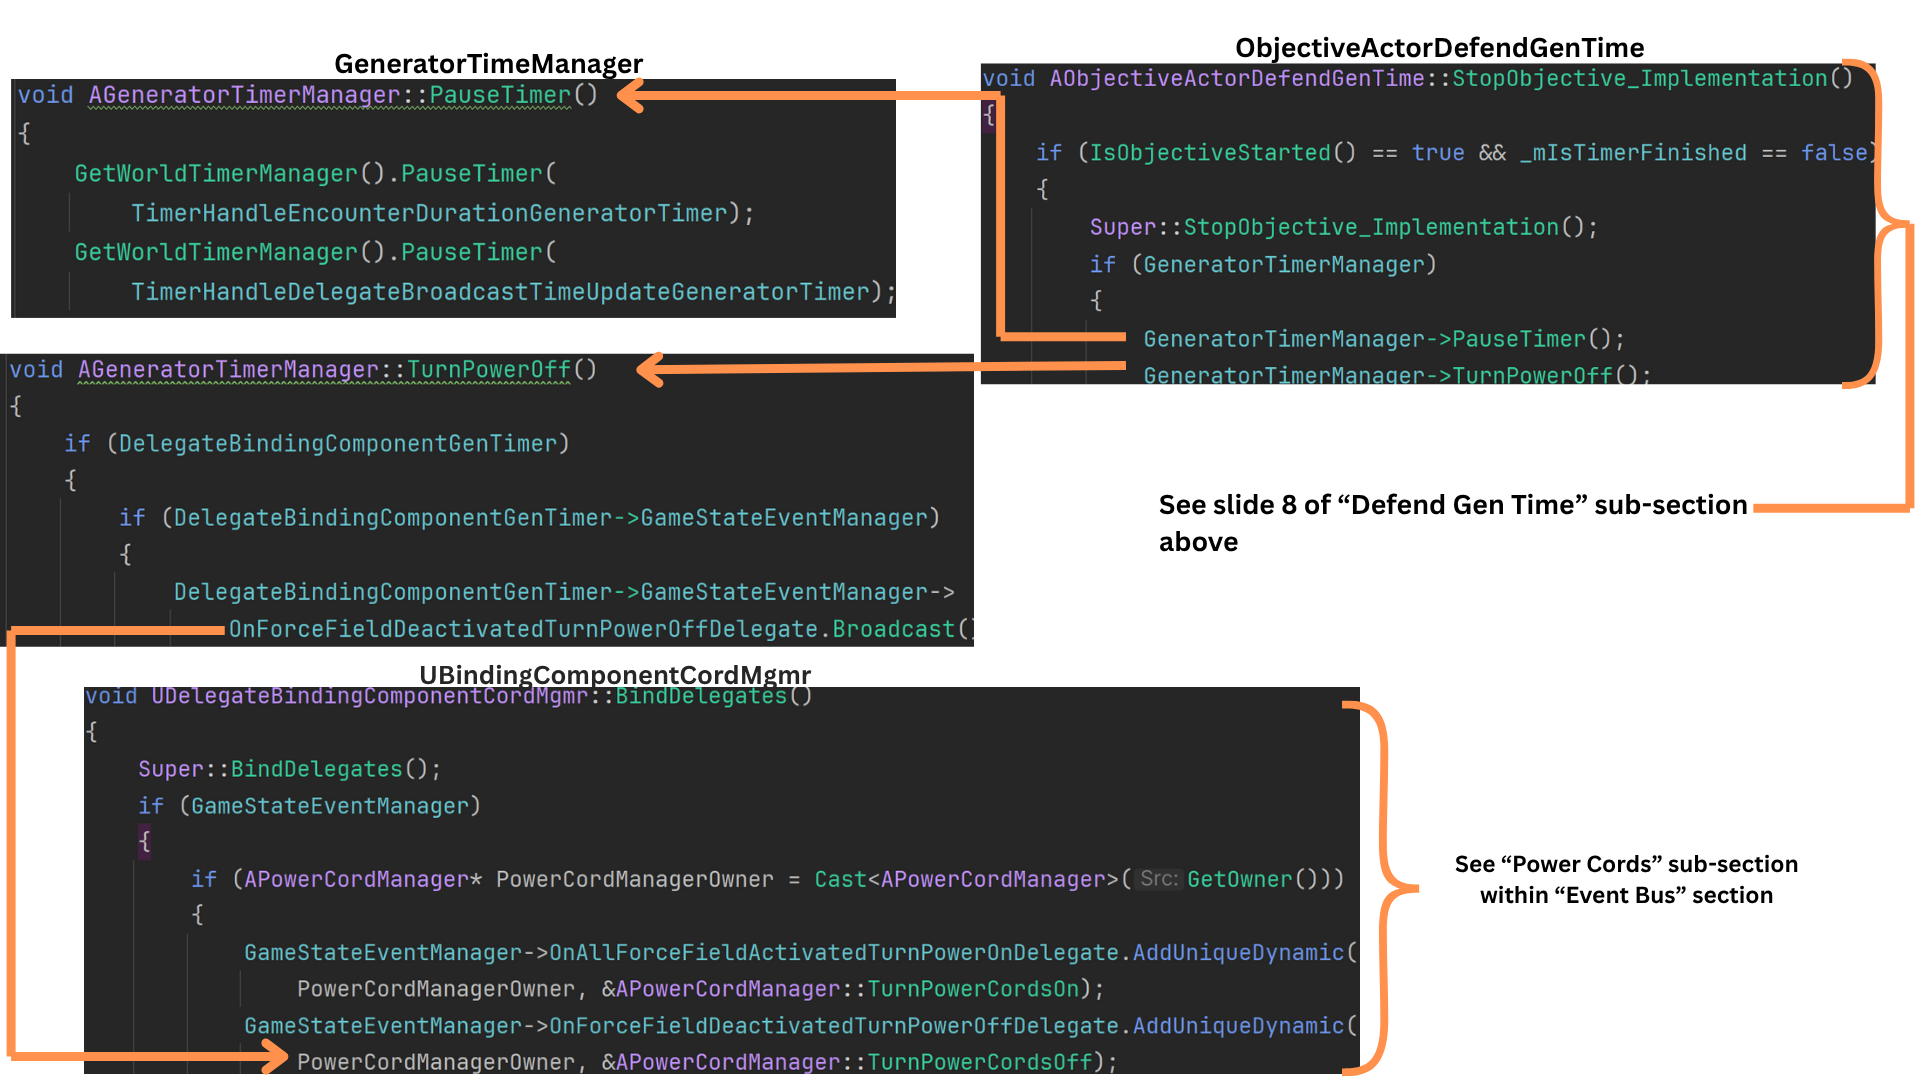
DefendGenTime overrides StopObjective while still calling the Super implementation that sets HasObjectiveStarted to false.
It also pauses both timers and invokes TurnOffPower, broadcasting a delegate that disables the generator-to-door power-cord effects.
Gen Time Manager
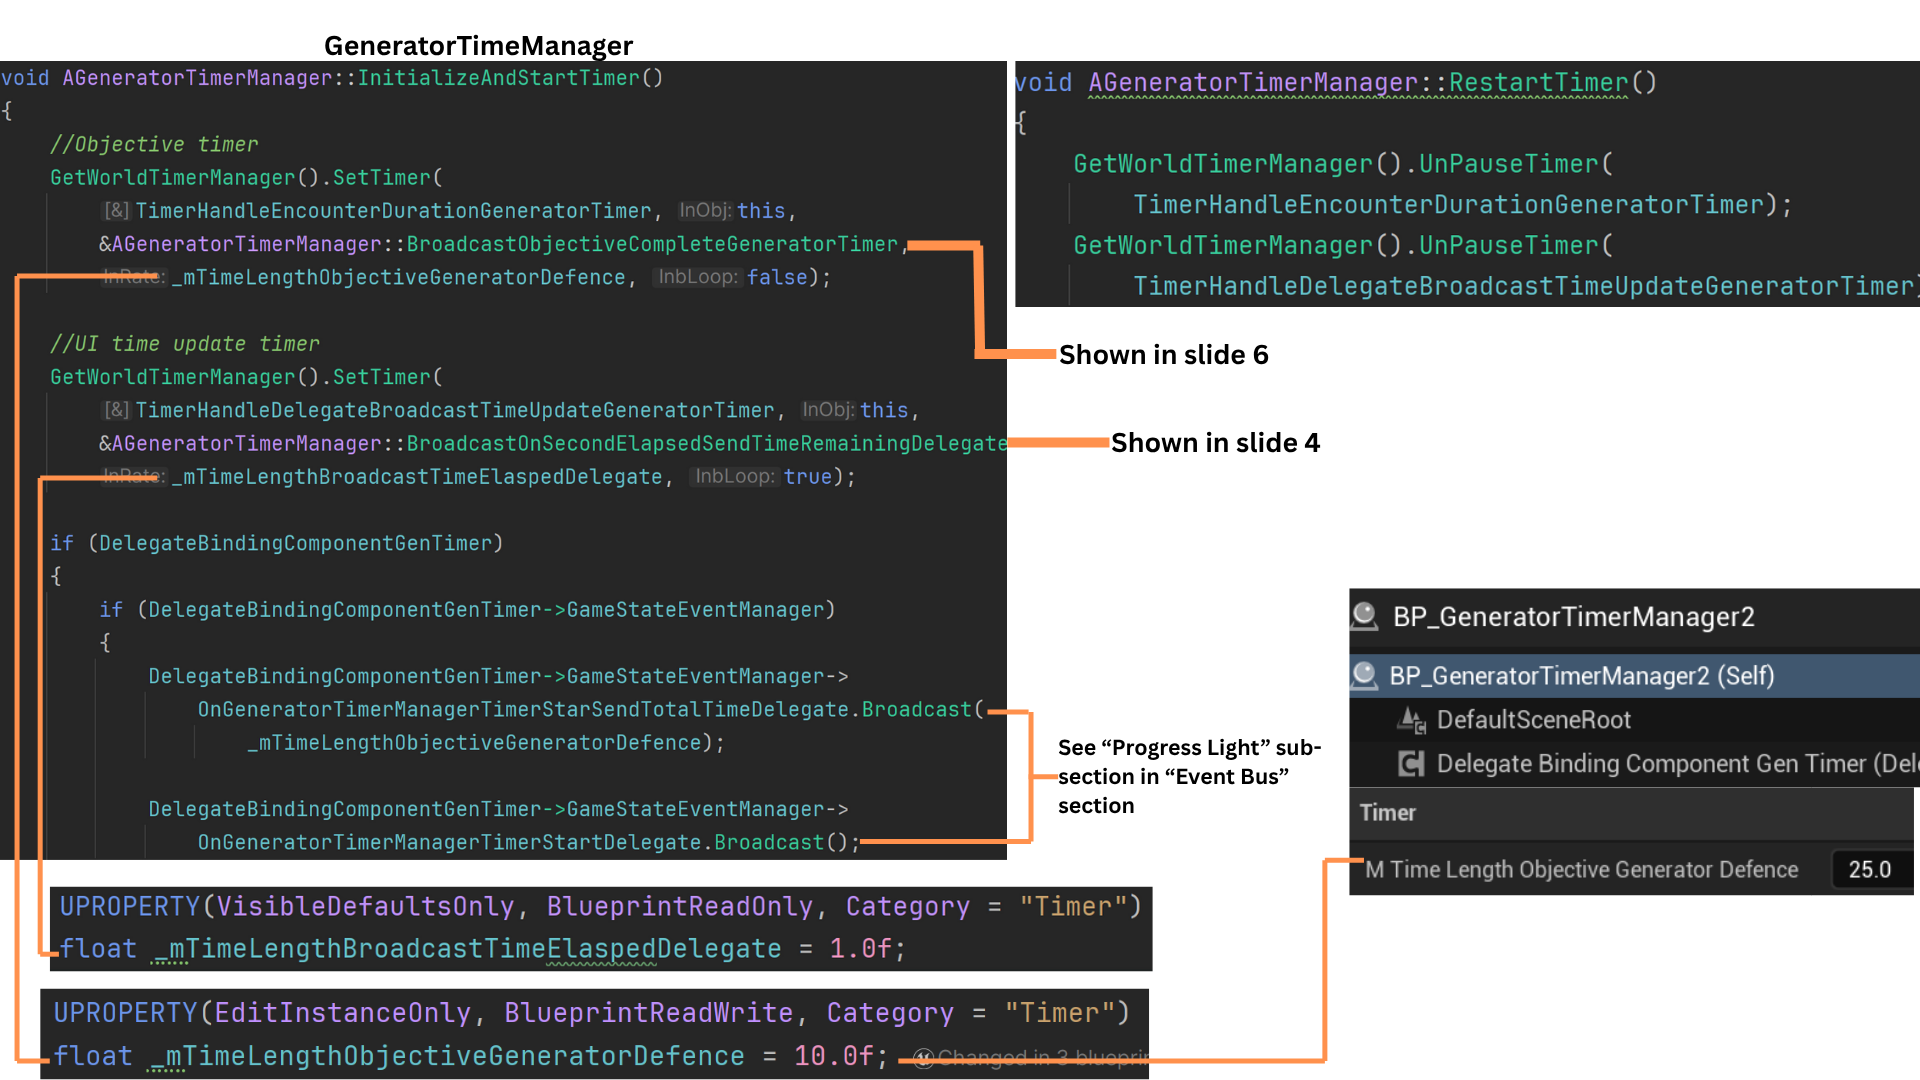
1. InitializeAndStartTime in the GeneratorTimeManager sets up two timers: one for the total time required to complete the objective, and another that fires once per second.
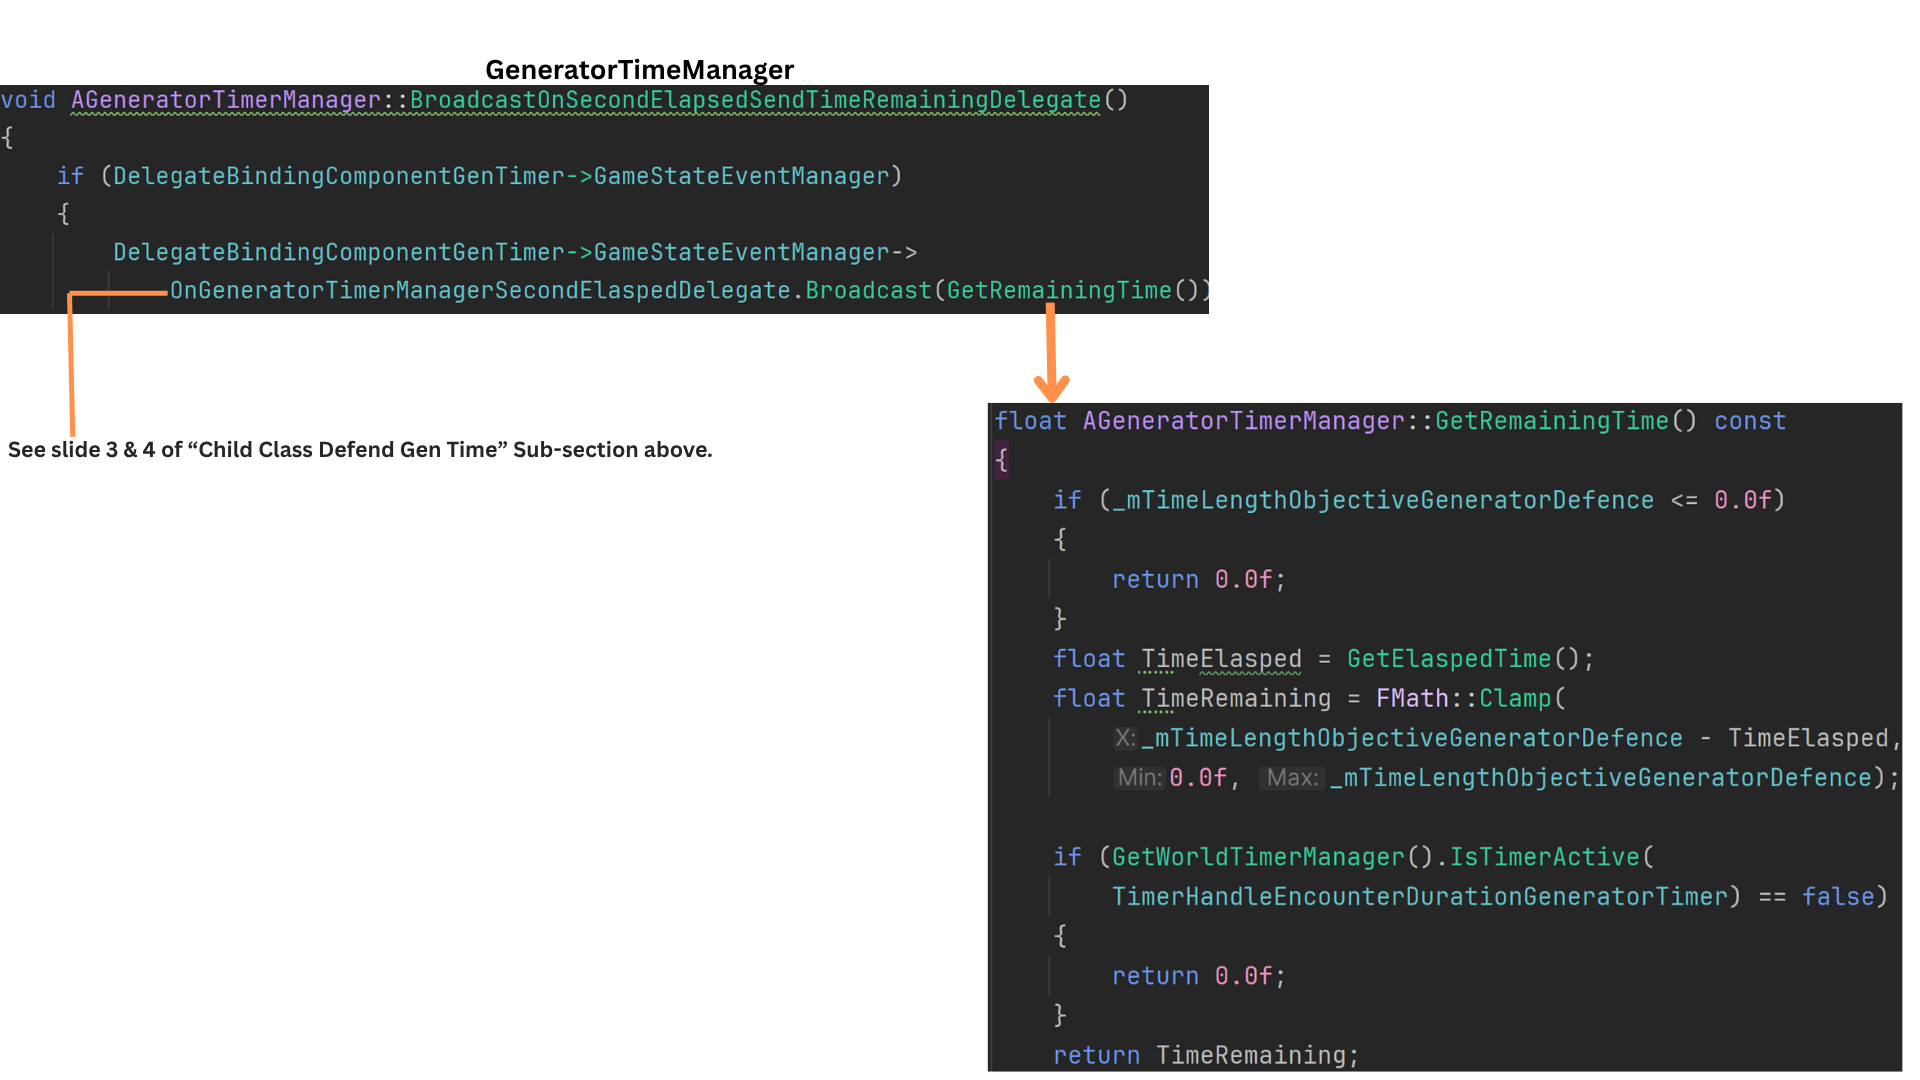
The per-second timer calls BroadcastOnSeconElaspedTimeRemainingDelegate, which then broadcasts OnGeneratorTimerManagerSecondElapsedDelegate.
When the total duration defined in TimeLengthObjectiveGeneratorDefence expires, BroadcastObjectiveCompleteGeneratorTimer is triggered.
At initialization, two delegates are broadcast—one announcing that the timer has started and another providing the total time for the objective.
2. Each time BroadcastOnSeconElaspedTimeRemainingDelegate fires, it uses GetRemainingTime to retrieve the timer’s remaining duration and passes that value through the delegate for any listeners, typically the UI-related systems.
3. TurnPowerOn broadcasts a delegate received by the binding component on the PowerCordManager.
The APowerCordMgmr maintains pointers to all power cords in the level and, when this delegate is received, activates them.
4. When the DefendGenTime objective is stopped, both timers are paused and TurnOffPower is called.
This triggers a companion delegate to the power-on event, except this one instructs the PowerCordManager to switch all power cords off.
5. When the total-time timer finishes and BroadcastObjectiveCompleteGeneratorTimer is fired, both timers are cleared and a completion delegate is broadcast.
The DefendGenTime objective is marked complete, and TurnOnAllGenerators is set to a permanently completed state, preventing any future reversals of its completion status.
6. As a safety measure, all timers are cleared during level transitions, such as when moving from the Empty streaming level back to the main menu.
ReturnToMainMenuHost is overridden and triggered via HandleReturningToMainMenu, which broadcasts OnGameOverClearAllActiveTimerDelegate.
Any actor using timers—including the GeneratorTimeManager—listens for this event and calls GameOverClearTimer to cancel all active timers.
Tech
UI
Default Layout and Health Bar
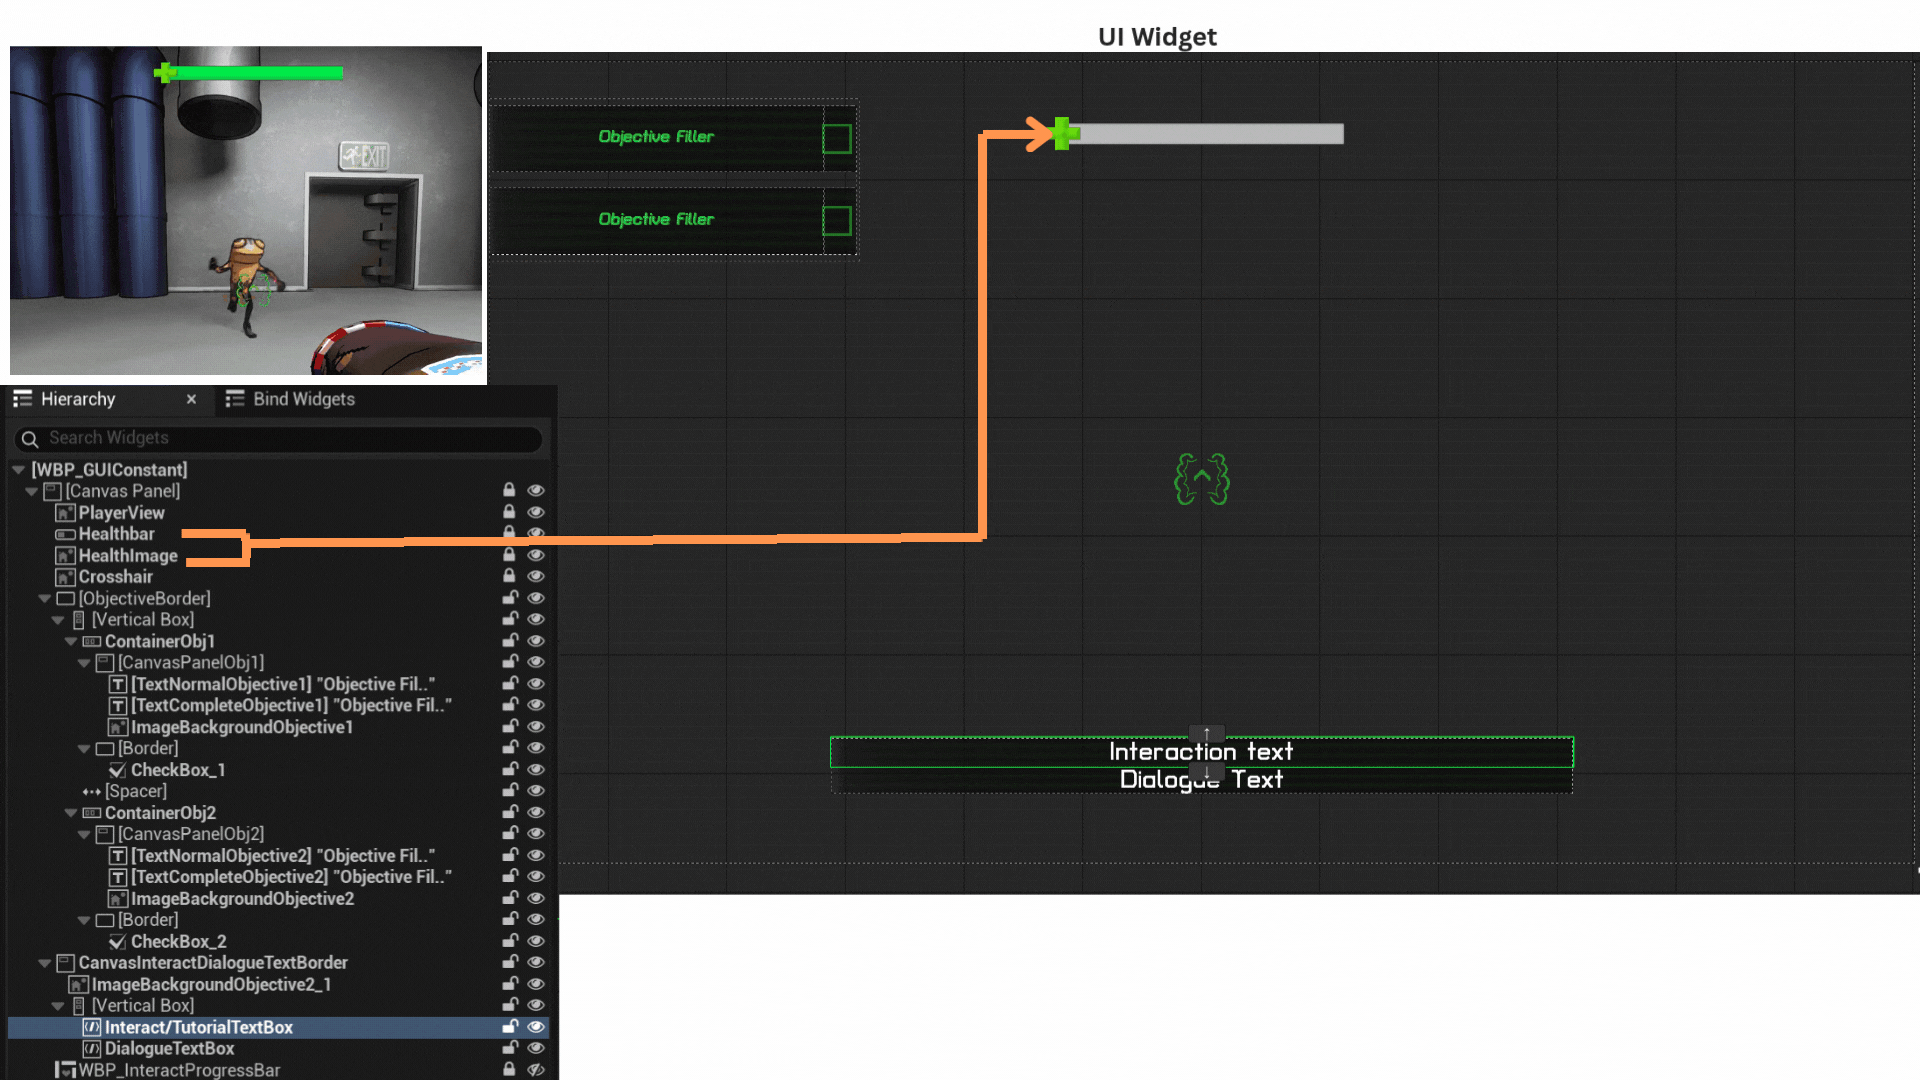

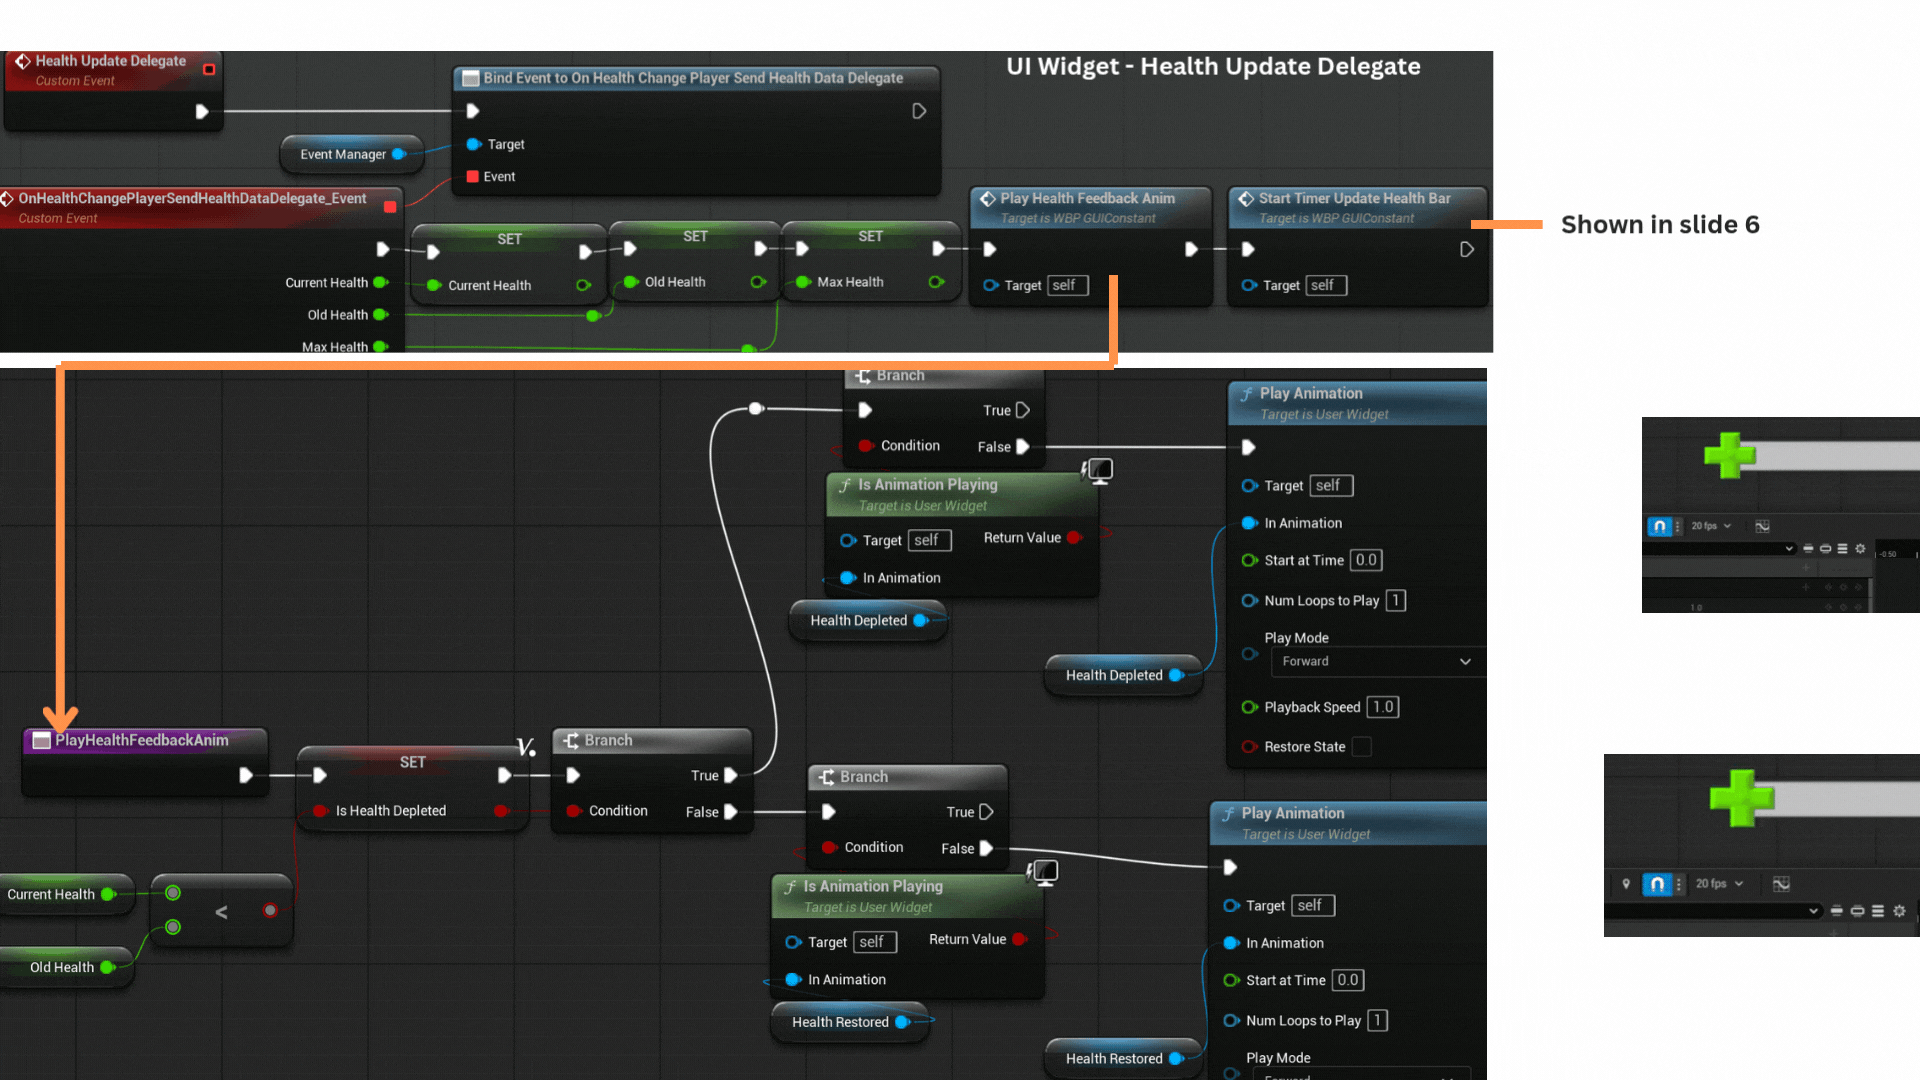
1. The health bar consists of a progress slider paired with an image element.
No bindings are used for updates, preventing unnecessary per-frame ticks and ensuring all changes occur explicitly through delegate-driven events.
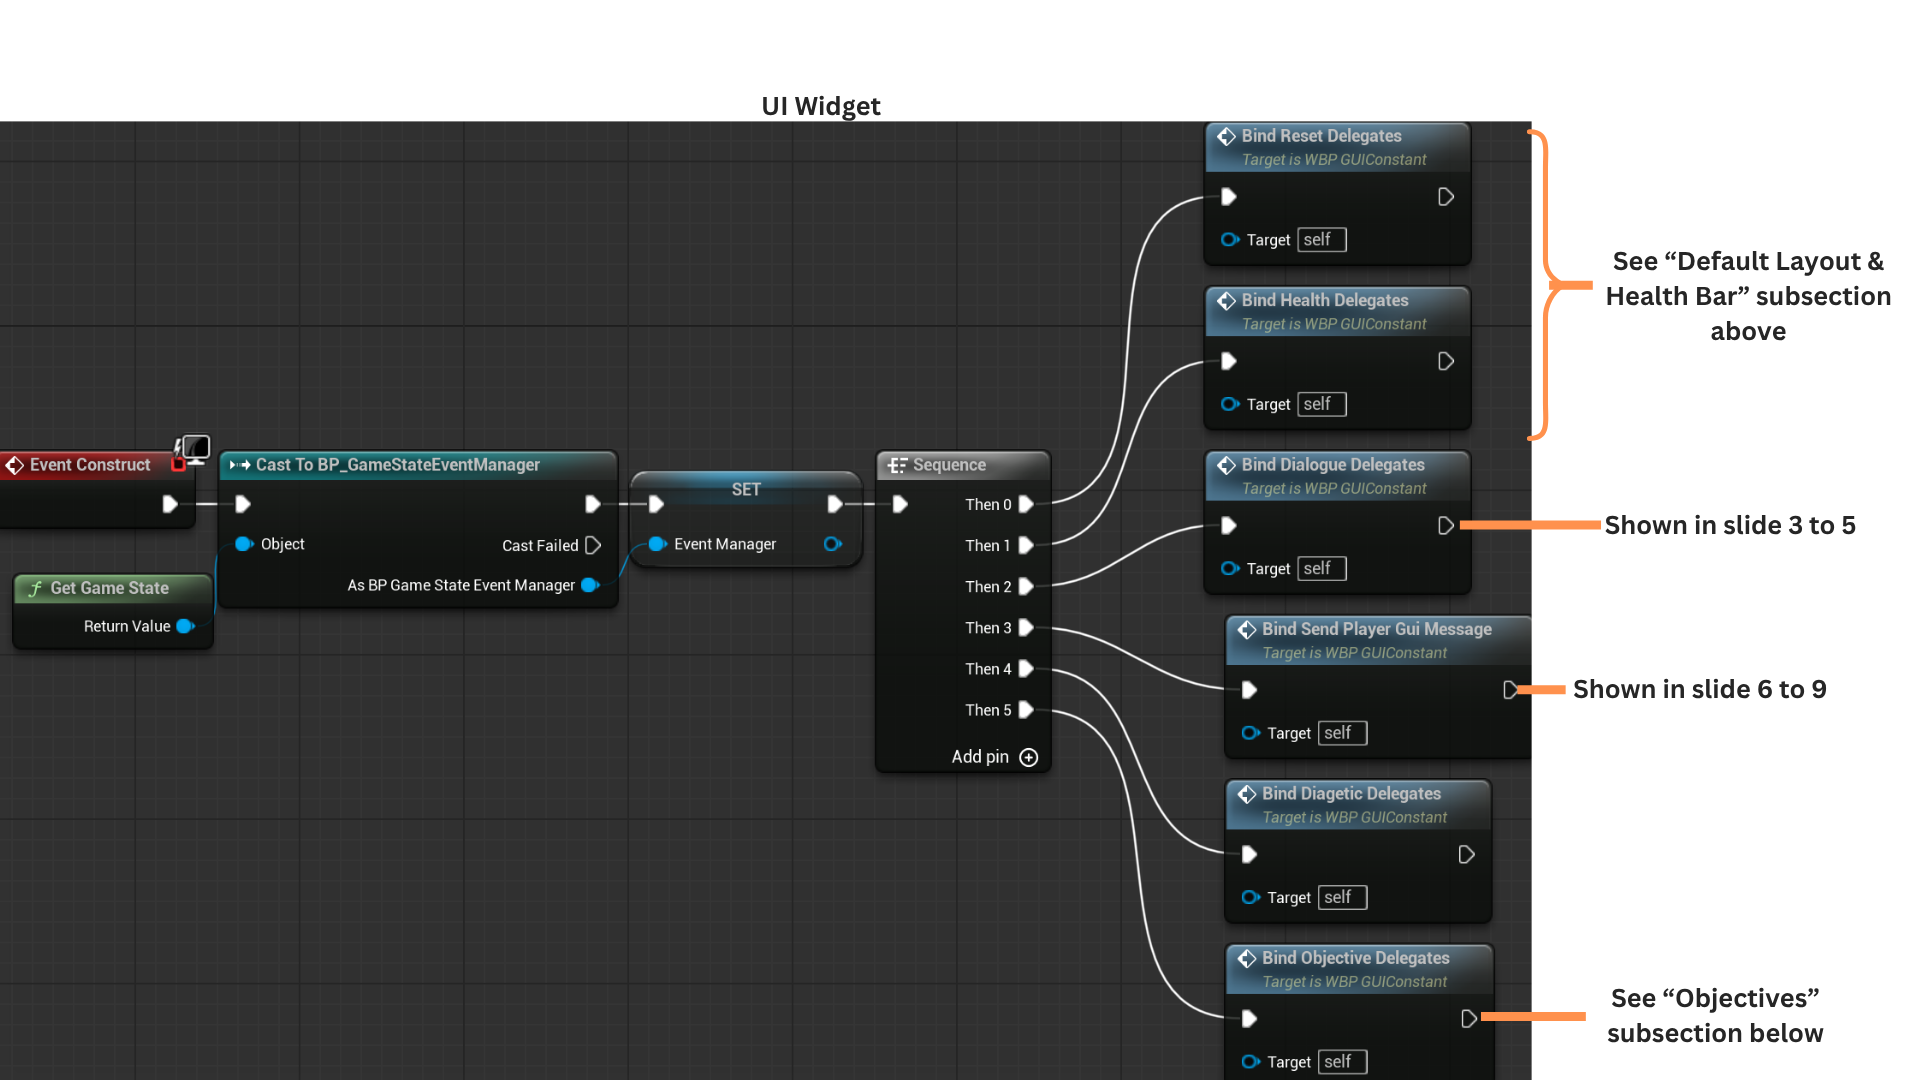
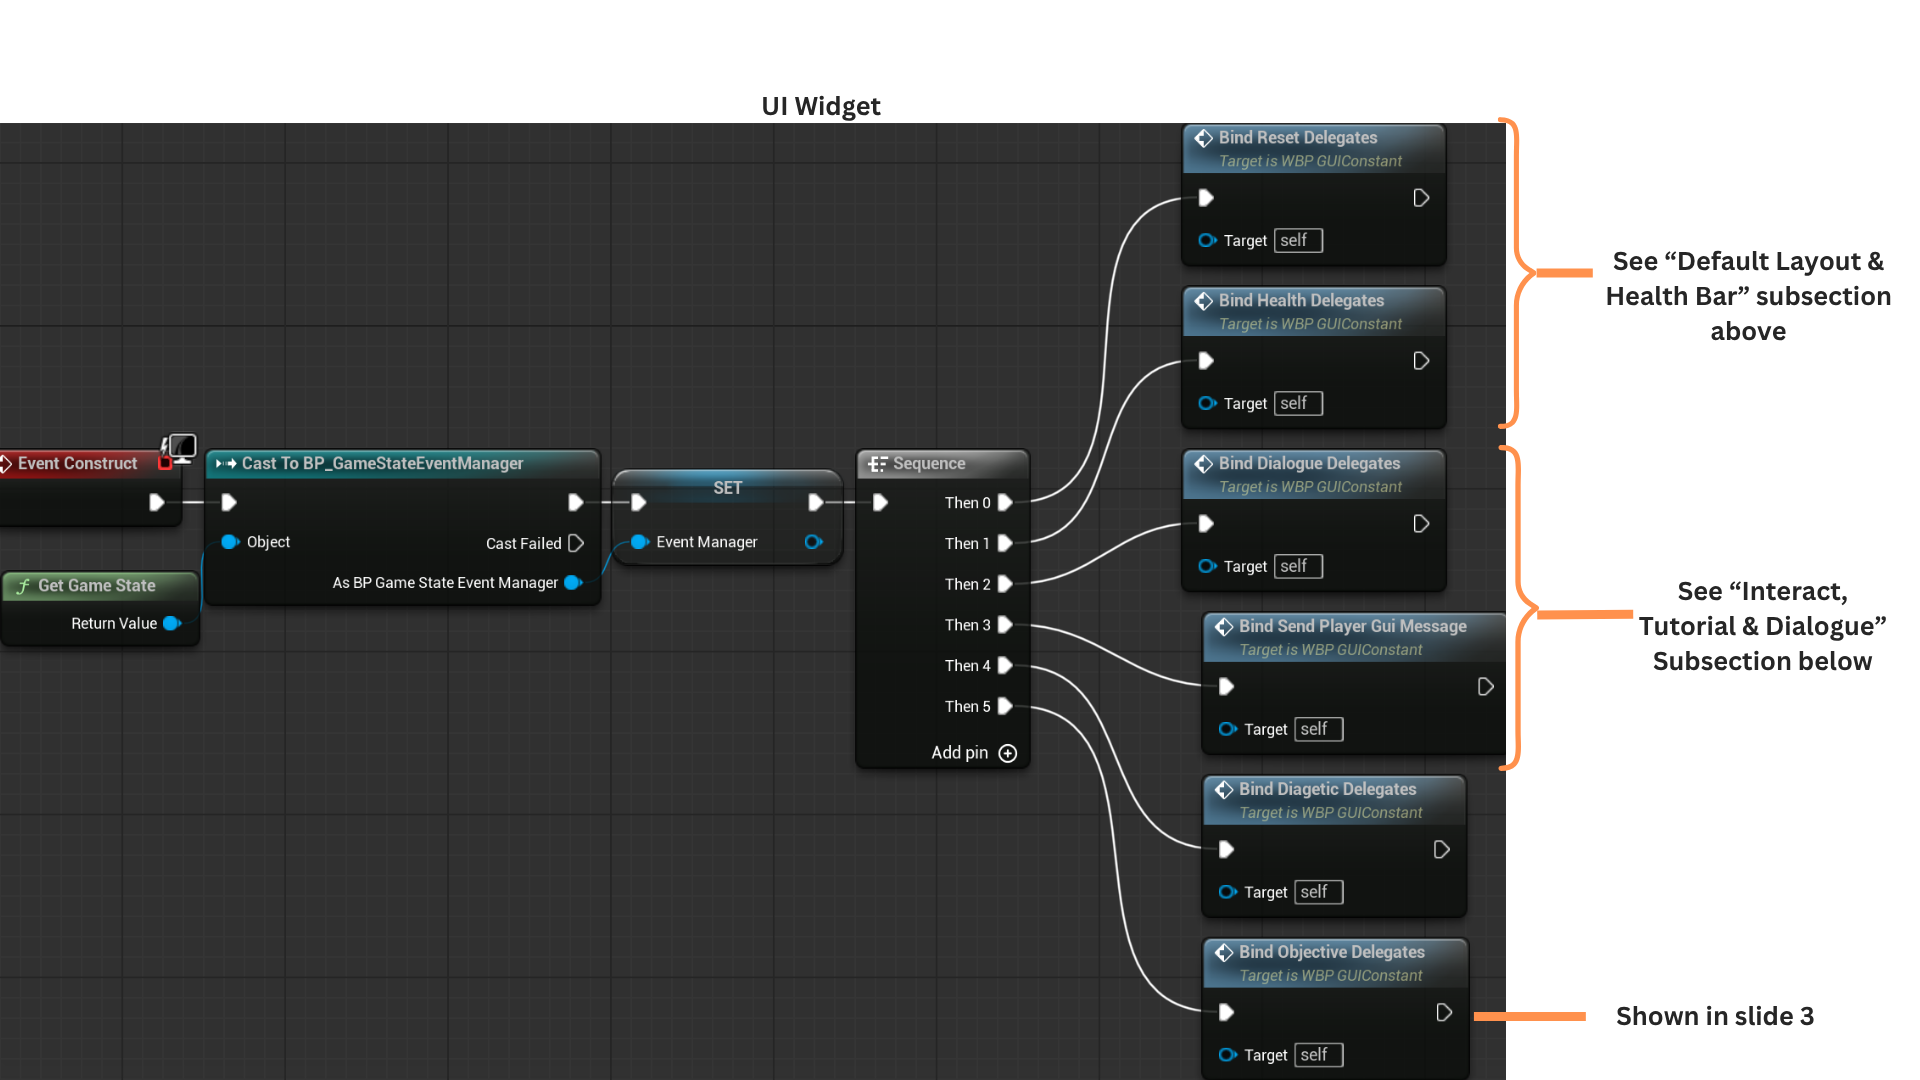
2. On Construct, the widget caches a reference to the GameState, which serves as the mediator in the Event Bus system.
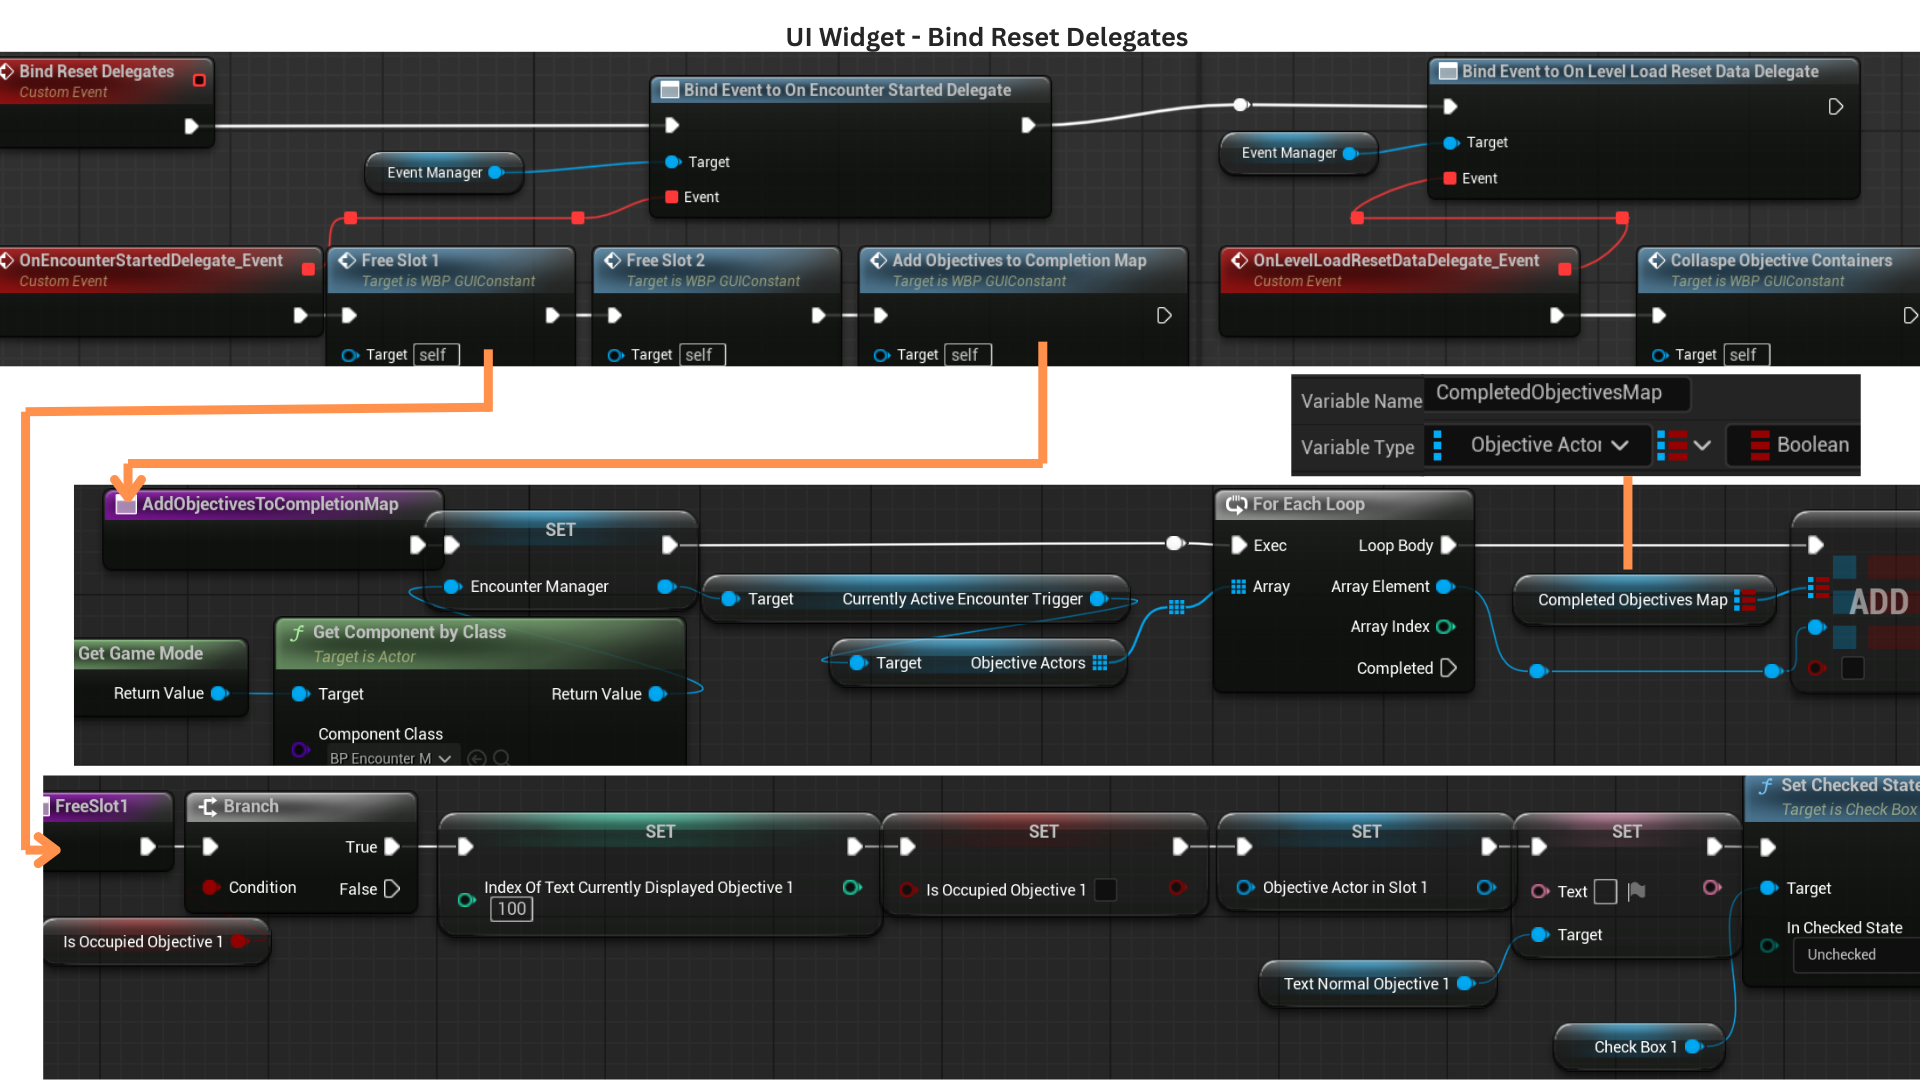
BindResetDelegates listens for events that free objective slots at encounter start and reset the UI when transitioning between sub-levels.
BindHealthDelegates connects the widget to broadcasts from the player's HealthComponent, enabling it to react to health initialization and health-changed events.
3. At the start of an encounter, all objective slots are cleared, and the objectives provided to the EncounterManager become keys in a map that tracks whether each objective has been completed and freed.
Freeing a slot checks if the slot is occupied; if so, it resets all tracking variables and clears the associated text and checkbox elements.
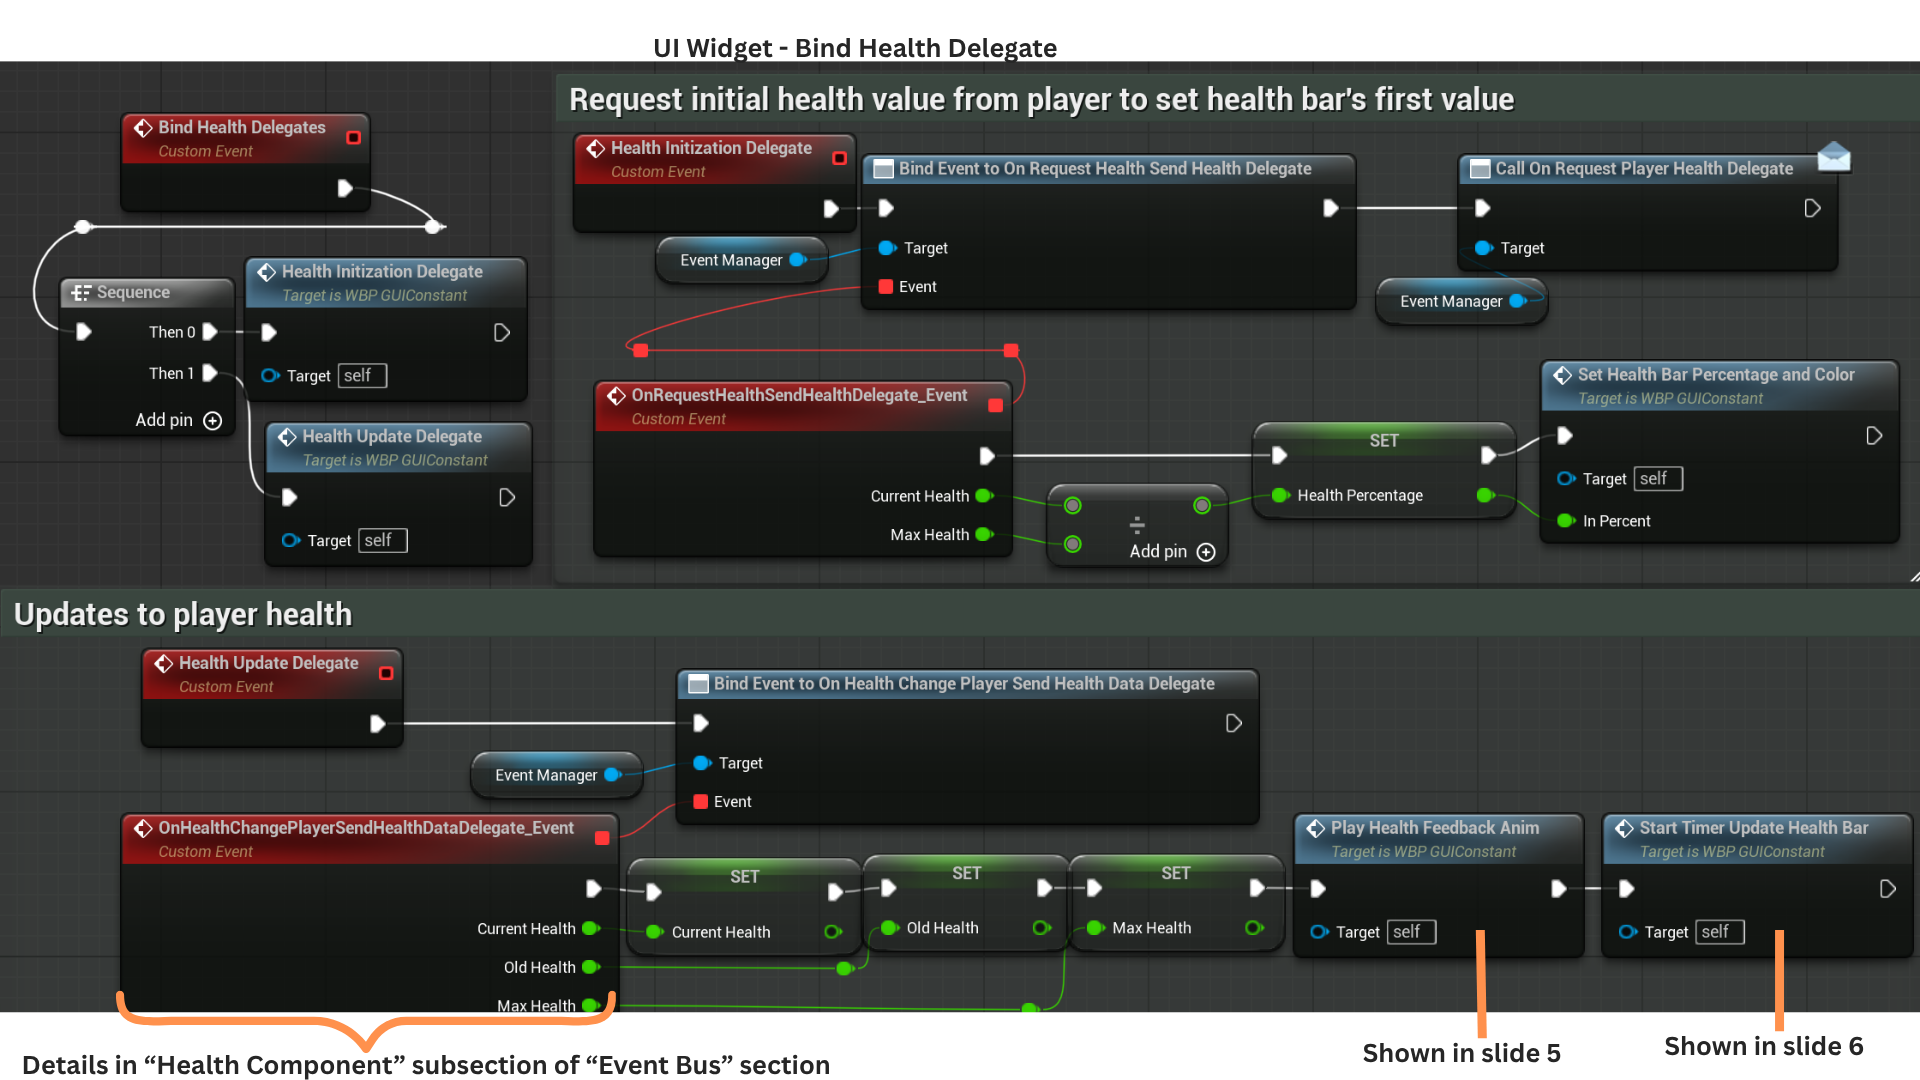
4. HealthInitializationDelegate binds to OnRequestHealthSendHealthDelegate, then broadcasts OnRequestPlayerHealthDelegate.
The player’s HealthComponent receives this request and responds by broadcasting OnRequestHealthSendHealthDelegate with the player’s current health, allowing the UI to initialize the health bar correctly.
HealthUpdateDelegate listens for OnHealthChangePlayerSendHealthDataDelegate, fired whenever the player's HealthComponent updates due to damage or healing.
5. PlayHealthFeedbackAnim selects and plays one of two animations—one for taking damage and one for healing—ensuring the UI provides immediate feedback on health changes.
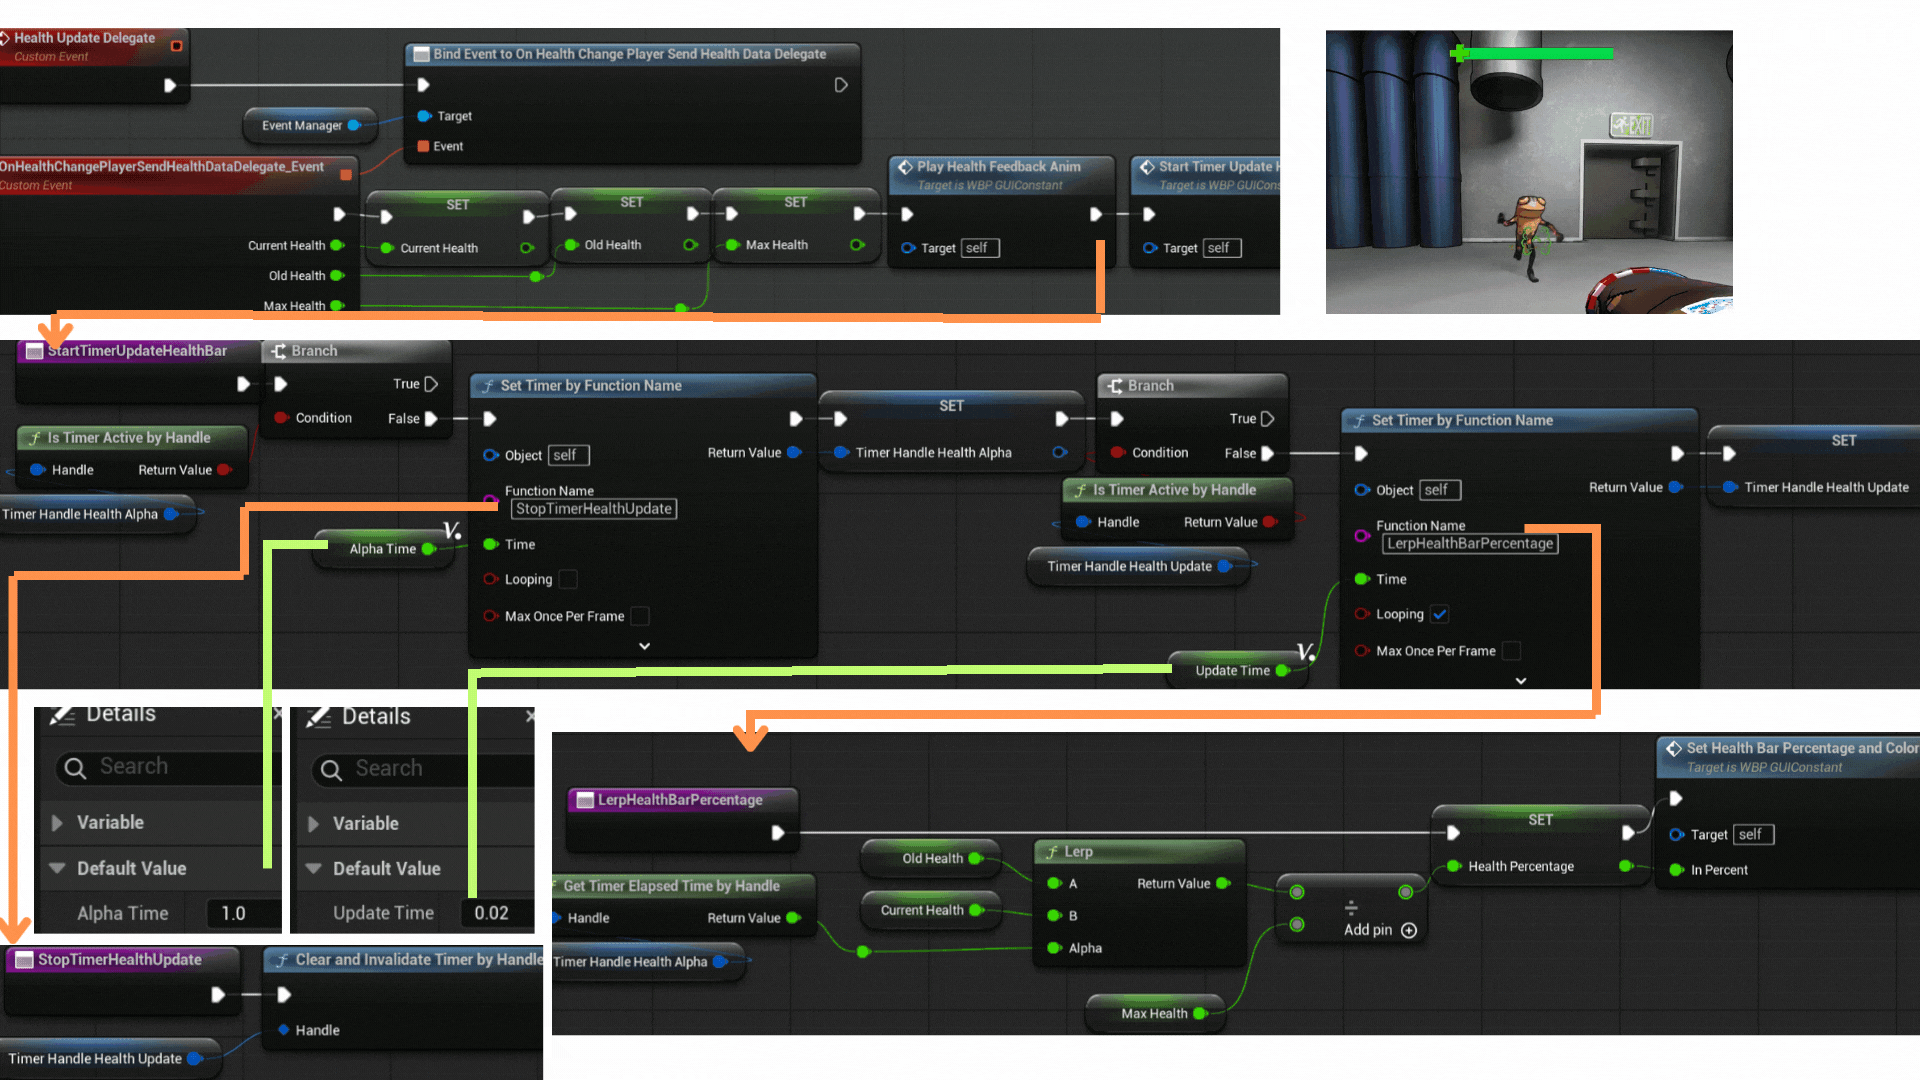
6. StartTimerUpdatedHealthBar begins a timed lerp toward the new health value.
TimerHandleHealthAlpha progresses an alpha value from 0 to 1 over one second and triggers StopTimerHealthUpdate when complete, clearing the update loop.
Meanwhile, TimerHandleHealthUpdate runs every 0.02 seconds and calls LerpHealthBarPercentage,
interpolating from OldHealth to CurrentHealth using the alpha value and updating both the slider’s fill percentage and its color.
Interaction, Tutorial and Dialogue
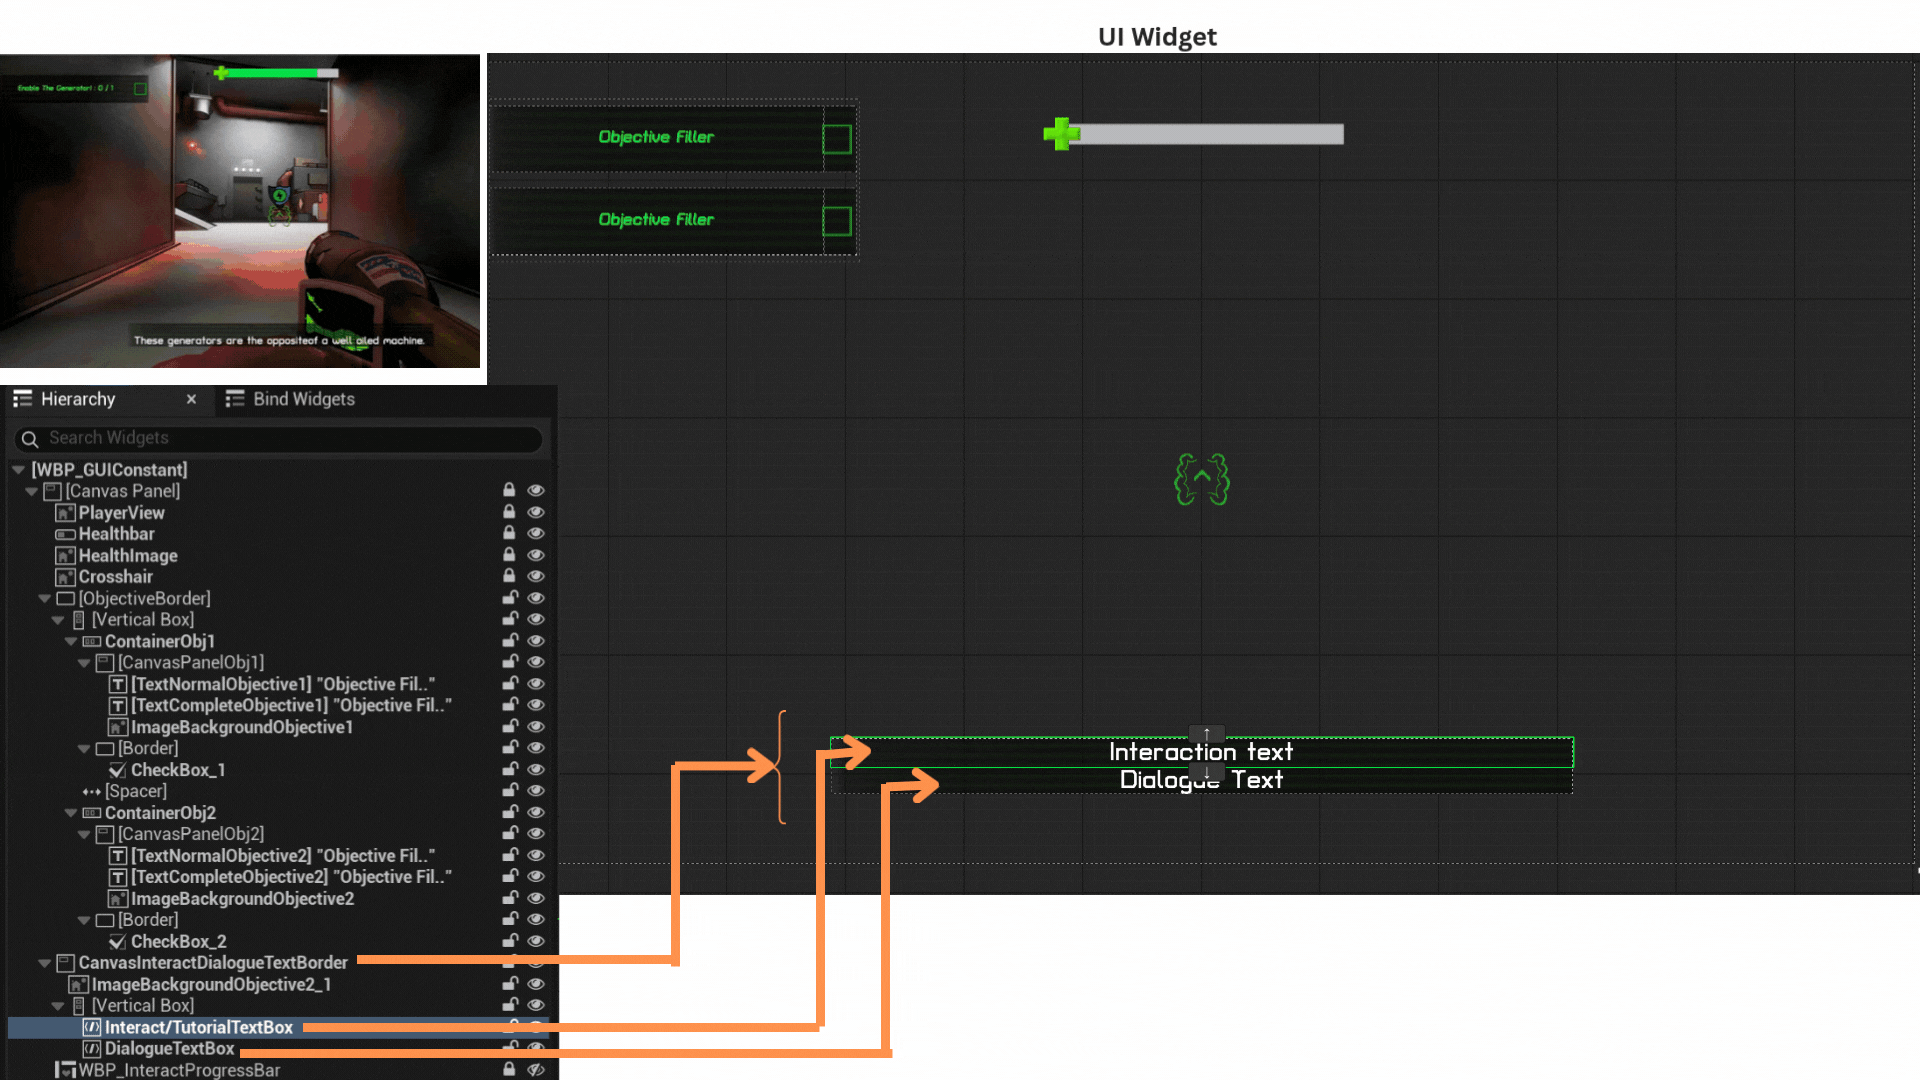


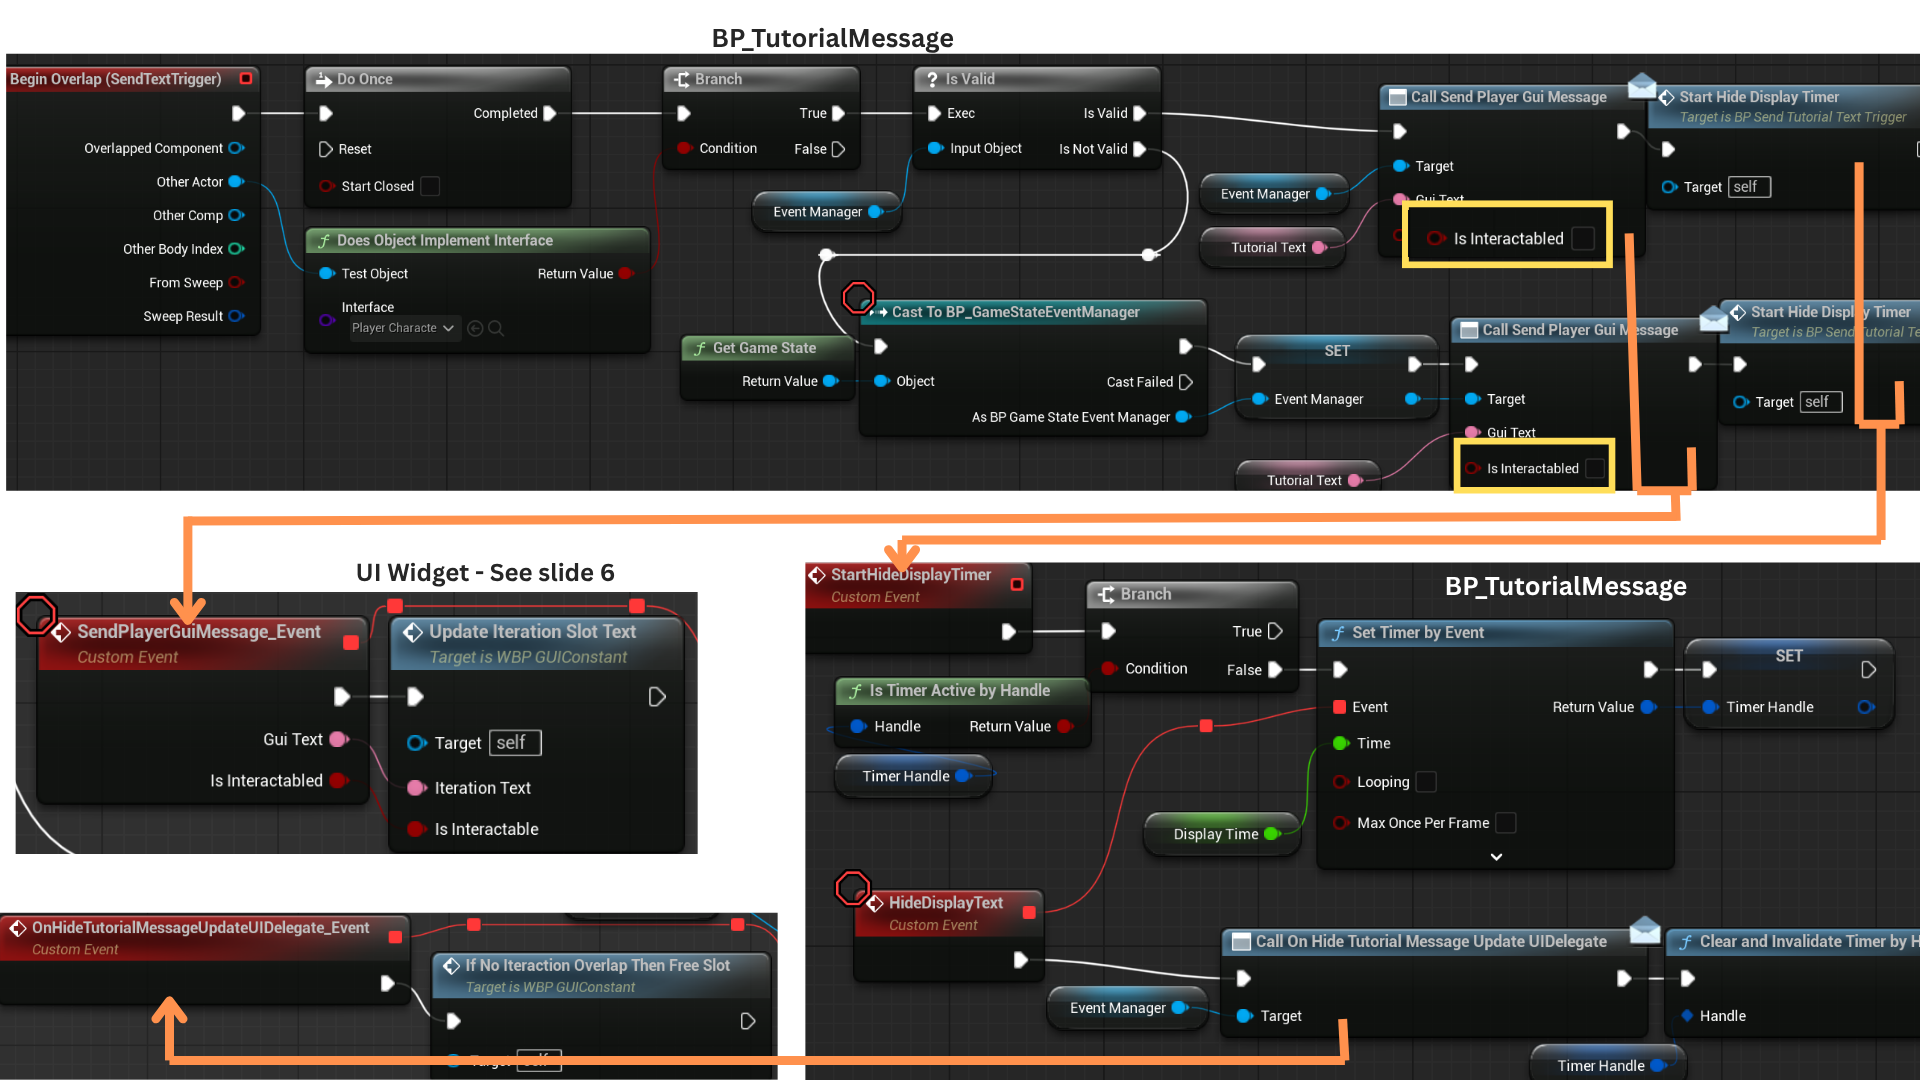
1. Text appears in three situations:
-- When the player overlaps an interactable actor, prompting them to hold E.
-- When a tutorial message provides additional information the first time a new objective appears.
-- When dialogue text accompanies spoken audio.
A Canvas Panel is used to allow multiple layered elements and dynamic resizing.
Interaction and tutorial messages update the Interact/TutorialTextBox, while dialogue text updates the DialogueTextBox.
2. BindDialogueDelegates connects the widget to the DialogueSubsystem and GameStateEventManager delegates that announce dialogue start and dialogue end events.
BindSendPlayerGuiMessage registers callbacks for interaction and tutorial text updates, ensuring the UI reacts when the player enters or leaves interactable areas or when tutorial prompts are triggered.
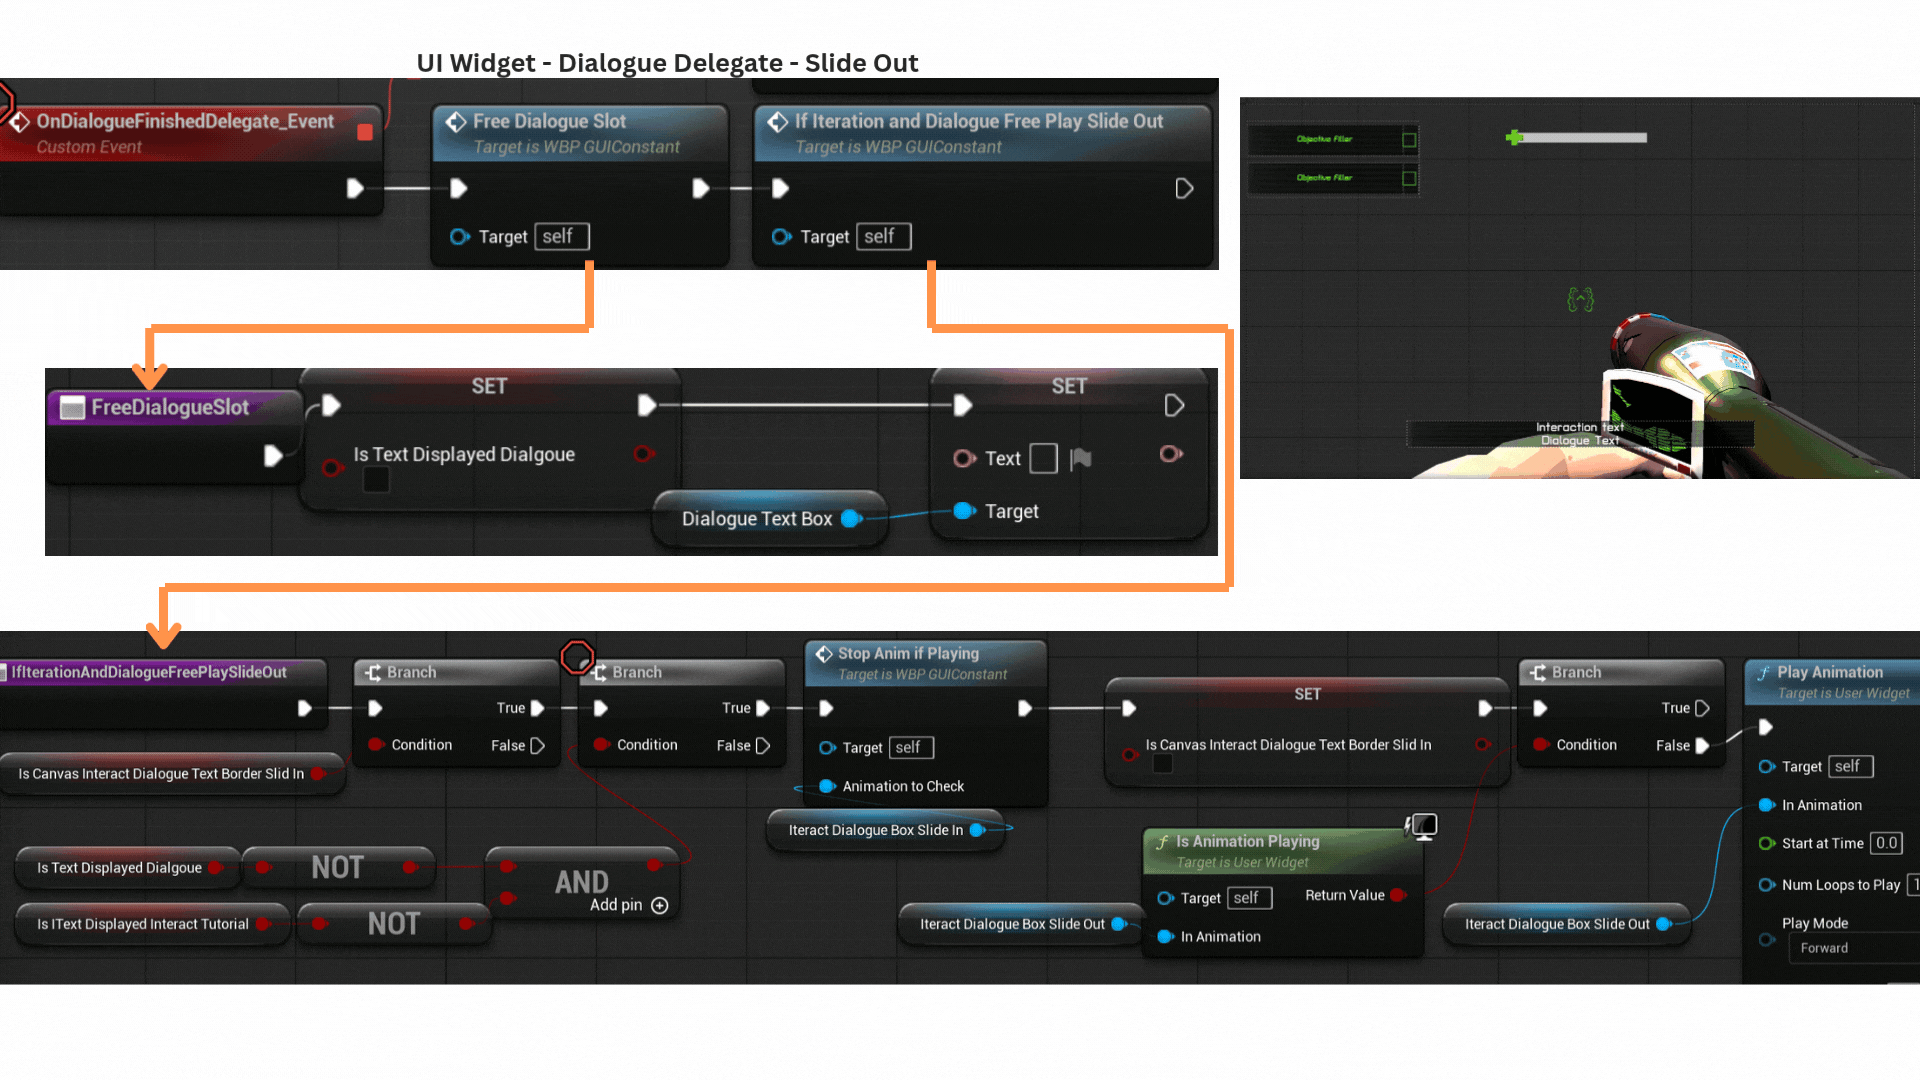
3. OnDialogueStartDelegate checks if dialogue text is currently displayed; if not, it sets IsTextDisplayedDialogue to true. Tutorial and interact messages set the parallel flag IsTextDisplayedInteractTutorial.
When either category finishes, it clears its flag and checks the other; the display slides out only when both are false, handled by IfInteractionAndDialogueFreePlaySlideOut.
The DialogueSubsystem manages FMOD playback and provides queued text through OnDialogueTextChange, which updates the DialogueTextBox accordingly.
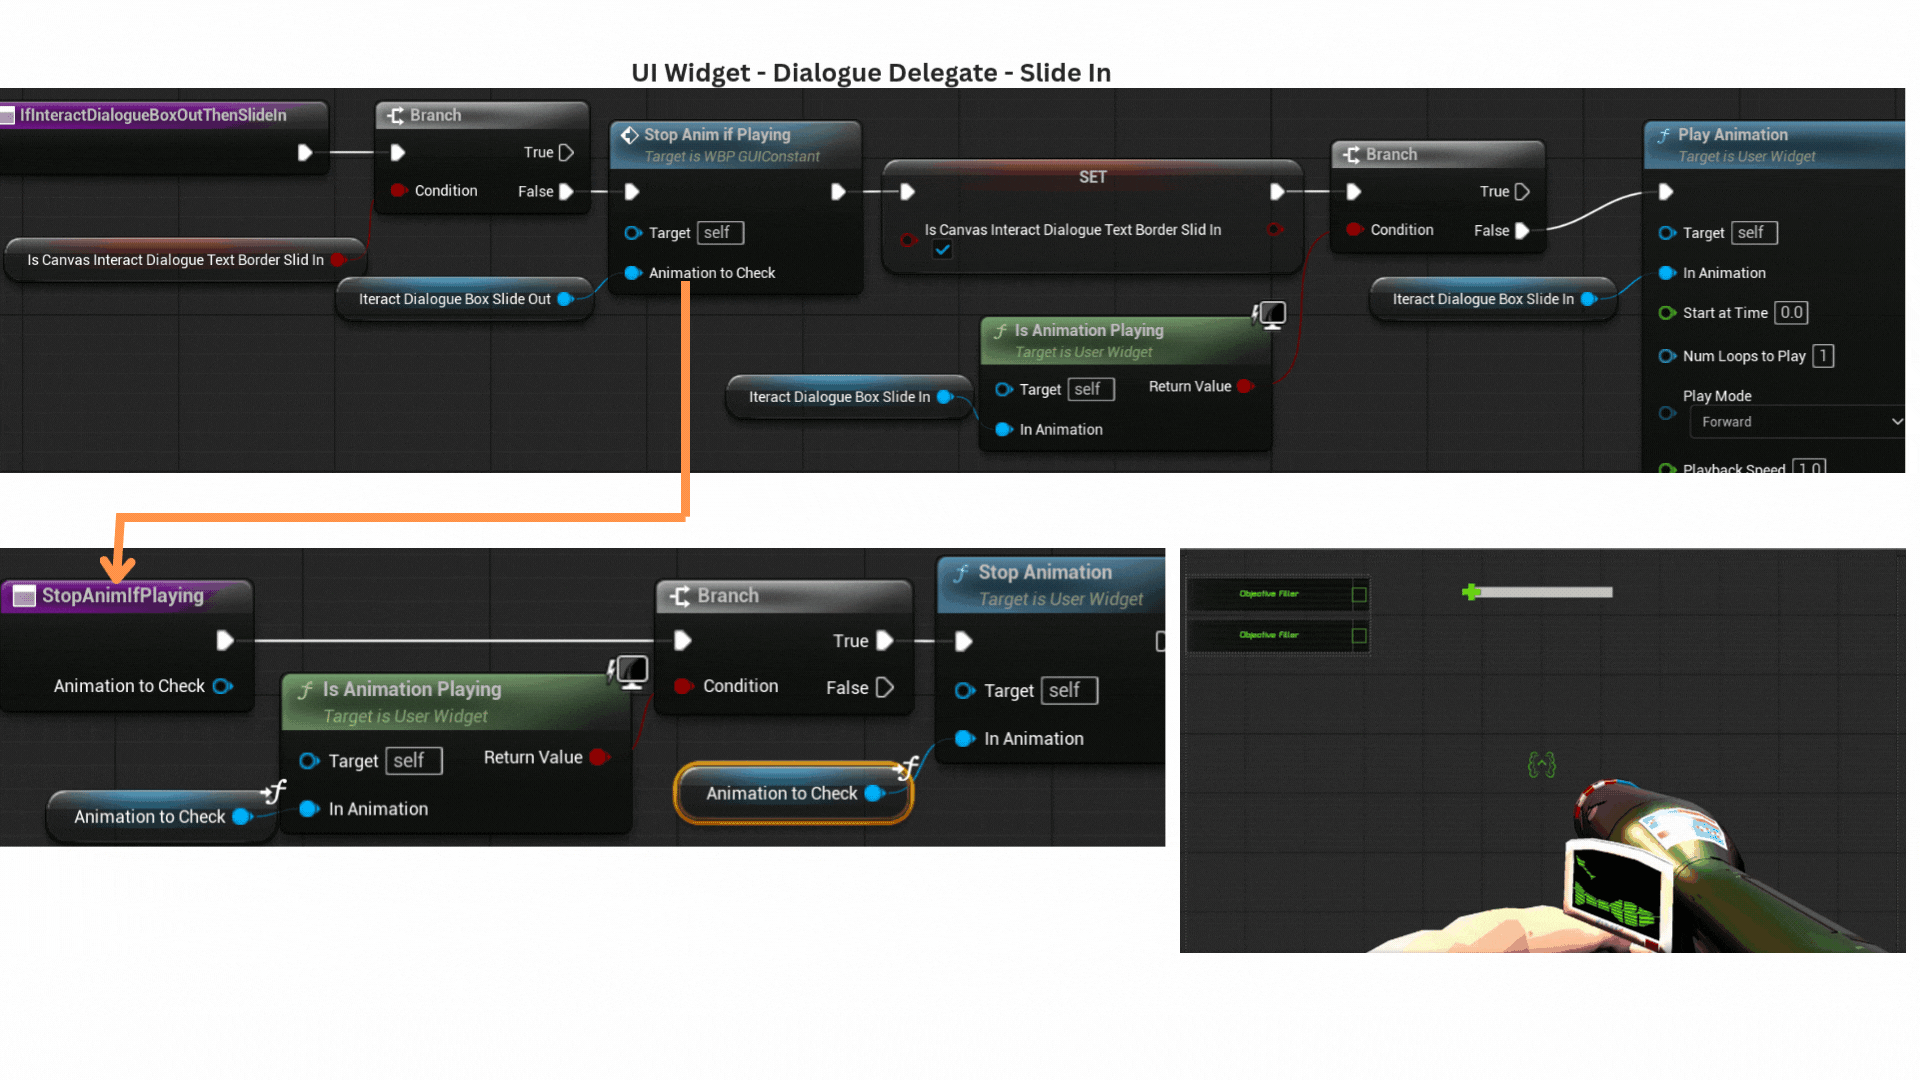
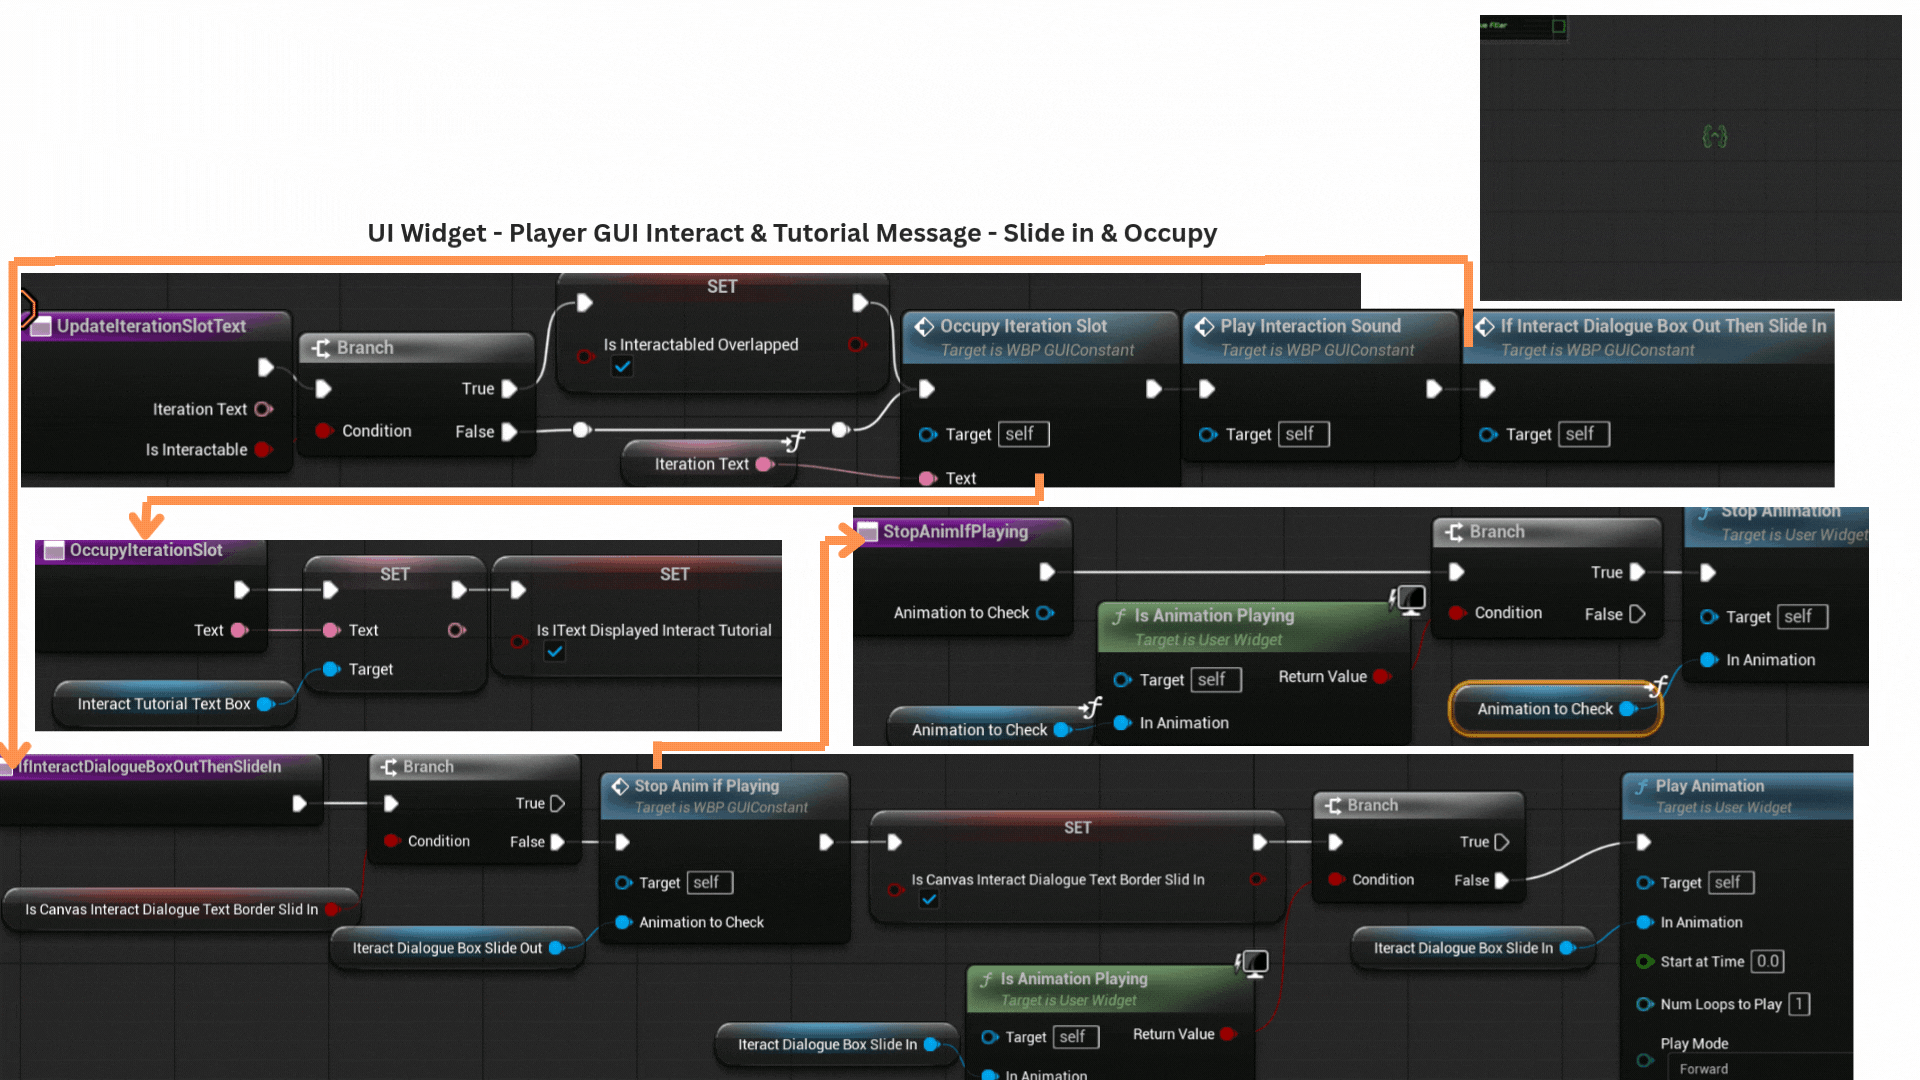
4. IfInteractDialogueBoxOutThenSlideIn checks whether the Canvas Panel is already visible by tracking IsCanvasInteractDialogueTextBorderSlideIn.
If the panel has not yet slid in, the flag is set and the slide-in animation plays, canceling any opposing animation via StopAnimIfPlaying before starting.
5. FreeDialogueSlot clears the dialogue text and sets IsTextDisplayedDialogue to false.
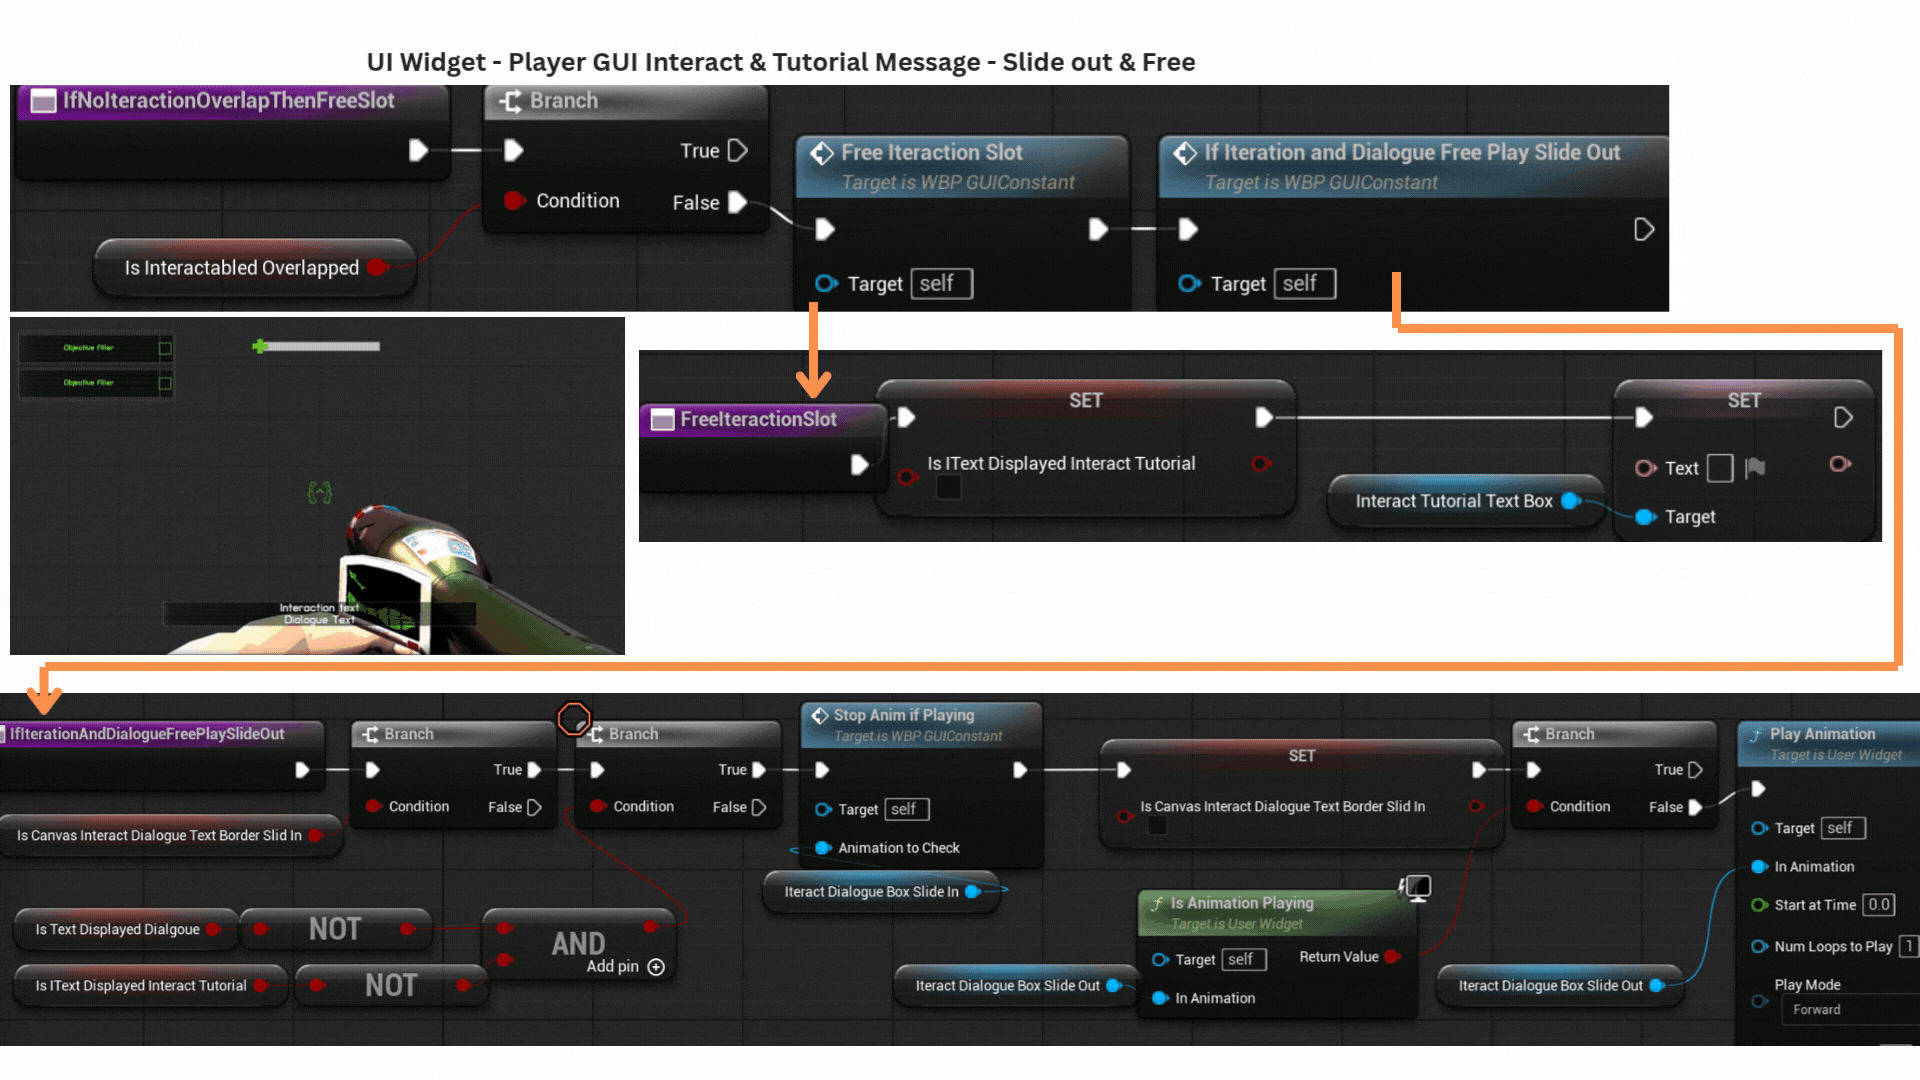
IfInteractionAndDialogueFreePlaySlideOut checks whether the Canvas Panel is currently slid in and whether both dialogue and interaction/tutorial text are cleared.
If so, it marks the panel as slid out and triggers the slide-out animation.
6. SendPlayerGuiMessage is fired by two different actor types.
--ACharacterBasePlayer sends the message when overlapping an actor implementing IInteractable, passing IsInteractable = true,
which sets IsInteractableOverlapped and prevents premature slot clearing if a tutorial message ends while the player is still overlapping.
--ATutorialMessage sends the same delegate but passes IsInteractable = false.
When player overlap ends, the player broadcasts OnInteractEndOverlapUpdateUIDelegate, clearing IsInteractableOverlapped and freeing the slot.
Tutorial trigger boxes start a timer, and when it finishes, they broadcast OnHideTutorialMessageUpdateUIDelegate to free the slot if interaction text is not active.
7. UpdateInteractionSlotText sets IsInteractionOverlapped when the delegate reports an interactable overlap.
OccupiedInteractionSlot updates the displayed text and sets IsTextDisplayedInteractionTutorial to true.
IfInteractDialogueBoxOutThenSlideIn is used to ensure the text panel animates into view when interaction or tutorial messages appear.
8. IfNotInteractionOverlapThenFreeSlot is triggered when the player stops overlapping an IInteractable actor or when a tutorial timer expires.
It checks whether the player is still overlapping any interactable; if not, it clears the text,
sets IsTextDisplayedInteractionTutorial to false, and then calls IfInteractionAndDialogueFreePlaySlideOut to hide the panel if both message types are finished.
9. A DoOnce node ensures the tutorial delegate fires only a single time.
he overlapped actor is checked for the IPlayerCharacterable interface.
During testing, the player could overlap a TutorialMessage before obtaining a reference to the GameStateEventManager, so a validity check re-acquires the reference if needed.
SendPlayerGuiMessage is called with IsInteractable = false, and StartHideDisplayTimer begins a countdown that eventually triggers OnHideTutorialMessageUpdateUIDelegate, handled by the UI widget.
10. The BoxComponentInteraction on BP_CharacterBasePlayer checks whether the overlapped actor implements IInteractable.
If so, it broadcasts SendPlayerGuiMessage with IsInteractable = true.
When overlap ends, it performs the same interface check and broadcasts OnInteractEndOverlapUpdateUIDelegate, allowing the UI to clear the interaction text.
Objectives
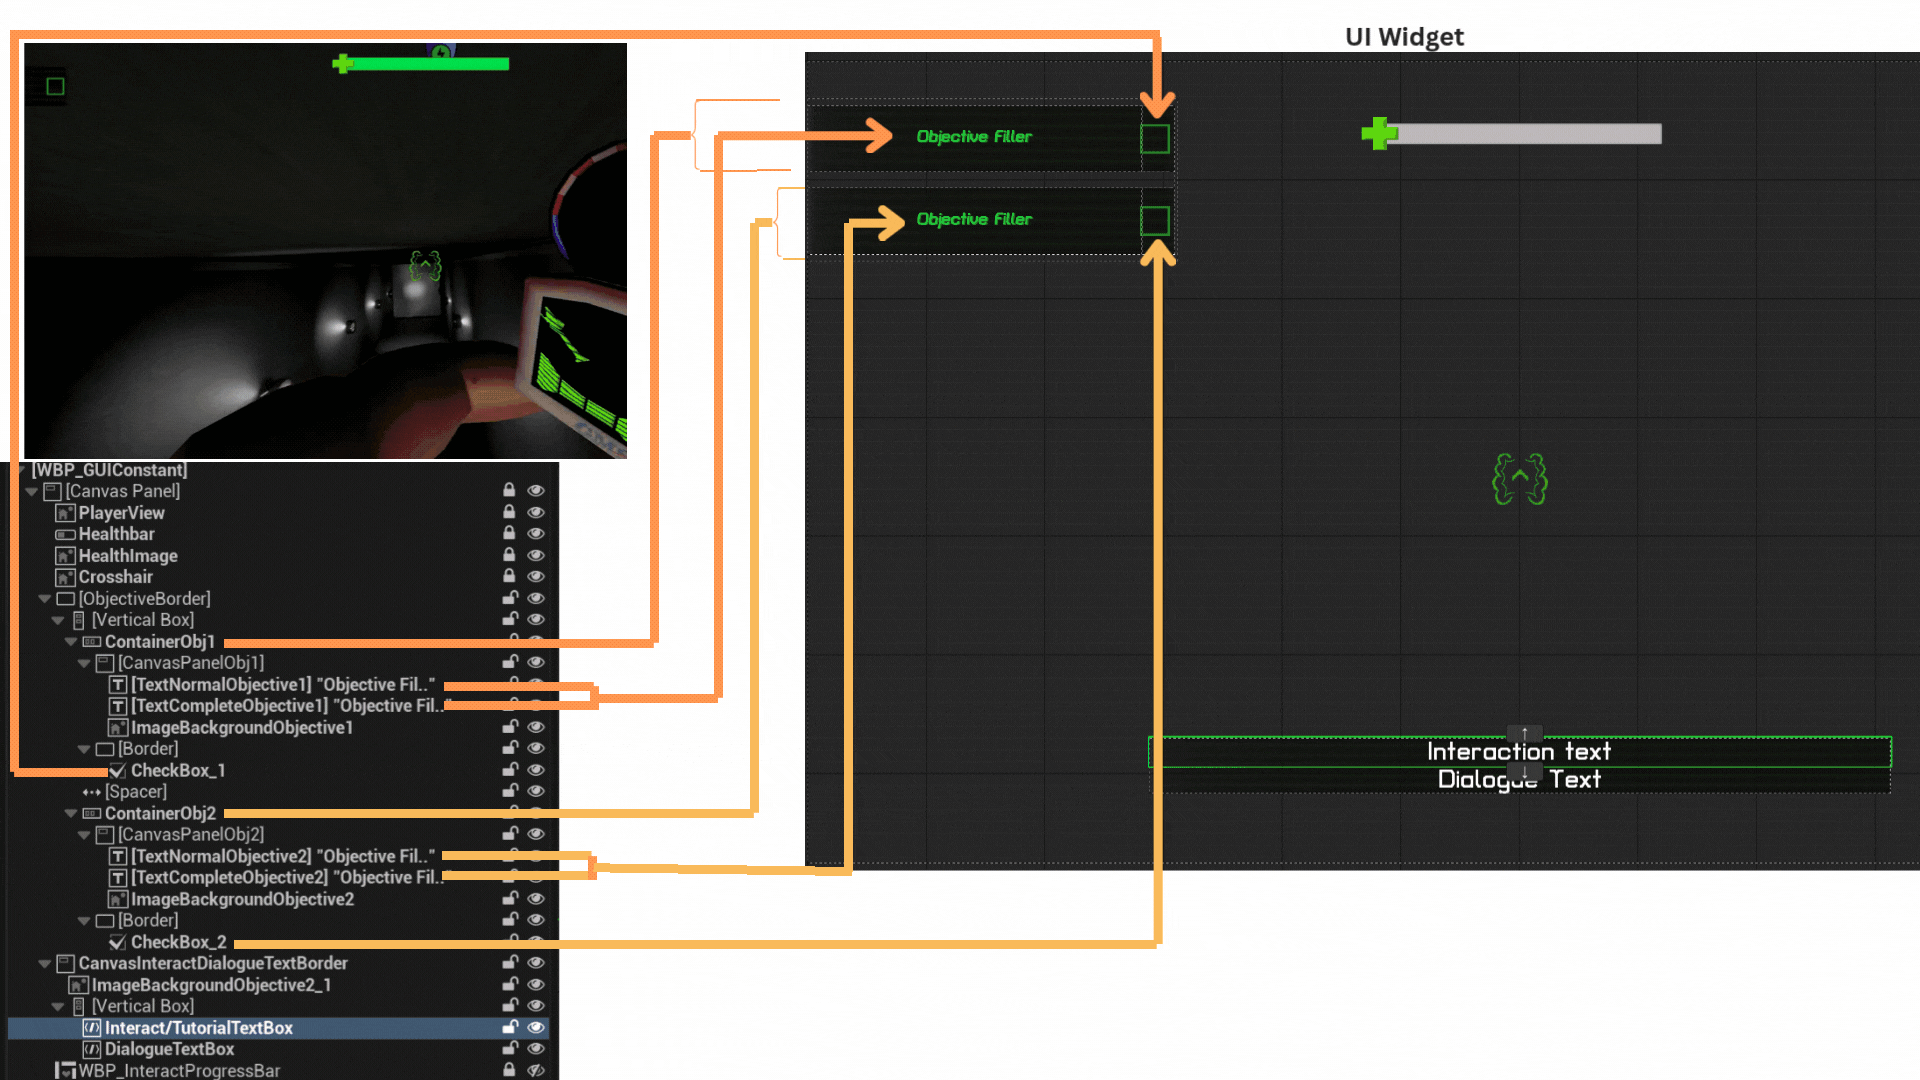
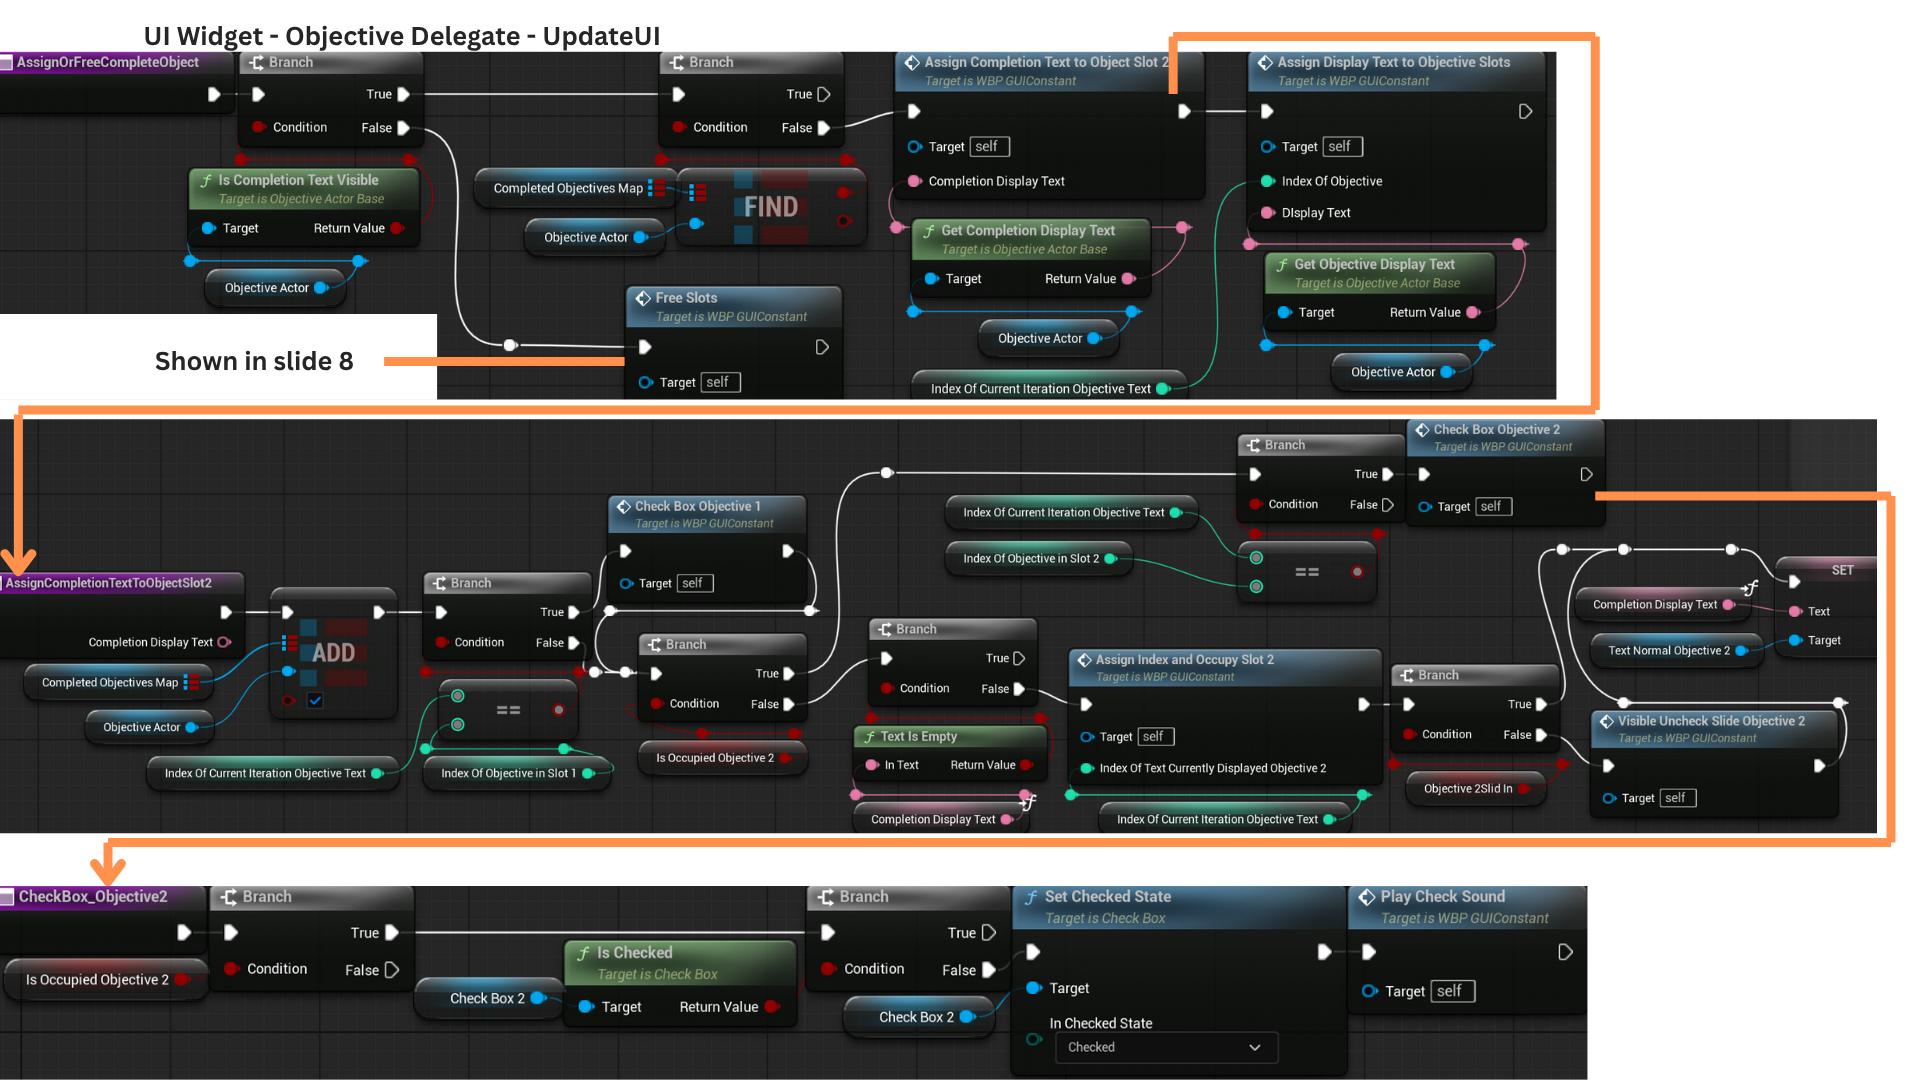
1.There are two objective slots, each able to hold one active objective.
When an objective begins, it assigns its DisplayText to the TextNormalObjective field in the appropriate slot.
Once the objective completes, the checkbox for that slot is checked and the TextCompleteObjective field is populated with the the DisplayText that can be animated idenpendently.
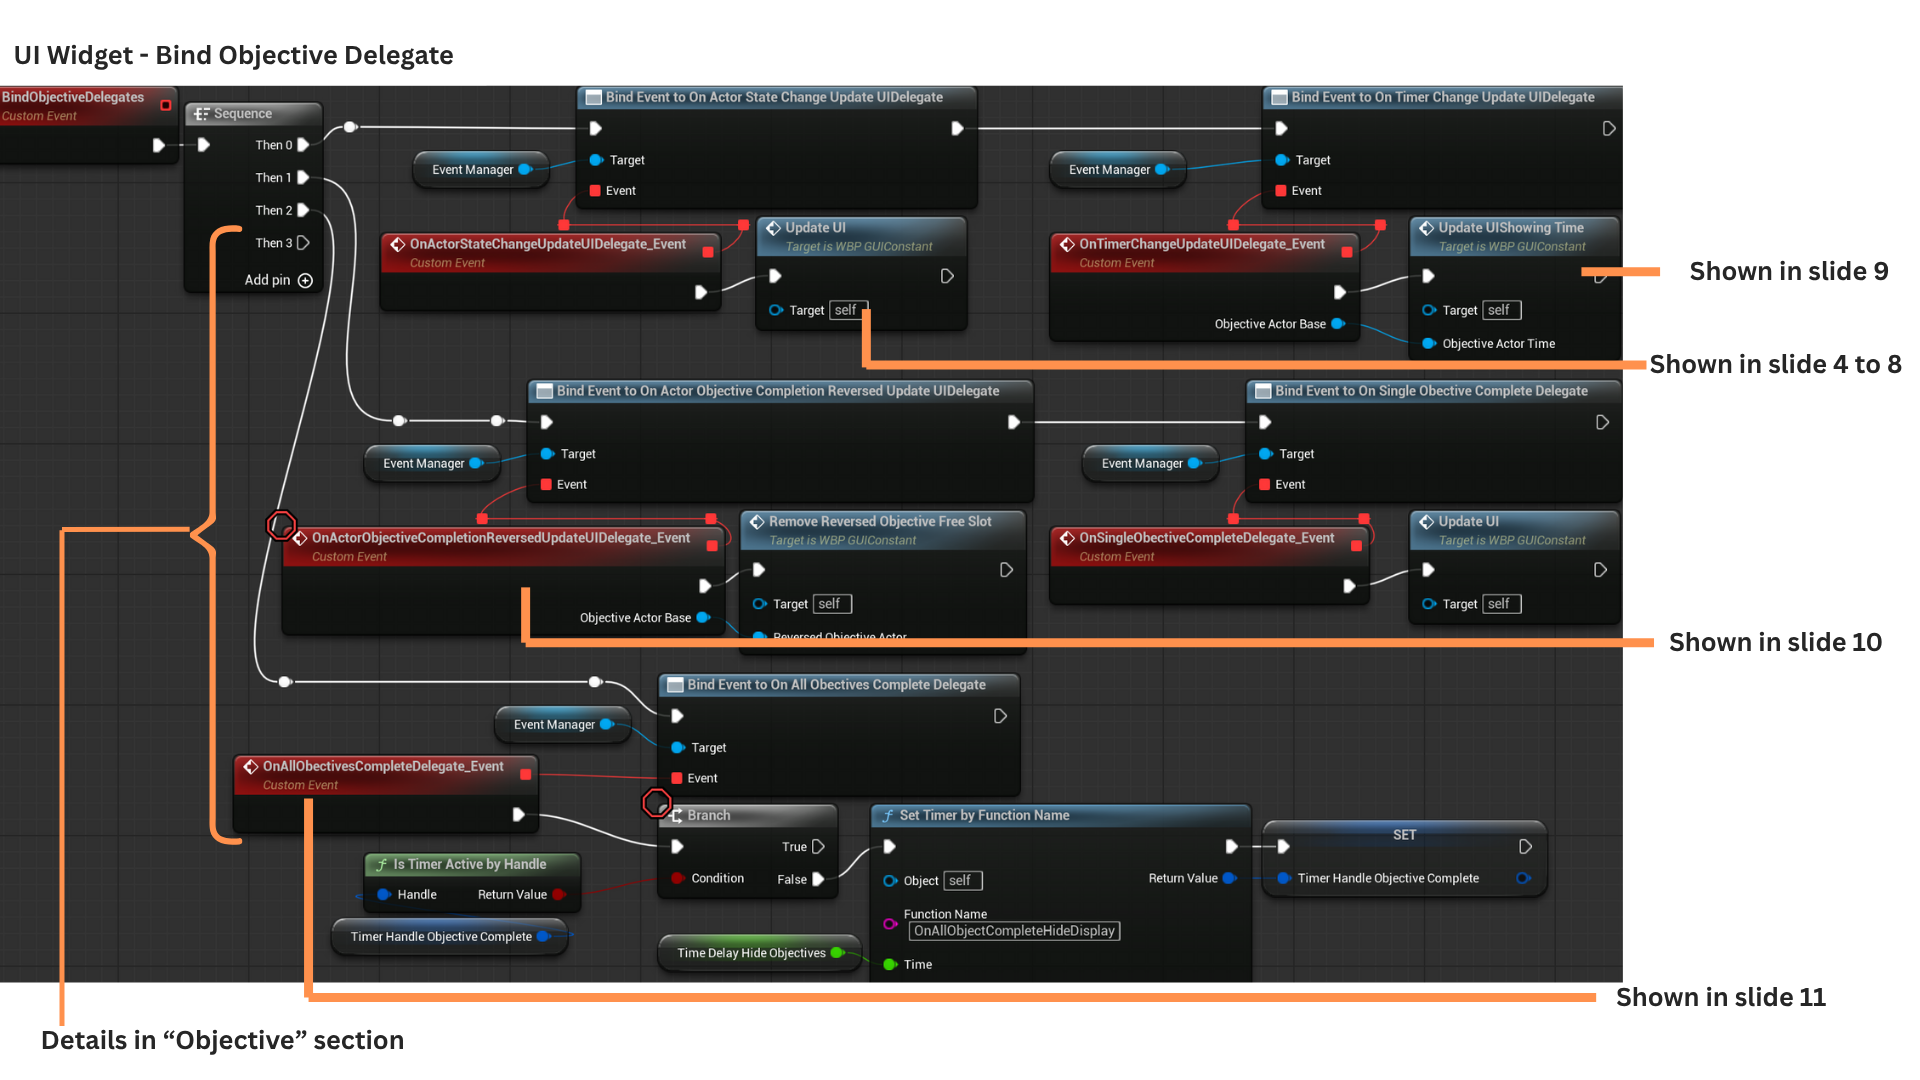
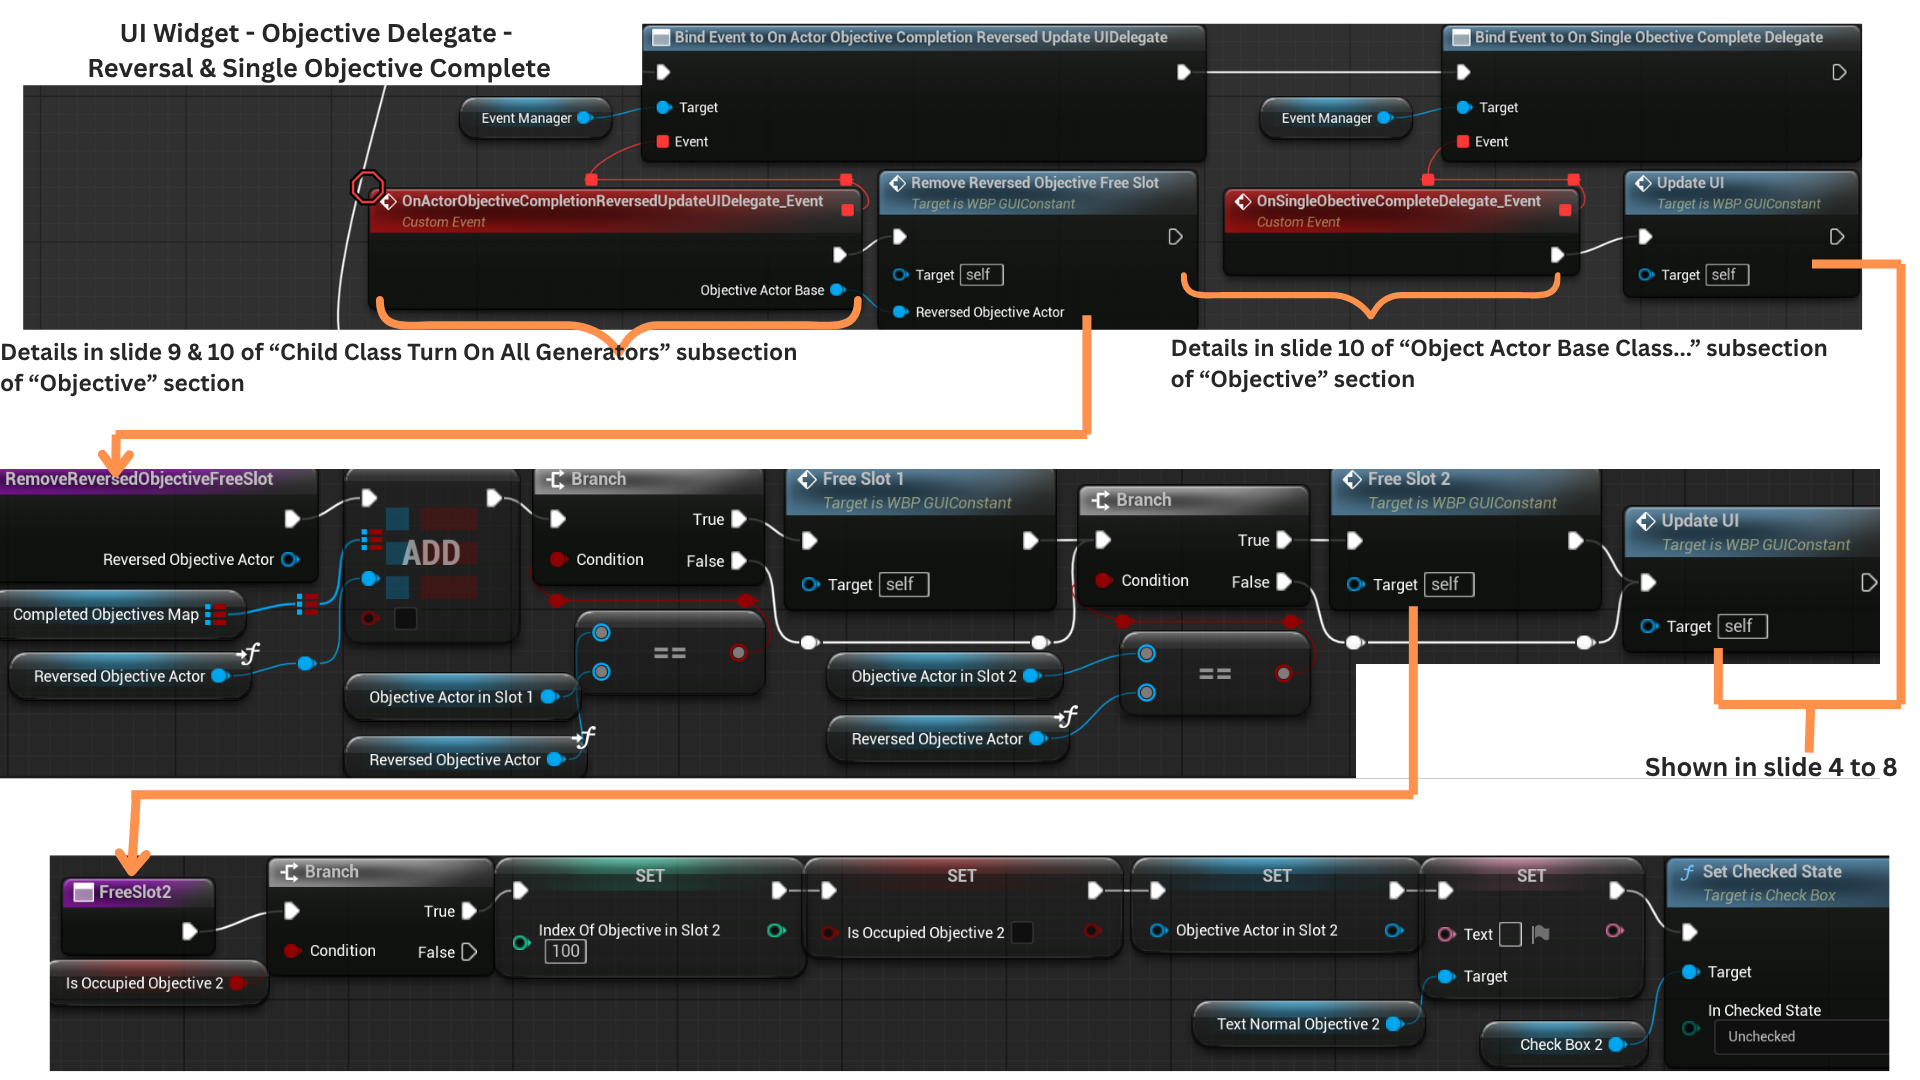
2. During Construct, BindObjectiveDelegates registers all UI handlers for objective-related events: action-based updates, timer-based updates, completion reversal, single-objective completion, and the event fired when all encounter objectives are finished.
3. OnActorStateChange responds to any action-driven objective starting or being updated.
OnTimerChangeUpdateUI handles objectives driven by timers and receives their periodic updates.
OnActorObjectiveCompletionReversedUpdateUIDelegate triggers when an objective that had been completed and freed is reversed back to incomplete.
OnSingleObjectiveComplete is called after an objective has completed and its completion text has finished displaying for its allotted duration.
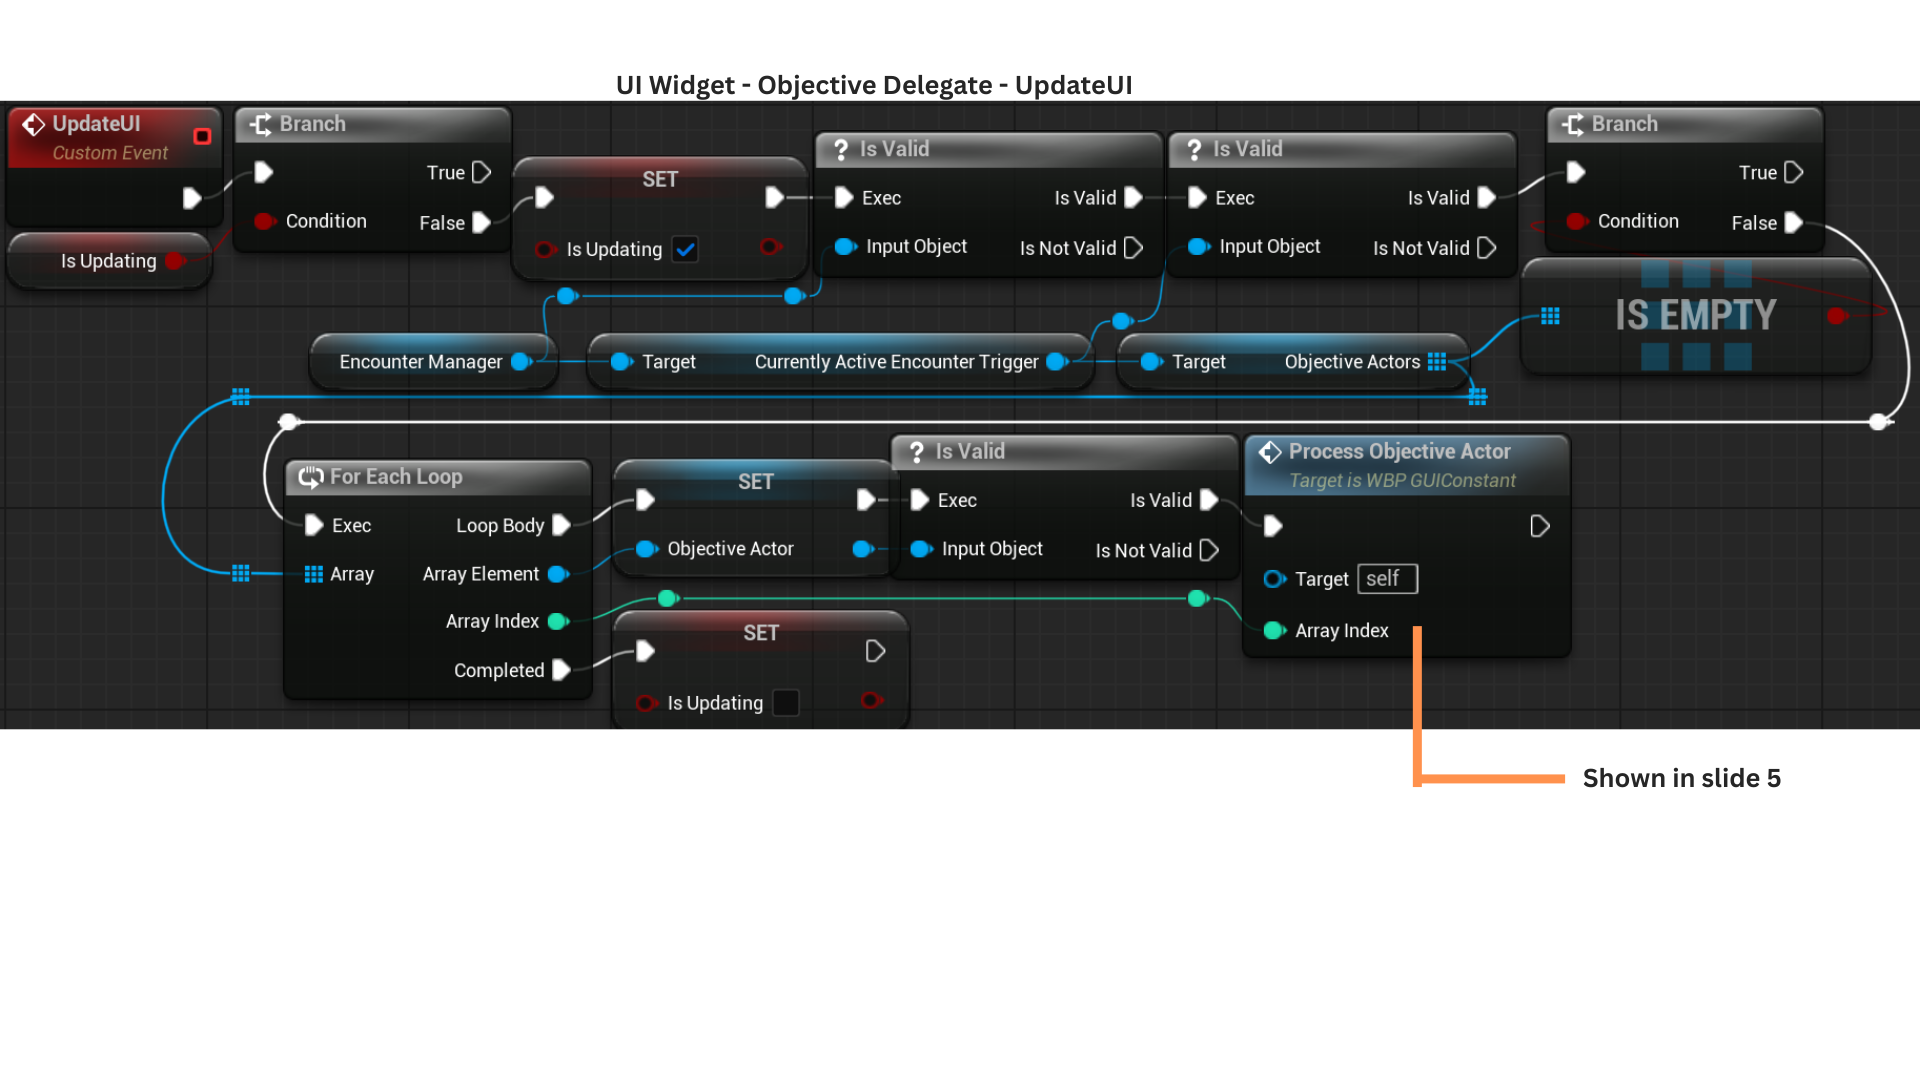
4. UpdateUI first checks whether the UI is already mid-update to prevent conflicting writes during animations or state changes.
It retrieves the array of ObjectiveActors from the EncounterManager (populated by the EncounterTrigger) and iterates through them, calling ProcessObjectiveActor for each.
Once all iterations complete, IsUpdating is reset to false.
5. ProcessObjectiveActor begins by ensuring no slide-in or slide-out animations are running, avoiding mid-animation state corruption.
It immediately exits if the objective is already freed (completed, stored in the completion map, and no longer visible).
For each iteration, the index is stored in IndexOfCurrentIterationObjectiveText.
If the objective has started but is not yet complete, it attempts to occupy a slot or updates its existing slot via AssignDisplayTextToObjectiveSlot, which ensures only the correct slot index is modified.
If the objective has started and is completed, AssignOrFreeCompleteObjective either applies completion text or frees the entry depending on visibility state.
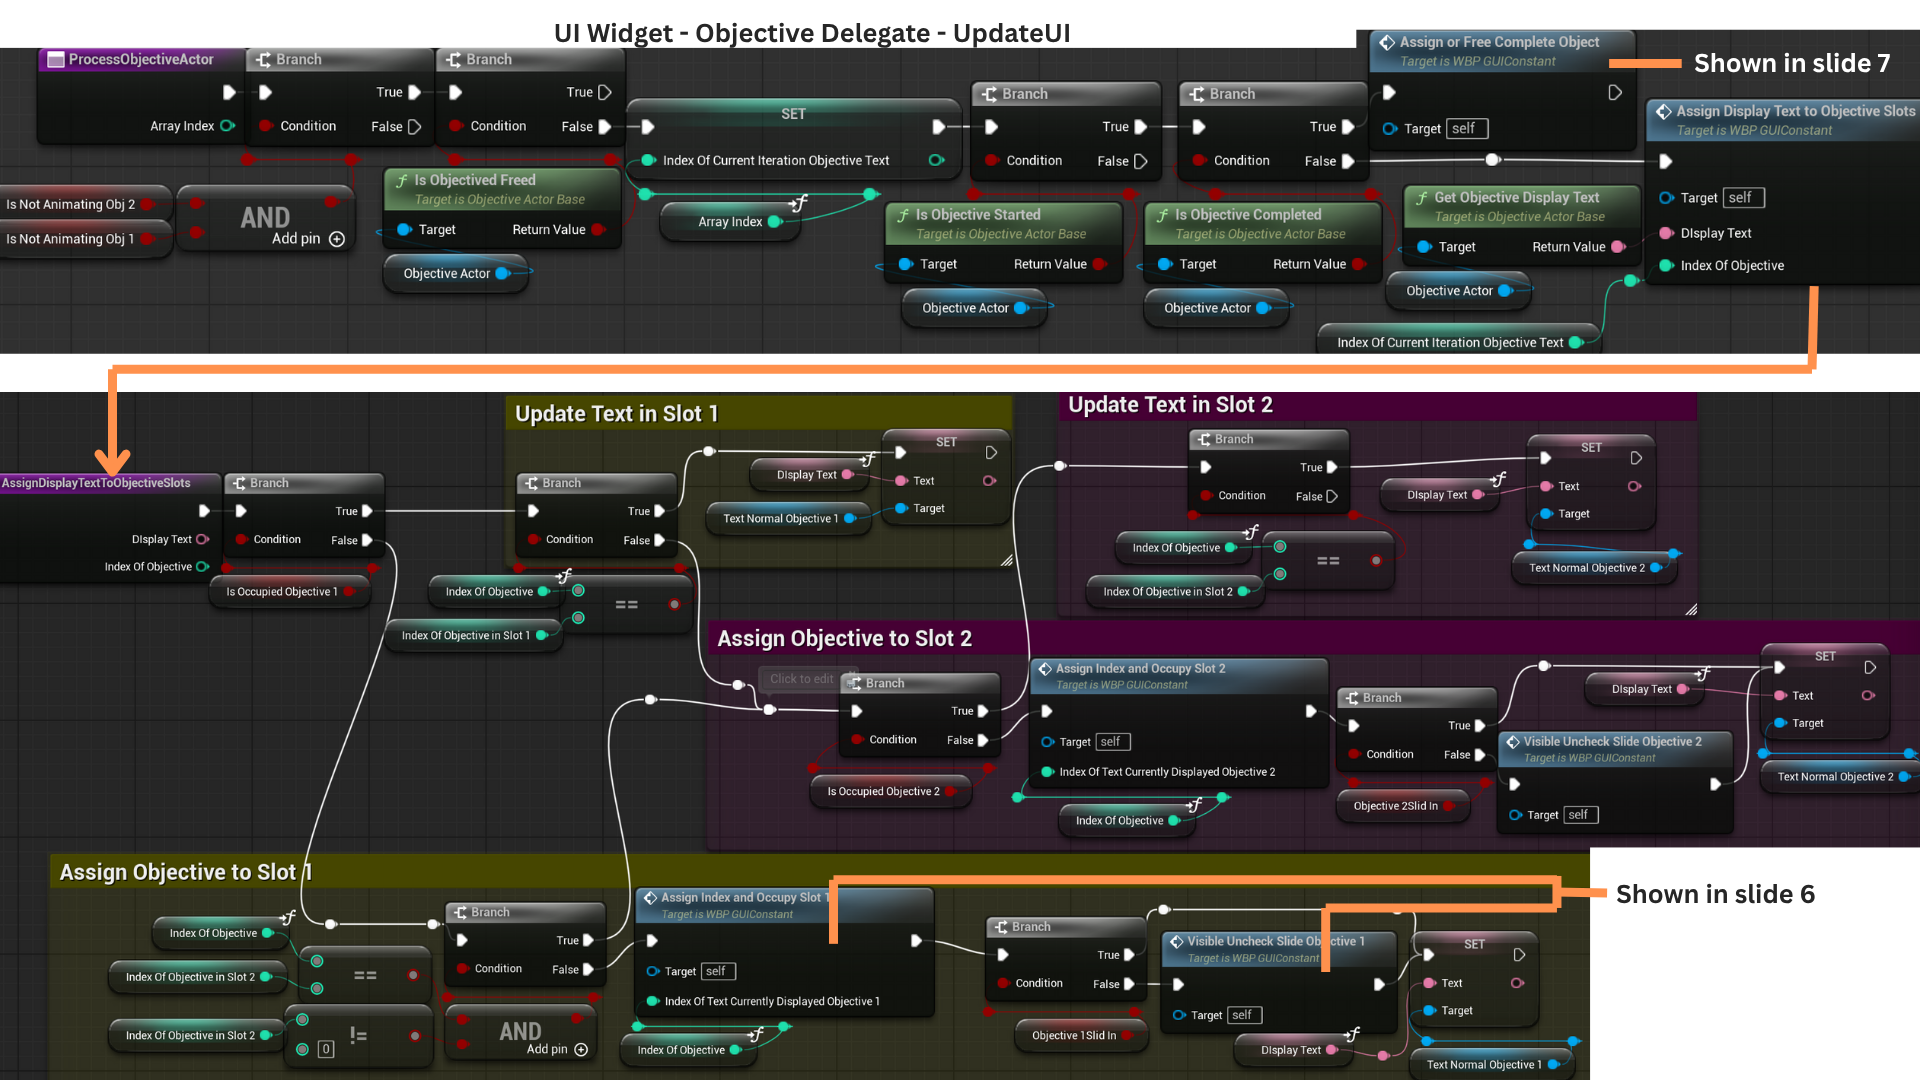
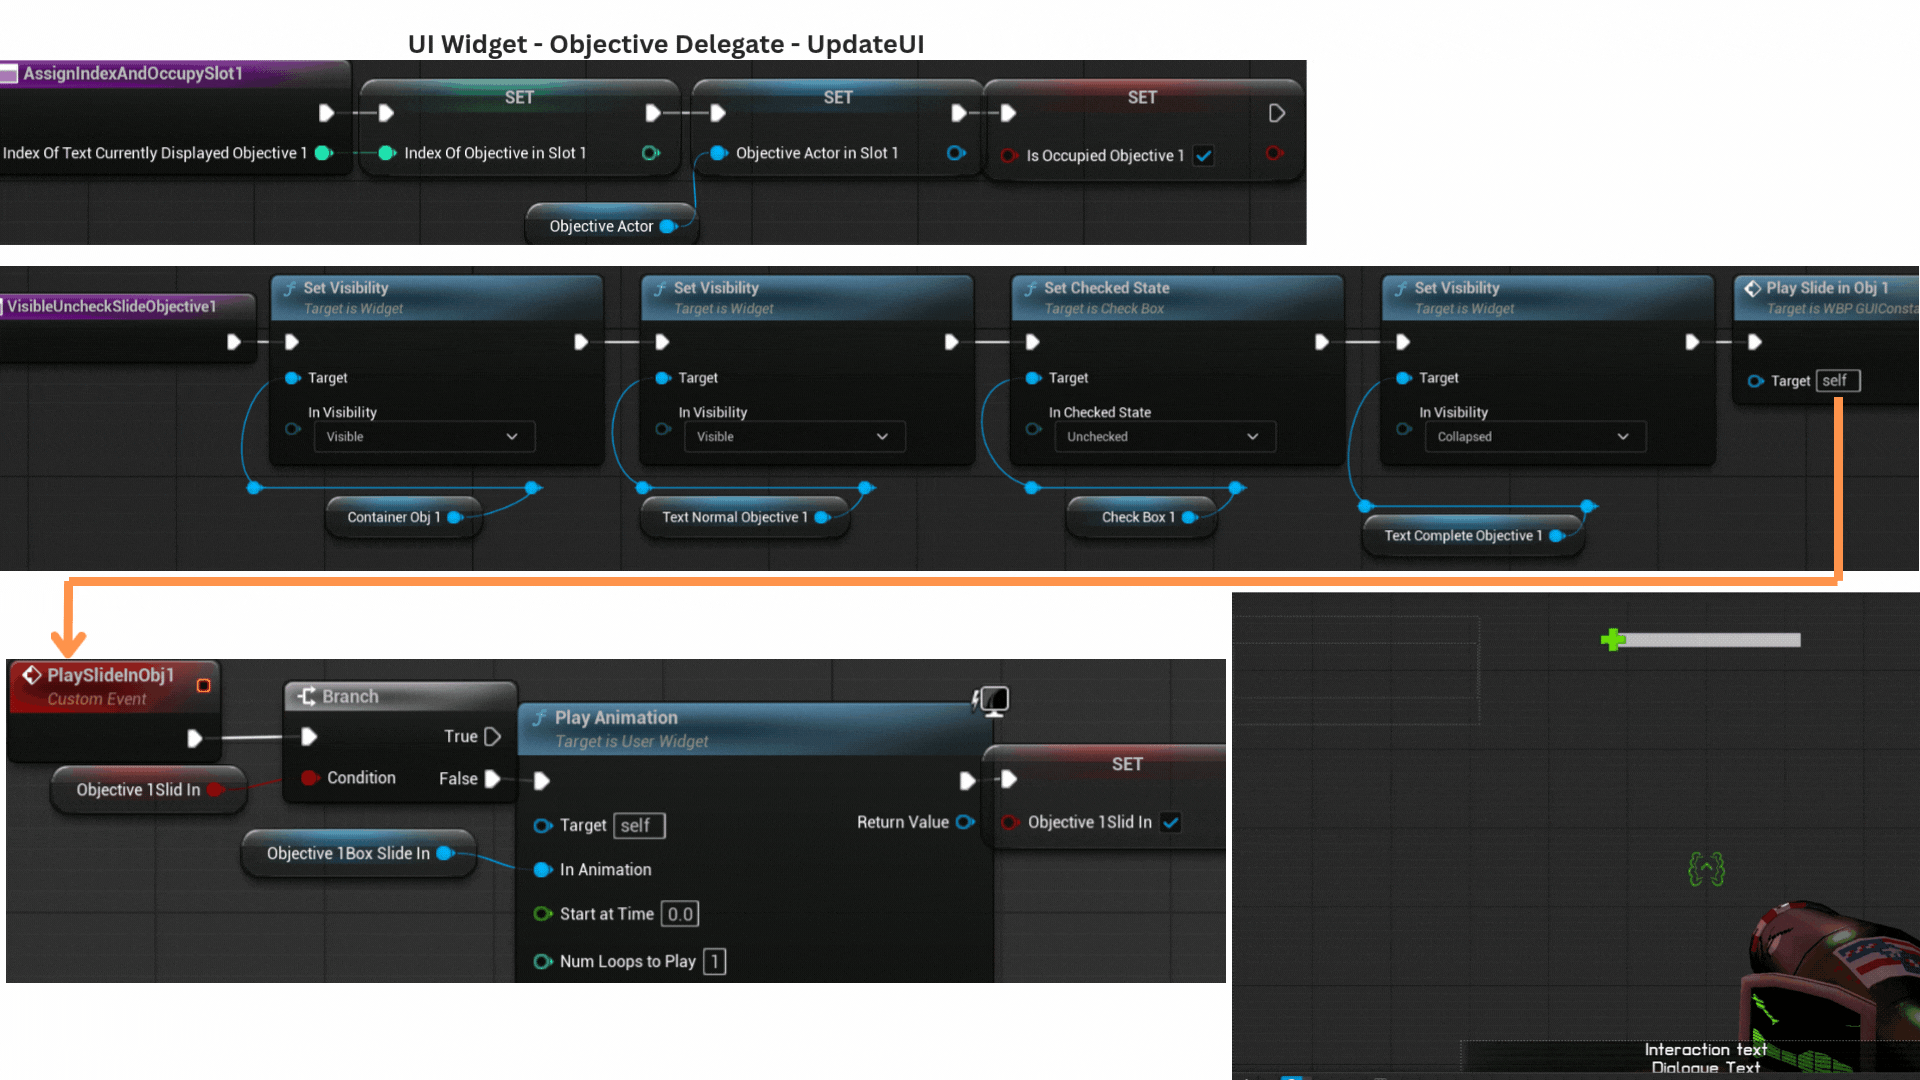
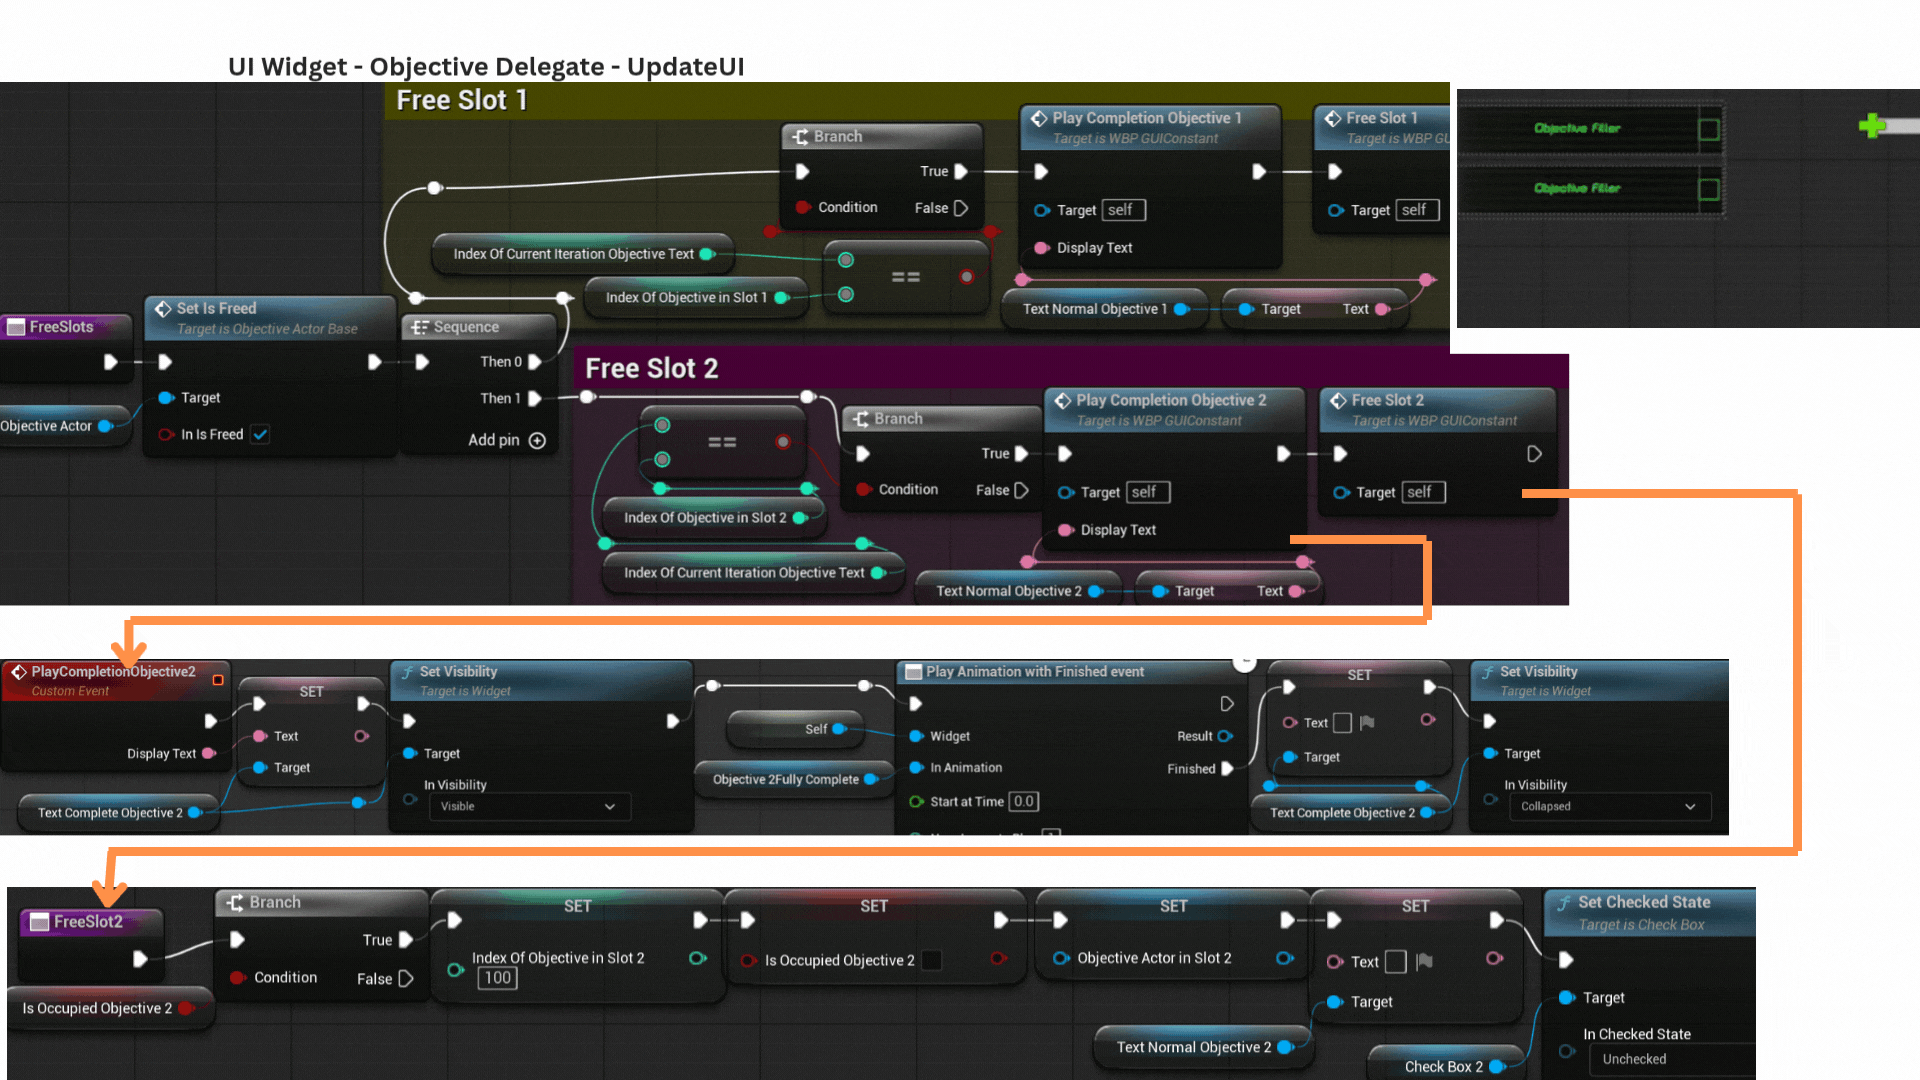
6. AssignIndexAndOccupySlot1 and Slot2 handle placing a new active objective into the first available slot.
They record the objective’s index, store its reference, and mark the slot as occupied.
The VisibleUncheckSlideInObjective functions configure the slot’s visibility state—showing the normal text, collapsing completion text, and ensuring the checkbox is unchecked.
PlaySlideInObj1 and Obj2 then animate the slot sliding in if it is not already visible.
7. AssignOrFreeCompleteObjective determines whether completion text should be applied.
If the completion text is visible and the completion map already marks the objective as completed (value of true), no update is needed.
If not, the entry is marked complete and the checkbox for the slot with the matching index is checked.
Completion text is only displayed if the second slot is free; otherwise, only the checkbox is updated.
8. Once an objective completes, a timer begins that eventually hides its completion text by setting IsCompletionTextVisible to false.
When the timer expires, FreeSlots marks the objective as freed and searches for the slot whose index matches the objective.
That slot’s TextNormalObjectiveText is transferred to TextCompleteObjectiveText to play a fade-out animation before the container is cleared.
9. UpdateUIShowingTime receives a reference to the ticking timer objective and compares it against the objectives occupying each slot.
Only the slot containing that specific objective updates its displayed time.
10. RemoveReversedObjectiveFromFreeSlot receives the reversed objective and updates the CompletedObjectiveMap entry to false.
If the reversal occurs before the objective was freed, each slot checks for a matching reference and clears it if found.
After reversing or completing cleanup, OnSingleObjectiveCompleteDelegate fires once IsCompletionTextVisible becomes true.
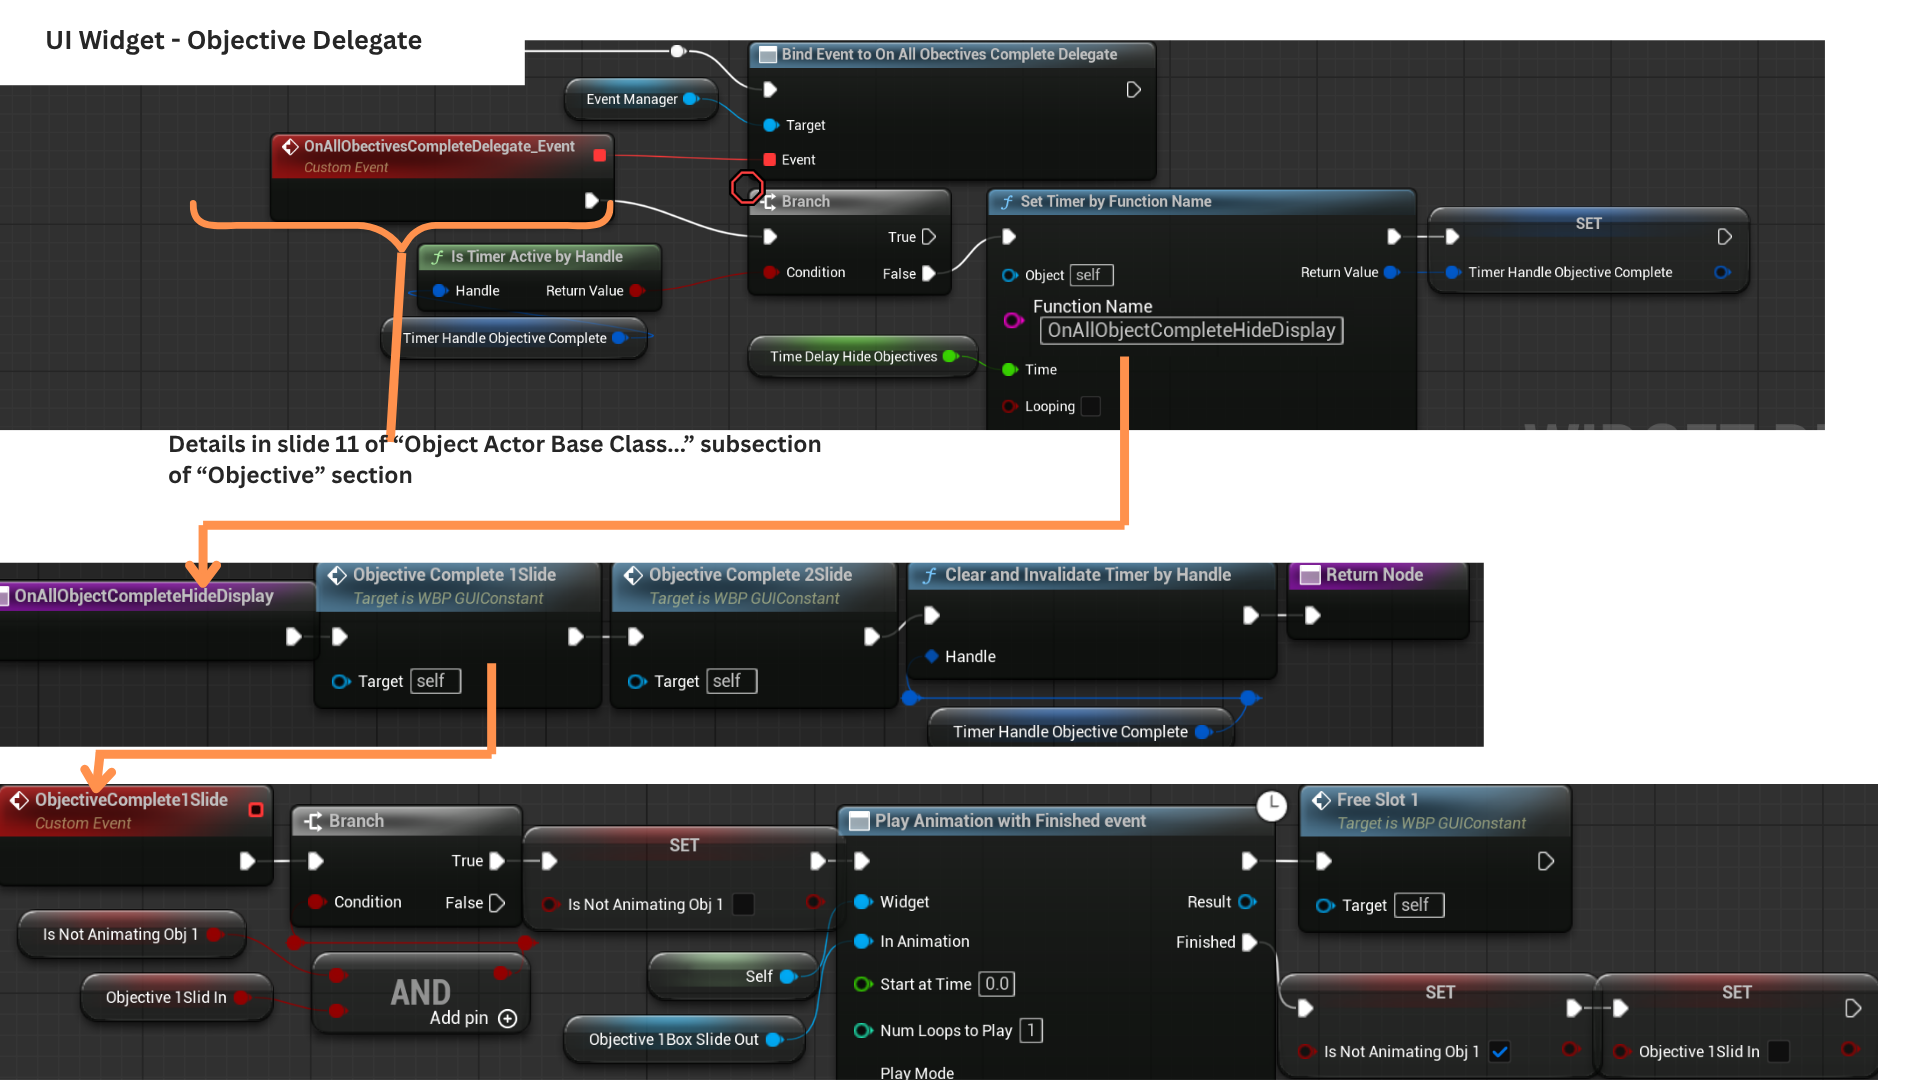
11. Once all encounter objectives finish, OnAllObjectivesComplete starts a timer that triggers OnAllObjectCompleteHideDisplay.
This plays the slide-out animation for both objective slots, clearing the UI for the next encounter.
Tech
Event Bus
Game State Event Manager and Binding Component
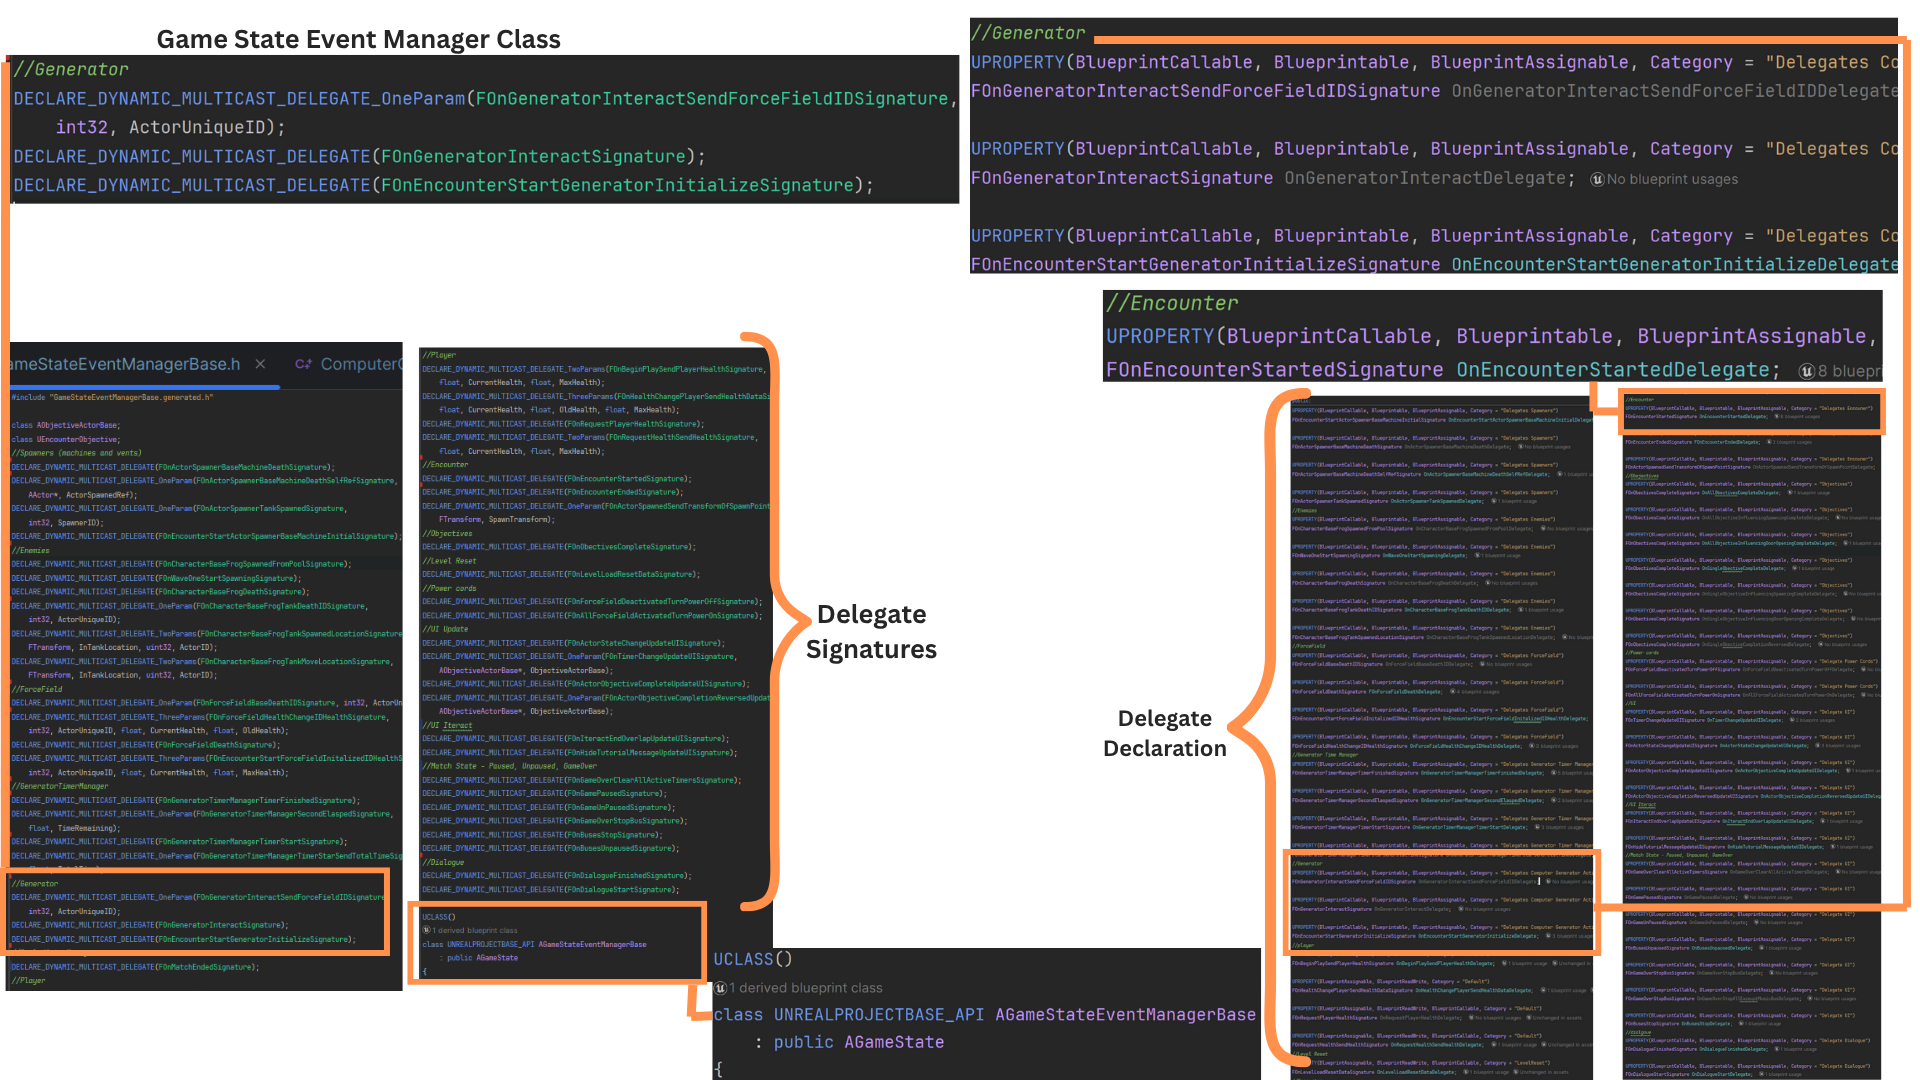

1. The GameStateEventManager inherits from AGameState and primarily serves as the central mediator for the event-bus system.
It defines nearly all delegate signatures used across the game, making it the ideal place for binding because it’s created early in the game's lifecycle.
By routing events through this class, actors never need direct references to each other, eliminating race-condition risks and simplifying communication.
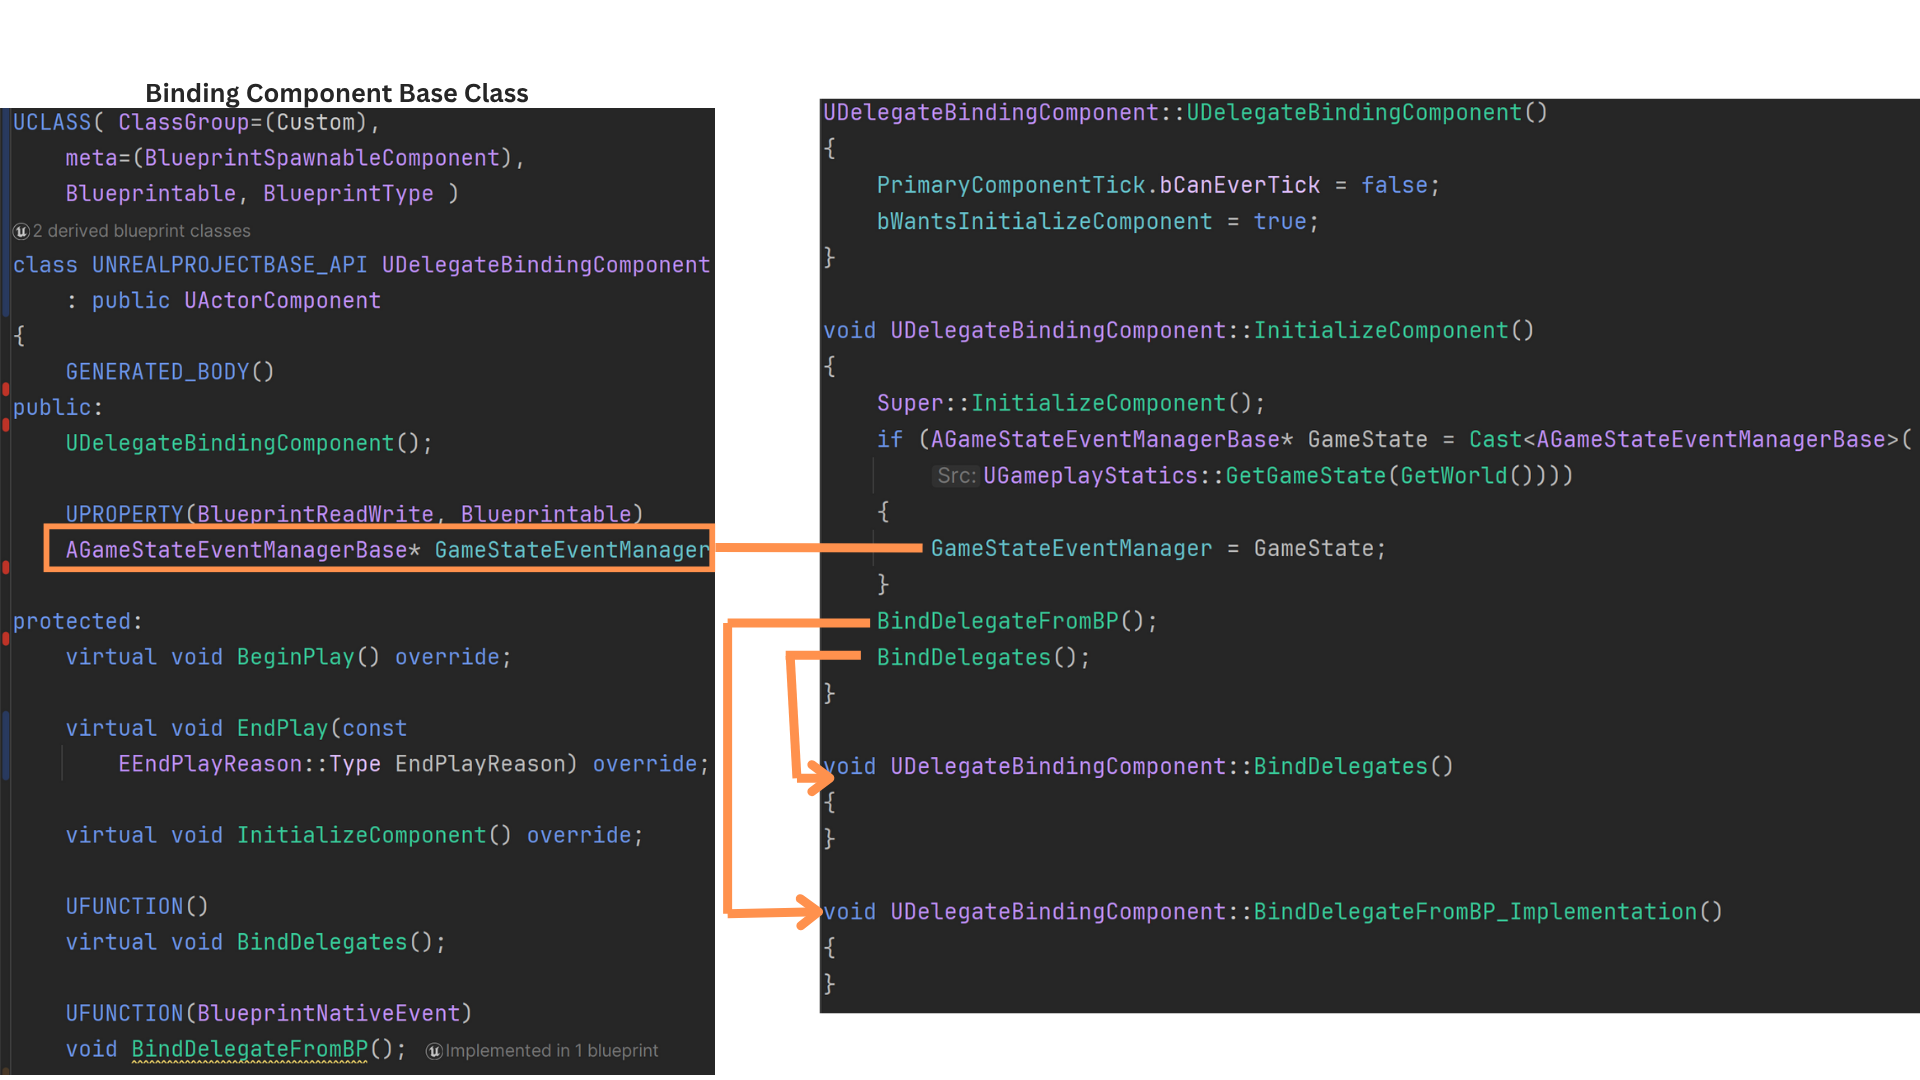
2. Because InitializeComponent runs before BeginPlay, it provides an early and reliable point for setting up bindings.
The base DelegateBindingComponent enables this by setting bWantsInitializeComponent to true.
During initialization, the component stores a pointer to the GameStateEventManager and calls BindDelegatesFromBP (for designers) and BindDelegates (for C++ bindings).
The C++ BindDelegates function is where most setup occurs in gameplay classes.
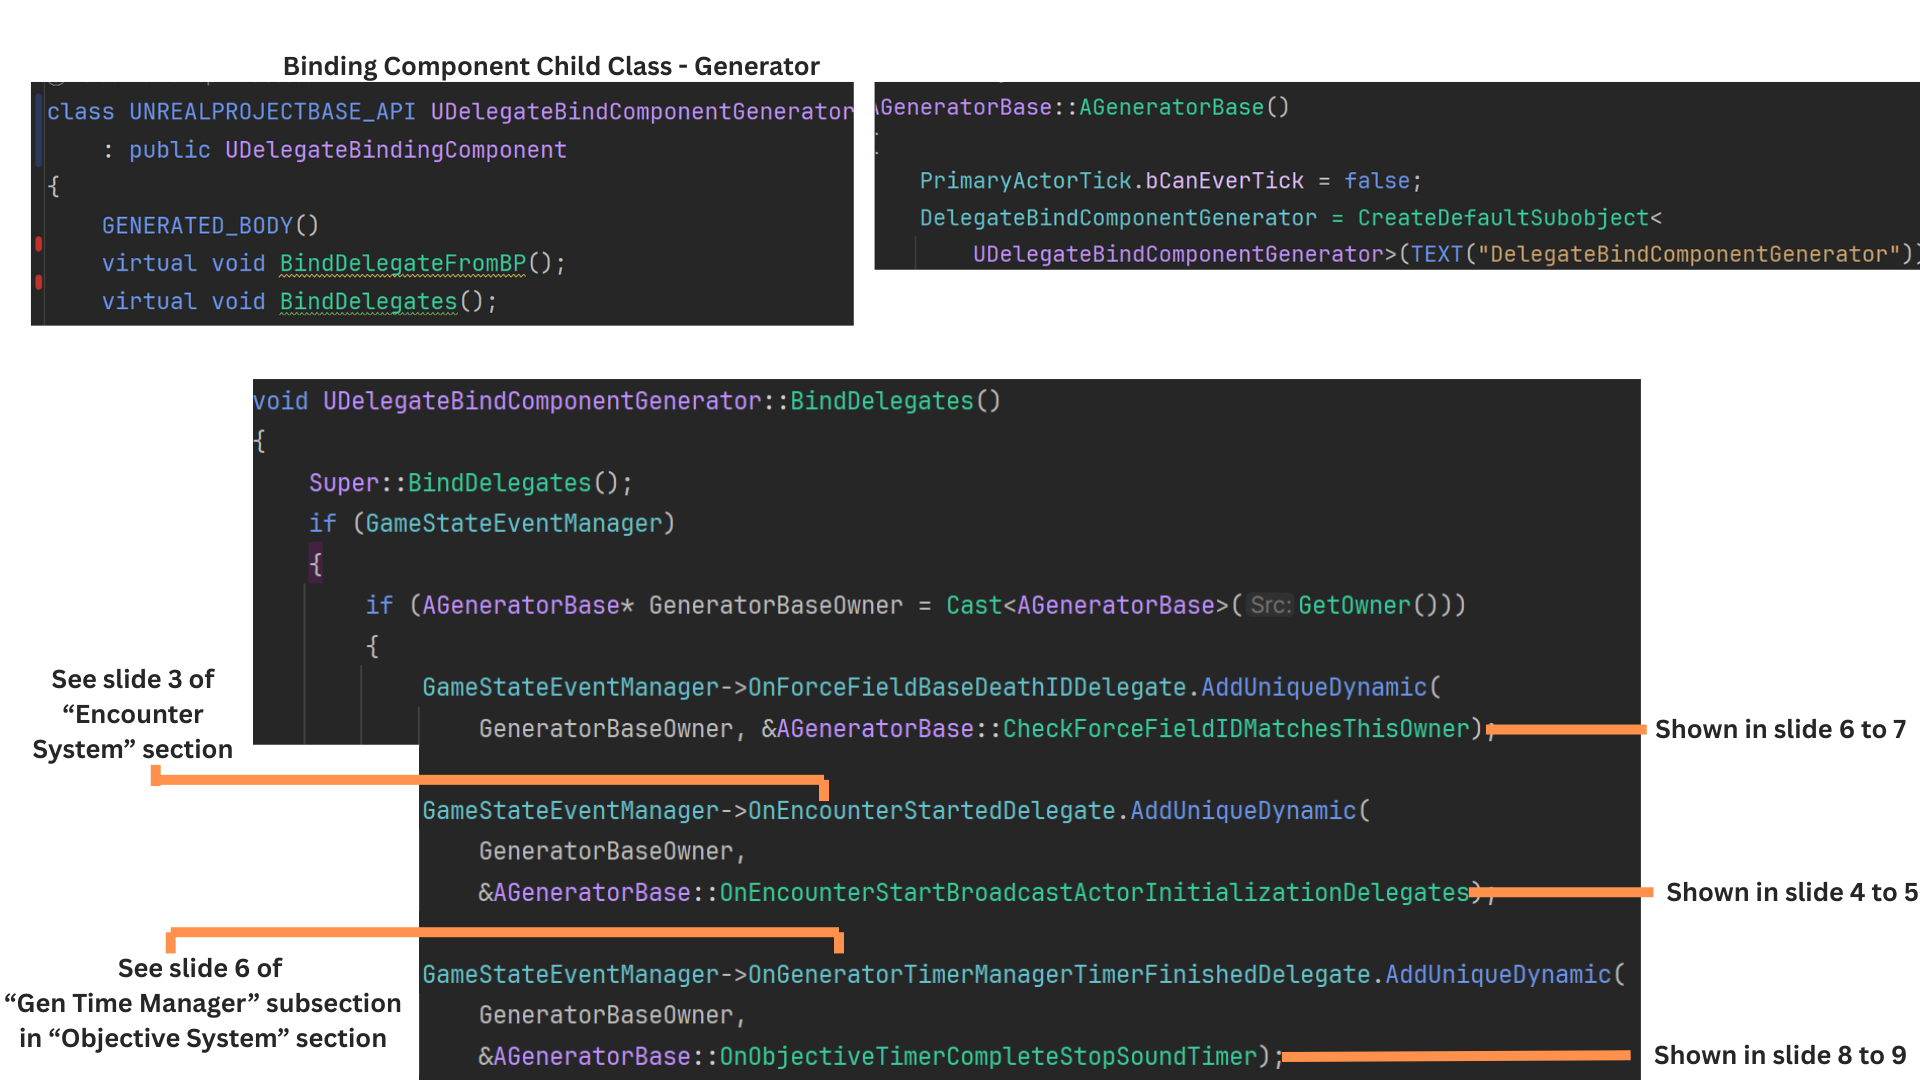
3. Actors that need event binding have their own specialized binding component, derived from DelegateBindingComponent.
Each component overrides BindDelegates, retrieves the owning actor, and binds the relevant actor functions to the appropriate delegate(s).
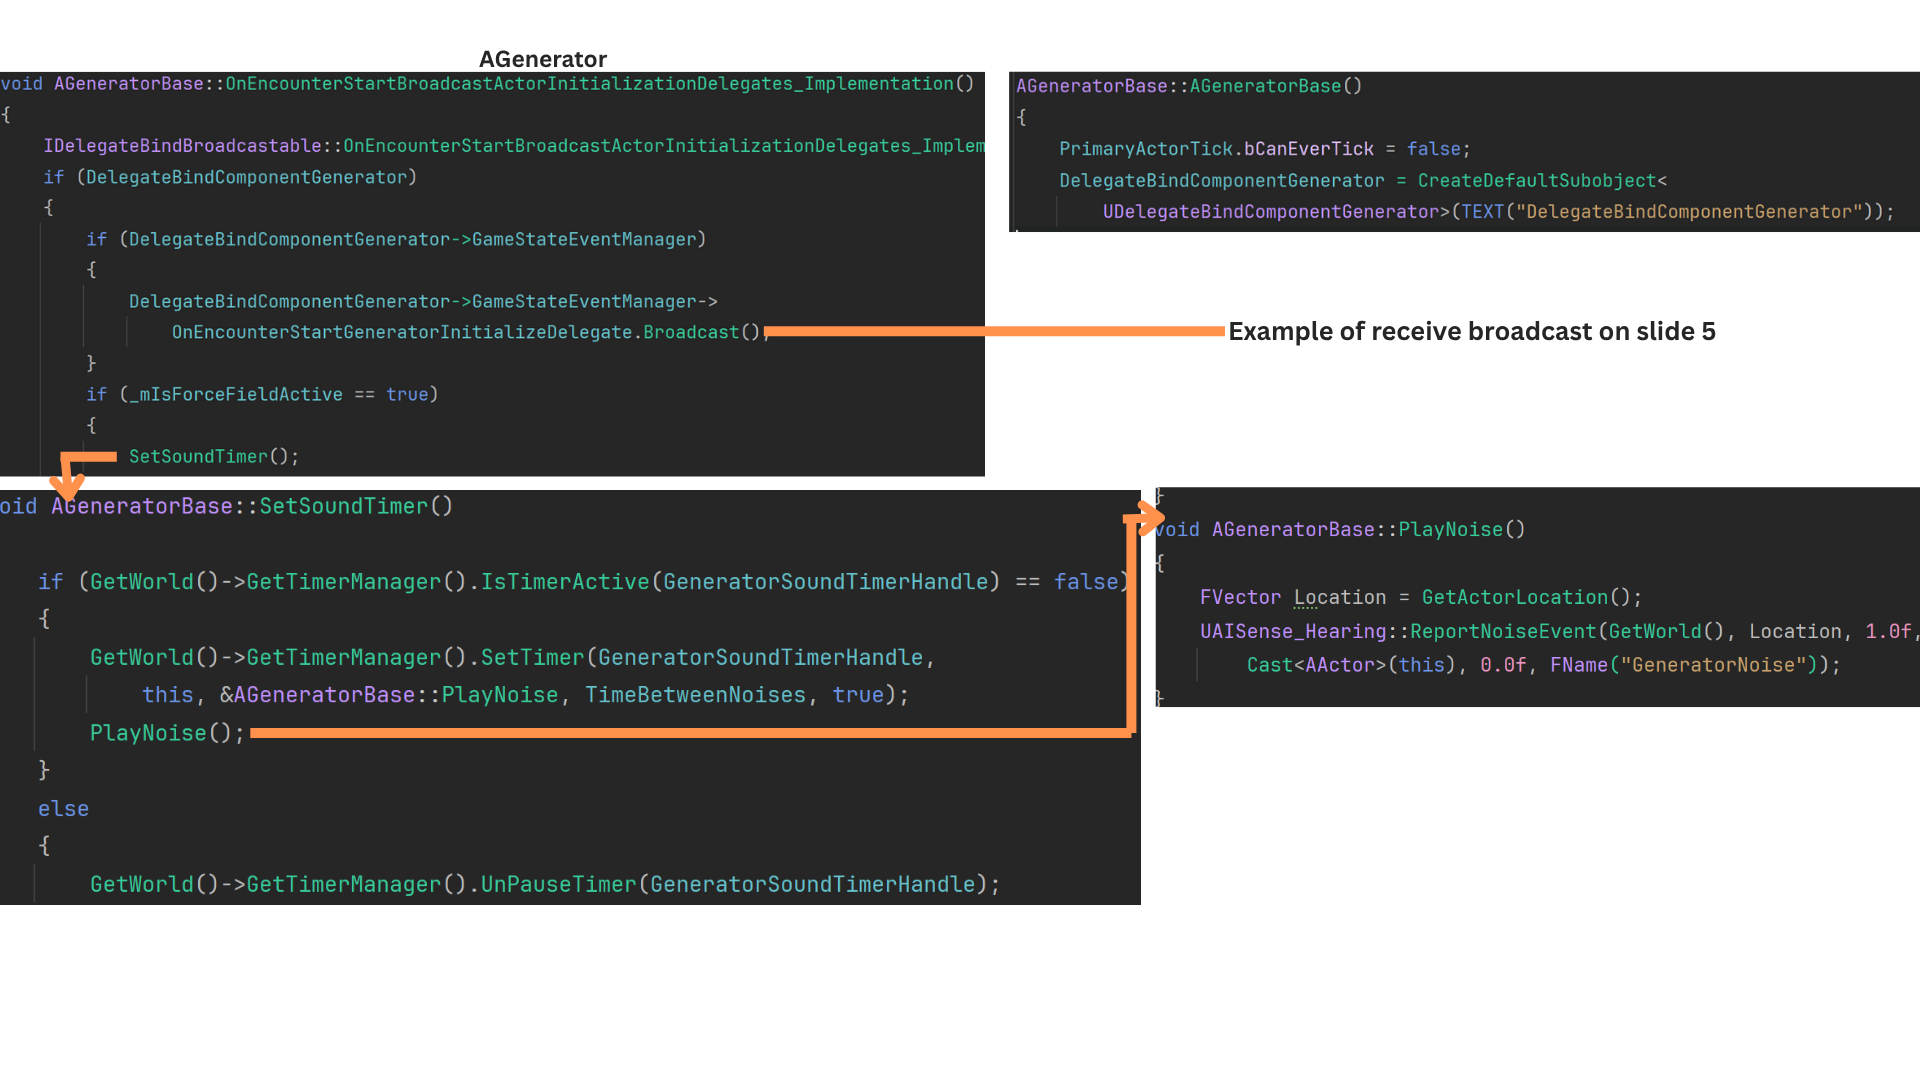
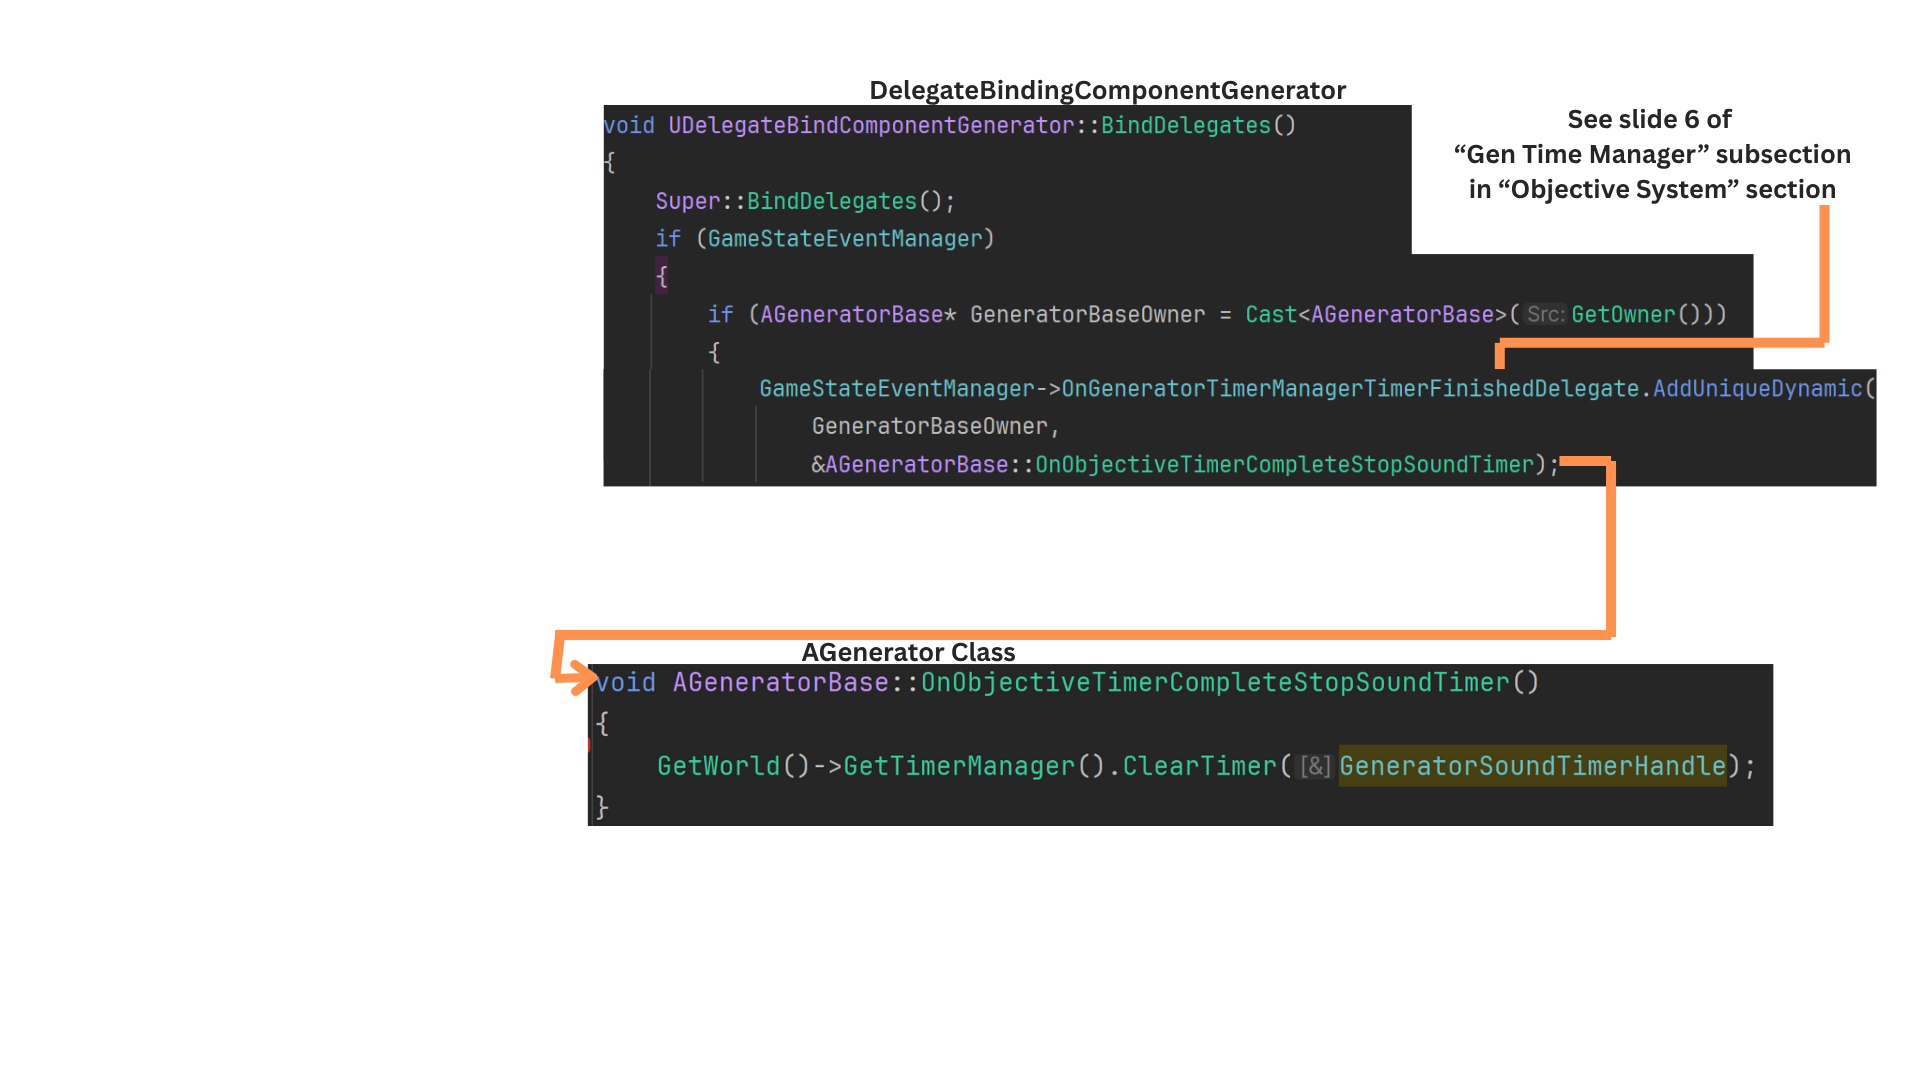
4. AGeneratorBase includes a DelegateBindComponentGenerator that handles both binding and broadcasting.
When an encounter begins, the generator uses this component to broadcast that it is now active and safe to reference.
It also starts a looping noise-timer via SetSoundTimer, which calls PlayNoise every cycle. These noise events are picked up by AI and cause them to enter an Investigate state.
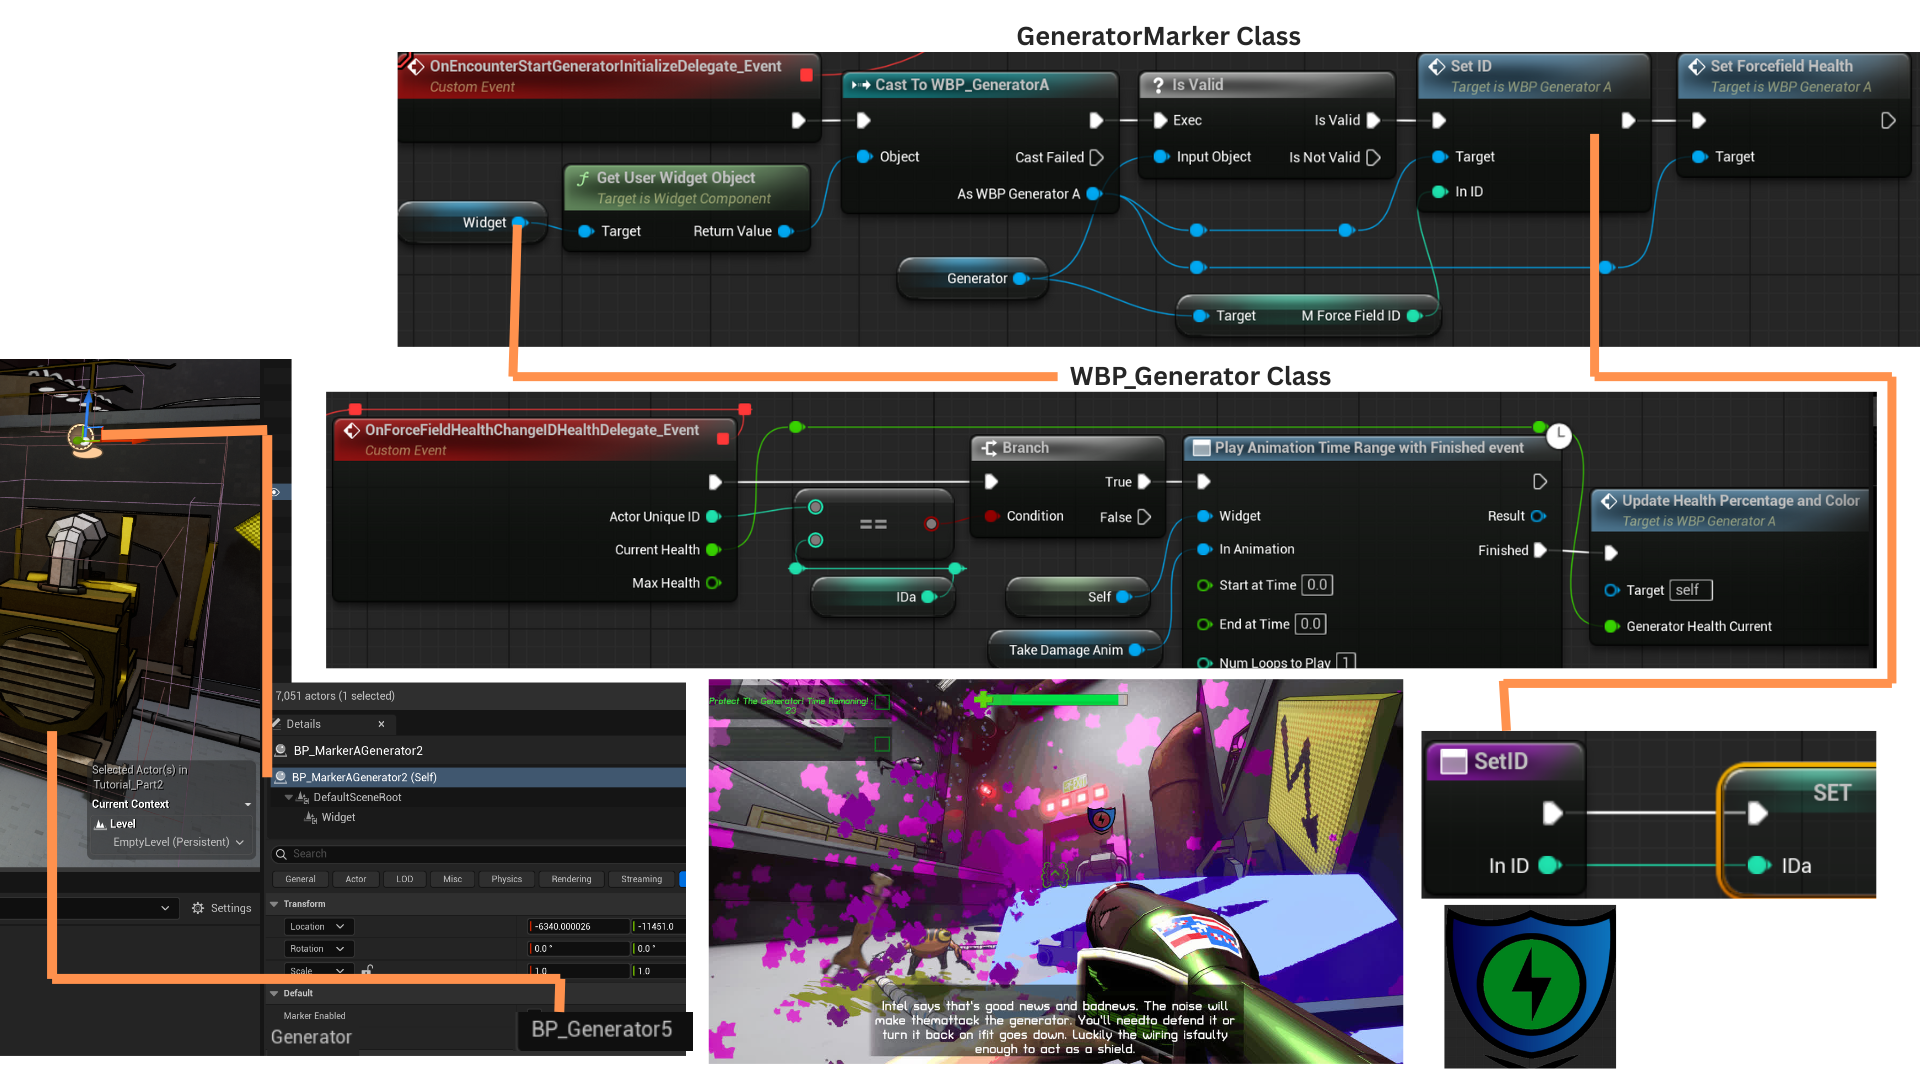
5. Each Generator has a UI marker that displays the health of its associated ForceField. Because multiple generators may exist, the widget tracks the ForceField using its UniqueID.
When health changes are broadcast, the widget updates only if the broadcast ID matches its stored ID.
The Generator spawns its ForceField and records the ID at BeginPlay. The marker assigns the ID when the encounter begins.
When the ForceField takes damage, it sends its ID so only the correct UI marker updates.
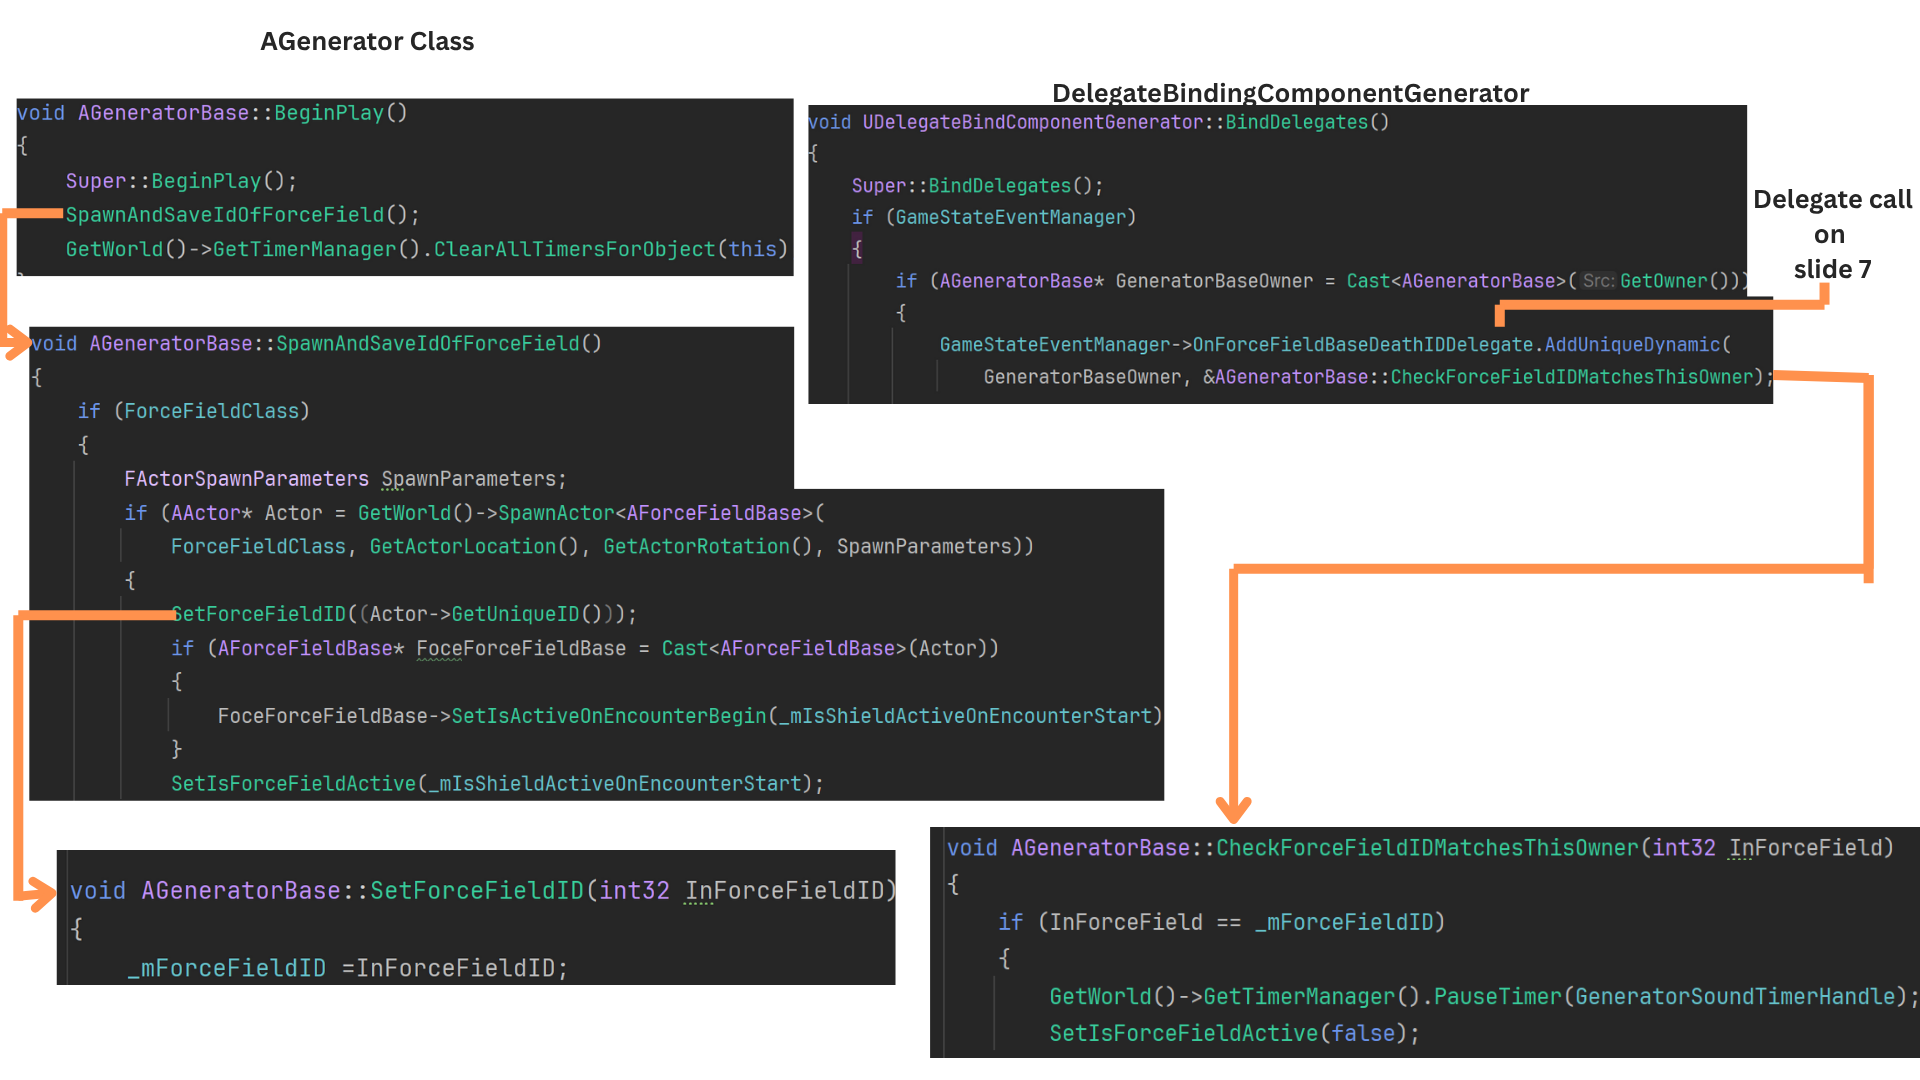
6. At BeginPlay, the Generator spawns its ForceField and records its UniqueID.
When the ForceField's health reaches zero, it broadcasts OnForceFieldBaseDeathIDDelegate with that ID.
The Generator’s binding component listens for this event, verifies the ID, deactivates the ForceField, and stops the noise-timer that attracts AI.
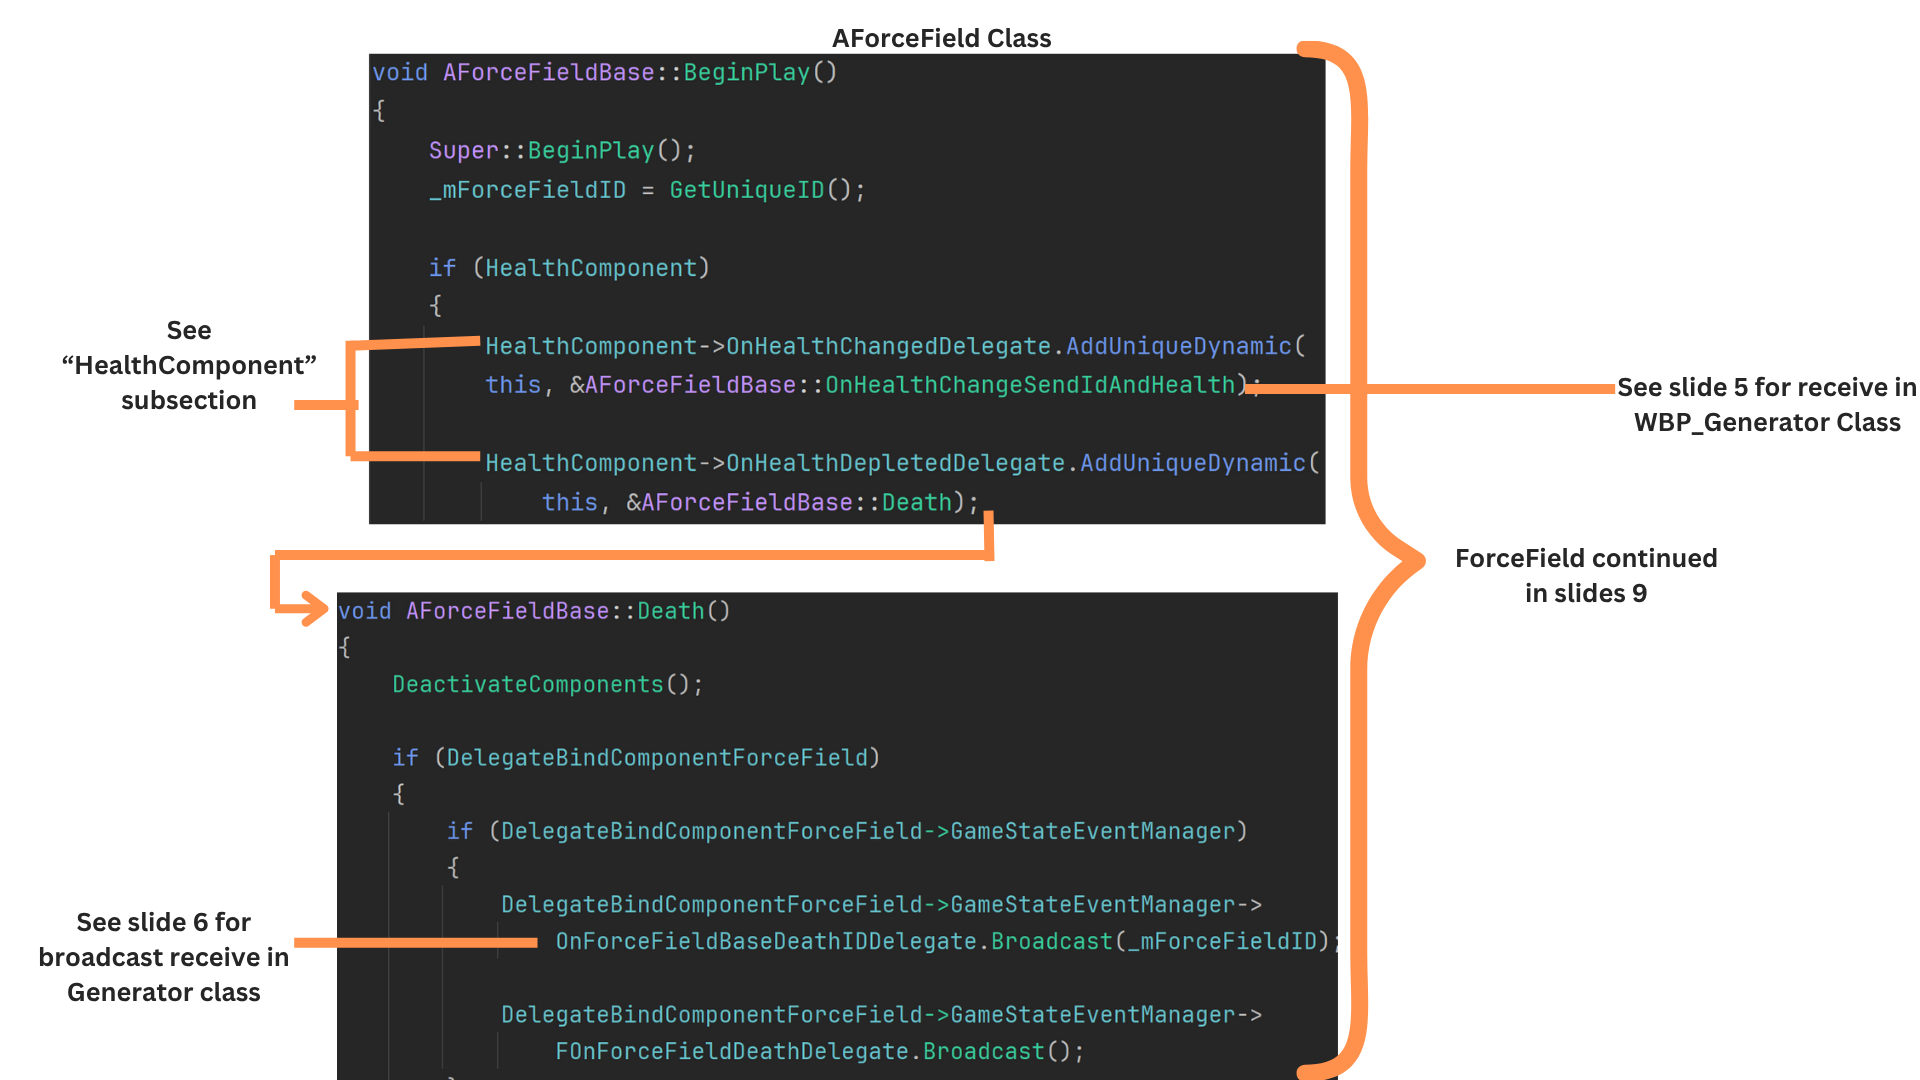
7. Any actor with a HealthComponent can receive broadcasts when health changes or reaches zero. These actors can forward that information through the GameStateEventManager.
ForceFieldBase also uses this pattern: when its HealthComponent fires OnHealthDepletedDelegate, it triggers its Death function and broadcasts OnForceFieldBaseDeathIDDelegate through its binding component.
8. The Generator’s binding component also listens for completion of the defend-generator timer.
When OnGeneratorTimeManagerFinishedDelegate fires, it calls OnObjectiveTimerCompleteStopSoundTimer, stopping the looping noise-timer that AI use to detect the generator.
9. Actors with occasional broadcasts may call the GameStateEventManager directly, but those that must bind before BeginPlay or broadcast often are given specialized binding components.
Health Component
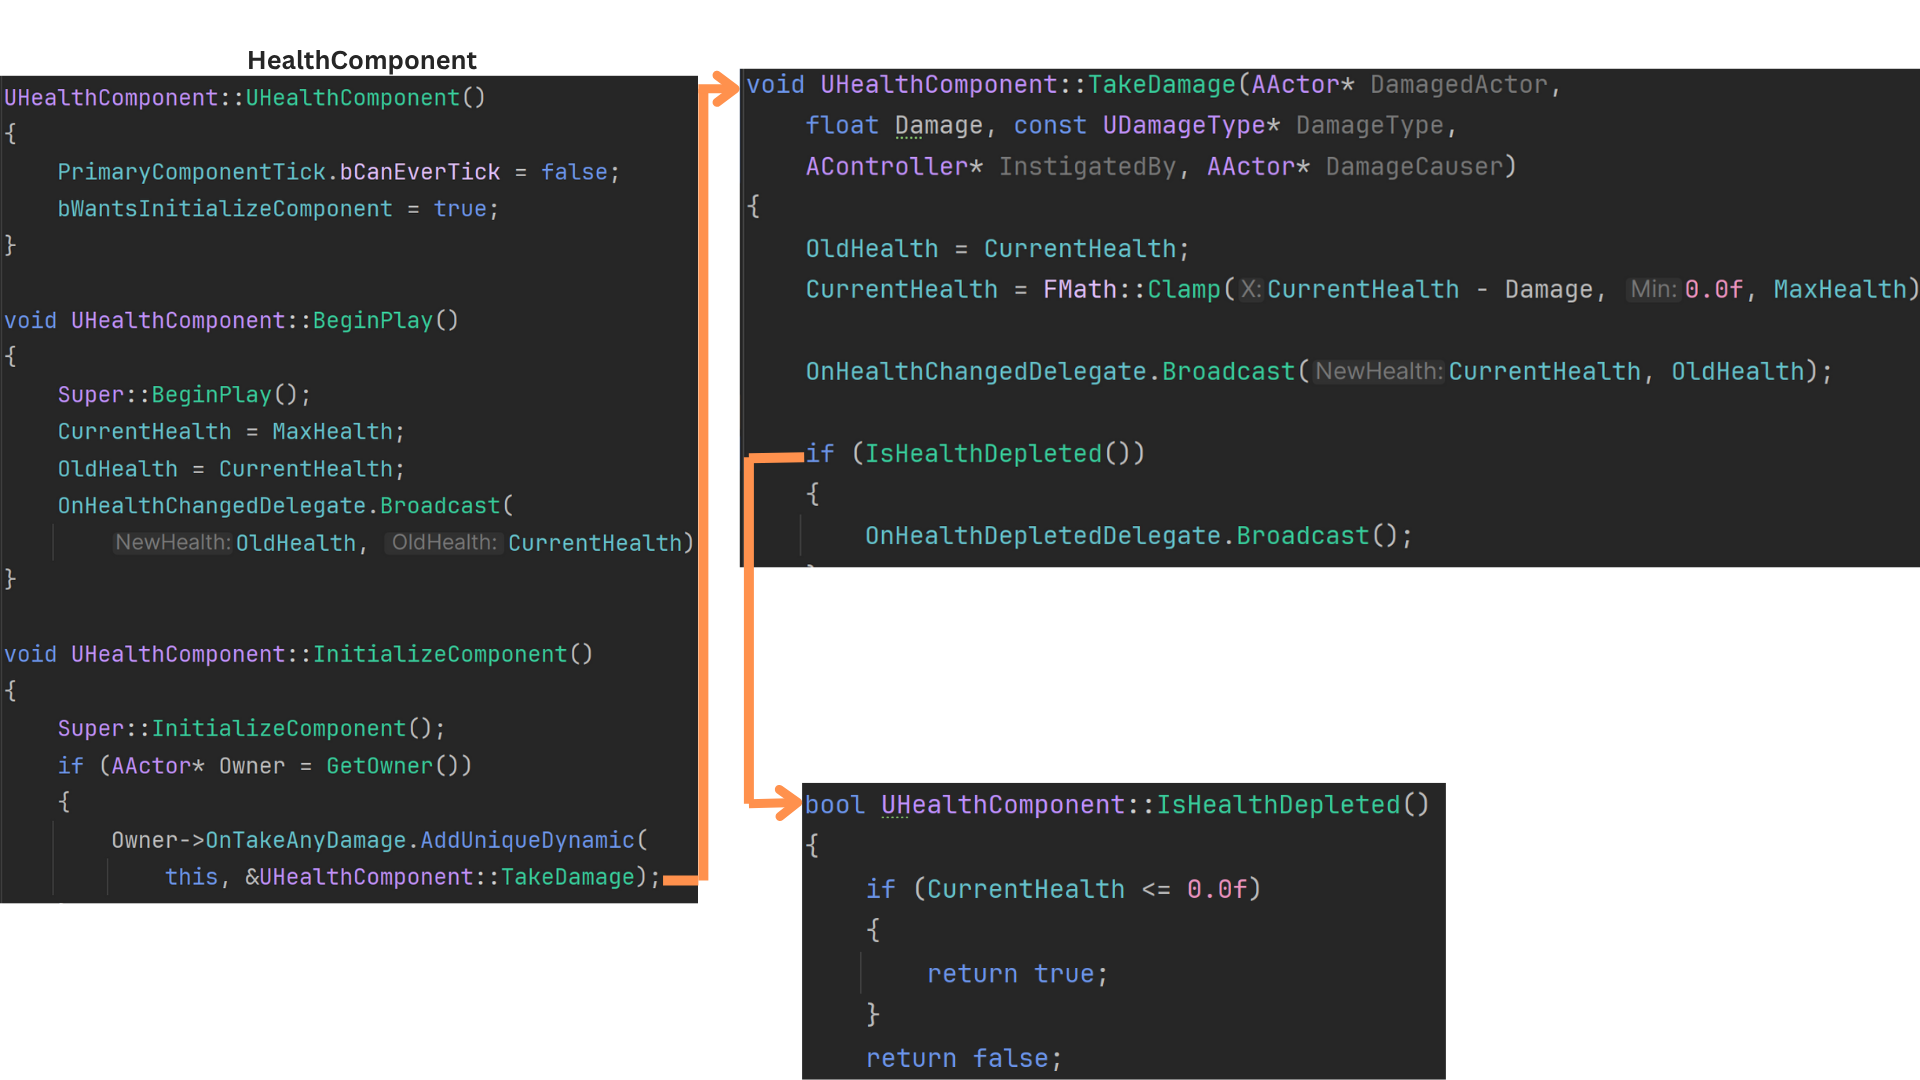
1. The HealthComponent manages all health-related functionality for an actor, including tracking health, applying damage, handling healing, and broadcasting both incremental health updates and full depletion.
During InitializeComponent, the component binds its TakeDamage function to the owning actor’s OnTakeDamage event.
TakeDamage updates CurrentHealth while saving OldHealth, then broadcasts both values.
If health reaches zero or below, the HealthComponent fires OnHealthDepletedDelegate.
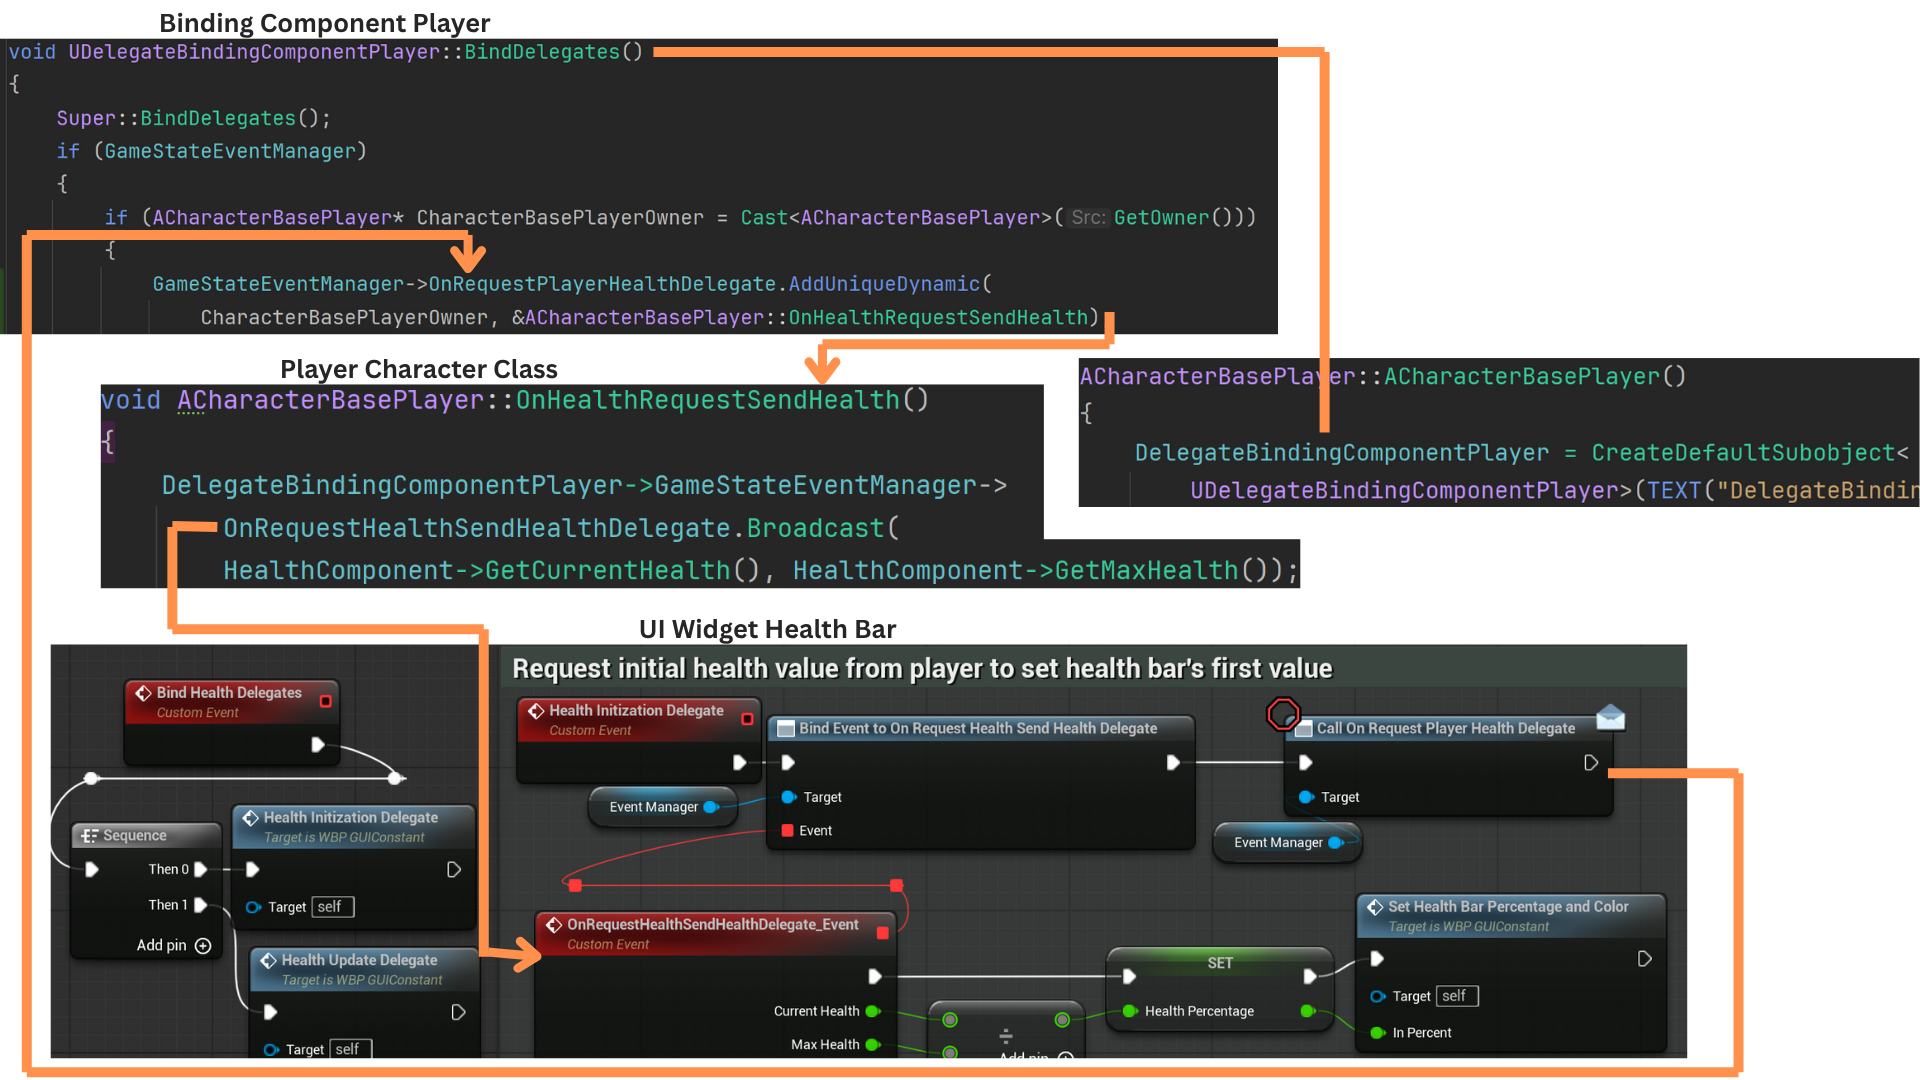
2. Only the owning actor binds directly to its HealthComponent’s delegates to avoid unnecessary coupling.
Other systems listen through that actor’s binding component, which forwards health-related broadcasts.
Because the UI needs initial health values before any damage occurs, the health widget binds to OnRequestHealthSendHealthDelegate, then immediately fires OnRequestPlayerHealthDelegate.
The player’s binding component—already initialized—receives this, calls OnHealthRequestSendHealth, and rebroadcasts the current and max health through OnRequestHealthSendHealthDelegate.
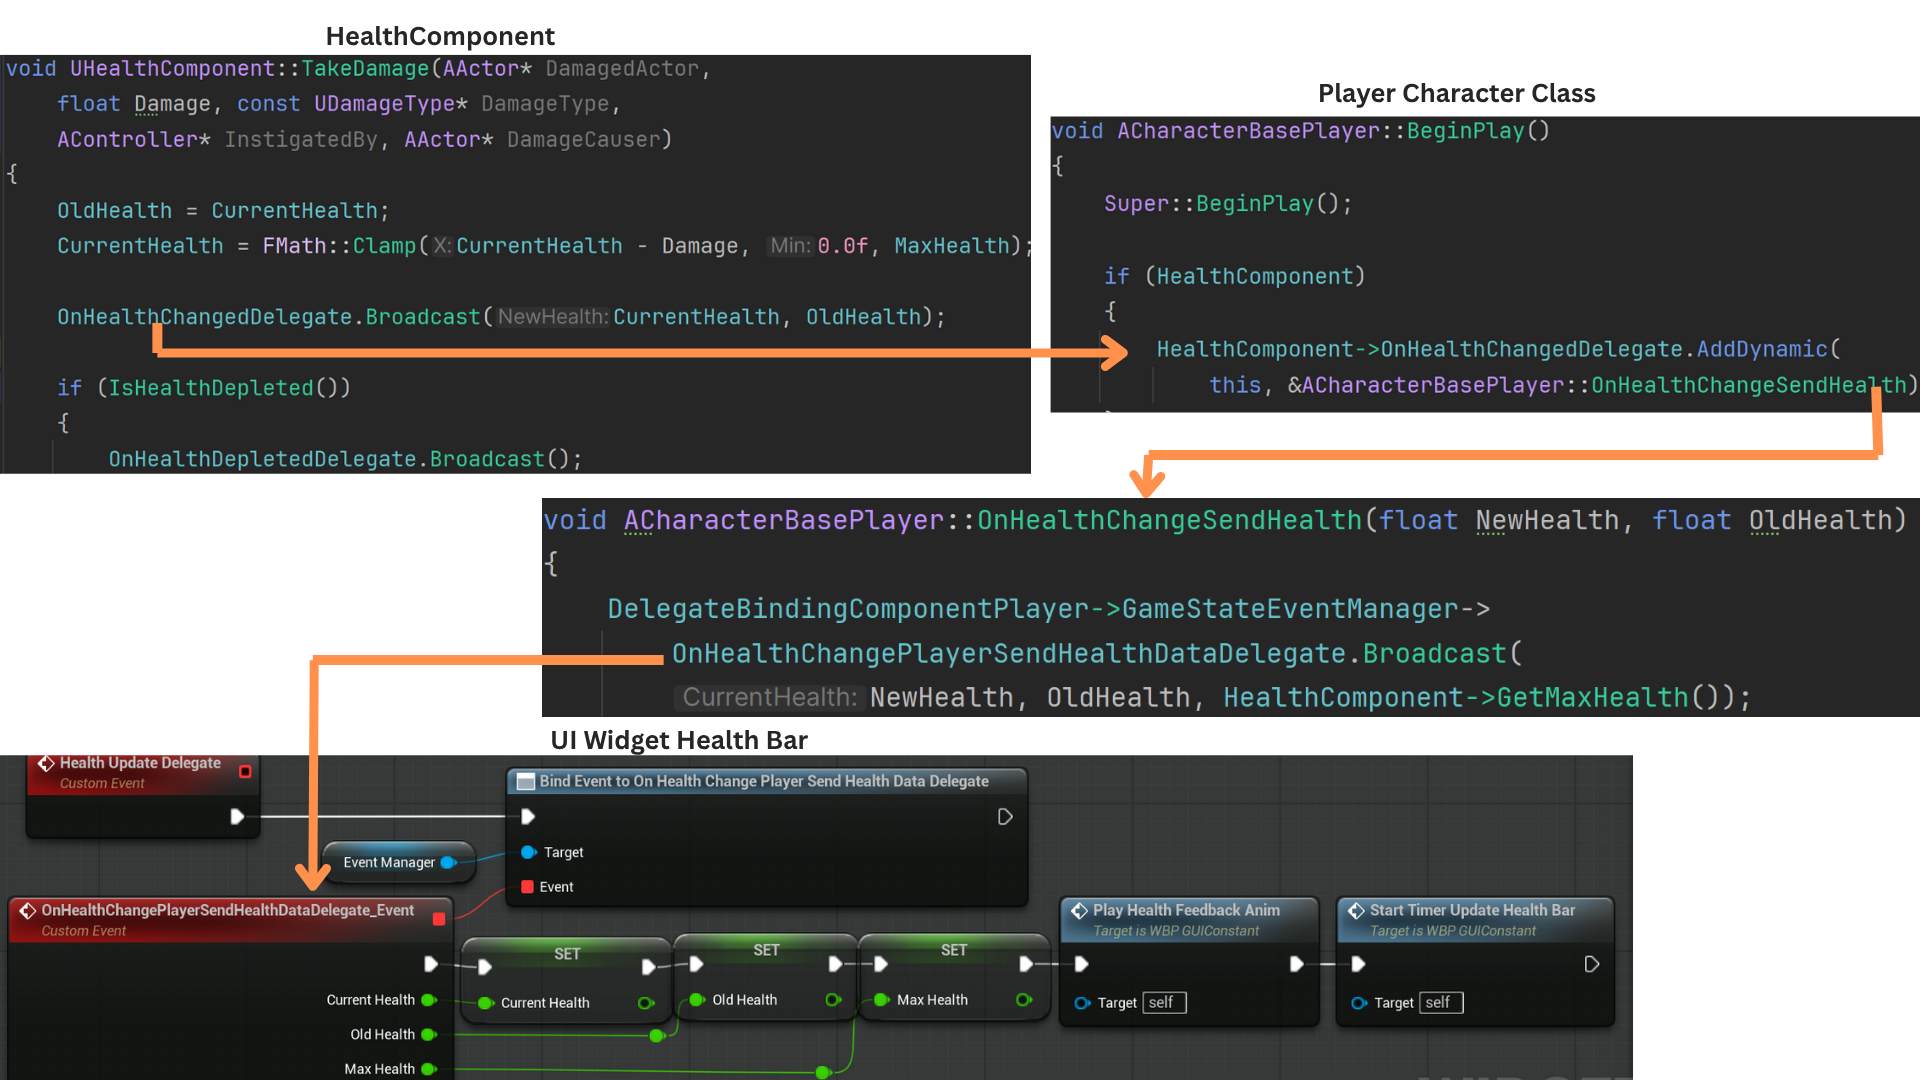
3. The player binds OnHealthChangeSendHealth to the HealthComponent’s OnHealthChangeDelegate. When TakeDamage is triggered, the player forwards the update through OnHealthChangePlayerSendHealthDataDelegate.
The UI listens for this broadcast and updates the health bar accordingly.
4. Two interfaces determine which actors can damage which team. Player attacks look for IPlayerDamagable, while frog attacks check for IEnemyDamagable.
All frog characters implement IPlayerDamagable, and both ACharacterBasePlayer and AForceField implement IEnemyDamagable.
5. The ForceField binds to its HealthComponent’s OnHealthChangeDelegate and OnHealthDepletedDelegate. When triggered, it forwards these events through the GameStateEventManager.
OnHealthChangeSendIDAndHealth broadcasts the ForceField’s UniqueID along with its updated health via OnForceFieldHealthChangeIDHealthDelegate.
The generator widget listens for this and updates only when the broadcast ID matches its own stored ID.
Game Events - Power Cords
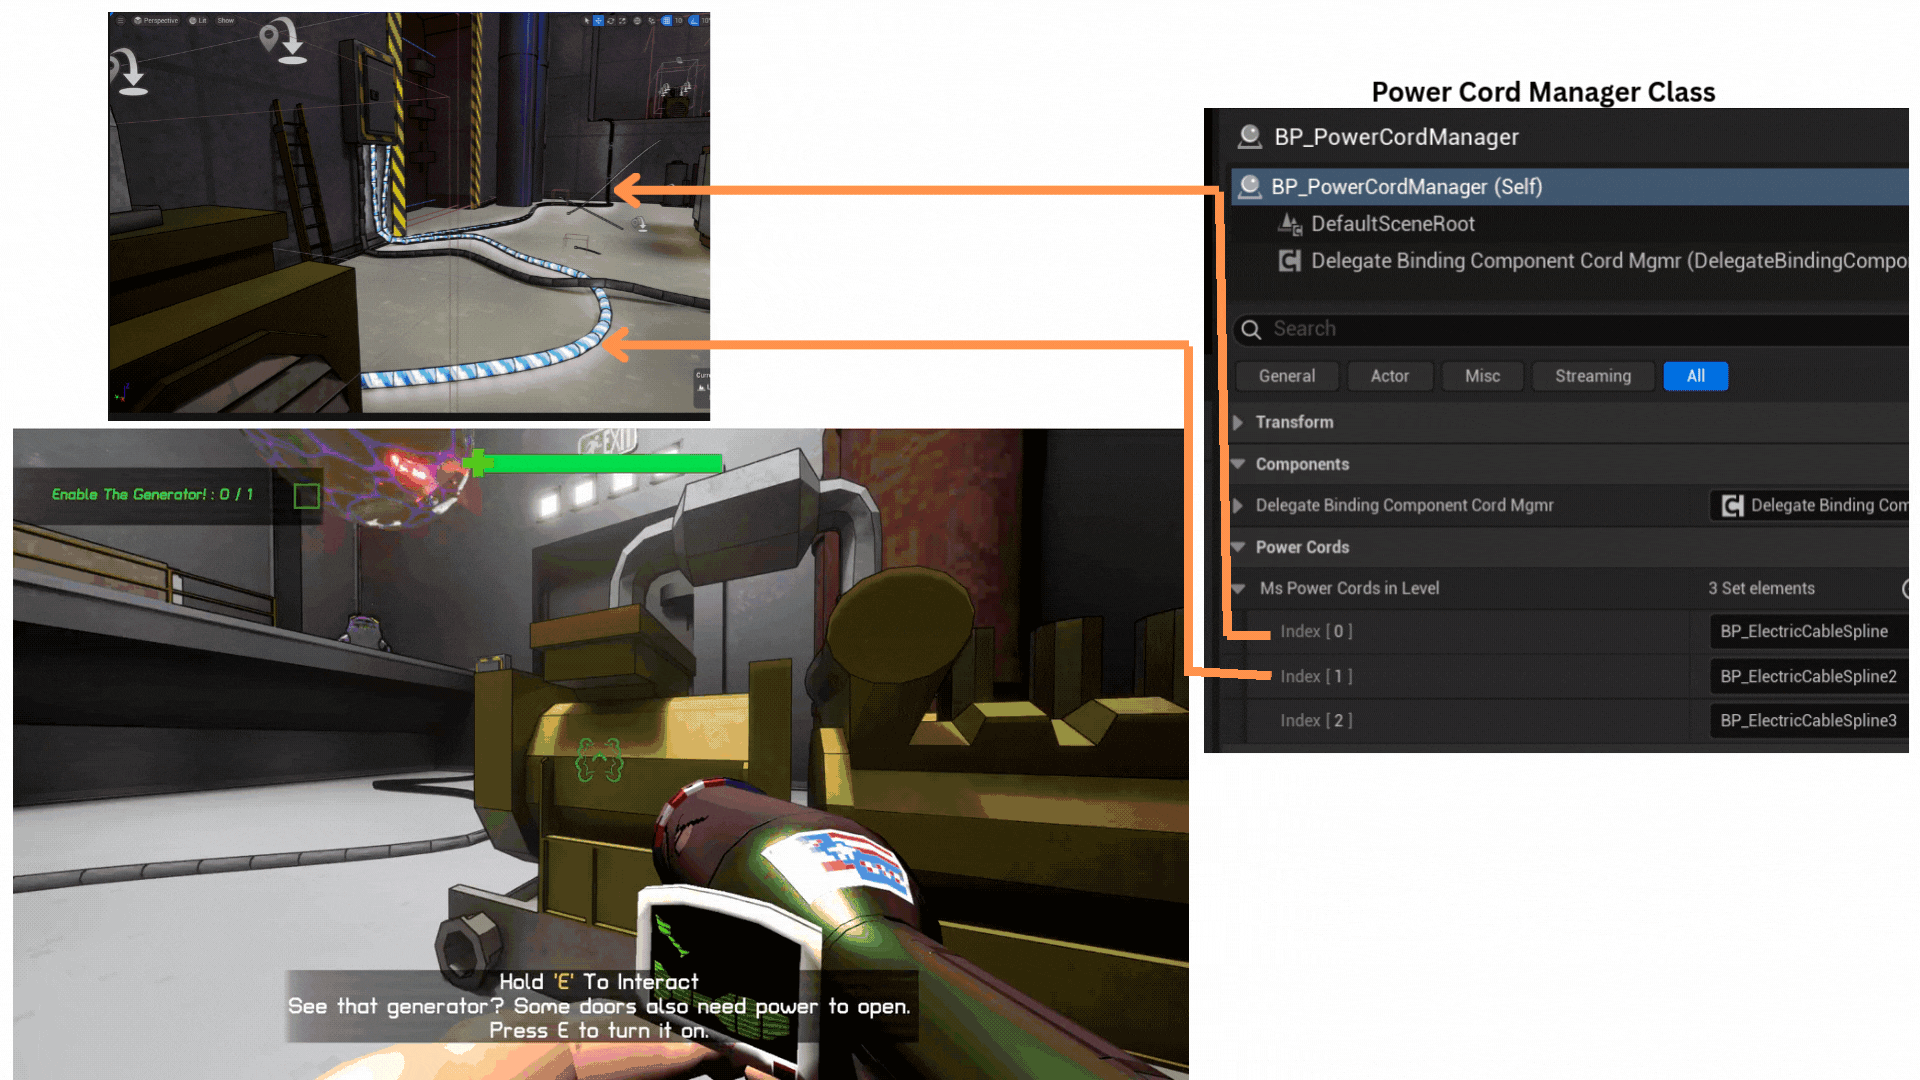
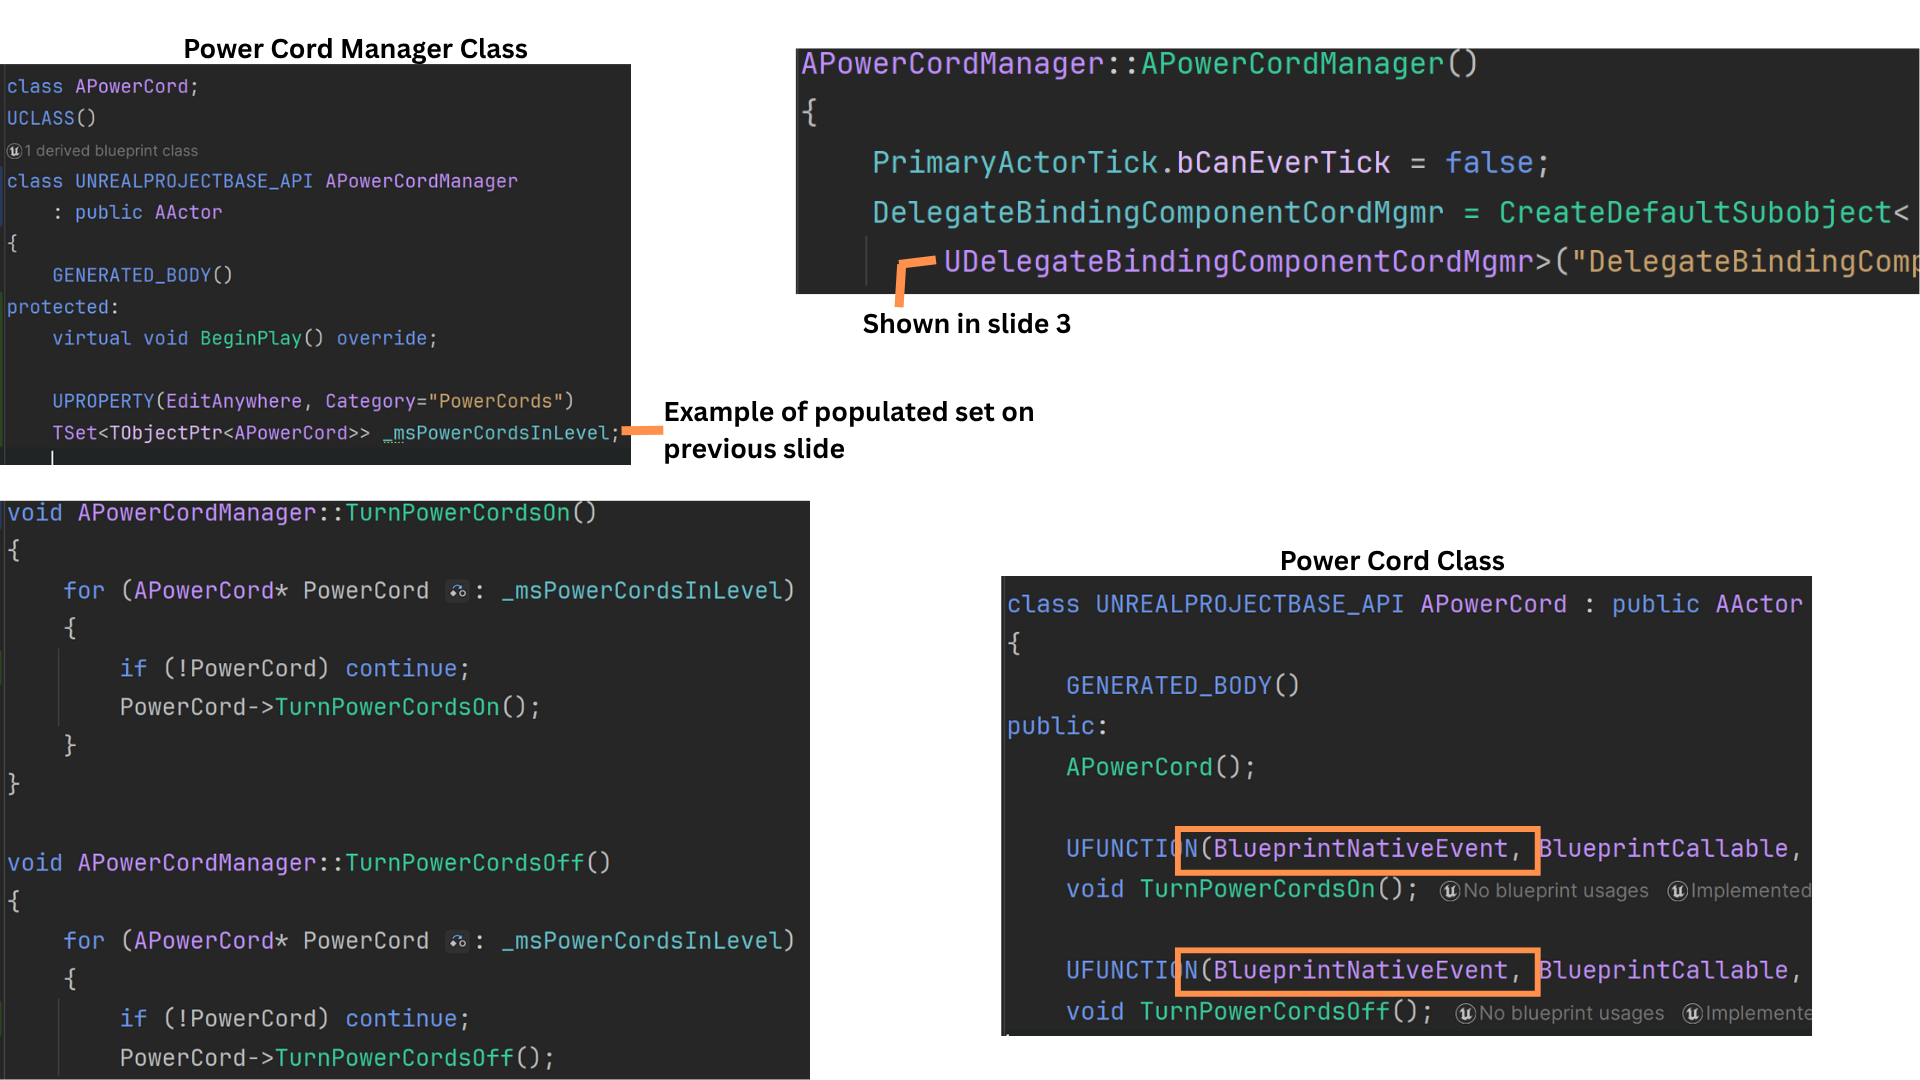
1. The PowerCordManager maintains an array of APowerCord actors placed in the sub-level by designers.
Power cords visually connect Generators to a door and activate only when all Generators are active.
If any Generator becomes inactive—typically due to its associated ForceField reaching zero health—the cords are turned off.
2. A binding component attached to the PowerCordManager listens for game events and triggers functions that iterate over all power cords, enabling or disabling them as needed.
TurnPowerCordsOn and TurnPowerCordsOff implement core logic in C++ but are declared as BlueprintNativeEvent, allowing designers to extend behavior in Blueprint.
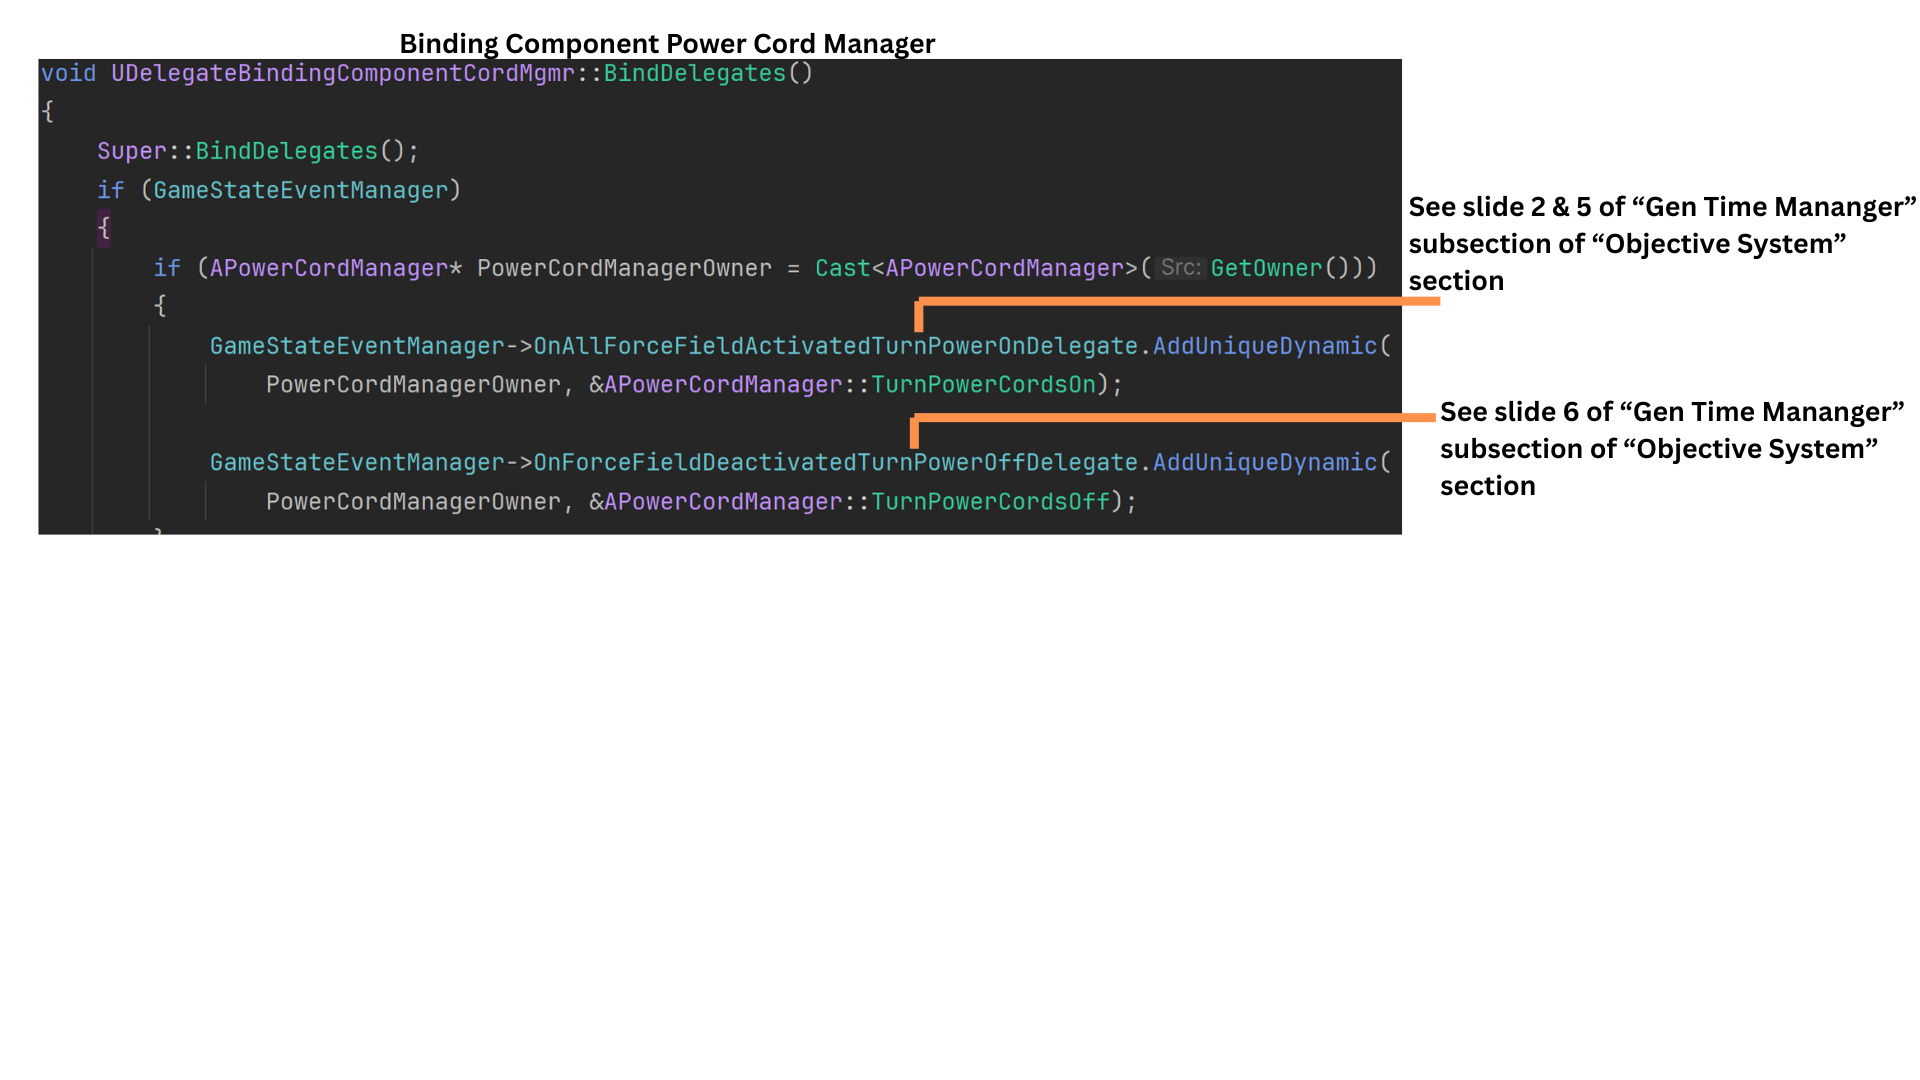
3. OnAllForceFieldActivatedTurnPowerOn is called by the GeneratorTimeManager whenever the generator-defense timer starts or resumes, indicating all ForceFields are active.
OnForceFieldDeactivatedTurnPowerOff is triggered when any ForceField broadcasts its death. The GeneratorTimeManager pauses the timer and notifies the PowerCordManager to turn off all cords.
Game Events - Progress Lights
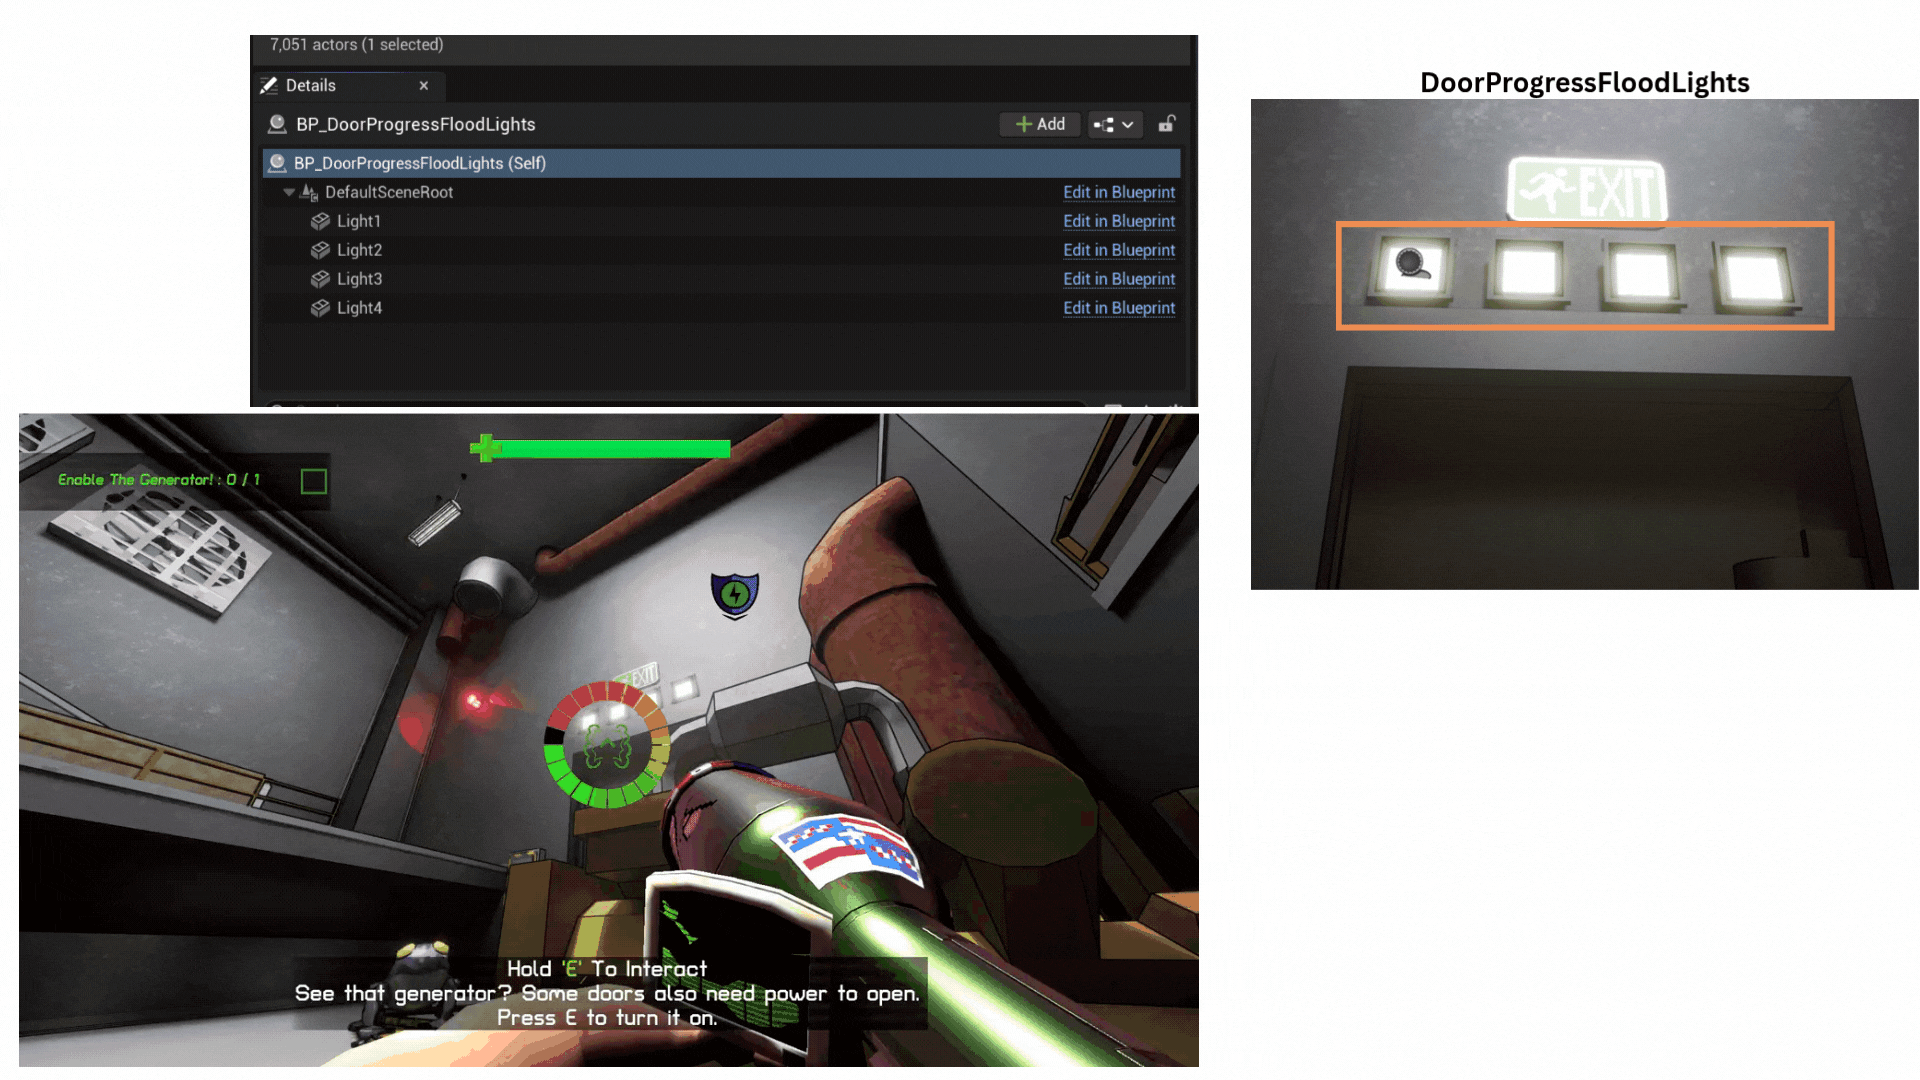
1. Above each door are progress lights that visually represent how much power the door has accumulated and how close it is to opening. Each light corresponds to progress within the generator-defense time objective.
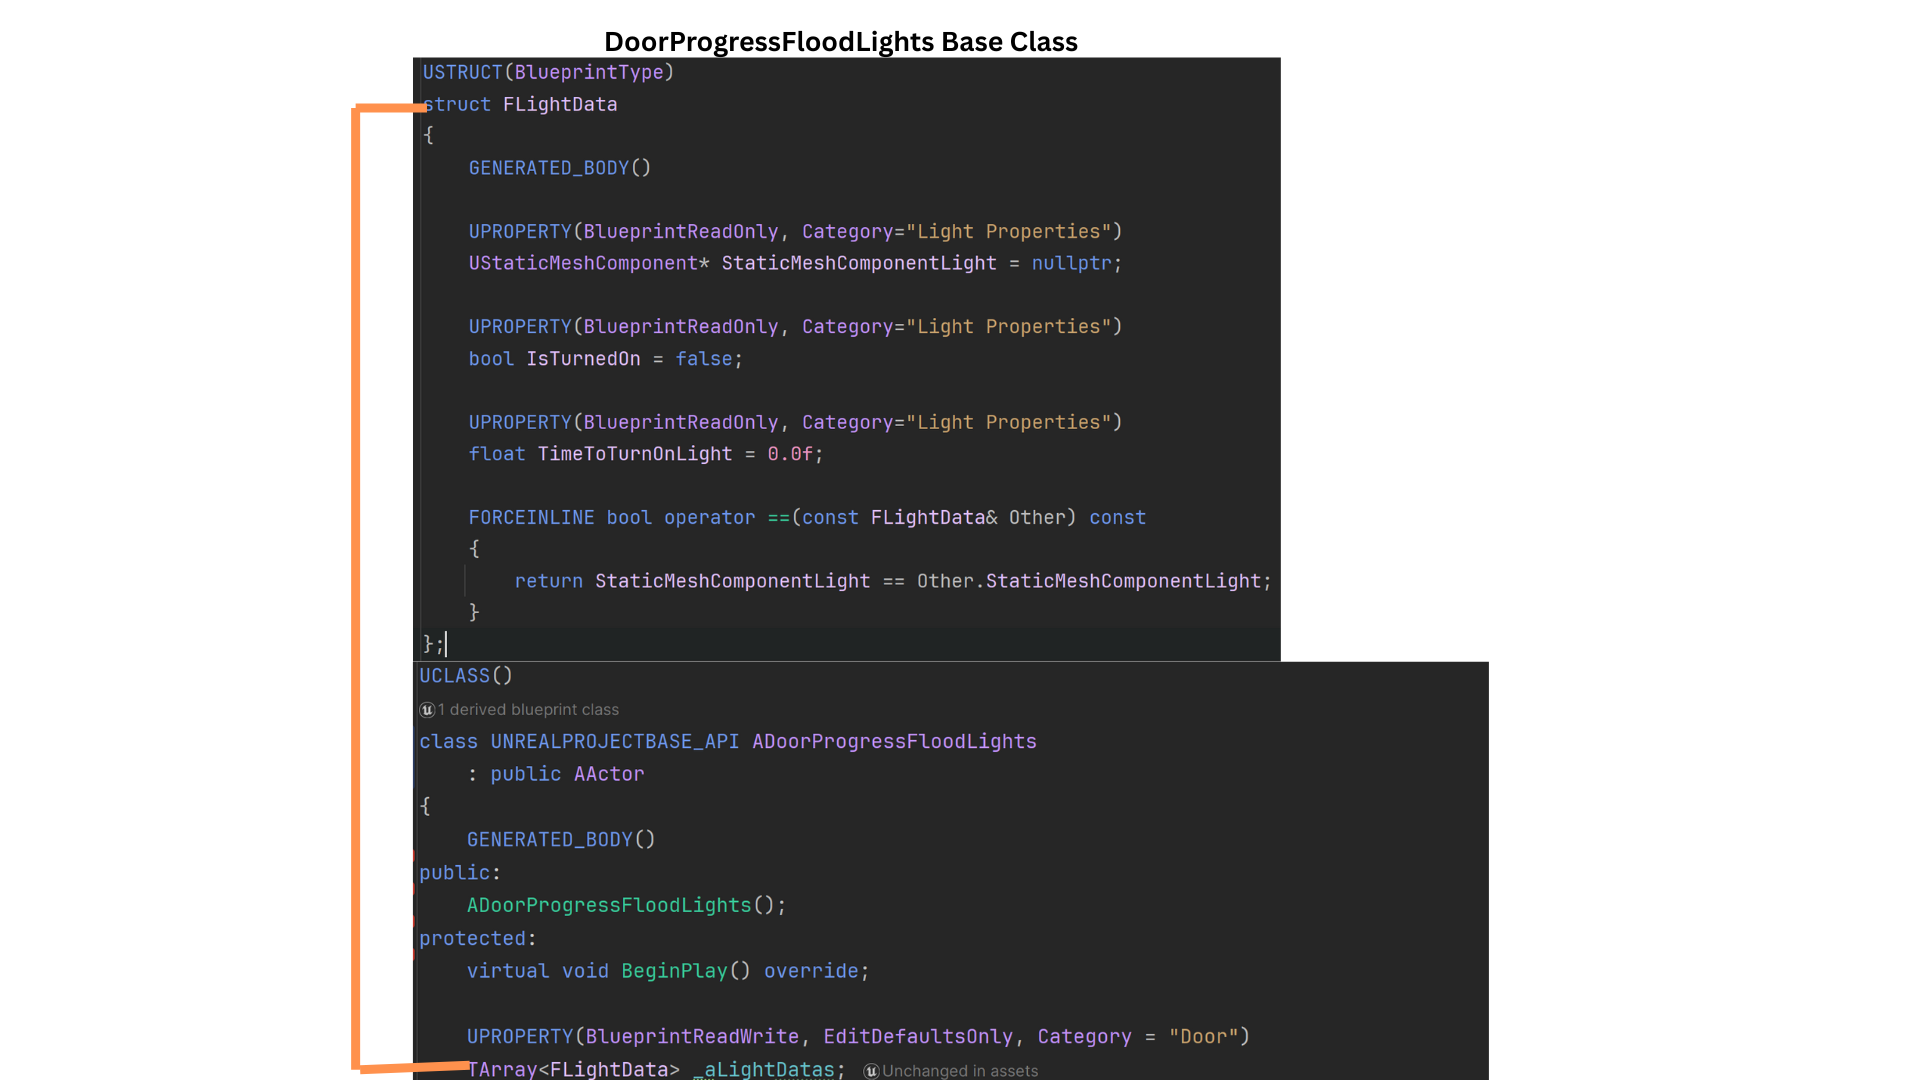
2. Each light is represented by a FLightData struct that stores the Static Mesh reference, the time at which the light should activate, whether it has already activated, and comparison operators for sorting or evaluation.
All lights are stored in the LightDatas array.
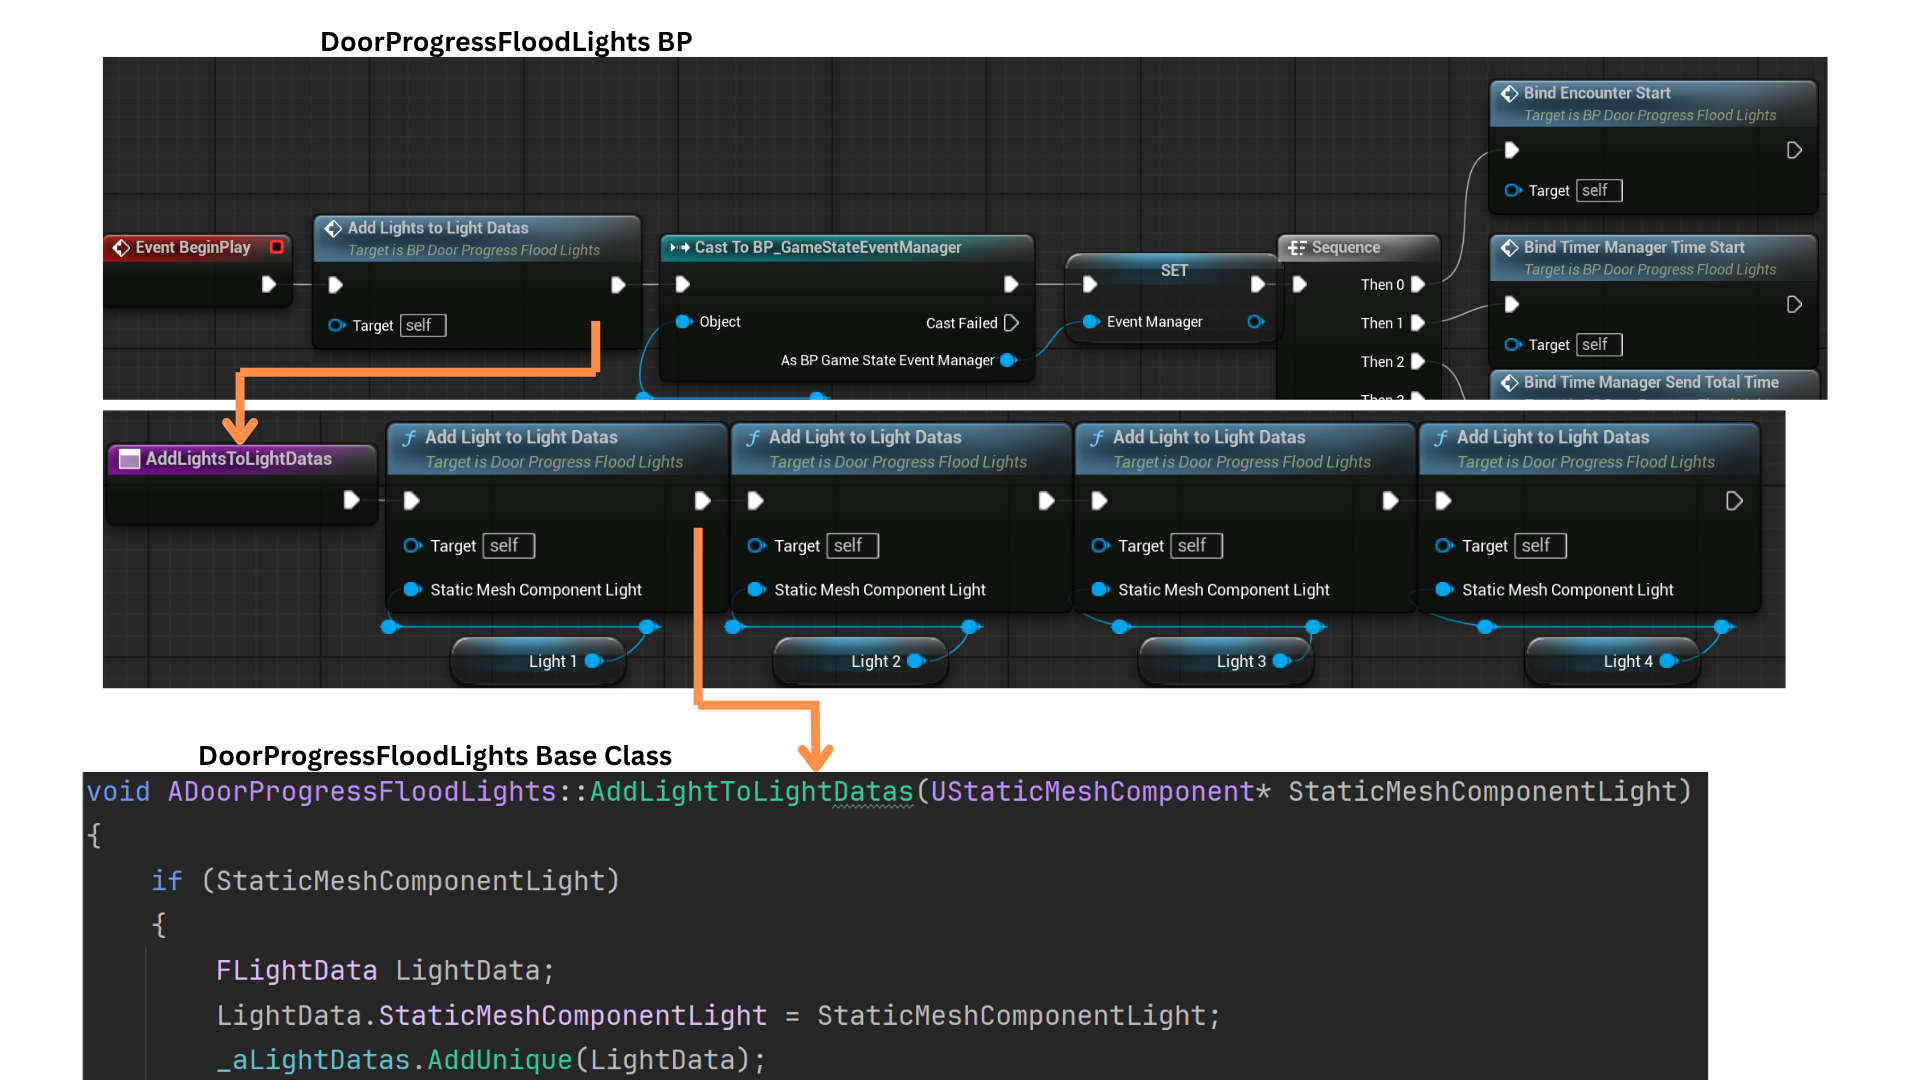
3. AddLightsToLightData is a Blueprint function that forwards to a C++ version with a different signature (accepting a Static Mesh component).
Designers can add more lights by calling this function multiple times in Blueprint.
The C++ AddLightToLightDatas creates a new FLightData, assigns the provided Static Mesh to its StaticMeshComponentLight field, and appends the struct to the LightDatas array.
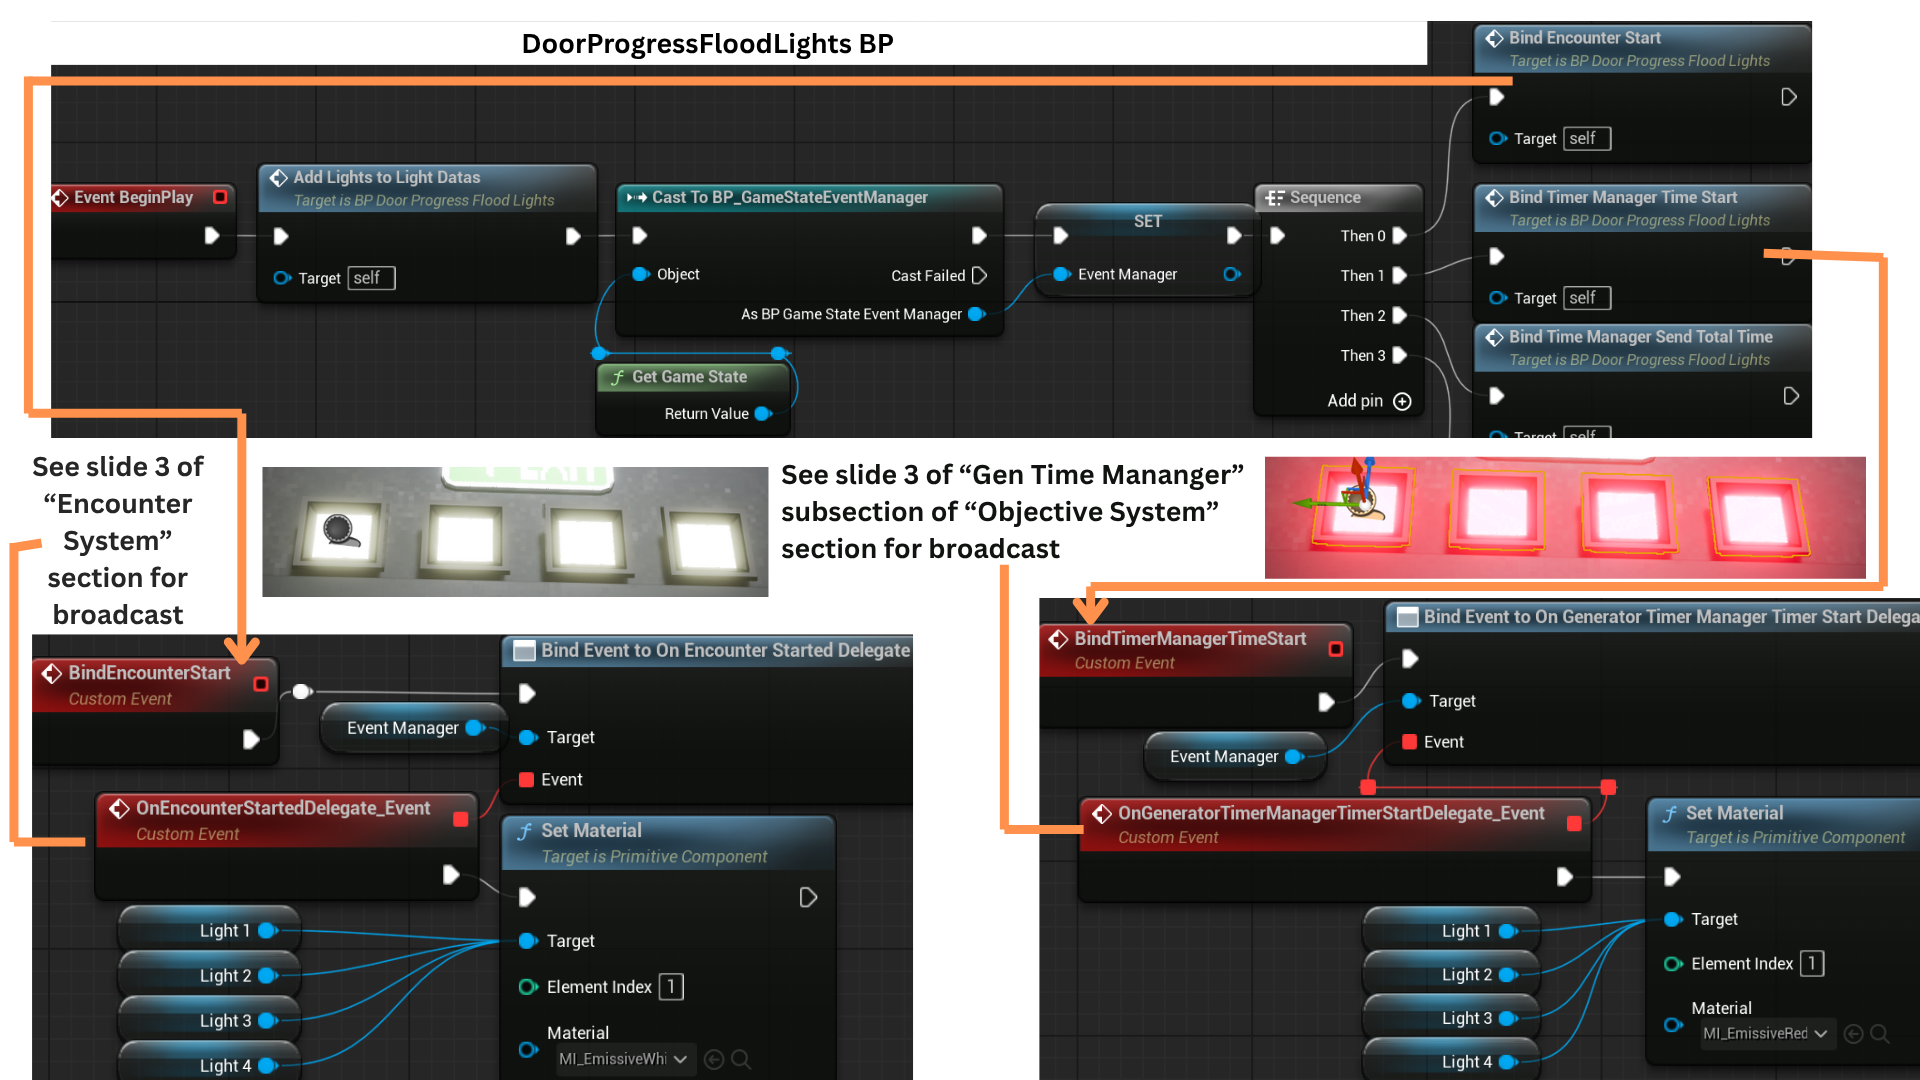
4. OnEncounterStartDelegate fires when the player enters the EncounterTrigger, at which point all lights have their materials set to white.
When the GeneratorTimeManager initializes the defense timer, OnGeneratorTimerManagerTimeStartDelegate is broadcast, switching all lights to red to indicate the start of the power-up sequence.
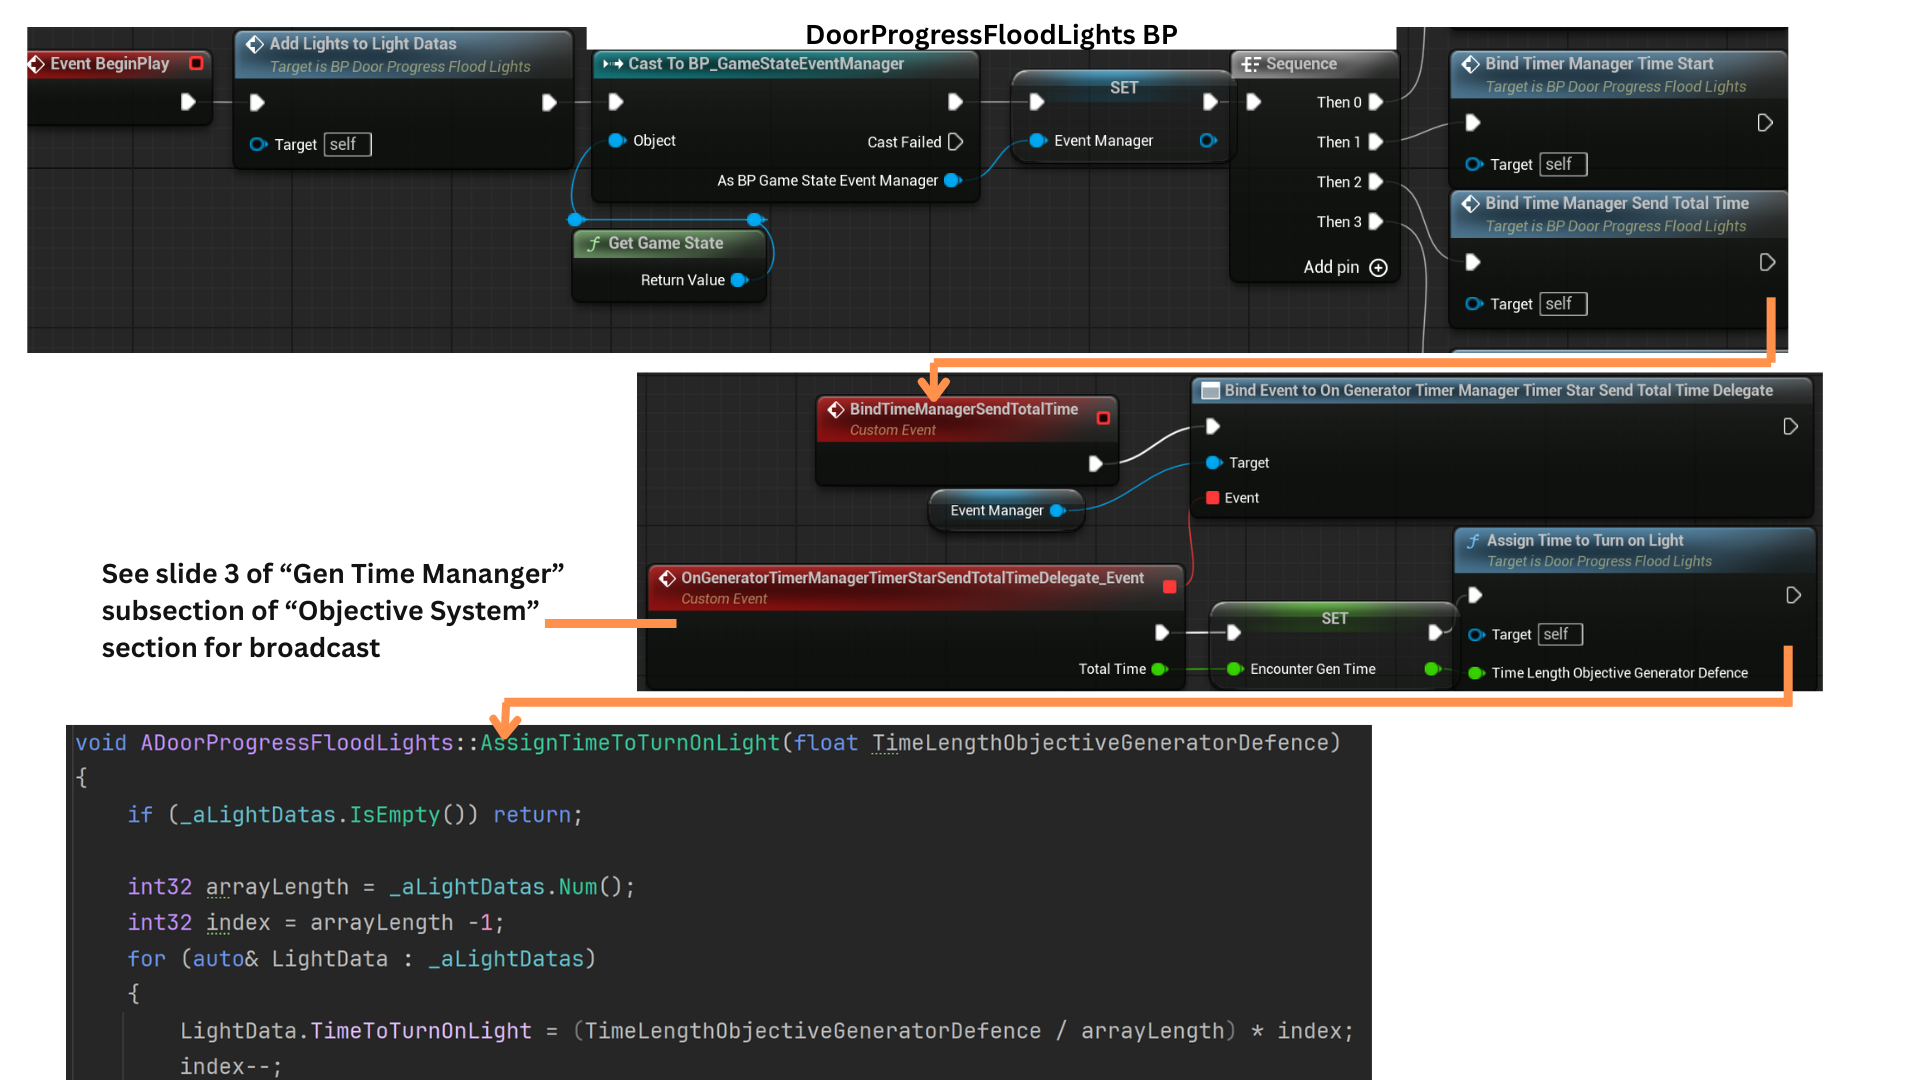
5. When the GeneratorTimeManager starts for the first time, it also broadcasts OnGeneratorTimeManagerTimerStartSendTotalTimeDelegate, which provides the TotalTime required to complete the objective.
AssignTimeToTurnOffLight uses this value to iterate over all lights and calculate the specific time at which each one should activate.
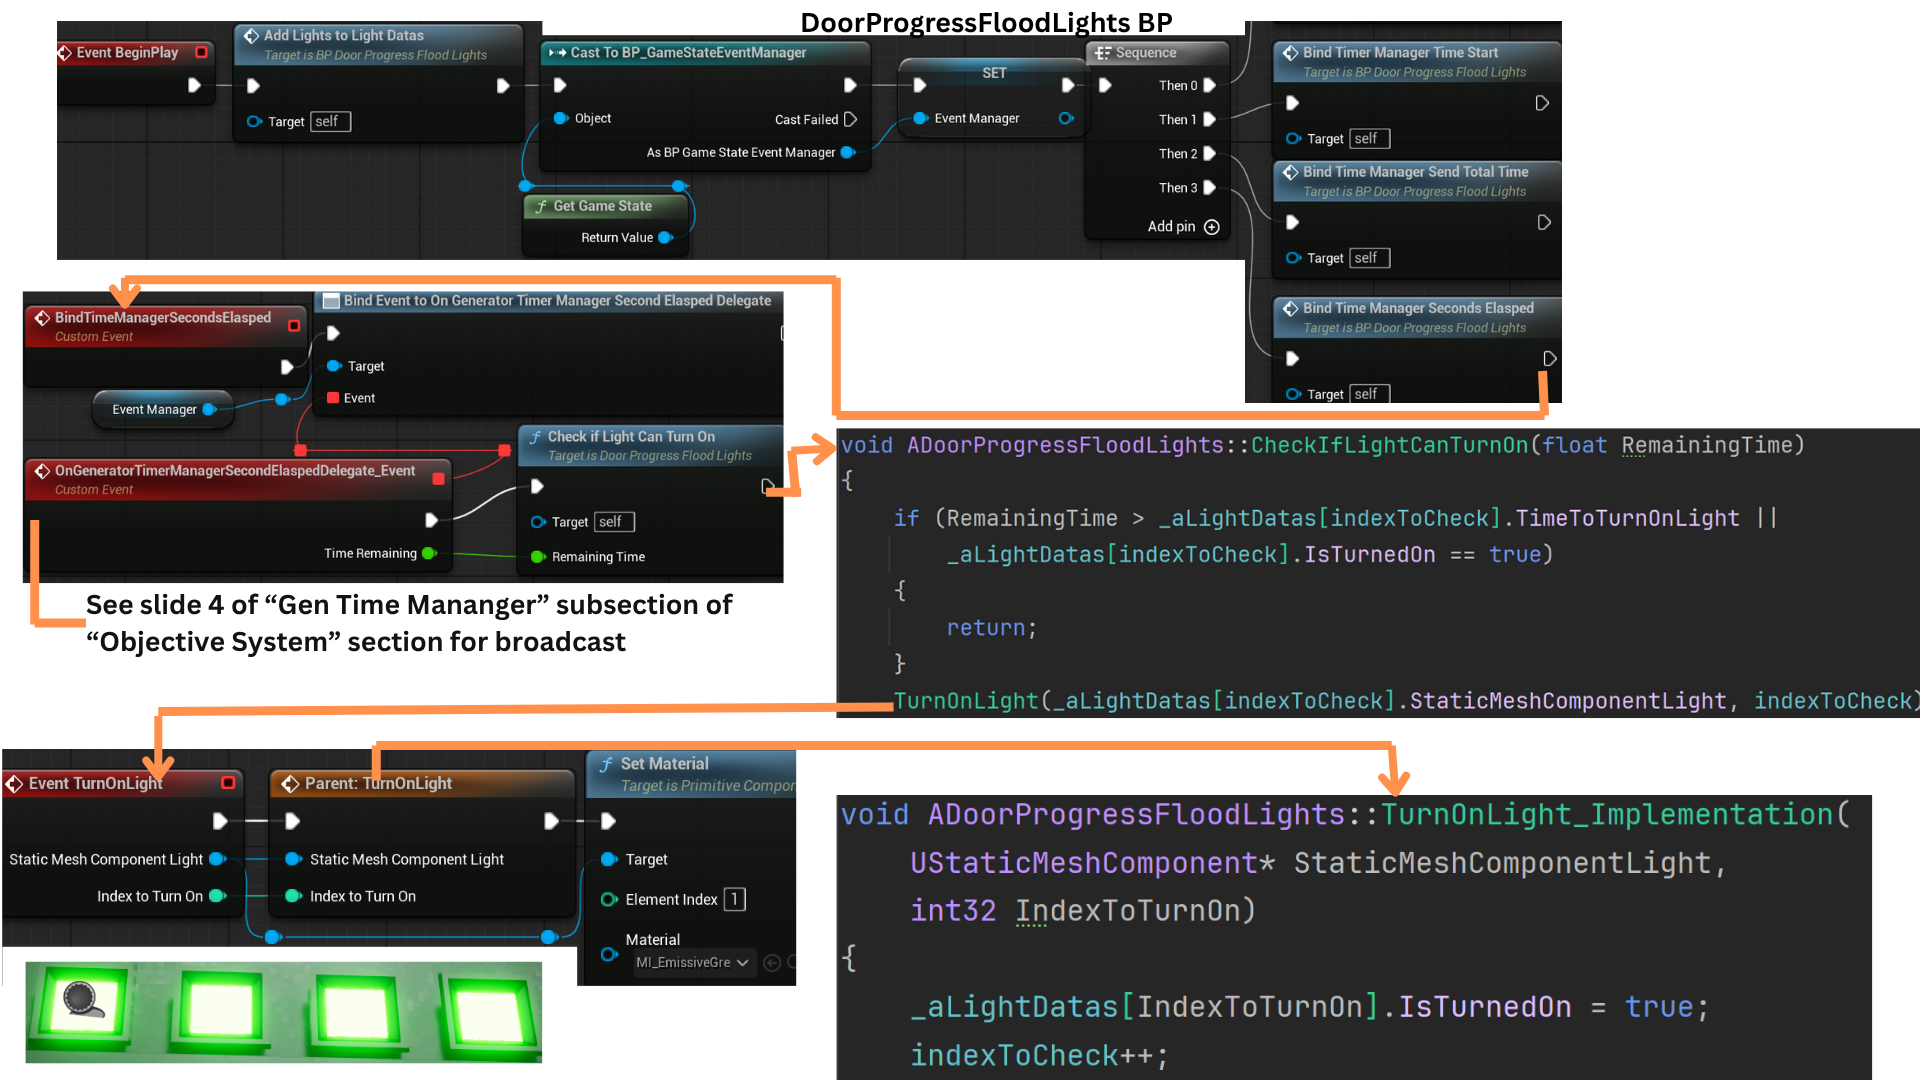
6. While the timer is active, OnGeneratorTimeManagerSecondElaspedDelegate broadcasts every second, providing the current TimeRemaining.
IndexToCheck is reset to 0 at the start of the encounter and allows the system to update lights efficiently without scanning the entire array each second.
CheckIfLightCanTurnOn compares the TimeToTurnOn value of the indexed light against TimeRemaining; if the threshold is reached, the light is activated and IndexToCheck is incremented to evaluate the next light in sequence.
Tech
Dialogue Subsystem
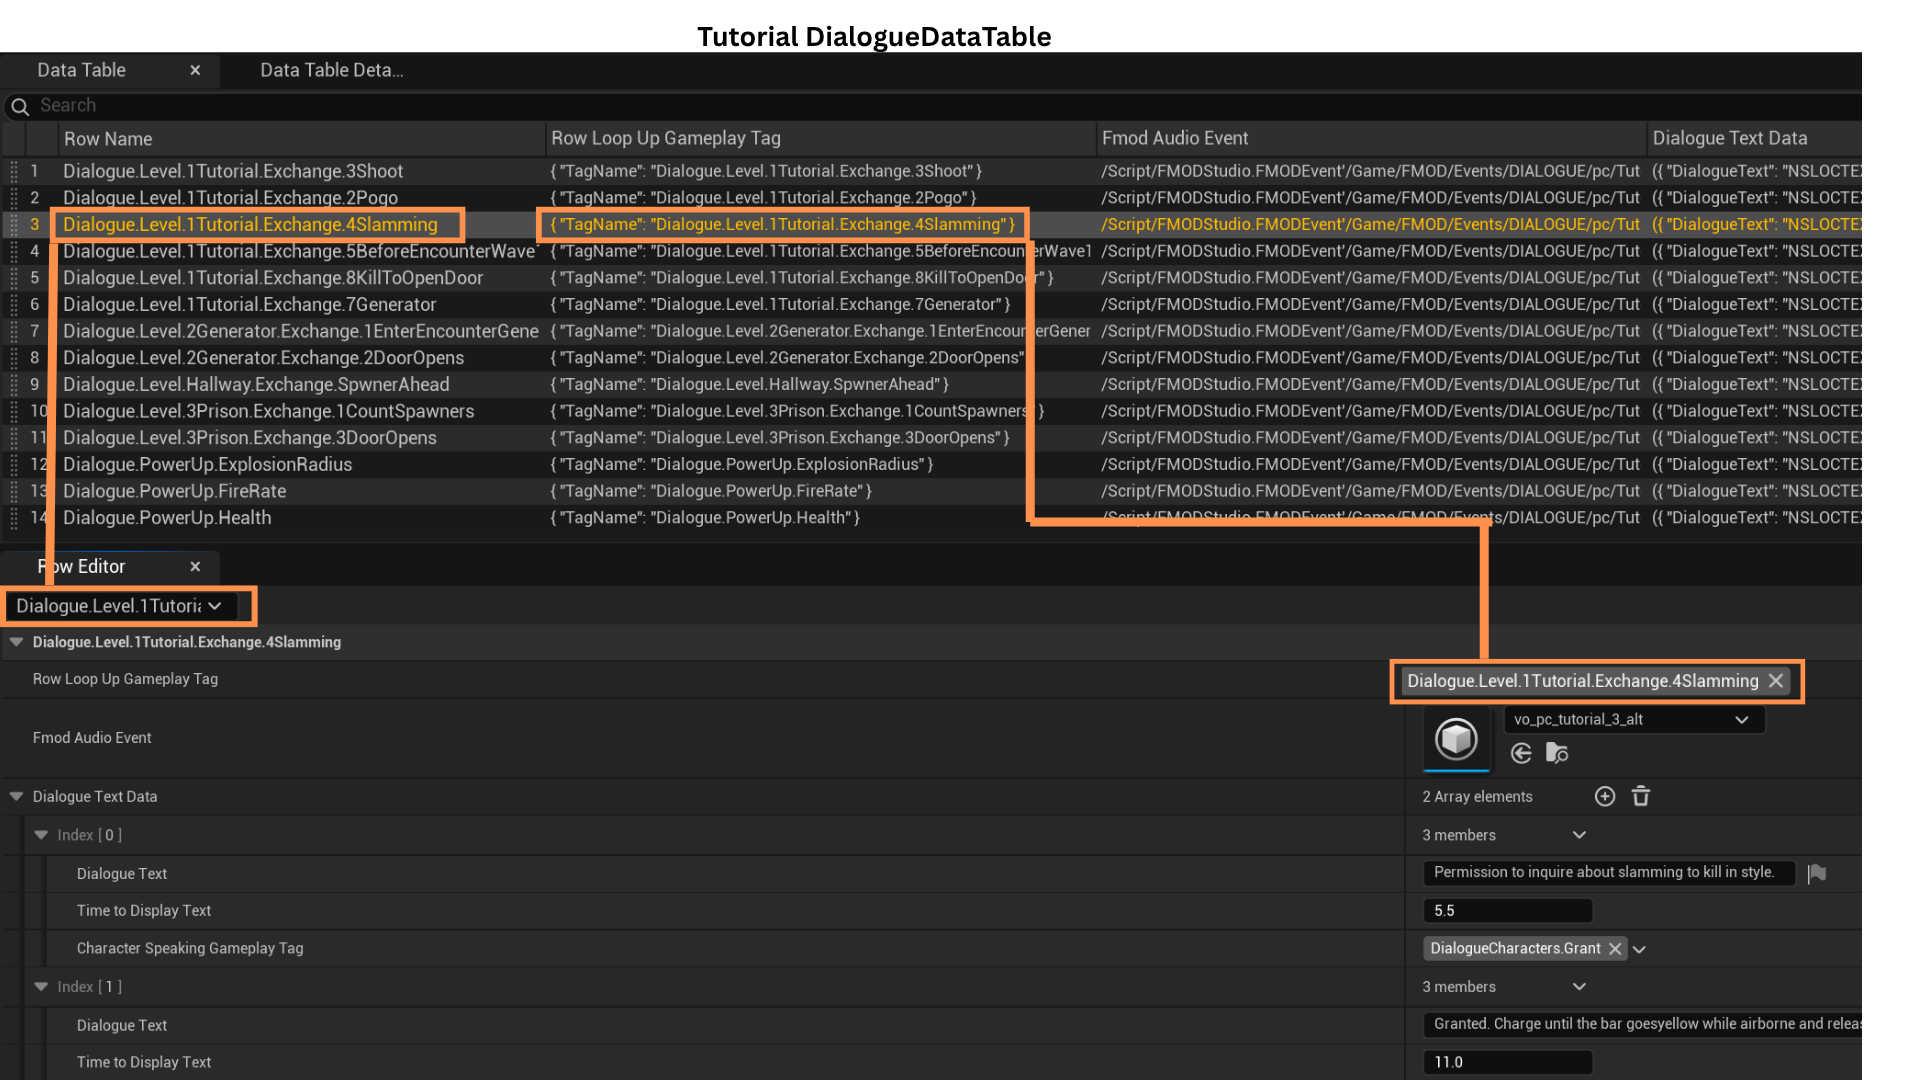
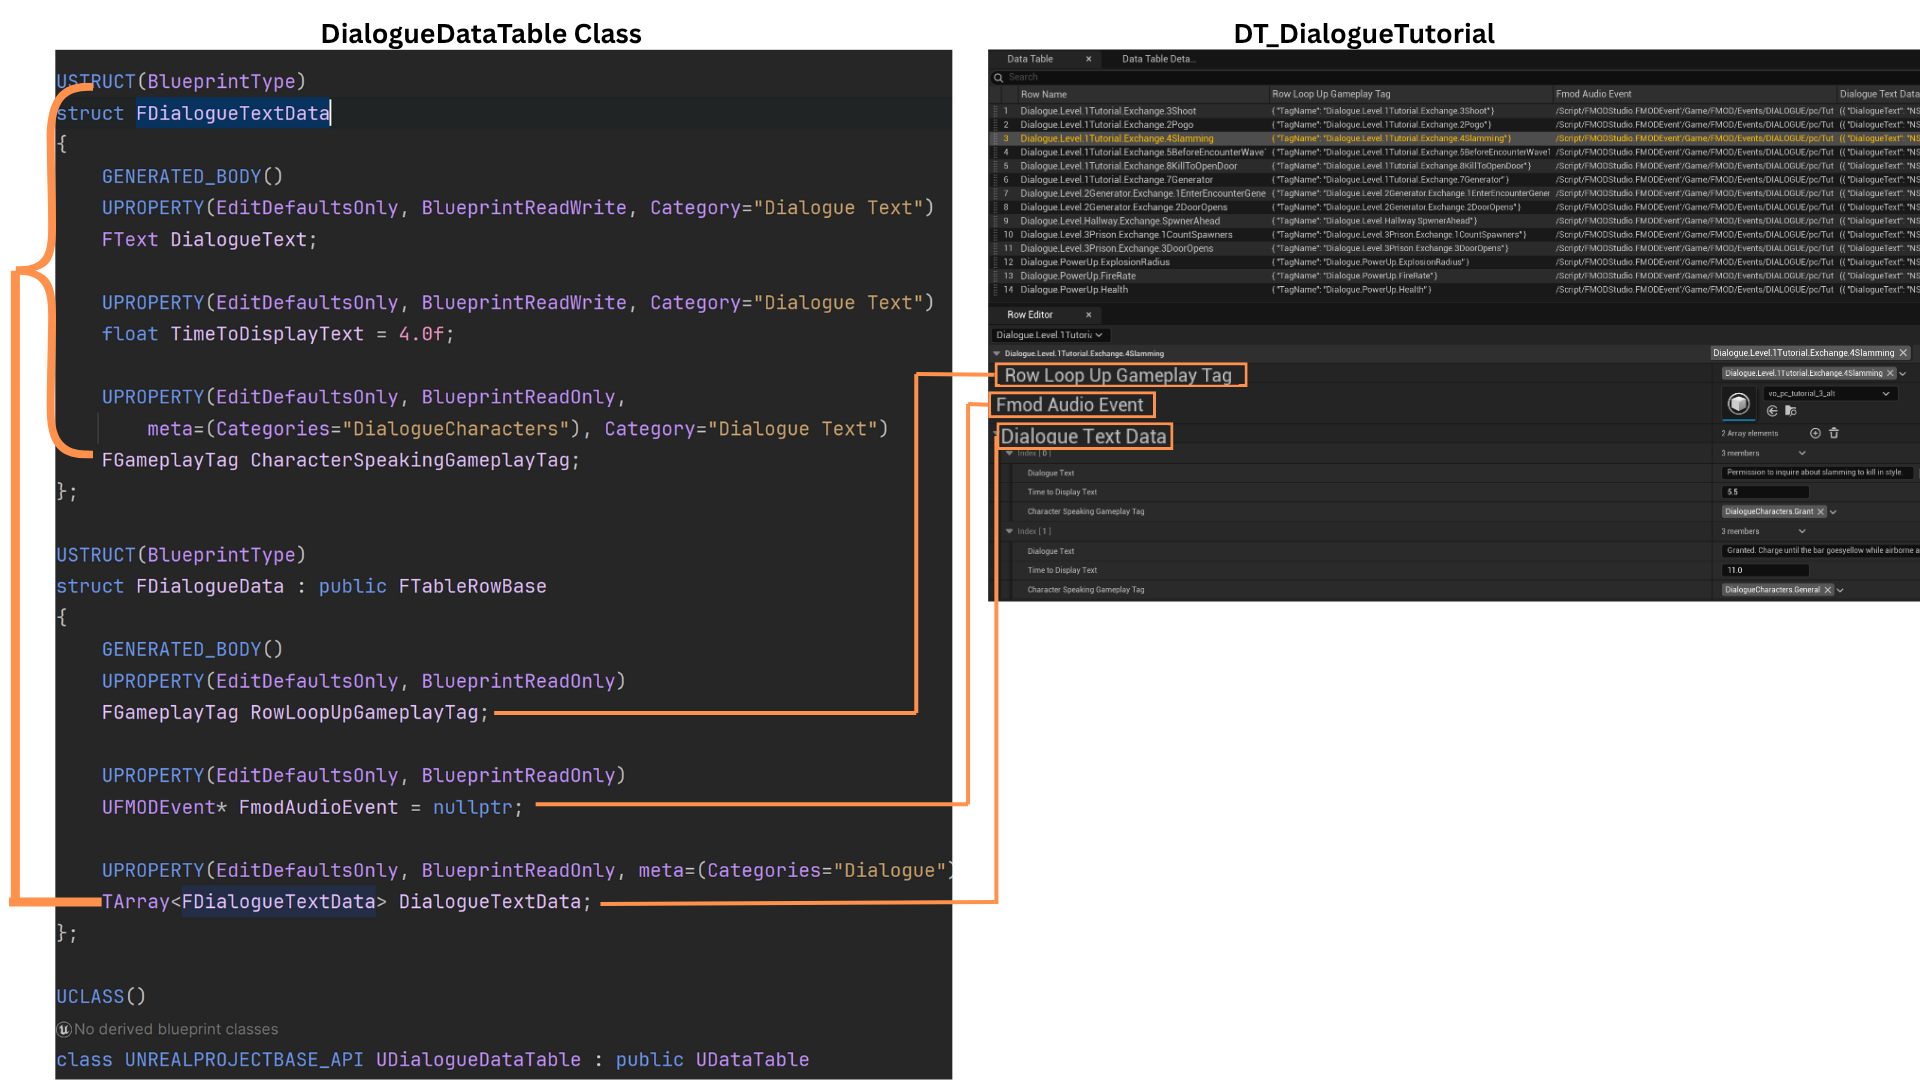
1. The Dialogue System uses a Composite Data Table and a Dialogue Subsystem to broadcast, receive, and look up dialogue information.
Each dialogue event is stored as a row in a Data Table using a GameplayTag as its key. DialogueTriggerBoxes contain a GameplayTag that determines which row they enqueue when activated.
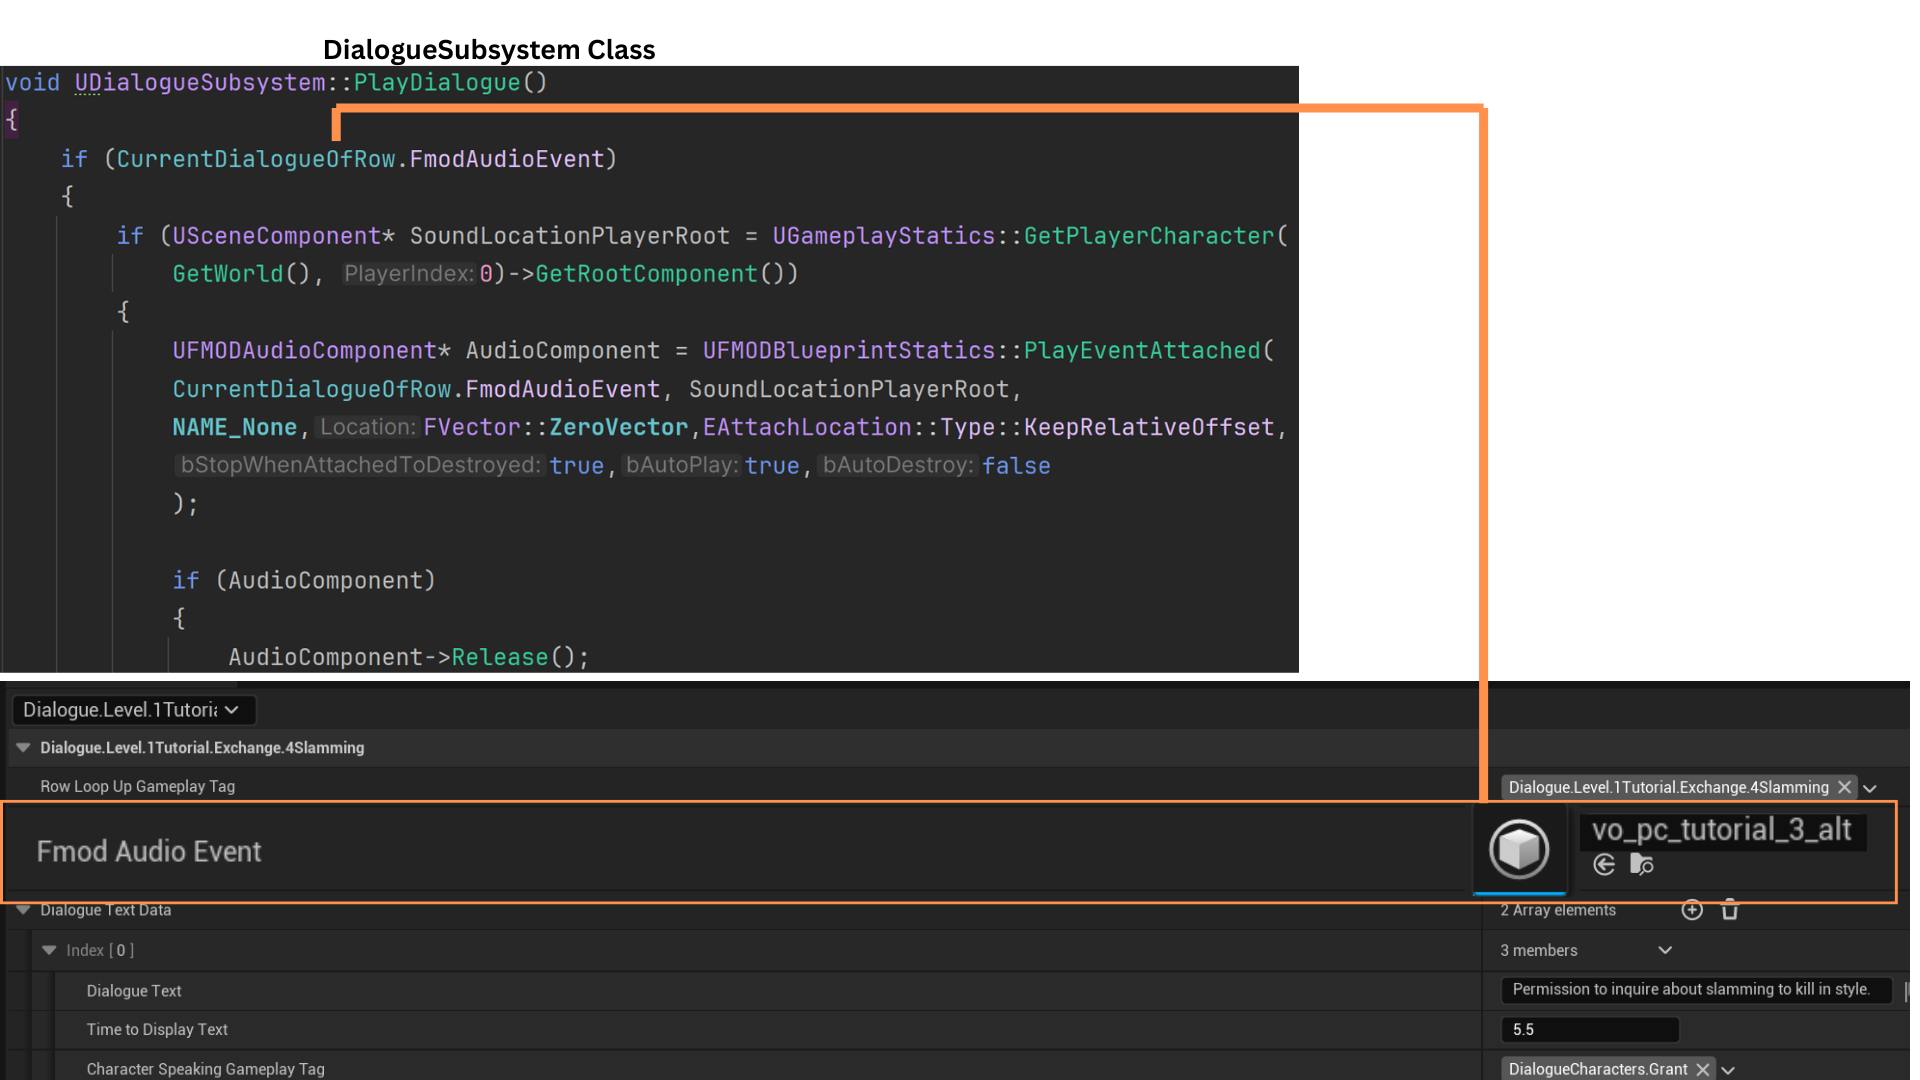
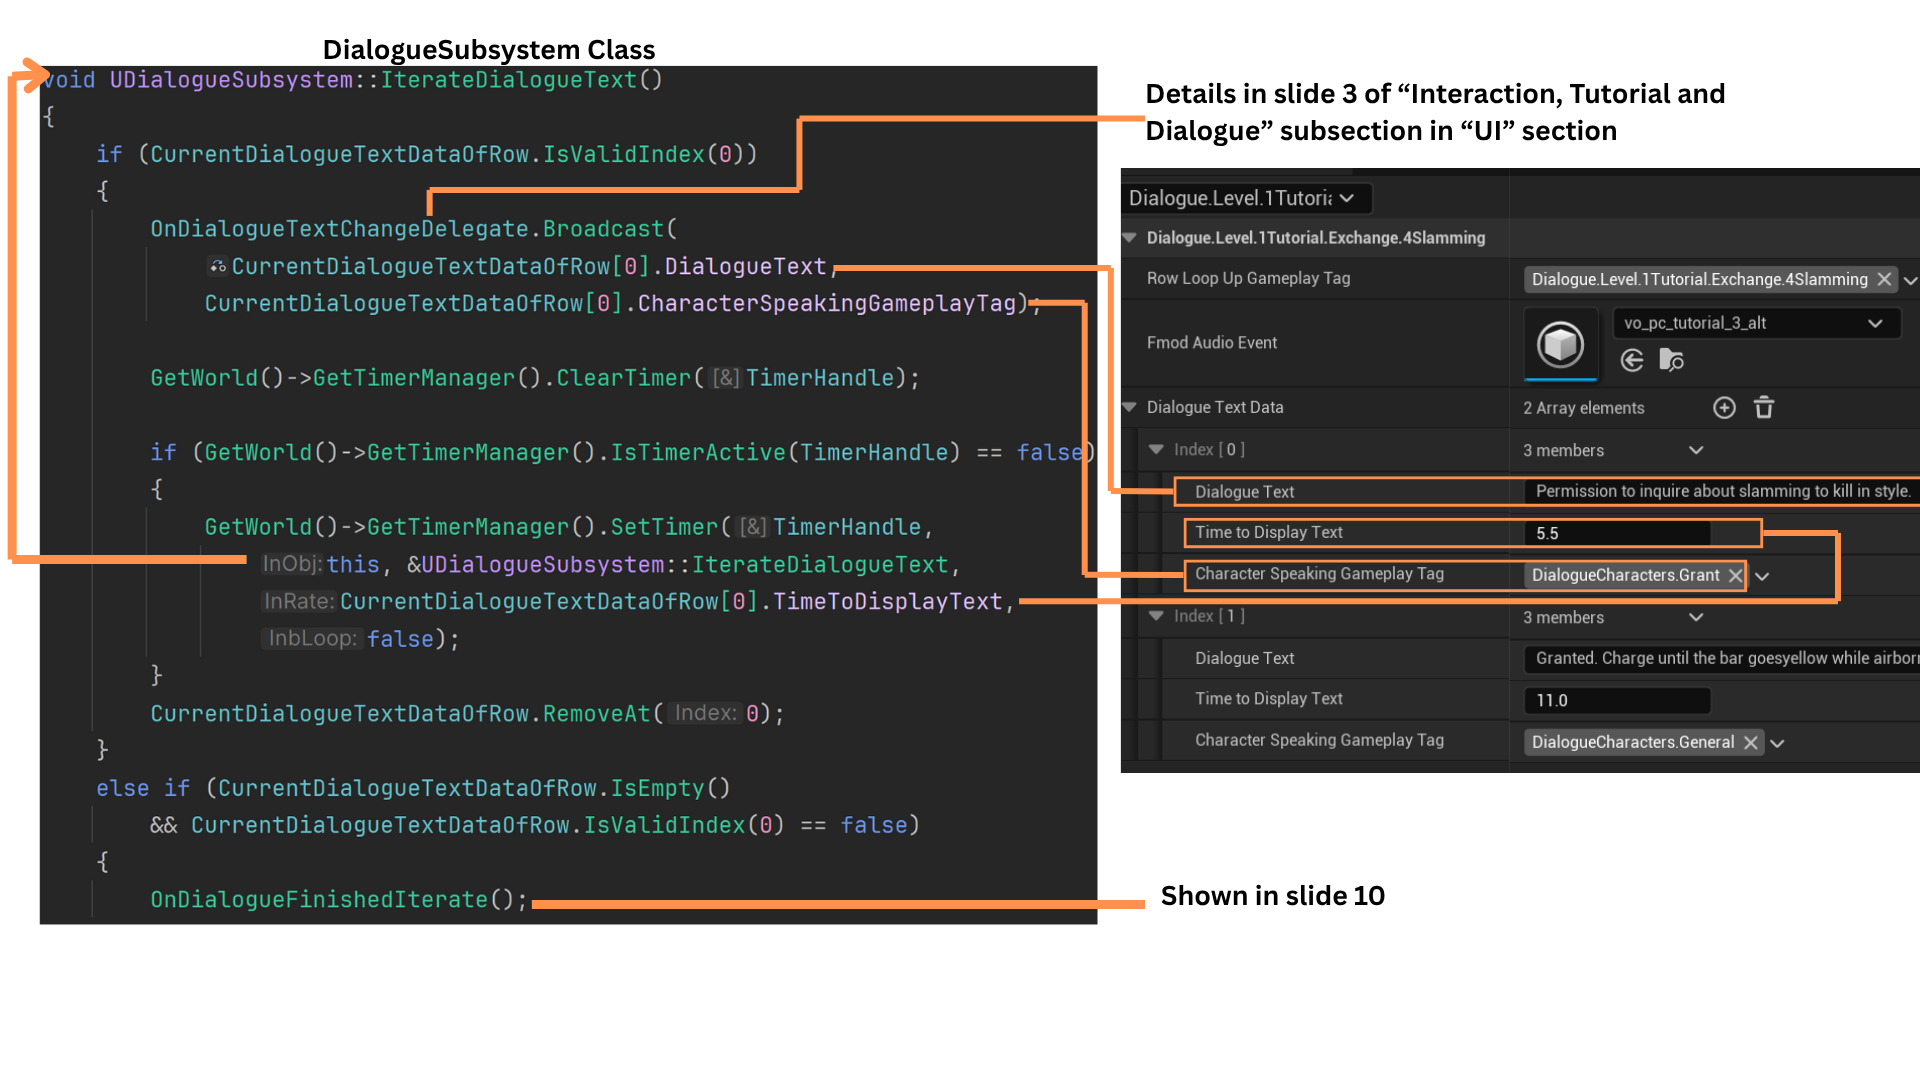
For example, a row may be named Dialogue.Level.1TutorialExchange.4Slamming.
2. Each row contains a GameplayTag (the same as the row name), an FMOD event for the spoken audio, and an array of FDialogueTextData entries.
FDialogueTextData includes the dialogue text, display duration, and a GameplayTag identifying the speaker.
The FMOD event may represent a single speaker or a conversation. The DialogueTextData array mirrors the order of spoken lines:
-- 1 entry = one speaker
-- 2 entries = two-character single exchange
-- 3 or more entries = two-character multiple exchange
TimeToDisplay aligns the on-screen text timing with the FMOD audio playback.
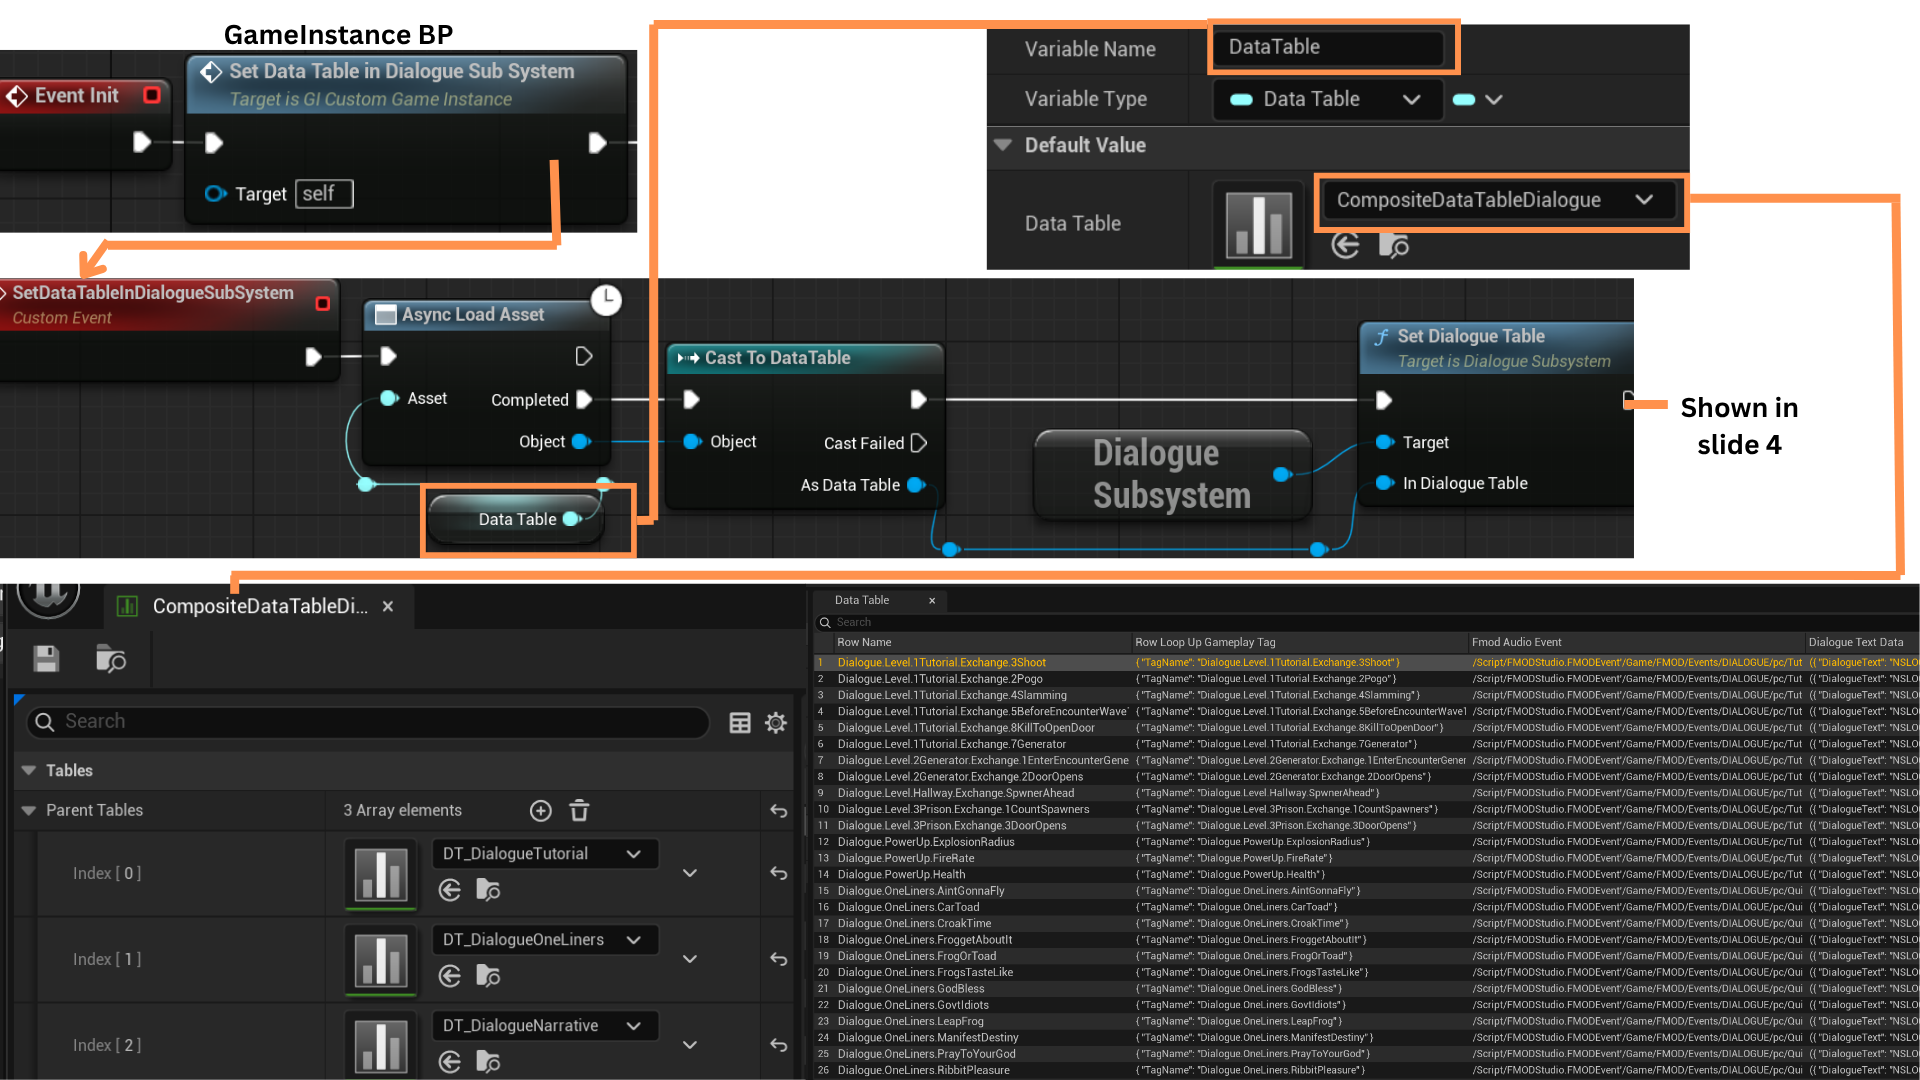
3. Dialogue is organized into three Data Tables: Dialogue, Oneliners, and Narrative, all merged into one Composite Data Table.
The Composite Table is stored as a soft object pointer in the GameInstance and asynchronously loaded during initialization.
SetDialogueTable is then used to pass this Composite Table into the DialogueSubsystem.
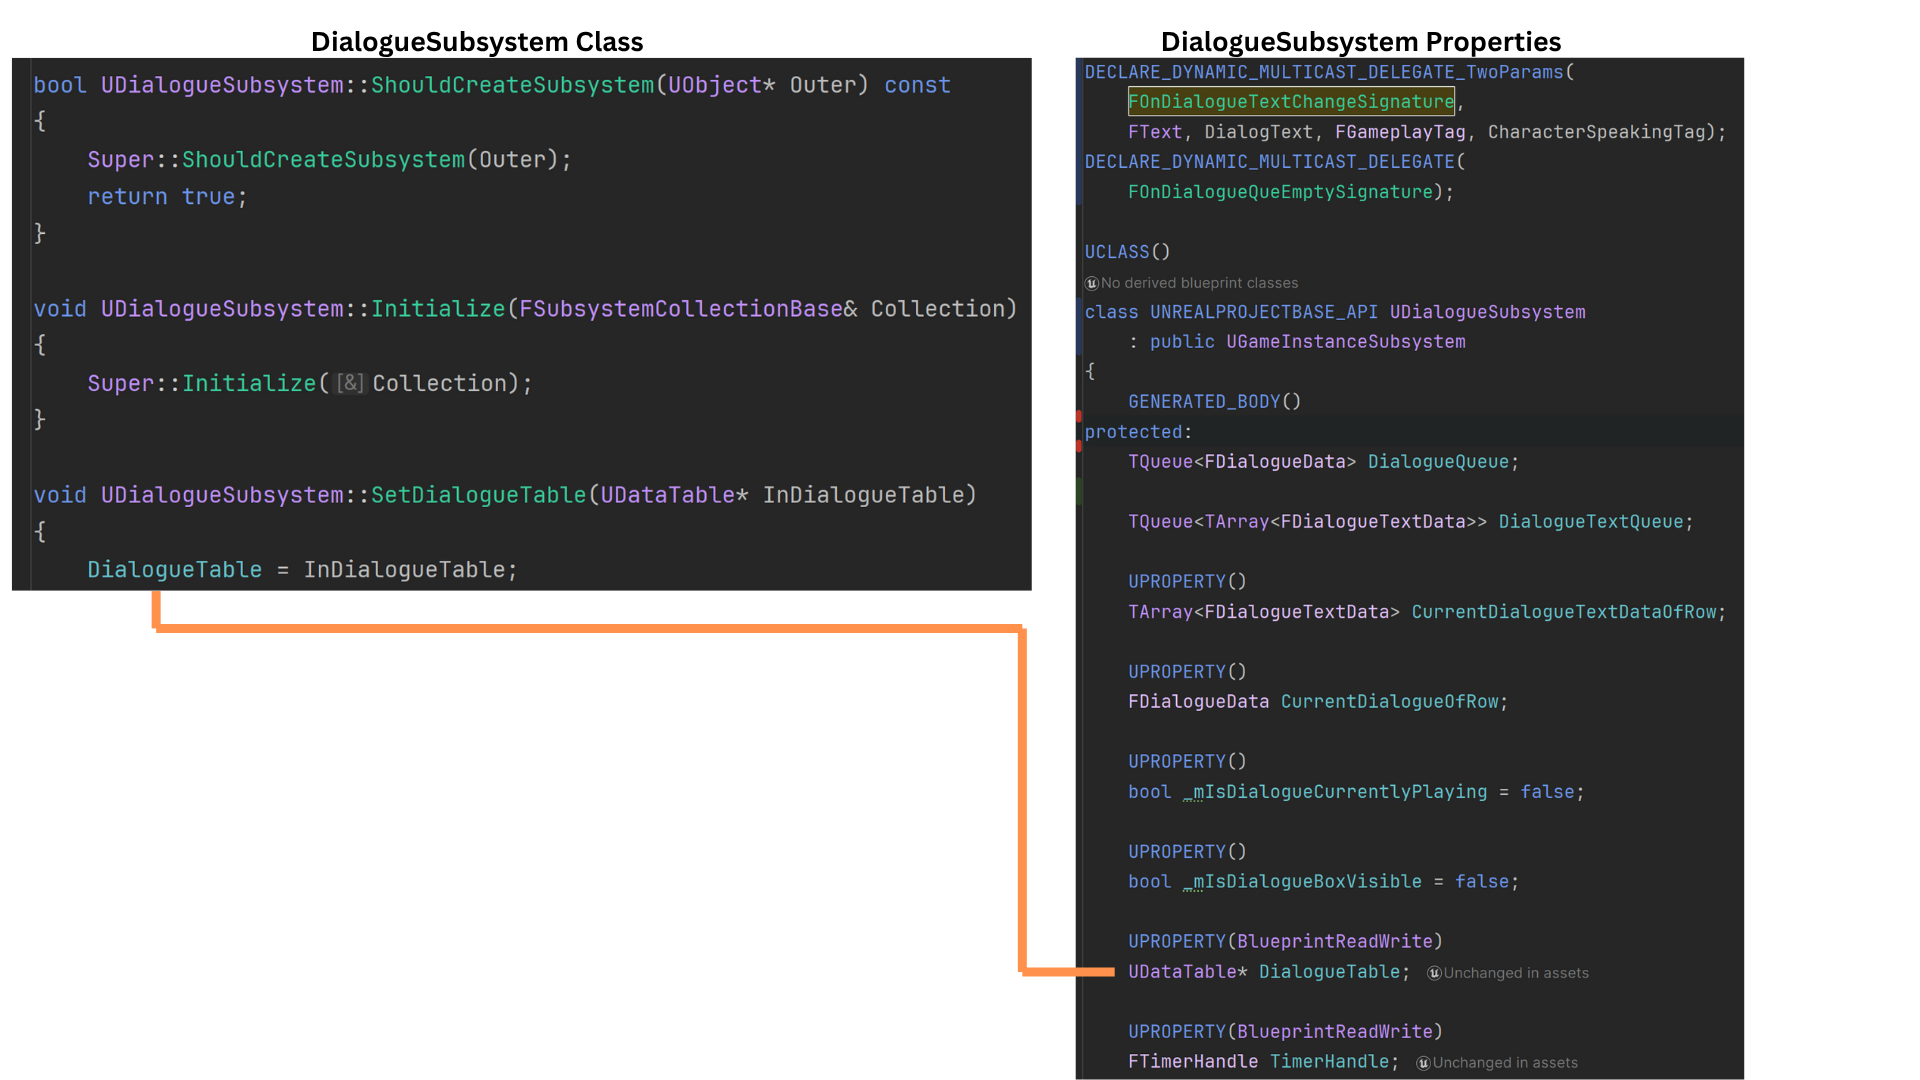
4. The DialogueSubsystem stores a pointer to the loaded Composite Data Table as DialogueTable.
Dialogue rows are managed using a TQueue, ensuring efficient and safe enqueue/dequeue operations.
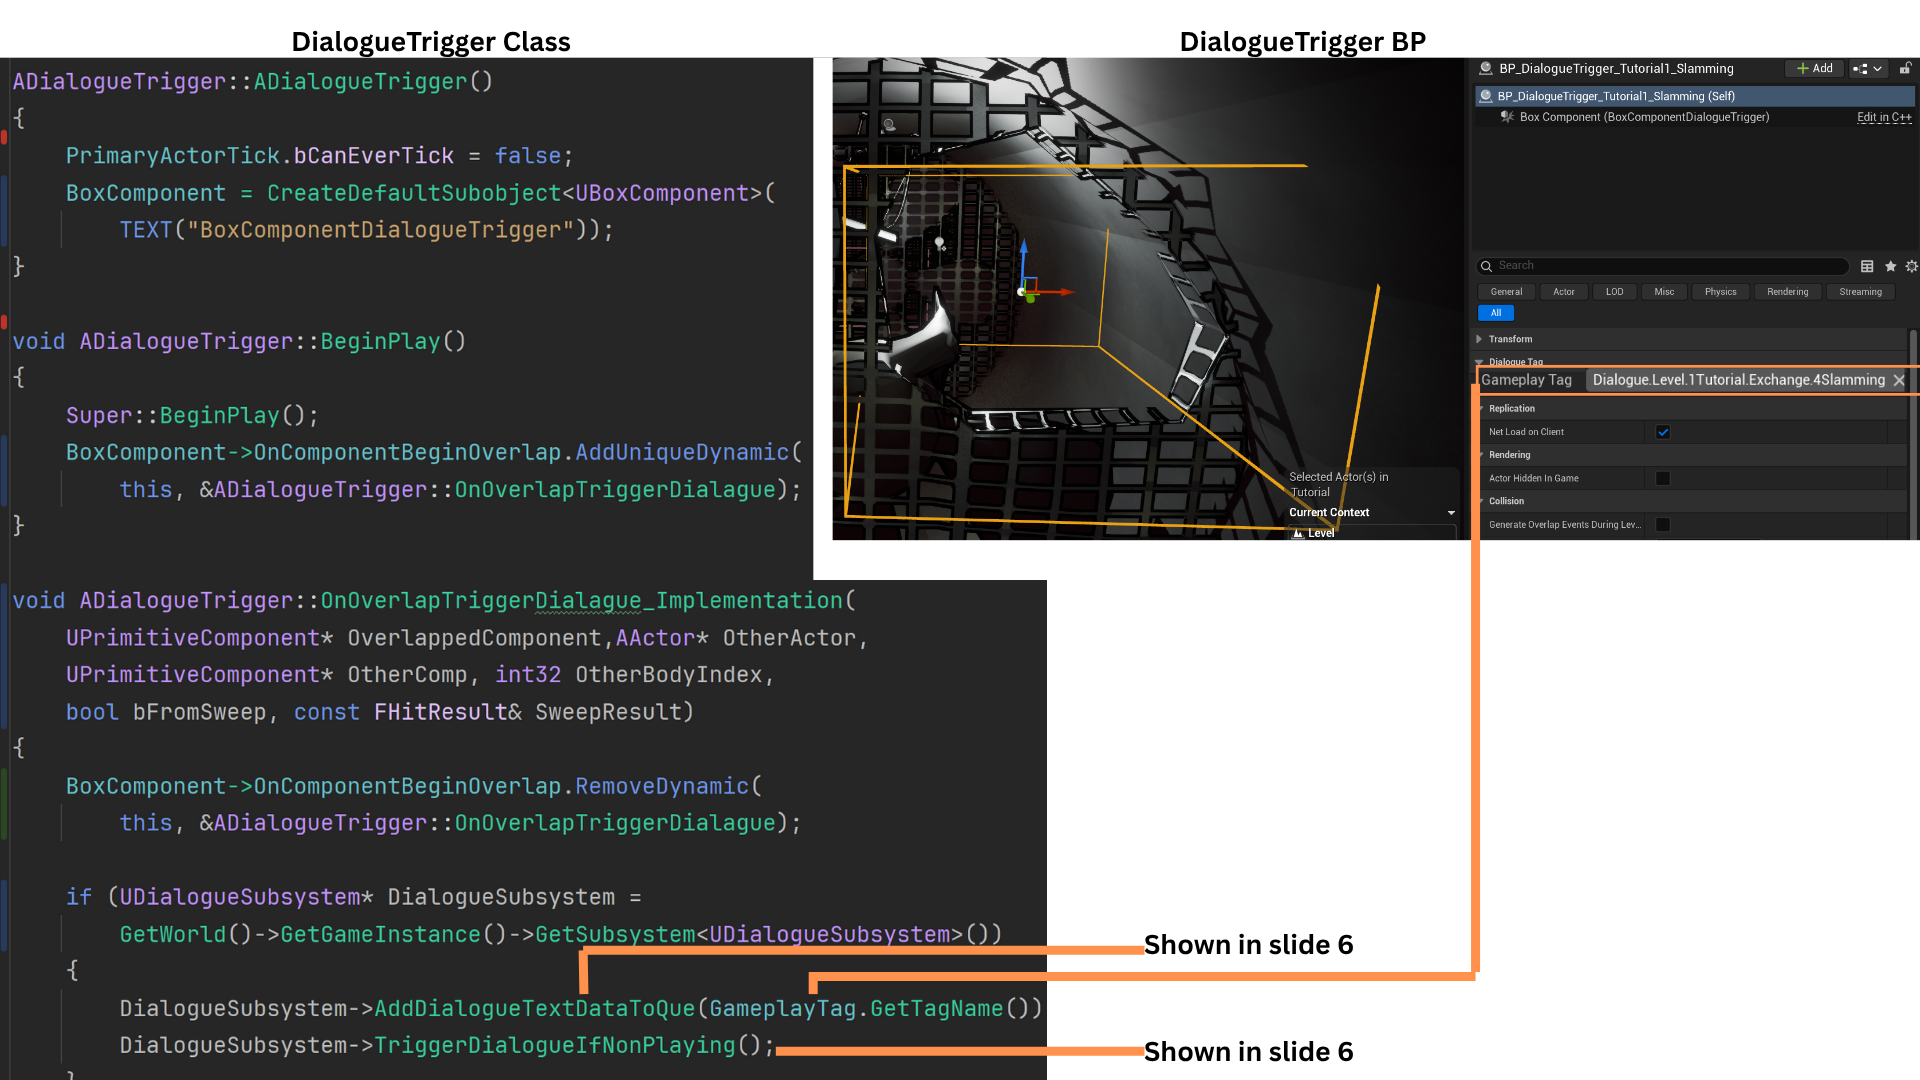
5. DialogueTriggers contain a GameplayTag matching a row in the Data Table.
OnOverlapTriggerDialogue is bound in BeginPlay and unbound after the first overlap so it fires only once.
When triggered, the DialogueSubsystem is accessed.
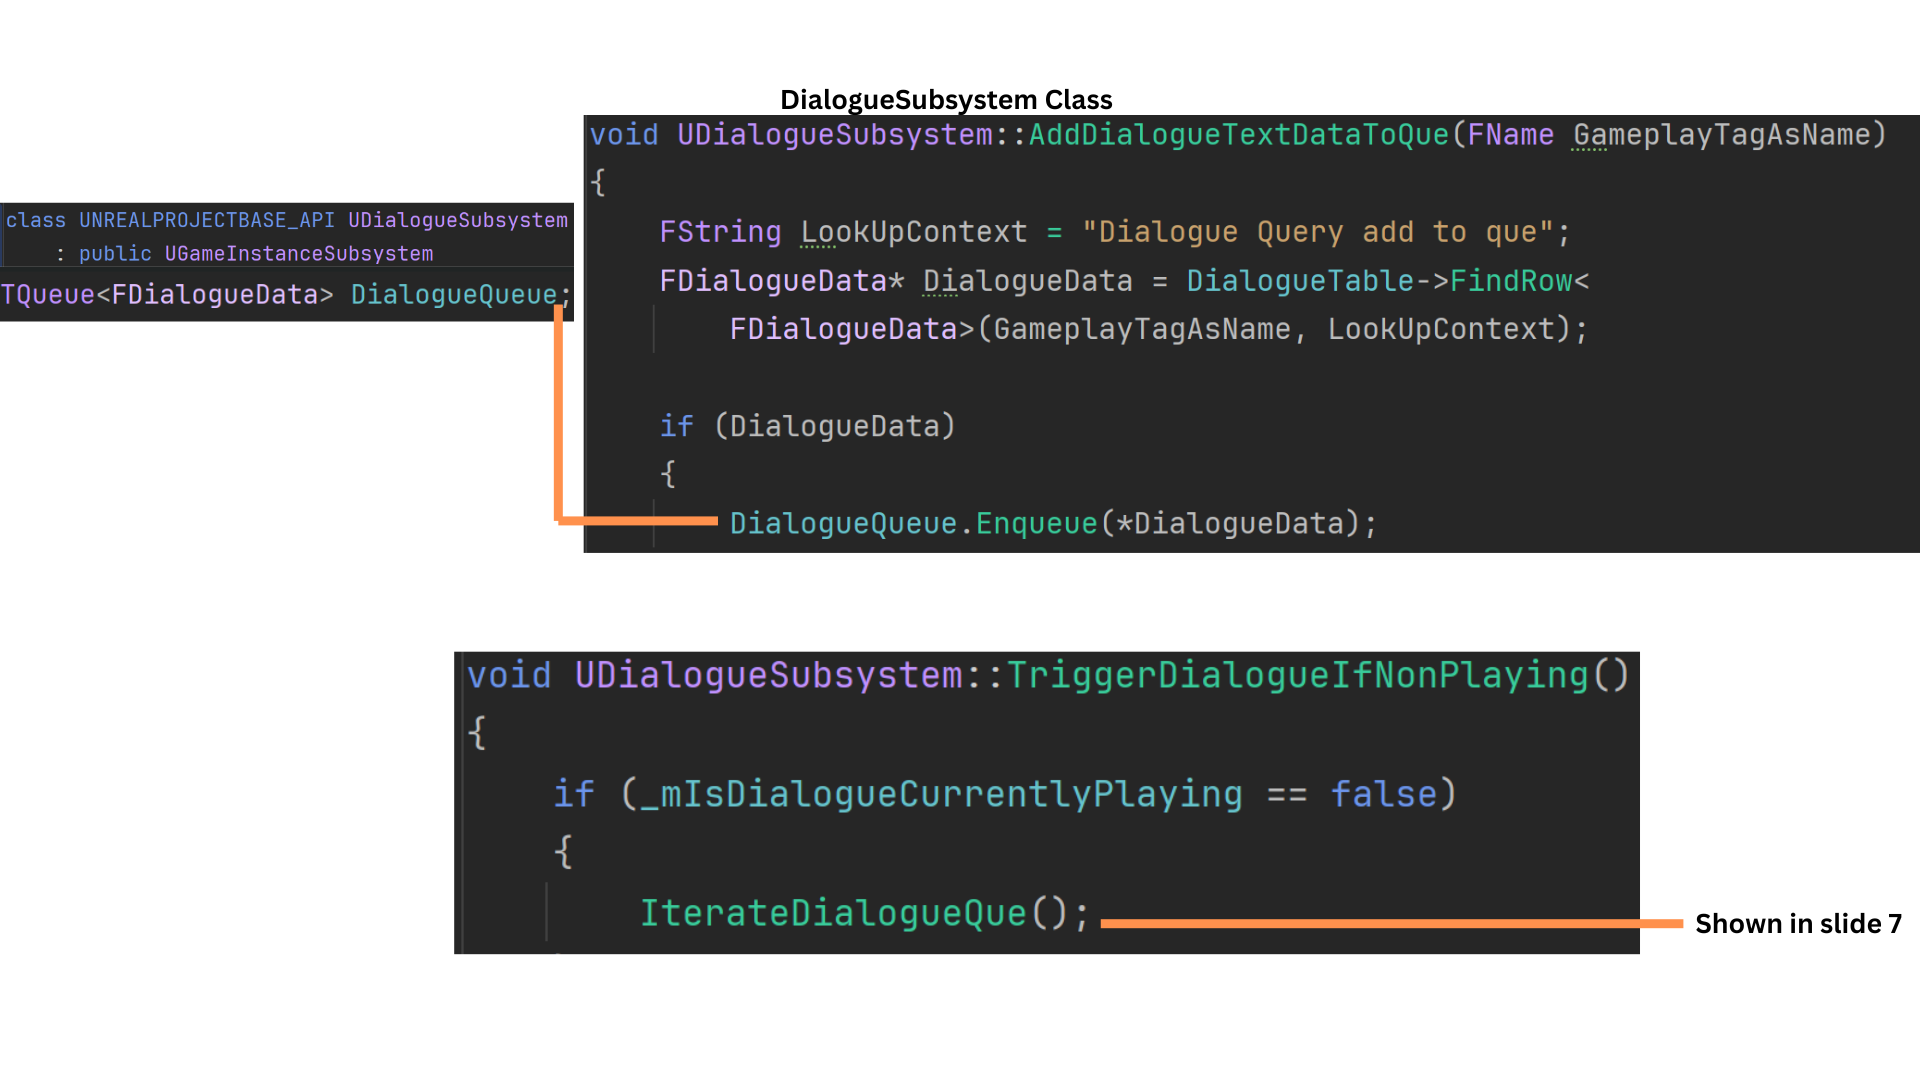
AddDialogueTextDataToQueue enqueues the corresponding row, and TriggerDialogueIfNonPlaying starts playback if no dialogue is currently active. Otherwise, the row waits in the queue.
6. AddDialogueTextDataToQueue looks up the row matching the GameplayTag, stores it as DialogueData, and enqueues it into DialogueQueue.
TriggerDialogueIfNonPlaying checks IsDialogueCurrentlyPlaying and calls IterateDialogueQueue if dialogue is not currently running.
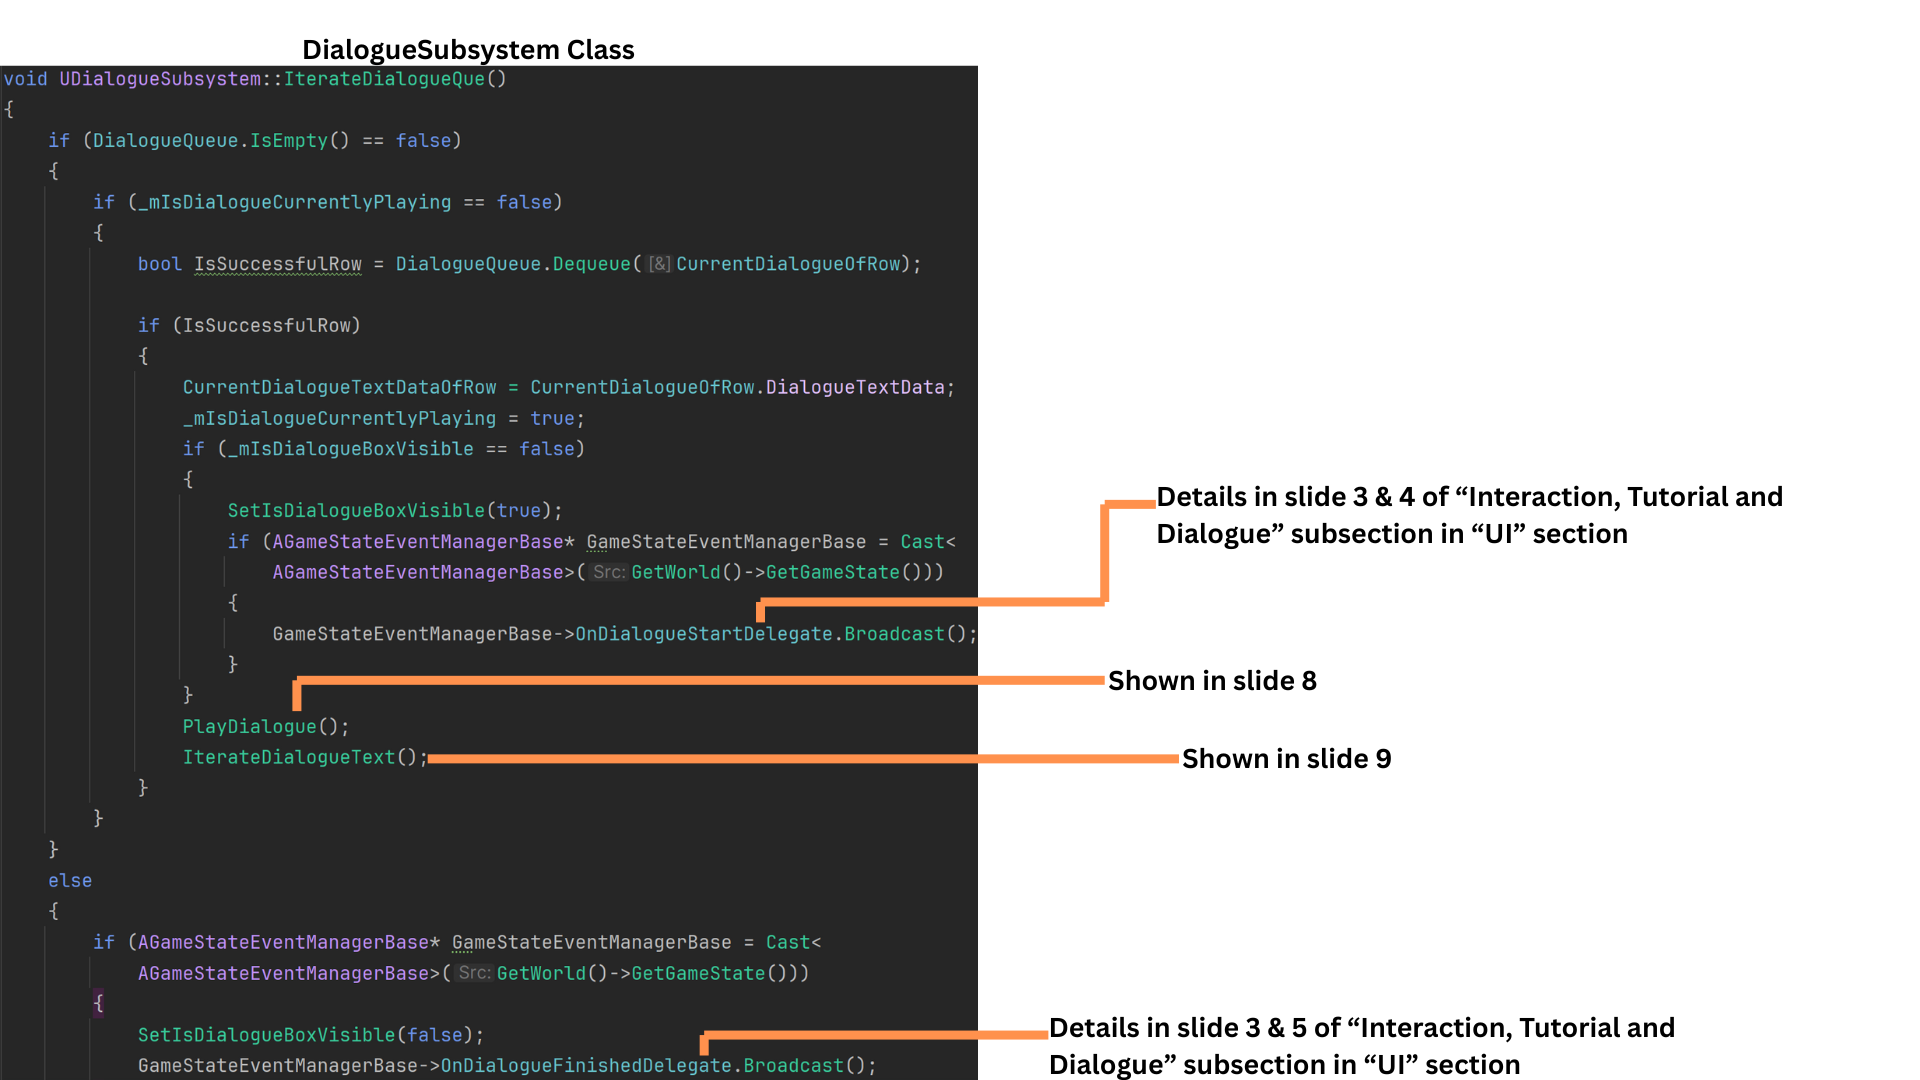
7. IterateDialogueQueue dequeues a row into CurrentDialogueOfRow.
The row’s DialogueTextData is stored in CurrentDialogueTextDataOfRow.
IsDialogueCurrentlyPlaying is set to true, allowing more items to queue while preventing parallel iteration.
OnDialogueStartDelegate notifies the UI.
PlayDialogue handles FMOD audio playback.
IterateDialogueText steps through each FDialogueTextData entry as the audio progresses.
If the queue becomes empty, OnDialogueFinishedDelegate signals the UI to hide dialogue text.
8. PlayDialogue uses the player’s root component as the audio location.
An UFmodAudioComponent pointer is stored so it can be released later. PlayEventAttached plays the FMOD event stored in the row struct, and the event is then released.
9. IterateDialogueText steps through CurrentDialogueTextDataOfRow, which contains text, speaker tag, and display duration.
It broadcasts the active line to the UI and schedules the next iteration using a timer set to TimeToDisplayText.
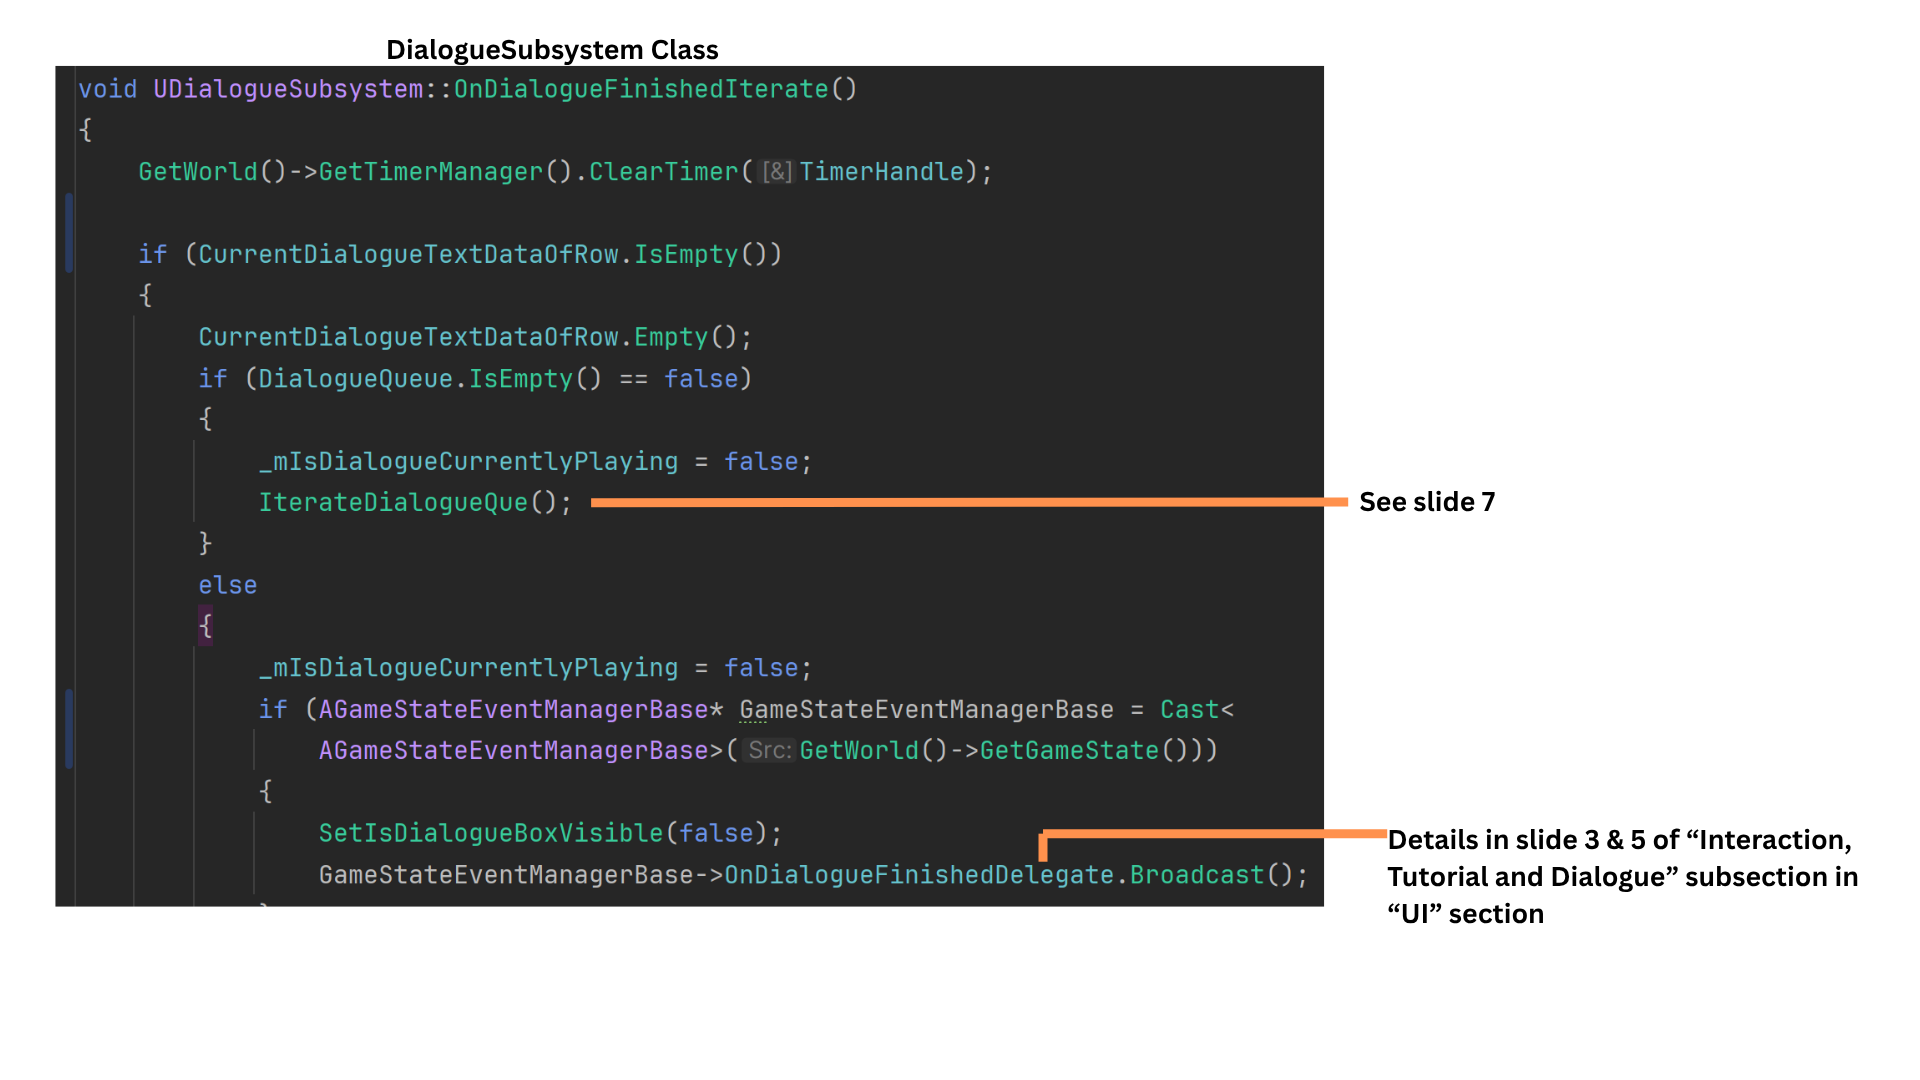
The first element is removed, and recursion continues until the array is empty. When finished, OnDialogueFinishedIterate is called.
10. OnDialogueFinishedIterate checks the DialogueQueue:
If not empty, IterateDialogueQueue processes the next row.
If empty, IsDialogueCurrentlyPlaying is set to false, and the UI is notified that dialogue has finished.